Table of Contents
Advertisement
Available languages
Available languages
Quick Links
Advertisement
Chapters
Table of Contents

Subscribe to Our Youtube Channel
Related Manuals for Häfele EL10K


Summary of Contents for Häfele EL10K
- Page 1 Digital door lock Model EL10K EL10K Installation guide & User manual * The contents of this user manual are subject to change without prior notice to the user in order to enhance performance of the products.
-
Page 2: Table Of Contents
CONTENTS Read before using .....................3 How to install ....................10 Lock operation ....................14 How to use ......................19 .........................21... -
Page 3: Read Before Using
Read before using Product features Four way solution Fingerprint, password, key card, and mechanical key. Master/ User Fingerprint, Master/ User Password and Master/ User Key card identification 3 master fingerprints, up to 97 user fingerprints. 3 master passwords, up to 47 user passwords. 3 master key cards, up to 47 user key cards. - Page 4 Read before using Product features Alarm for battery replacement time When the power of battery is too low a warning signal will appear on the screen. Please replace all batteries immediately Anti-panic function The lockset can be unlock from inside with simple action of pressing down the handle. Even privacy function is activated or battery is dead, people can escape easily in the emergency such as fire etc.
- Page 5 Read before using Warnings Read and understand all instructions before use. • If damage is caused by failure to follow this instructions, the warranty does not apply. • Only use the alkaline batteries. • Do not expose the product and accessories to rain or water. •...
- Page 6 Read before using Factory default settings Settings Factory defaults Master identification Any fingerprint, any password and any key card Opening mode setting Single Verification Dismantle alert Turned on Speaker Enabled 6 times for password Wrong identification entry limit 6 times for key card 12 times for fingerprint System language English...
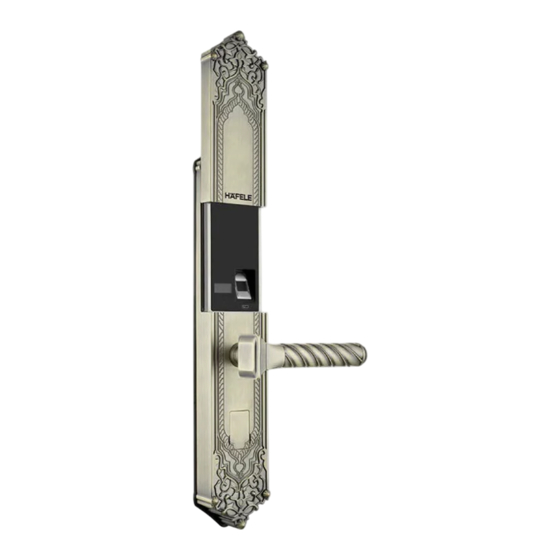
- Page 7 Read before using Product specification - exterior trim 72.5 Wire Damped Slide Cover Exterior Lever Handle Exterior Panel Lever Handle Reversing Cylinder Cap Switch Front of Exterior Trim Back of Exterior Trim Remark: 1.The overall dimension above is not including silicon pad. 2.The information above is for specific model.
- Page 8 Read before using Product specification - exterior trim Battery Case Wire Reset Button Battery Cover Interior Lever Handle Reversing Screw Interior Panel Privacy Turn Front of Interior Trim Back of Interior Trim...
- Page 9 Read before using Product features Items Sub-items Specification Fingerprint Capacity: 3 masters + 97 users Password Capacity: 3 masters + 47 users Unlock way Card Capacity: 3 masters + 47 users Mechanical Key 2 Keys Working Voltage 4 pieces of 1.5V AA alkaline battery Baterry life Over 2,000 times under normal usage Power Supply...
-
Page 10: How To Install
How to install Reverse lever handle Reverse exterior lever handle (Note: make sure the lock is locked before reversing the lever handle. If you are not sure whether it is locked, please confirm by Push left Push right electrify the lock and pull out the mechanical key. - Page 11 How to install Install lock case Door Self-tapping Screw Lock Case Self-tapping Screw Installation of lock case 1.Insert the lock case into the pre-drilled hole on door side. Make sure the latch should be upward. 2.Fix the lock case by 4 pieces of self-tapping screw provided.
- Page 12 How to install Install exterior trim = ‘ † Š Exterior Trim Silicon Pad Back Baseplate M5X45 Philip’s Flat Head Screw 8X8X130 Spindle 22 Stud Connecting Stud Anti-cut Sleeve Installation of exterior trim Cover the anti-cut sleeve onto one-side of connecting stud and screw it on the front baseplate. Fix M6X12 Flat End Screw into the M6 screw hole on the bottom of handle, and then screw 26 stud on it.
- Page 13 How to install =‘ † Š Install exterior trim Exterior Trim Interior Trim Spindle for Privacy Turn Spring for 8X8 Spindle M5X95 Philip’s Flat Head Screw Wiring Port M4X15 Philip’s Round Head Screw Installation of interior trim Connect the wiring port on both-side trim. Insert the spring for 8X8 spindle in the square hole of interior lever handle.
-
Page 14: Lock Operation
Lock operation Menu table 1. Add master 2. Add user Fingerprint (FP) 3. Del. single user* 4. Del. all user* 1. Add master user 2. Add user Password (PW) 3. Del. single user* 4. Del. all user* 1. Add master user 2. - Page 15 Lock operation Explanation for advance setting Delete single user CAUTION In order to prevent misoperation, when there is only one master identification left (e.g. master’s fingerprint), the operation of deleting single user in fingerprint setting will be failed. It is the same for other type of master identification (such as master’...
- Page 16 Lock operation Explanation for advance setting Temporary user setting 1. Enter the menu by master’s fingerprint/password/card. 2. Select “Temporary User” in the “System Setting” menu. 3. Select “Add Temp. User” and input password for the temporary user. 4. Return to “Temporary User” menu, and then select “Date Setting” to set the start date and end date that allow the temporary user to unlock by password (Noted: the start date and the end date cannot be set on the same day.
- Page 17 Lock operation Explanation for advance setting Single password setting 1. Enter the menu by master’s fingerprint/password/card. 2. Select “Temporary User” in the “System Setting” menu. 3. Select “Add a Single PW” and input password. CAUTION Single password is a one-time password. It will be invalid after it is input to unlock the lockset once. Delete temporary user 1.
- Page 18 Lock operation Explanation for advance setting Passage mode setting Turn on passage mode: 1. Unlock by enter master’s or user’s fingerprint/password/card. 2. After door open, long press key “0” till display screen shown “Passage On”. Turn off passage mode: 1. Unlock by enter master’s or user’s fingerprint/password/card. 2.
-
Page 19: How To Use
How to use Open & lock the door How to open the door from outside Fingerprint Password Card 1.Place enrolled 1.Pull up the slide cover 1.Place enrolled finger properly on the to lighten keypad. card properly on the fingerprint sensor area. 2.Enter enrolled card icon area... - Page 20 How to use Service features Restore to factory default settings Operat ion inst ruct ions 1.Open battery cover and find the reset button. 2.The reset button and keep pressing “ ” on touch key pad to reset the system. 3.After that all user data and settings will be deleted. Reset but t on Emergence power supply Pull up...
-
Page 21: Faq
Common faults and exclusion Fault Phenomenon Possibility Failure Analysis Solution The fingerprint is added The fingerprint imaging quality 1) Tear off the scratch-proof successfully, but it is often is too low, the scratch-proof film from fingerprint sensor. reported “wrong finger” when film of fingerprint sensor is not 2) Add a few users with using the fingerprint to unlock... - Page 22 Khóa điện t ử EL10K EL10K HƯỚNG DẪN LẮP ĐẶT & SỬ DỤNG * Nội dung của hướng dẫn sử dụng này sẽ được t hay đổi mà không cần t hông báo t rước cho người dùng để nâng cao hiệu năng của sản phẩm.
- Page 23 MỤC LỤC Thông t in cần biết ...................24 Hướng dẫn lắp đặt ..................32 Hướng dẫn cài đặt ...................35 Hướng dẫn sử dụng ..................40 Câu hỏi t hường gặp ..................42...
-
Page 24: Thông Tin Cần Biết
Thông tin cần biết Tính năng sản phẩm 4 cách mở Vân t ay, mật khẩu, t hẻ t ừ, và chìa khóa cơ Xác thực bằng Vân tay chủ/người dùng, Mật khẩu chủ/người dùng và Thẻ từ chủ/ người dùng 3 vân t ay chủ, 97 vân t ay người dùng. - Page 25 Thông tin cần biết Tính năng sản phẩm Cảnh báo thay pin Khi dung lượng Pin quá t hấp, t ín hiệu cảnh báo sẽ hiện lên t rên mặt bàn phím. Vui lòng t hay t ất cả Pin ngay lập t ức. Chức năng chống hoảng loạn Người dùng có...
- Page 26 Thông tin cần biết Thận trọng Đọc và hiểu t ất cả hướng dẫn t rước khi sử dụng. • Nếu hư hỏng gây ra bởi việc không t uân t hủ t heo hướng dẫn sử dụng này, việc bảo hành sẽ •...
- Page 27 Thông tin cần biết Cài đặt mặc định Cài đặt Thiết lập mặc định Xác t hực chủ Vân t ay, mật khẩu và t hẻ t ừ bất kỳ Cài đặt chế độ mở Xác t hực đơn Báo động phá...
- Page 28 Thông tin cần biết Thông số kỹ thuật Mặt ngoài khóa 72.5 Dây điện Nắp t rượt Tay nắm ngoài Mặt ngoài Công t ắc đảo Nắp che ruột khóa chiều t ay nắm Mặt ngoài khóa - Mặt t rước Mặt ngoài khóa - Mặt sau Chú...
- Page 29 Thông tin cần biết Thông số kỹ thuật Mặt trong khóa Hộp pin Dây điện Nút t hiết lập lại Nắp pin Tay nắm t rong Vít đảo chiều Mặt t rong Chốt riêng t ư Mặt t rong khóa - Mặt t rước Mặt t rong khóa - Mặt sau...
- Page 30 Thông tin cần biết Đặc tính sản phẩm Mục Mục phụ Thông số kỹ t huật Vân t ay Dung lượng: 3 chủ và 97 người dùng Mật khẩu Dung lượng: 3 chủ và 47 người dùng Phương t hức mở khóa Thẻ...
- Page 31 Thông tin cần biết Đảo chiều tay nắm Đảo chiều tay nắm ngoài (Chú ý: đảm bảo rằng cửa đã khóa trước khi đảo chiều tay nắm. Nếu quý khách không chắc chắn rằng cửa đã khóa hay chưa, vui Đẩy sang t rái Đẩy sang phải lòng xác nhận bằng cách cấp điện cho...
-
Page 32: Hướng Dẫn Lắp Đặt
Hướng dẫn lắp đặt Lắp đặt thân khóa Cửa Vít Thân khóa Vít Lắp đặt thân khóa 1. Đưa t hân khóa vào lỗ khoan sẵn t rên cửa. Đảm bảo rằng chốt cài hướng lên t rên. 2. Cố định t hân khóa bằng 4 vít được cung cấp. - Page 33 Hướng dẫn lắp đặt Lắp đặt mặt ngoài khóa = ‘ † Š Dây điện Mặt ngoài khóa Miếng đệm silicon Tấm lót mặt sau Vít đầu phẳng Phillip M5X45 Trục 8X8X130 Bu-lông 22 Bu-lông liên kết Ron chống cắt Lắp đặt mặt ngoài khóa...
- Page 34 Hướng dẫn lắp đặt =‘ † Š Lắp đặt mặt trong khóa Mặt ngoài khóa Mặt t rong khóa Trục của chốt riêng t ư Lò xo t rục 8X8 Vít đầu phẳng Philip M5X95 Cổng kết nối dây t ín hiệu Ví...
-
Page 35: Hướng Dẫn Cài Đặt
Hướng dẫn cài đặt Bảng hướng dẫn 1. Thêm vân t ay chủ nhà Vân t ay 2. Thêm vân t ay người dùng 3. Xóa một người dùng* 4. Xóa t oàn bộ người dùng* 1. Thêm mật khẩu chủ nhà Mật khẩu 2.Thêm mật khẩu người dùng 3. - Page 36 Hướng dẫn cài đặt Giải thích cài đặt nâng cao Xóa một người dùng LƯU Ý Để t ránh vận hành sai, khi chỉ còn một phương t hức xác t hực chủ (ví dụ vân t ay chủ), việc xóa người dùng lẻ...
- Page 37 Hướng dẫn cài đặt Giải thích cài đặt nâng cao Cài đặt người dùng tạm thời 1. Truy cập vào menu bằng vân t ay/mật khẩu/t hẻ t ừ chủ. 2. Chọn “Người dùng t ạm t hời” t rong mục “Cài đặt hệ t hống”. 3.
- Page 38 Hướng dẫn cài đặt Giải thích cài đặt nâng cao Cài đặt mật khẩu dùng một lần 1. Truy cập vào menu bằng vân t ay/mật khẩu/t hẻ t ừ chủ. 2. Chọn “Người dùng t ạm t hời” t rong mục “Cài đặt hệ t hống”. 3.
- Page 39 Hướng dẫn cài đặt Giải thích cài đặt nâng cao Cài đặt chế độ luôn mở Bật chế độ luôn mở: 1. Mở khóa bằng cách nhập vân t ay/mật khẩu/t hẻ t ừ của chủ hoặc người dùng. 2.
-
Page 40: Hướng Dẫn Sử Dụng
Hướng dẫn sử dụng Mở và khóa cửa Hướng dẫn mở cửa từ bên ngoài Vân tay Mật khẩu Thẻ từ 1. Đặt ngón t ay đã đăng 1. Mở nắp t rượt để khởi 1. Đặt t hẻ t ừ đã đăng ký... - Page 41 Hướng dẫn sử dụng Tính năng dịch vụ Khôi phục cài đặt mặc định Hướng dẫn t hực hiện: 1. Mở nắp pin và t ìm nút t hiết lập lại. 2. Nhấn nút t hiết lập lại và ấn giữ t rên bàn phím cảm ứng để...
-
Page 42: Câu Hỏi Thường Gặp
Câu hỏi thường gặp Lỗi thường gặp và cách khắc phục Hiện tượng lỗi Phân tích khả năng gây ra lỗi Giải pháp Đã t hêm vân t ay t hành công Chất lượng hình ảnh vân t ay 1) Bóc lớp chống xước ra khỏi nhưng t hường bị... - Page 44 Häfele VN LLC. Phone: (+84 28) 39 113 113 Email: info@hafele.com.vn...
Need help?
Do you have a question about the EL10K and is the answer not in the manual?
Questions and answers