Advertisement
Available languages
Available languages
Quick Links
Item #: 484807
Installation and Operation Manual
Rev Date: 2018-10-31
Manuel d'installation et d'opération
Rn2SL
Slimline Radon Fan
Ventilateur de radon Slimline
United States
10048 Industrial Blvd., Lenexa, KS, 66215
Tel.: 800.747.1762 • Fax: 800.487.9915
Canada
50 Kanalflakt Way, Bouctouche, NB, E4S 3M5
Tel.: 800.565.3548 • Fax: 877.747.8116
Advertisement

Related Manuals for SystemAir fantech Rn2SL


Summary of Contents for SystemAir fantech Rn2SL
- Page 1 Item #: 484807 Installation and Operation Manual Rev Date: 2018-10-31 Manuel d'installation et d'opération Rn2SL Slimline Radon Fan Ventilateur de radon Slimline United States 10048 Industrial Blvd., Lenexa, KS, 66215 Tel.: 800.747.1762 • Fax: 800.487.9915 Canada 50 Kanalflakt Way, Bouctouche, NB, E4S 3M5 Tel.: 800.565.3548 •...
- Page 2 Note Warning / Information Technical Practical tip Important note information WARNINGS DO NOT CONNECT POWER SUPPLY until fan is completely installed. Make sure electrical service to the fan is in the locked “OFF” position. 1. This unit has rotating parts and safety precautions should be exercised during installation, operation and maintenance. 2.
-
Page 3: Installation
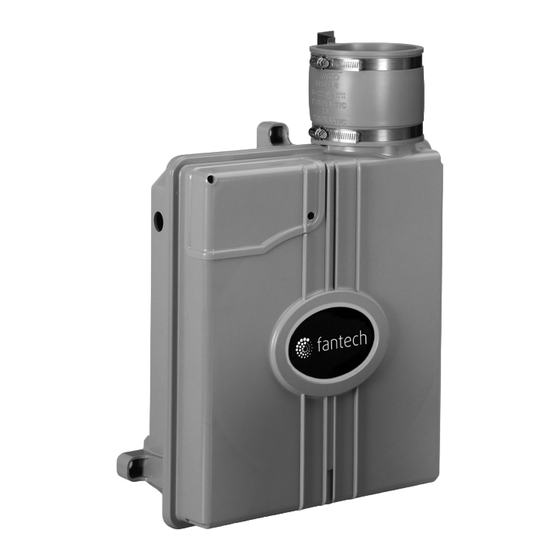
INSTALLATION The Rn2SL is designed for use with 4" schedule 20 or schedule 40 PVC pipe. Prior to installation, the suction pipe should be terminated at the exte- rior wall. The suction pipe should be installed with a slight incline to drain water away from the fan. The Rn2SL has an integrated condensate bypass. A secondary condensate bypass is not required. - Page 4 INSTALLING THE Rn2SL (Cont.) 3. Insert a Flexible Coupling (item 4 provided) over Rn2SL discharge and 4. Measure 17” up and 1 3/8” to the right from center of Suction Pipe securely tighten fan side Hose Clamp. (item 6 not provided). Mark this location. 5.
- Page 5 INSTALLING THE Rn2SL (Cont.) 7. Insert the Rn2SL with Rubber Sleeve in the suction pipe as far as it 8. Wrap the Metal Bracket Hose Clamp around Flexible Coupling, but do can penetrate. not tighten it. 9. Insert the Discharge Pipe (item 7 not provided) into the Flexible Coupling and tighten the Hose Clamp.
-
Page 6: Wiring Diagram
WIRING DIAGRAM Capacitor Brown Black Line IN (Black) Fan Motor 120V AC Blue Neutral (White) Order of wires on the terminal block may not be as shown. There are typically three wires to be connected to an electrical fan; Load, Neutral and Ground. Load provides power to the fan, Neutral is for returning current and closing the electrical circuit, and Ground is for an additional path to safely return current to the ground, in case of an accidental electrical short in the fan and/or discharging of fan metal components. - Page 7 Note Warning / Information Technical Practical tip Important note information AVERTISSEMENTS NE PAS BRANCHER À L’ALIMENTATION ÉLECTRIQUE avant l’installation complète du ventilateur. Assurez-vous que l’alimentation électrique du ventilateur est en position hors tension verrouillée (OFF). 1. Cet appareil comporte des pièces rotatives; il est essentiel de faire preuve de prudence pendant l’installation, le fonctionnement et l’entretien. 2.
- Page 8 INSTALLATION Le Rn2SL est conçu pour une utilisation avec un tuyau de PVC de série 20 ou 40 de 4 po. Avant l’installation, il faut prévoir une sortie pour le tuyau d’aspiration sur un mur extérieur. Le tuyau d’aspiration devrait être installé avec une pente légère pour drainer l’eau hors du ventilateur. Le Rn2SL comporte un contournement au condenseur intégré.
- Page 9 INSTALLATION DU Rn2SL (Suite) 3. Insérez un raccord de conduit souple (article 4 inclus) sur la sortie 4. Mesurez 17 po en haut et 1 3/8 po à droite du centre du tuyau d’évacuation du Rn2SL et serrez le collet de serrage latéral du d’aspiration (article 6 non inclus).
- Page 10 INSTALLATION DU Rn2SL (Suite) 7. Insérez le plus loin possible le Rn2SL recouvert du manchon en caou- 8. Enroulez le collet de serrage raccordé au support de fixation autour du tchouc dans le tuyau d’aspiration. raccord de conduit souple, mais ne le serrez pas. 9.
-
Page 11: Schéma Électrique
SCHÉMA ÉLECTRIQUE Condensateur Brun Noir Line IN (Noir) Moteur 120V AC Bleu Neutral (Blanc) L'ordre des fils sur le bornier peut ne pas être comme indiqué. Il y a généralement trois fils à connecter à un ventilateur électrique, charge, neutre et mise à terre. La charge alimente le ventilateur, le neutre sert à rétablir le courant et à... - Page 12 WARRANTY Five (5) Year Warranty This warranty supersedes all prior warranties DURING ENTIRE WARRANTY PERIOD: END USER, AS CREDIT TO DISTRIBUTOR’S ACCOUNT WILL BE Fantech will repair or replace any part which has a factory defect in PENDING INSPECTION AND VERIFICATION OF ACTUAL DEFECT BY workmanship or material.
-
Page 13: Garantie
GARANTIE Garantie de 5 ans Cette garantie remplace toutes les garanties précédentes. DURANT TOUTE LA PÉRIODE DE GARANTIE: L'UTILISATEUR FINAL L'ÉQUIPEMENT DÉFECTUEUX RETOURNÉ PAR Fantech s'engage à réparer ou à remplacer toute pièce présentant un L'UTILISATEUR FINAL, CAR LE COMPTE DU DISTRIBUTEUR NE SERA défaut d'usine en matière de qualité... - Page 14 NOTES...
- Page 15 NOTES...
- Page 16 Fantech reserves the right to make technical changes. Fantech se réserve le droit de faire des changements tech- For updated documentation please refer to www.fantech.net niques. Pour de la documentation à jour, s'il vous plaît se référer au www.fantech.net Fantech®...
Need help?
Do you have a question about the fantech Rn2SL and is the answer not in the manual?
Questions and answers