Table of Contents
Advertisement
Advertisement
Table of Contents

Subscribe to Our Youtube Channel
Related Manuals for Horizon Fitness 7.4AT


Summary of Contents for Horizon Fitness 7.4AT
- Page 1 OWNER’S MANUAL Read the TREADMILL GUIDE before using this OWNER’S MANUAL.
- Page 2 ENGLISH...
-
Page 3: Important Precautions
IMPORTANT PRECAUTIONS SAVE THESE INSTRUCTIONS When using an electrical product, basic precautions should always be followed, including the following: Read all instructions before using this treadmill. It is the responsibility of the owner to ensure that all users of this treadmill are adequately informed of all warnings and precautions. - Page 4 DANGER TO REDUCE THE RISK OF ELECTRICAL SHOCK: Always unplug the treadmill from the electrical outlet immediately after using, before cleaning, performing maintenance and putting on or taking off parts. WARNING TO REDUCE THE RISK OF BURNS, FIRE, ELECTRICAL SHOCK OR INJURY TO PERSONS: •...
- Page 5 WARNING TO REDUCE THE RISK OF BURNS, FIRE, ELECTRICAL SHOCK OR INJURY TO PERSONS: • At NO time should pets or children under the age of 13 be closer to the treadmill than 10 feet. • At NO time should children under the age of 13 use the treadmill. •...
-
Page 6: Grounding Instructions
GROUNDING INSTRUCTIONS This product must be grounded. If a treadmill should malfunction or breakdown, grounding provides a path of least resistance for electrical current to reduce the risk of electrical shock. This product is equipped with a cord having an equipment-grounding conductor and a grounding plug. - Page 7 Place the treadmill on a level and stable surface. There should be one foot of clearance in front of the treadmill for the power cord. Please leave a clear zone behind the treadmill that is at least the width of the treadmill and at least 79”...
-
Page 9: Serial Number Location
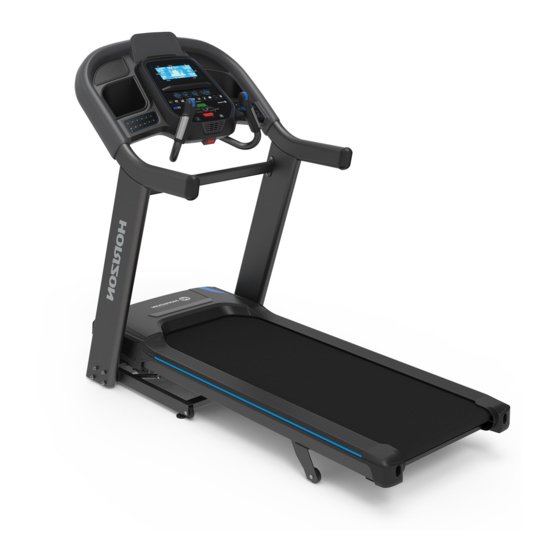
ENTER YOUR SERIAL NUMBER AND MODEL NAME IN THE BOXES BELOW: SERIAL NUMBER LOCATION » Refer to the SERIAL NUMBER and MODEL NAME when calling for service. SERIAL NUMBER: HORIZON 7.4AT TREADMILL MODEL NAME:... - Page 10 SPEAKERS TABLET/READING RACK CONSOLE WATER BOTTLE HOLDER CONTROL PANEL AND DISPLAY WINDOWS CONSOLE FAN SAFETY KEY PLACEMENT PULSE RATE GRIPS CROSS SUPPORT BAR ON/OFF SWITCH POWER CORD CONSOLE MAST MOTOR COVER FOOT LATCH (UNDERNEATH DECK) RUNNING BELT/RUNNING DECK CONSOLE MAST COVER SIDE RAIL CAUTION WARNUNG...
-
Page 11: Pre-Assembly
PRE ASSEMBLY TOOLS INCLUDED: 8 mm T-Wrench UNPACKING 6 mm L-Wrench 5 mm L-Wrench Place the treadmill carton on a level flat surface. It is recommended that you place a protective covering on your floor. Take CAUTION when handling and transporting this unit. Never PARTS INCLUDED: open box when it is on its side. -
Page 12: Assembly Step
ASSEMBLY STEP 1 Cut the BANDING STRAPS (10) and lift the running HARDWARE FOR STEP 1 deck upward from the rear to remove all contents from PART TYPE DESCRIPTION underneath the running deck. UPRIGHT GUIDE BOLT M8X1.25PX11L Open HARDWARE FOR STEP 1. MAST BOLT M8X1.25PX80L Insert UPRIGHT GUIDE BOLT (A) into MAIN FRAME... - Page 13 ASSEMBLY STEP 2 HARDWARE FOR STEP 2 PART TYPE DESCRIPTION BOLT M6X1.0PX15L NOTE: Do not fully tighten bolts until STEP Open HARDWARE FOR STEP 2. Attach CROSS SUPPORT BAR (5) using holes on UPRIGHT MASTS (4) with 4 BOLTS (E).
- Page 14 ASSEMBLY STEP 3 Open HARDWARE FOR STEP 3. HARDWARE FOR STEP 3 PART TYPE DESCRIPTION Have someone help hold the console while attaching the CONSOLE CABLE (2). Use the lead wire to ARC WASHER 8.4X15.5X1.6T carefully pull the CONSOLE CABLE (2) out of the SHORT BOLT M8x1.25Px15L RIGHT CONSOLE MAST (4).
- Page 15 ASSEMBLY STEP 4 Open HARDWARE FOR STEP 4. HARDWARE FOR STEP 4 PART TYPE DESCRIPTION Attach RIGHT SIDE PULSE RATE GRIP (8) to the underside of the CONSOLE (6) using BOLT 4 BOLTS (I), 4 SPRING WASHERS (J) and SPRING WASHER 8.2X15.4X2.0T 4 FLAT WASHERS (K).
- Page 16 Before the first use, lubricate the treadmill deck by following the instructions in the MAINTENANCE section in the TREADMILL GUIDE. 7.4AT User Weight Capacity: 159 Kg / 350 Lbs. Dimensions (L×W×H) : 193 X 93 X 161 cm / 76” X 37” X 63”...
-
Page 17: Treadmill Operation
TREADMILL OPERATION This section explains how to use your treadmill’s console and programming. The BASIC OPERATION section in the TREADMILL GUIDE has instructions for the following: • LOCATION OF THE TREADMILL • USING THE SAFETY KEY • FOLDING THE TREADMILL •... - Page 18 WATT COUNT DOWN PACE WATT COUNT DOWN TEMPO LAPS INCLINE COUNT STEIGUNG RUNDEN CALORIES HEART RATE KALORIEN HERZFREQUENZ TIME SPEED DISTANCE CALORIES ZEIT GESCHWINDIGKEIT ENTFERNUNG KALORIEN COUNT DOWN INCLINE PACE HEART RATE COUNT DOWN STEIGUNG TEMPO HERZFREQUENZ PROGRAMS PROGRAMME INCLINE SPEED STEIGUNG GESCHWINDIGKEIT...
-
Page 19: Console Operation
CONSOLE OPERATION Note: There is a thin protective sheet of clear plastic on the overlay of the console that should be removed before use. A) LCD DISPLAY WINDOWS: Watts, Pace, Calories/Hour, Heart Rate, Laps. LED DISPLAY: Time, Speed, Distance, Incline, Pace, Heart Rate, and Calories. C) WORKOUT LED INDICATORS: indicates what workout is set for the current program. -
Page 20: Display Windows
WATT COUNT DOWN PACE WATT COUNT DOWN TEMPO LAPS INCLINE COUNT STEIGUNG RUNDEN CALORIES HEART RATE KALORIEN HERZFREQUENZ TIME SPEED DISTANCE CALORIES ZEIT GESCHWINDIGKEIT ENTFERNUNG KALORIEN COUNT DOWN INCLINE PACE HEART RATE COUNT DOWN STEIGUNG TEMPO HERZFREQUENZ DISPLAY WINDOWS • T IME: Shown as minutes : seconds. - Page 21 GETTING STARTED 1) Check to make sure no objects are placed on the belt that will hinder the movement of the treadmill. 2) Plug in the power cord and turn the treadmill ON. (The ON/OFF switch is next to the power cord.) 3) Stand on the side rails of the treadmill.
- Page 22 INCLINE SCROLL WHEEL SPEED SCROLL WHEEL Roll forward/backward to increase/decrease incline. Roll forward/backward to increase/decrease speed INTERVAL BUTTON 1 INTERVAL BUTTON 2 HOW TO PROGRAM AND USE CUSTOM INTERVAL BUTTONS The programmable interval buttons located on the pulse rate grips are designed to help you customize this machine to match whatever workout you like to do the most.
- Page 23 WORKOUT PROFILES MANUAL: Control everything about your workout – from start to finish. This program is a basic workout with no pre-defined settings, allowing you to manually adjust the machine at any time. It begins with an incline at 0 and speed at 0.8 km/h. HILL CLIMB: Simulates a hill ascent and descent.
- Page 24 MY FIRST 5K: This 9-week program is intended for inexperienced runners looking to run their first 5k or simply begin an exercise routine. It is designed specifically to keep you motivated and engaged, gradually building your strength, increasing your stamina and giving you the confidence it takes to complete your first 5k.
- Page 25 FAT BURN: Relatively slow and steady is the name of the game to maximize your weight-loss goals. Promotes weight loss by increasing and decreasing the speed and incline, while keeping you in your fat burning zone. Speed and Incline changes, segments repeat every 30 seconds. Segment Warm Up Time...
- Page 26 TARGET PROFILES DISTANCE: Push yourself and go further during your workout with 13 distance workouts. Choose from 1 mile, 2 miles, 5k, 5 miles, 10k, 8 miles, 15k, 10 miles, 20k, half marathon, 15 miles, 20 miles, and marathon goals. You set your level. Incline changes and all segments are 0.1 miles.
- Page 27 TARGET HEART RATE: This program is designed for you to improve your overall cardiovascular fitness levels. You simply set your target heart rate. The program will then monitor and adjust the intensity level to maintain your heart rate within your targeted range while you exercise – a proven method to maximize your weight loss and fitness goals. A chest strap is required and must be worn during the duration of this program.
- Page 28 CUSTOM HEART RATE: This program allows you to set your Heart Rate for a specified time. The program will adjust incline to keep your Heart Rate in your target zone. Build multiple Heart Rate targets into a full program to help you reach your cardiovascular goals.
- Page 29 TREADMILL SPRINT 8 CHART Speed changes and segments repeat 90 and 30 seconds. Segment Warm Up Cool Down Time (Sec) 3:00 Mins Incline Level 9 Speed (mph) Speed (km/h) 10.08 10.08 10.4 10.4 10.4 10.4 Incline Level 10 Speed (mph) Speed (km/h) 10.4 10.4...
-
Page 30: Finishing Your Workout
When your workout is complete, the unit will beep. Your workout information will stay displayed on the console for 30 seconds and then reset. USING YOUR MUSIC DEVICE The 7.4AT Treadmill will connect and stream music form your compatible music device. This includes many smart phones and traditional mp3 players such as the iPod ®... - Page 31 You will need to ensure that your wireless heart rate monitoring device is Bluetooth 4.0 compatible and is also “open” to sharing data. Non-“open” or “closed” devices typically only share data with their proprietary apps. The 7.4AT Treadmill needs an “open”...
- Page 32 Horizon 7.4AT | Rev. 1.0 D ©2020 Johnson Health Tech...
Need help?
Do you have a question about the 7.4AT and is the answer not in the manual?
Questions and answers