Advertisement
Quick Links
Advertisement

Subscribe to Our Youtube Channel
Related Manuals for BROSA Single Size Upholstered Gaslift Bed Base


Summary of Contents for BROSA Single Size Upholstered Gaslift Bed Base
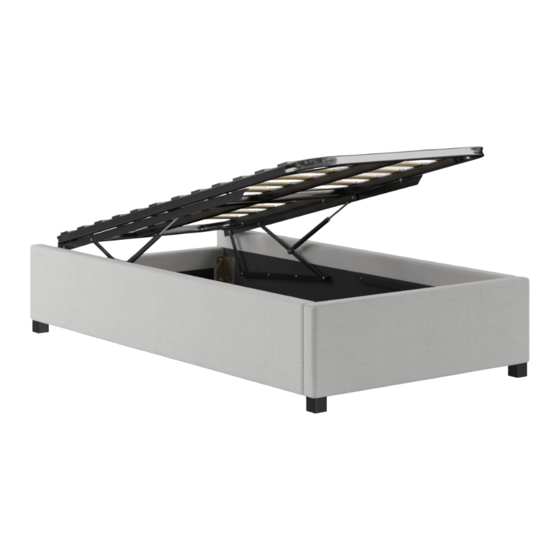
- Page 1 Single Size Upholstered Gaslift Bed Base A S S E M B LY G U I D E...
- Page 2 F O R Y O U R S A F E T Y Lift, don’t drag. This protects Check the assembly guide your floor and product. for required components. Assembly requires 2 people. Assembling this product on It's always easier with a a soft surface protects its friend.
- Page 3 Components Before you get started, check you have all of the pieces below. If anything’s missing, we’ll sort it out right away. Simply visit: www.brosa.com.au/pages/product-return-and-parts-request Headboard x 1 ② Right Sideboard x 1 ① ⑤ Slat Set x 1 ③...
- Page 4 Step 1 Loosen the pre-attached bolts on both ② ③ ④ sideboards and the footboard using the Allen key but do not remove them. ② ③ ④...
- Page 5 Step 2 Hook the brackets to the bolts. Screw the bolts with the Allen key but do not tighten them yet. ① ② ③ ④...
- Page 6 Step 3 Adjust and make sure the frame formed in Step 2 is aligned perfectly and then tighten all bolts with the Allen key I.
- Page 7 Step 4 Unscrew and remove the nut from the threaded rod of the gas lift arm. Keep the removed nut for the following assembly. Repeat this for the other side.
- Page 8 Step 5 Lift the gas lift arm and the gas lift strut so that the threaded rod of the arm can fit into the hole of the strut.
- Page 9 Step 6 Secure the structure formed in Step 5 using the nut removed in Step 4 with the spanner G. Repeat the process for the other side.
- Page 10 Step 7 ⑥ Fit the wooden support bars into the slots. ⑥...
- Page 11 Step 8 ⑦ Place the floor boards on top of the wooden support bars. ⑦...
- Page 12 Step 9 ⑤ Unfold the slat set to make a full-size slat set. ⑤...
- Page 13 Step 10 Place the slat set on a level protected surface, making sure the underside is facing you. Fit a flat washer to a long bolt A. Insert the bolt from one side of the middle bars, making sure it protrudes from the other side.
- Page 14 Step 11 Flip the slat set the right way up and align it with the holes on the gas lift arms. Insert bolts into corresponding holes on the slat set frame. Attach flange nuts onto the bolts from the other side and fix them with the screwdriver and spanner G.
- Page 15 Step 12 ⑨ Attach both handles to the end of the slat set frame. ⑨...
- Page 16 Step 13 With a friend, push the slats down. It requires a fair amount of strength because there isn’t a mattress on the slats to add weight yet.
- Page 17 Step 14 ⑧ The rubber blocks on the mattress retainer can be rotated into different positions. Rotate both rubber blocks to be horizontally longer. Repeat this for the other retainer. Clip the mattress retainers to proper spots on the front end of the slat set frame from inside as shown in the diagram below.
- Page 18 Step 15 Enjoy your new Single Size Gaslift Bed Base!
- Page 19 Warning 1. Please do NOT sit on the bed frame without a mattress. 2. The maximum loading weight for the bed base is 250kg. Please do NOT exceed the weight limit. MAX. 250 KG...
- Page 20 3. Please always use the handles to lift and lower the bed frame to avoid trapping your fingers. Always use both hands.
- Page 21 4. To make sure that the gas lift mechanism performs properly and can be used for a longer time, choose a mattress/topper under 70kg. <70KG...
- Page 22 5. Do not allow children to play around the bed when it is lifted up.
-
Page 23: Troubleshooting
Troubleshooting 1. If you are using a mattress higher than 24cm, your mattress might go against your bedhead while you lift it up and stop your gas lift mechanism from locking into place. 2. Moving your bed base a bit further away will give your high mattress more space to move. - Page 24 User Recommendation We hope you enjoy your new piece of Brosa furniture. Correct maintenance will increase its durability and keep it looking beautiful for longer. Follow these tips as a guide. 1. Furniture should be assembled according to our Assembly Guides.
- Page 25 4. Pilling Through regular use, the surface of natural fibre fabric can twist and form tiny balls – this is known as pilling. It is an inherent feature of this particular type of fabric and can be caused by environmental factors such as humidity or friction between two fabrics.
Need help?
Do you have a question about the Single Size Upholstered Gaslift Bed Base and is the answer not in the manual?
Questions and answers