
Related Manuals for NeuraLabel Sirius


Summary of Contents for NeuraLabel Sirius
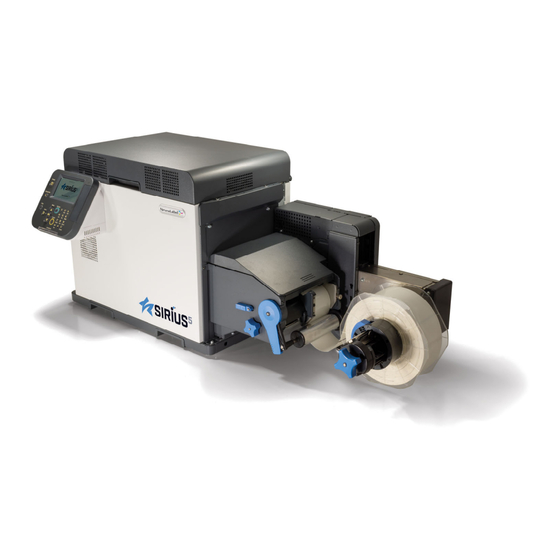
- Page 1 NeuraLabel Sirius Printer Installa on and Quick Start Guide Download Complete Guides at: www.neuralabel.com/neuralabel‐sirius‐label‐printer‐support www.neuralabel.com May 2020 Page...
- Page 2 In the Boxes Printer Unwinder Power Cable Preinstalled in Printer Toner: Cyan, Magenta, Yellow, Black, White* Transfer Belt Fuser Things to Prepare (Not Included) LAN Cable (for network connec on) USB Cable for Printer to Computer connec on This printer supports the opera ng systems (OS) listed below: Windows 10/Windows 10 (64‐bit version);...
- Page 3 Installa on Space When selec ng an installa on loca on, find one that meets the following specifica ons: loca on that is level and can support the weight of the machine (approximately 140 lbs). loca on near a power socket that can easily accessed. ...
-
Page 4: Unpacking Printer
Unpacking Printer 1. Open the top of the box and re‐ 3. Remove the handles (4 pieces), move the accessories. and then remove the top of the packing box. 2. Remove top layer of packing materials. Page 5... - Page 5 4. Open out the bo om part of the 5. Cut and remove the bands that box, place your hands on the secure the printer. printers handles and support the printer as you remove the front and back packing materials on the bo om.
- Page 6 8. Remove the desiccant. 11. Remove the Pad‐TC from the top of the print cartridge, and re‐ move the tape securing the li up lever. 9. Grasp the top cover open lever and open the top cover. 12. Turn the li up lever to lower the print cartridges.
- Page 7 13. Pull out the sheet‐protec on. 14. Close the top cover. Page 8...
- Page 8 Unpacking Unwinder 1. Open the top of the packing box. 4. Remove the plas c bag from the unwinder, and then remove the ac‐ cessories. 2. Remove the top layer of packing materials. 5. Peel off the tape from two loca‐ ons.
- Page 9 Installing the Unwinder to the Printer 1. Check whether the adjuster on the 3. Use three screws to secure the unwinder is raised up. If the ad‐ unwinder to the printer. Tighten juster is not raised, before you the screws in order (1, 2, 3) as mount it on the printer, rotate it to show in the diagram.
-
Page 10: Printer Setup
Printer Setup Connec ng to a PC Network Connec on Network Connec on ‐ USB Connec on Manual IP Automa c IP Install the printer driver. Connect the cable. Turn on the printer. Set the printer's IP address Connect the cable. Turn on the computer. - Page 11 Where to Connect Network or USB Cable Network Connec on 1. Plug in printer to your network now using a network cable. Once the printer con‐ nects to your network, it will auto assign an address and display this on the opera‐ tor panel above the ink cartridge level and in the network menu.
-
Page 12: Install The Printer Driver
5. When complete, the Sirius5 PCL6 driver will be added to the Installed printer driv‐ ers list. 6. Once driver installa on is complete, use the USB cable to plug in the Sirius printer to your Windows computer. 7. The driver installa on will complete automa cally. -
Page 13: Loading Media
Loading Media 1. Open the Flange Locking Lever. 2. Remove the flange. 3. Rotate the Roll Paper Holder Knob to contract the Roll Paper Holder sha . 4. Slide roll paper onto the Roll Paper Holder sha as far as it will go. 5. - Page 14 8. Close the Flange Locking Lever. 9. Lower the Unwinder Cover Open Lever to open the Unwinder Cover. Open the Unwinder Cover manually in the direc on indicated by the arrow un l it locks. Page 15...
- Page 15 10. Before loading the paper, rotate 13. Pass paper below the Tension Bar the Roll Paper Guide Adjustment and F0 Roller, and align the lead‐ Knob clockwise and move the Roll ing edge of the paper with the Paper Guide towards you. Roll Paper Guide and Paper Guide.
- Page 16 15. Rotate the Roll Paper Posi on 18. A er loading the paper, rotate Adjustment Dial to adjust the the Roll Paper Guide Adjustment paper un l it is straight. Knob counterclockwise and align the Roll Paper Guide to the width of the paper.
- Page 17 Cau on : Selec ng the wrong Media Type and Weight could nega vely affect results. If unsure, contact NeuraLabel Support. 10. Click [Add] and then select [Close]. 11. On the Paper Se ngs drop down menu., select the paper size that was created.
- Page 18 Cau on : Selec ng the wrong Media Type and Weight could nega vely affect results. If unsure, contact NeuraLabel Support. 10. Click [Add] and then select [Close]. 11. On the Paper Se ngs drop down menu., select the paper size that was created.
- Page 19 Cau on : Selec ng the wrong Media Type and Weight could nega vely affect results. If unsure, contact NeuraLabel Support. 10. Click [Add] and then select [Close]. 11. On the Paper Se ngs drop down menu., select the paper size that was created.
- Page 20 Cau on : Selec ng the wrong Media Type and Weight could nega vely affect results. If unsure, contact NeuraLabel Support. 10. Click [Add] and then select [Close]. 11. On the Paper Se ngs drop down menu., select the paper size that was created.
- Page 21 The rewinder is posi oned using a baseplate. Matrix Remover : Your Sirius may come with a Ma‐ trix Remover (inline or offline) that, in a single pass process, removes the waste material from the pre die‐cut media and rewinds the finished labels on a...
- Page 22 NeuraLabel Contact Informa on www.neuralabel.com support@neuralabel.com orders@neuralabel.com Page 24...
Need help?
Do you have a question about the Sirius and is the answer not in the manual?
Questions and answers