NeuraLabel 550e Setup And Quick Start Manual
Notouch system
Hide thumbs
Also See for 550e:
- Quick printing manual (2 pages) ,
- Setup and quick start manual (9 pages)

Related Manuals for NeuraLabel 550e


Summary of Contents for NeuraLabel 550e
- Page 1 NeuraLabel 550e NoTouch System Setup and Quick Start Guide January 2021 www.neuralabel.com Page 1...
- Page 2 • Step 6: Feeder Setup • Step 7: Power Up the System • Step 8: Media Setup • Step 9: Load Media • Step 10: Printing and Winding • Printing Tips & Troubleshooting • Firmware and Contact Information www.neuralabel.com Page 2...
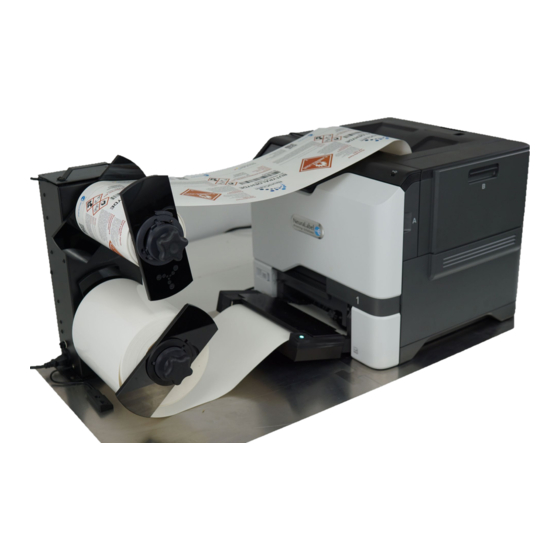
- Page 3 Unpacking the Printer and Feeder Remove printer from box. Lift from box with two people. Remove feeder from box and set aside. Continuous Feeder Attachment Print Engine Power Cord Starter Toner www.neuralabel.com Page 3...
- Page 4 Unpacking the NoTouch Remove all contents from the box. • Tower • Packaged items in plastic bag • Printer Base Plate (2 pieces) • Packaging may differ from photo. Tower Base Plate www.neuralabel.com Page 4...
- Page 5 Flanges – 2 permanent rear and 2 removable • Power cord • 4 screws Outer Flanges Rewinder Sensor Rear Flanges Equipment Required Unwinder Sensor Attached to Baseplate Knobs • Phillips head screwdriver • Rolled media • 3 inch core Spindles Tower www.neuralabel.com Page 5...
- Page 6 2 datum slots goes to the right. The side with the smaller tower outline with 4 screw posts goes to the left. Printer Guides Tower Posts Printer Slots Tower Guides Baseplate Dimensions: 41” x 20.5” Recommended Minimum Table Size: 60” x 30” www.neuralabel.com Page 6...
-
Page 7: Step 2: Printer Setup
OFF. Plug in the network cable into the printer port (middle left side of back of printer) and wall outlet. (USB is also supported.) Bottom Hole Power Port at Back of Printer Always plug laser printers directly into a wall power outlet. www.neuralabel.com Page 7... - Page 8 Step 2: Printer Setup continues Open printer side door labeled B. Unpack starter toner and place in printer. Close printer door. Door B www.neuralabel.com Page 8...
- Page 9 Screw down snugly and verify there is no “wobble.” Plug the Tower’s power cord into the Tower port (bottom left side of Tower) and wall outlet, but keep the Tower turned OFF. Tower Power Port 4 Screws and hex spacers attach tower to baseplate www.neuralabel.com Page 9...
- Page 10 Tower must be powered OFF during this step. The unwinder sensor should already be attached to the base plate using pattern and one screw. Plug the unwinder sensor into the Tower port (bottom left side of the Tower) Unwinder Sensor Port www.neuralabel.com Page 10 Page 10...
- Page 11 Use your index finger and thumb to grasp the base of the sensor and attach clip; slide it on the attach clip by pressing together. Be sure not to grasp the movable spring-loaded trigger. Rewinder Sensor slides Rewinder Sensor Port onto Attach Clip Rewinder Attach Clip on printer www.neuralabel.com Page 11 Page 11...
-
Page 12: Step 6: Feeder Setup
Make sure it attaches squarely to the printer. Attach the feeder round “barrel” connector to the round connector at the back of the printer just above the printer’s power port. Continuous Feeder Attachment Feeder Barrel Connector NOTE: The Feeder is powered by the printer. www.neuralabel.com Page 12... -
Page 13: Step 7: Power Up The System
Press the power button near the printer operator panel. The printer and the attached feeder will boot up. This will take about one minute. • The printer operator panel displays the NeuraLabel logo and then the home screen. • The feeder executes a boot up diagnostic sequence which exercises all the motors. -
Page 14: Step 8: Media Setup
Lock the flange. Tighten the core on the upper spindle. spindle by turning nob clockwise. unlocked • Flat side of flange should always face media. • Media must be loaded with printable side facing down. locked Media face down www.neuralabel.com Page 14 Page 14... -
Page 15: Step 9: Load Media
Then turn the Tower ON. locked Tower ON: The tower will begin spinning when the printer starts. Wait until it stops and tape the media edge on the rewinder core. Squeeze the rewinder trigger to start rewinding. www.neuralabel.com Page 15 Page 15... - Page 16 Watch as the unwinder and rewinder elegantly control media rolls. If you have trouble: The NeuraLabel 550e printer has a slow start feature. You must add Leading Blank Space to the print job and select Leading Blank Space Slowdown. Use this feature until you are ready to web up the media at the normal print speed.
- Page 17 NeuraLabel 550e NoTouch Tips and Checklist • Make sure the media and flanges are aligned and the flanges have been latched. • Make sure the chucks are tightened so the media cores do not slip. • Make sure the receiving core is not too small and the receiving flanges are not too tight for the media width.
-
Page 18: Contact Information
For example 1 flash, pause, 2 flashes, indicates version 1.2. Update the NoTouch Firmware with a USB cable connected from the NoTouch firmware port to your PC. Run the provided update program. All available Firmware Updates are found at NeuraLabel.com/setup/550e Contact Information •...
Need help?
Do you have a question about the 550e and is the answer not in the manual?
Questions and answers
how can reset fusing unite neuralable