Table of Contents
Advertisement
Quick Links
Advertisement
Table of Contents

Related Manuals for NeuraLabel Sprint


Summary of Contents for NeuraLabel Sprint
- Page 1 NeuraLabel Sprint Unwinder/Rewinder Setup Guide November 2019...
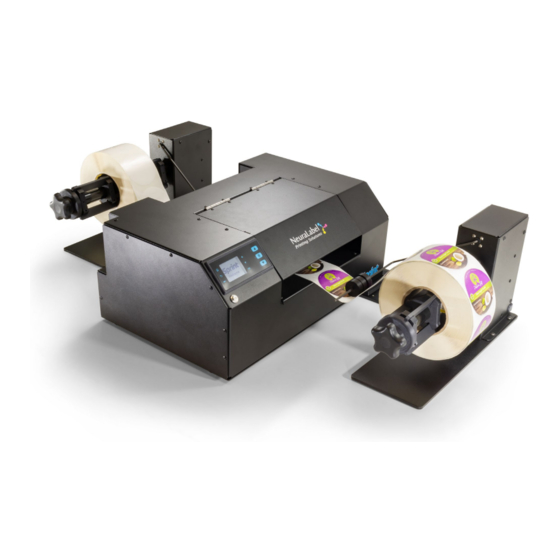
- Page 2 NeuraLabel Sprint Page 1 Unwinder/Rewinder Setup Unpacking Remove top foam insert. Remove and unpack unwinder. Remove and unpack rewinder. In the Box Rewinder Unwinder Before You Begin Locate a sturdy table at least at least 24” x 36” to fit the printer and roll units.
- Page 3 Page 2 Unwinder/Rewinder Setup Turn printer Off. Printer must be off when plugging in winding equipment. Position Unwinder Place Unwinder in position next to the Sprint printer and slide the guide into place underneath the printer Position Rewinder Place the Rewinder in position next to the Sprint printer and slide the guide into place underneath the printer.
- Page 4 NeuraLabel Sprint Page 3 Unwinder/Rewinder Setup Plug in Unwinder Plug in Unwinder into the lower port in the back of the printer. Plug in Rewinder Plug in Rewinder into the upper port in the back of the printer. Units with only a single port are for Unwinders.
- Page 5 NeuraLabel Sprint Page 4 Unwinder/Rewinder Setup Load Media onto Unwinder Place the media to roll out face up on the unwinder, about in the center of the track. Load Core onto Rewinder Place an empty 3-inch core on the rewinder to match the location of the unwinder.
- Page 6 NeuraLabel Sprint Page 5 Unwinder/Rewinder Setup Turn printer On. Printer must be on to load media. Load the Media When printer has powered up completely, load the media into the back of the printer, adjusting the gray guides to the media.
- Page 7 NeuraLabel Sprint Page 6 Unwinder/Rewinder Setup Check Alignment Check the alignment of the winder cores and printer guides. Adjust if needed by loosening the chucks. Be sure to retighten chucks after aligning media. Turn On Rewinder Finally rotate the Rewinder arm to place it in its Ready position.
- Page 8 NeuraLabel Contact Information • www.neuralabel.com • support@neuralabel.com • orders@neuralabel.com NeuraLabel Printing Solutions © 2019 Neuralog LP...
Need help?
Do you have a question about the Sprint and is the answer not in the manual?
Questions and answers