Table of Contents
Advertisement
Quick Links
Smart-1 625 Installing and
Removing Expansion Line Cards
This document is for the Smart-1 625 Security Management appliance.
Safety Instructions
Lift the appliance with assistance. To avoid injury, do not attempt to lift the appliance by yourself.
n
Opening or removing the appliance cover, while the appliance is powered on may expose you to a
n
risk of electric shock.
Do not operate the appliance without the cover for more than five minutes.
n
Operating the appliance without the cover can result in component damage.
n
Many repairs may only be done by a certified service technician. Only perform troubleshooting and
n
simple repairs as authorized in your product documentation, or as directed by the technical support.
We recommend that you always use an antistatic mat and antistatic strap on your wrist, while working
n
on components inside the appliance.
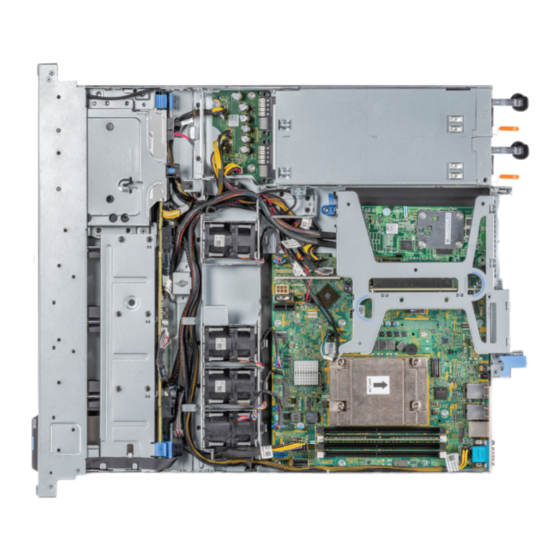
For proper heat dissipation and cooling, Smart-1 625 appliances contain a cooling air shroud that
n
covers the memory module sockets.
For more information, see the Enterprise Products Safety, Environmental, and Regulatory Information
booklet supplied in the original appliance shipping carton.
Important - We recommend that only experienced personnel install or remove hardware
components. Installing or removing components incorrectly can permanently damage
the Security ManagementAppliance
Important - Make sure that you are electromagnetically grounded when working with
Hardware Components of the appliance. ESD (electrostatic discharge) can damage the
appliance.
[Classification: Protected]
© 2019 Check Point Software Technologies Ltd. All rights reserved.
For a list of our trademarks, please refer to: www.checkpoint.com/copyright.html.
For a list of our Third Party Copyright notices, please refer to: www.checkpoint.com/3rd_party_copyright.html.
1
Advertisement
Table of Contents

Related Manuals for Check Point Smart-1 625


Summary of Contents for Check Point Smart-1 625
- Page 1 We recommend that you always use an antistatic mat and antistatic strap on your wrist, while working on components inside the appliance. For proper heat dissipation and cooling, Smart-1 625 appliances contain a cooling air shroud that covers the memory module sockets.
- Page 2 Hardware Components Item Description Front panel Riser Rear panel...
- Page 3 For a list of supported line cards, see: https://www.checkpoint.com/downloads/products/smart-1-405-410-625-5050-5150-datasheet.pdf In the Smart-1 625 appliance there is 1 available expansion line card slot. Procedure Use the relevant install or replace workflow for your appliance. For each step in the workflow, follow the instructions as described in the subsequent sections of this guide.
- Page 4 PSU removal. 6. Remove the appliance from the rack. See the Smart-1 625 Installing the Telescopic Rails Guide 7. Put the Electrostatic Discharge (ESD) grounding strap on your wrist and attach the other end to a grounding point. 8. Remove the appliance cover.
- Page 5 Removing the Riser 1. Open the blue expansion card riser retention latch located on the appliance (1). 2. Holding the blue touch points (2), lift the expansion card riser from the appliance. Note - The illustration shows a riser with only the onboard NIC installed. Removing an Expansion Line Card from the Riser 1.
- Page 6 5. If you are removing the card permanently, install a filler bracket in the empty expansion card slot. Note - Install a filler bracket over an empty expansion card slot to maintain Federal Communications Commission (FCC) certification of the system. The brackets also keep dust and dirt out of the system and aid in proper cooling and airflow inside the system.
- Page 7 2. Close the system cover release latch (2). 3. Using a 1/4 inch flat head or Phillips #2 screwdriver, turn the lock clockwise to the lock position (3). Smart-1 625 Installing the Telescopic Rails Guide 4. Install the appliances into the rack. See the 5.
- Page 8 7. If you opened the hook-and-loop straps, close them to secure the appliance cables. 8. Press the Power button on the front panel to turn on the Security Management appliance. Installing a Transceiver If your expansion line card contains removable transceivers, you can install and replace these transceivers. For a list of supported transceivers, see: https://www.checkpoint.com/downloads/products/smart-1-405-410-625-5050-5150-datasheet.pdf Item...
Need help?
Do you have a question about the Smart-1 625 and is the answer not in the manual?
Questions and answers