
Subscribe to Our Youtube Channel
Related Manuals for Kohler Mira Event XS


Summary of Contents for Kohler Mira Event XS
- Page 1 Mira Event XS Thermostatic Power Shower These instructions must be left with the user Installation & User Guide 1293809-W2-E...
-
Page 2: Important Safety Information
Important Safety Information WARNING - This shower can deliver scalding temperatures, cause fire, electric shock or other personal injury if not operated, or maintained in accordance with the instructions, warnings and cautions contained in this guide and on the appliance. Please read the important safety information and the operation section of this guide before using the shower. - Page 3 21. DO NOT connect the outlet of the shower to any tap, control valve, trigger operated handset or showerhead other than those specified for use with this shower as the outlet acts as a vent for the tank body. Only Kohler Mira recommended accessories should be used. 1293809-W2-E...
-
Page 4: Disposal And Recycling
22. DO NOT perform any unspecified modifications, or drill or cut holes in the product other than instructed by this guide. When servicing only use genuine Kohler Mira replacement parts. 23. Always check the water temperature is safe before entering the shower. 24. The water supplies to this product must be isolated if the product is not to be used for a long period of time. - Page 5 Products manufactured by Kohler Mira Ltd are designed to be safe, provided that they are installed, used and maintained in good working order, in accordance with our instructions and recommendations.
-
Page 6: Recommended Usage
Heavy Commercial Healthcare The Mira Event XS is not suitable for use in institutional/commercial applications. It must not be used with mains water pressure applications; for example, instantaneous electric heaters, instantaneous gas water heaters, unvented mains pressure systems, pumped shower systems and some combination-type storage systems. -
Page 7: Pack Contents
Pack Contents Tick the appropriate boxes to familiarise yourself with the part names and to confirm that the parts are included. 1 x Event XS T Thermostatic Power Shower 1 x Push-Fit Release Tool 3 x Rubber Wall Plugs 3 x Fixing Screws 3 x Rubber Feet 4 x Case Inserts Documentation 1 x Guarantee Registration Document 1293809-W2-E... - Page 8 Dimensions Dimensions are in millimetres. 1293809-W2-E...
-
Page 9: Specifications
1.3. Temperature control – To obtain the full listed performance the Mira Event XS should be installed, operated and maintained in accordance with this guide. - Page 10 1.10. Noise – The Mira Event XS is supplied with anti-vibration rubber feet and rubber wall plugs that isolate the unit from the wall in order to minimize the amount of noise transmitted. The type of wall the Mira Event XS is fixed to will also affect...
-
Page 11: Installation Requirements
1. General 1.1. Do not take risks with plumbing or electrical equipment. 1.2. Do not install the Mira Event XS in a position where it could become frozen. 1.3. Isolate electrical and water supplies before proceeding with the installation of the Mira Event XS. - Page 12 3.1. Do not use excessive force when making connections to the flexible hoses or handset, finger tightness is sufficient. 3.2. Do not solder supply pipework with the Mira Event XS connected. Heat transmitted through the pipework will melt the inlet manifold. 3.3. The storage cistern should have a minimum storage capacity of 230 litres to provide adequate showering time. Insufficient storage may result in the pump...
- Page 13 C = Total length of 15 mm pipe in cold water supply pipe run* D = Total length of 22 mm pipe in cold water supply pipe run* *Measure from the base of the cold water cistern to the relevant inlet port on the Mira Event XS. Hot Water Supply Cold Water Supply...
- Page 14 Isolating Valves missing Cistern Other Cold Hose retaining Supply Draw Offs ring missing Vent Cold Pipe Supply Strained Hose This layout is not suitable Side D.H.W. for the Mira Event XS. Entry *Incorrect supply Boss connections Other Hot Draw Offs Incorrect Installation 1293809-W2-E...
-
Page 15: Installation
Installation 1. Before You Start A. Choose the appropriate configuration for your installation: TOP ENTRY SUPPLY CONFIGURATION Half Case Falling Water Insert Falling Electrical Supply Supply Pipes (in miniature trunking) Thinned Section of Case. Cable Channel Full Case Insert BOTTOM ENTRY SUPPLY CONFIGURATION Full Case Insert Bottom... - Page 16 WALL ENTRY SUPPLY CONFIGURATION Full Case Insert Thinned Section of Case. Cable Channel Bottom Cable Channel Thinned Section of Case. Half Case Insert B. Changing the Blanking Plugs 1293809-W2-E...
- Page 17 Using this procedure as a guide, adjust the steps for bottom entry configurations as appropriate. 1293809-W2-E...
-
Page 18: Installation Of The Shower Unit
Installation of the Shower Unit Warning, isolate the electrical and water supplies before installing the shower! Decide on a suitable position for the shower unit and fittings. See “Installation - Plumbing” for further details. Hold the assembly against the wall and Note! The cover retaining screws are mark the positions of the 3 fixing holes. captive and need not be removed. 1293809-W2-E... - Page 19 Drill the fixing holes. DO NOT drill through the shower unit into the wall. DO NOT drill into buried cables or pipes. Trim the thinned section of the case covering Feed the water pipe and electrical cable the cable channel. to the inlet of the shower unit. For rear in- let, use an elbow fitting. We recommend a falling supply to prevent air lock in the For a falling water supply pipe, care-...
- Page 20 Rubber Feet 1 min Fix the shower unit to the wall, 3 x No. 8 x 1¼” screws and wall plugs are sup- plied. See “Installation - Plumbing” for further details. Miniature Trunking Caution! Do not use stainless steel piping for inlet pipework. If chrome-plated copper pipework is used then all traces of chrome plate must be removed from the...
-
Page 21: Fitting The Cover
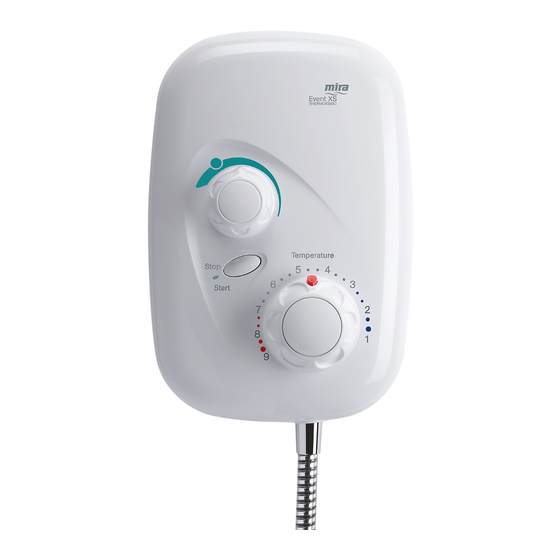
Fitting the Cover 1293809-W2-E... - Page 22 Temperature Control Knob Temperature Knob Insert Important! Align & push the temperature control knob onto the temperature hub and ensure it fully clicks into position. Fit the insert to lock the knob in place (see Important Safety Information). Install the shower fittings. Refer to the Installation and User Guide packed with the fittings. 1293809-W2-E...
- Page 23 Commissioning Follow this procedure to check the function and performance before using the shower for the first time. Make sure that all users are familiar with the operation of the shower. This guide is the property of the homeowner. Switch electrical supply on. Turn power control to low.
- Page 24 1 min Stop Start Residual water may drain for a few minutes. 1293809-W2-E...
-
Page 25: Adjustable Maximum Temperature Setting
2. Adjustable Maximum Temperature Setting Note! An adequate supply of hot water at least 12°C above the required temperature must be available for correct operation of the shower control. Warning! Resetting the temperature of the temperature stop will also reset the maximum temperature obtainable with the override operated. - Page 26 Stop Start Start the Shower Unit. Turn the flow control anticlockwise fully (maximum flow) and allow the water temperature to stabilise. Turn the temperature spindle until the required maximum water temperature is obtained. Caution! When resistance is felt DO NOT USE FORCE to turn the spindle any further as this is the maximum obtainable temperature from the appliance with the Safety Note! This will available hot water storage temperature.
- Page 27 Align the pip on the temperature hub with the slot in the thermostatic cartridge. Refer to section 'Fitting the Cover' Stop for temperature Start control knob fitting. Check the maximum temperature setting. If necessary repeat the temperature adjustment until the correct the setting is achieved.
-
Page 28: Temperature Override Button - Disable
3. Temperature Override Button – Disable The Mira Event XS incorporates a temperature override button that allows the user to override the preset maximum temperature. This override button can be disabled, limiting the maximum selectable showering temperature to the preset value. This setting is recommended for the young, the elderly, the infirm, or anyone inexperienced in the correct operation of the controls. - Page 29 1293809-W2-E...
-
Page 30: Operation
Operation See Important Safety Information before operating your shower. Volume/Flow Control Stop Start For safety reasons, this appliance is fitted with an adjustable maximum temperature setting. This setting must be checked and adjusted as necessary to suit both site conditions and Temperature Control user’s comfort. 1293809-W2-E... -
Page 31: Fault Diagnosis
Fault Diagnosis 1. User Maintenance The Mira Event XS is fully performance tested after assembly. Providing the Mira Event XS has been correctly installed and is operated as advised, difficulties should not arise. In the unlikely event that you experience problems with your appliance then the following procedure will enable you to undertake basic fault finding before contacting the person responsible for installing your shower. -
Page 32: Installer Maintenance
The Mira Event XS is one part of an entire plumbing system. The fitting of a pump places additional requirements on the plumbing system. Some systems may require plumbing modifications to allow them to cope with higher flow rates. Providing the Mira Event XS has been correctly installed and is operated as advised, difficulties should not arise. Fault diagnosis and maintenance must be carried out by a competent person for whom the fault diagnosis table is provided. - Page 33 Electrical supply failure. Check power supply. PCB failure. Renew the PCB. Motor overheated, thermal If the thermal switch operates switch operated. repeatedly contact Kohler Mira for further advice. Pump speed does not change. PCB failure. Renew the PCB. Low or no water flow. Isolating valves closed. Open valves.
-
Page 34: Maintenance
Maintenance Front Cover – Removal Switch electrical supply Off. Turn off the water supply isolation valve. 1293809-W2-E... - Page 35 Filter Cap - Install the front cover, refer to section: 'Fitting the Cover' Switch electrical supply on. Turn the water supply on and check the shower unit for leaks. - Commission the Mira Event XS, refer to section: 'Commissioning'. 1293809-W2-E...
- Page 36 Cleaning Always read the IMPORTANT SAFETY INFORMATION for your shower. Cleaning the showerhead Many household and commercial cleaners, including hand and surface cleaning wipes contain abrasive and chemical substances that can damage plastics, plating and printing and should not be used. These finishes should be cleaned with a mild washing up detergent or soap solution, and then wiped dry using a soft cloth. It is IMPORTANT to keep the Showerhead and Hose clean and free from blockage to make sure your shower performs to its optimum.
-
Page 37: Wiring Diagram
Wiring Diagram POTENTIOMETER SWITCH ON/OFF THERMAL TRIP BLUE MOTOR ORANGE BROWN SOLENOID VALVE BROWN 1293809-W2-E... -
Page 38: Spare Parts
Spare Parts 453.08 A,D,E 147.67 B,E,F 453.01 453.14 147.67 Check Valve Pack 1532.405 453.01 Cartridge – Thermostatic 453.27 453.03 Motor Pump Assembly – identified 'A' 453.07 Inlet Manifold Assembly – identified 'B' 453.08 PCB Assembly – Power 453.10 Harness Assembly – Thermostatic – identified 'C' 453.13 Solenoid Valve Assembly – identified 'D' 1532.407 453.14 Filter/Cap Assembly 453.15 Seal Pack – identified 'E' 453.23 Mixer Valve Body – identified 'F' 453.27 Temperature Override Stop 453.28 Outlet Elbow Assembly – identified 'H' 1532.405 Cover Assembly – Thermostatic 1532.407 Temperature Knob Assembly – Thermostatic 1532.409... - Page 39 Notes 1293809-W2-E...
-
Page 40: Customer Service
Kohler Mira Limited. Cromwell Road, K/E S.A.S. Cheltenham, 3 rue de Brennus, The company reserves the right Gloucestershire 93631, La Plaine Saint-Denis, to alter product specifi cations GL52 5EP France without notice. 14648 1293809-W2-E © Kohler Mira Limited, June 2021 1473739-W6-A...
Need help?
Do you have a question about the Mira Event XS and is the answer not in the manual?
Questions and answers