Racelogic VBOX Video HD2 User Manual
Hide thumbs
Also See for VBOX Video HD2:
- Quick start manual (13 pages) ,
- Using manual (7 pages) ,
- Assembly manual (2 pages)
Table of Contents
Advertisement
VBOX Video HD2 User Manual
•
01 - HD2 Introduction
•
02 - HD2 Hardware Overview
•
03 - HD2 Camera Preview App
•
04 - HD2 Logging
•
05 - HD2 Using with OLED Display
•
06 - HD2 Connecting to the Vehicle CAN Bus
•
07 - HD2 HDMI Output
•
08 - HD2 Setup Software Overview - Windows
•
09 - HD2 Setup Software Overview - macOS
•
10 - HD2 Technical Properties
•
VBOX Video HD2 - Cable Identification
•
VBOX Video HD2 - CAN Output Format
•
VBOX Video HD2 - PIN OUTS
•
VBOX Video HD2 - Technical Specification
•
VBOX Video HD2 - Updating the Firmware and Software
1
Advertisement
Table of Contents

Related Manuals for Racelogic VBOX Video HD2


Summary of Contents for Racelogic VBOX Video HD2
- Page 1 10 - HD2 Technical Properties • VBOX Video HD2 - Cable Identification • VBOX Video HD2 - CAN Output Format • VBOX Video HD2 - PIN OUTS • VBOX Video HD2 - Technical Specification • VBOX Video HD2 - Updating the Firmware and Software...
-
Page 2: Software Installation
01 - HD2 Introduction VBOX Video HD2 is a dual camera, 1080p, 30 or 60 fps video system including 10 Hz GPS data-logging and a live graphical overlay. The HD2 is compatible with OLED systems, as well as Racelogic modules, such as the Micro Input Module and Mini Input Module. - Page 3 You can select specific car parameters from our CAN database and also add your own logo. The scene can then be uploaded on to the unit by saving to an SD card and inserting into the powered VBOX. https://en.racelogic.support//Product_Info/Video_Data_Loggers/VBOX_Video_HD2/VBOX_Video_HD2_User_Guide/01_- _HD2_Introduction...
- Page 4 (Windows, macOS) to be and also change where the second camera is located (Windows, macOS). Elements These are graphical items in the scene, such as gauges, text, picture-in-picture, bar graphs, track maps etc. https://en.racelogic.support//Product_Info/Video_Data_Loggers/VBOX_Video_HD2/VBOX_Video_HD2_User_Guide/01_- _HD2_Introduction...
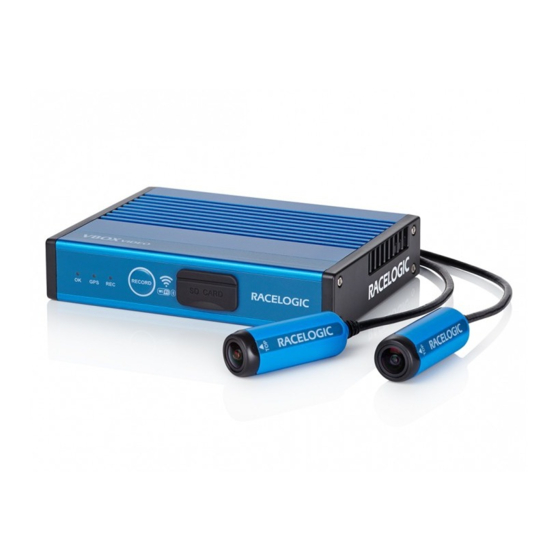
- Page 5 What’s included in the kit The standard inventory and optional extras available for the VBOX Video HD2 are listed below. VBOX Video HD2 Standard Inventory Description Quantity Product Code VBOX Video HD2 Unit VBVDHD2 VBOX Video 1080p Camera (3 m),...
- Page 6 DBSUCSETX3 Li-ion Battery Pack RLACS112 Bluetooth Heart Rate Monitor RLACS227 Bluetooth OBD Module RLACS228 Quick Release Unit Mounting Bracket RLACS258 Roll Cage Unit Mount RLACS268 Harsh Environment Fan RLACS247 Second Car Kit RLACS274 Tyre Temperature Monitoring System RLACS272 https://en.racelogic.support//Product_Info/Video_Data_Loggers/VBOX_Video_HD2/VBOX_Video_HD2_User_Guide/01_- _HD2_Introduction...
- Page 7 Start Guide. The VBOX Video HD2 is designed to disperse heat from internal components through the lid of the box, as such the unit will become hot to the touch when running. The enclosure is designed to use airflow to cool the unit down, so do ensure that the top of the HD2 is left open to the air.
-
Page 8: Front Panel
Front Panel Rear Panel https://en.racelogic.support//Product_Info/Video_Data_Loggers/VBOX_Video_HD2/VBOX_Video_HD2_User_Guide/02_- _HD2_Hardware_Overview... - Page 9 • USB 2.0 Host Interface (USB) For recording to USB flash drives, fast USB drive required • WiFi For camera setup/preview • RS232 (CAN/SER) For communication with OLED Display • HDMI video output (side connector, V6 HDMI unit) https://en.racelogic.support//Product_Info/Video_Data_Loggers/VBOX_Video_HD2/VBOX_Video_HD2_User_Guide/02_- _HD2_Hardware_Overview...
-
Page 10: Led Behaviour
Closing Files – DO NOT REMOVE MEDIA There is a fourth LED on the rear of the system. If the mounting solution only allows the back panel to be visible, this status LED works on a simple ‘traffic light’ style system. https://en.racelogic.support//Product_Info/Video_Data_Loggers/VBOX_Video_HD2/VBOX_Video_HD2_User_Guide/02_- _HD2_Hardware_Overview... -
Page 11: Connection Diagrams
Not ready to record (either no GPS or no SD Card USB Orange Memory OK) Green Ready to record – system all OK Blue Recording – DO NOT REMOVE MEDIA Connection Diagrams Information on connecting different types of OLED display is available here. https://en.racelogic.support//Product_Info/Video_Data_Loggers/VBOX_Video_HD2/VBOX_Video_HD2_User_Guide/02_- _HD2_Hardware_Overview... -
Page 12: Supplied Equipment
Supplied equipment https://en.racelogic.support//Product_Info/Video_Data_Loggers/VBOX_Video_HD2/VBOX_Video_HD2_User_Guide/02_- _HD2_Hardware_Overview... - Page 13 Including OLED Display and USB Logging https://en.racelogic.support//Product_Info/Video_Data_Loggers/VBOX_Video_HD2/VBOX_Video_HD2_User_Guide/02_- _HD2_Hardware_Overview...
- Page 14 Including CAN and Stereo Microphones https://en.racelogic.support//Product_Info/Video_Data_Loggers/VBOX_Video_HD2/VBOX_Video_HD2_User_Guide/02_- _HD2_Hardware_Overview...
-
Page 15: Unit Dimensions
Unit Dimensions Measurements all displayed in mm. https://en.racelogic.support//Product_Info/Video_Data_Loggers/VBOX_Video_HD2/VBOX_Video_HD2_User_Guide/02_- _HD2_Hardware_Overview... - Page 16 _HD2_Hardware_Overview...
- Page 17 _HD2_Hardware_Overview...
- Page 18 Once the application is installed, a VBOX Video icon should show on the device. Power on the VBOX Video HD2, and wait for it to fully boot up. As soon as the HD2 is on, it will transmit a Wi-Fi signal which can be picked up by the iOS/Android device.
- Page 19 This will prompt the app to request a password confirmation: https://en.racelogic.support//Product_Info/Video_Data_Loggers/VBOX_Video_HD2/VBOX_Video_HD2_User_Guide/03_- _HD2_Camera_Preview_App...
- Page 20 The password to connect to the HD2 set as default is the serial number of the HD2 unit. In this example it is VVH020472. Enter this as the password and you should see the device connect to the HD2: When there is a successful Wi-Fi connection to the HD2, open the application to view a live camera preview. https://en.racelogic.support//Product_Info/Video_Data_Loggers/VBOX_Video_HD2/VBOX_Video_HD2_User_Guide/03_- _HD2_Camera_Preview_App...
- Page 21 If the connection drops at any time, press the ‘refresh’ button shown below to connect to the unit again. If the app is opened with no connection to a VBOX Video HD2, the user will see the message displayed below. Check https://en.racelogic.support//Product_Info/Video_Data_Loggers/VBOX_Video_HD2/VBOX_Video_HD2_User_Guide/03_-...
-
Page 22: Settings Menu
The Settings icon highlighted below opens the Settings section where specification details of the HD2 unit and cameras can be found: WIFI Here it is possible to change the Wi-Fi SSID by tapping on the Wi-Fi name. A box will appear which allows a new Wi-Fi name to be entered and saved: https://en.racelogic.support//Product_Info/Video_Data_Loggers/VBOX_Video_HD2/VBOX_Video_HD2_User_Guide/03_- _HD2_Camera_Preview_App... - Page 23 Save diagnostic logs to SD card This instructs the HD2 to save its encrypted diagnostic log to the SD card, for use by Racelogic support when requested. Export current scene to SD card This saves the current HD2 scene to the SD card. This feature is particularly useful if you have not got the scene file saved locally on a computer and would like to edit the scene.
- Page 24 Note: A Bluetooth device will need to be turned off to be unpaired with the HD2 as it will constantly try to reconnect if on. If a Bluetooth connection is active, a 'Bluetooth' icon will appear on the top right of the main app screen. https://en.racelogic.support//Product_Info/Video_Data_Loggers/VBOX_Video_HD2/VBOX_Video_HD2_User_Guide/03_- _HD2_Camera_Preview_App...
-
Page 25: Track Selection
HDMI This menu enables the VBOX Video HD2 HDMI variant (V6) to stream real time video and audio from the HD2 to an HDMI compatible monitor, recorder or streaming device. Selecting enables you to choose to output from Camera 1 (without graphics), Camera 2 (without graphics) or Camera 1 and 2 (with graphics). - Page 26 _HD2_Camera_Preview_App...
-
Page 27: Exposure Setting
When selecting the exposure icon a message will appear which enables the exposure window to be set manually or returned to the default setting. Selecting 'Set window' allows the user to drag a box around the area of the image the exposure should be set to. https://en.racelogic.support//Product_Info/Video_Data_Loggers/VBOX_Video_HD2/VBOX_Video_HD2_User_Guide/03_- _HD2_Camera_Preview_App... - Page 28 MB/s (4 MB/s absolute minimum), a speed class of 10 (4 absolute minimum) and good USB chipsets are essential. IMPORTANT – If you are logging to USB storage, do not connect the media to the VBOX Video HD2 until the unit has fully booted (OK LED changes from Green –...
- Page 29 VBOX Video HD2. Note: The 32 GB SD card supplied with the VBOX Video HD2 is formatted in the FAT32 file format. SDXC cards (64 GB and above) Purchased SDXC cards will be formatted in exFAT or NTFS file formats; the exFAT format...
- Page 30 GPS signals when in and around the pit lanes. VBOX Video HD2 is set to log to SD card first if both an SD card and USB device are connected, however this can be changed if desired.
- Page 31 The logging behaviour of VBOX Video HD2 is totally user configurable, so can be altered to suit different requirements. As well as logging Only when moving, the HD2 can also be set to log Continuously, Manually or by using Advanced logging options.
- Page 32 In order to pair the Bluetooth start/stop logging switch with the HD2 unit, the correct setting must be firstly selected within VBOX Video Setup software. 1. Firstly, power up VBOX Video HD2. 2. Insert the SD card in to a computer and open VBOX Video Setup Software, which can be downloaded here.
- Page 33 Note: Only one logging switch can be paired to a VBOX Video HD2 at any time. Note: The Bluetooth logging switch will go into ‘sleep’ mode after 1 minute of no activity.
- Page 34 *Bluetooth logging buttons purchased before the release of Firmware version 1.2.45 (prior to October '16) would not have been supplied with an SD card and will require a pairing file, obtainable from Racelogic, when upgrading to Firmware version 1.2.45 or later. To do this, please remove the rear cover of the Bluetooth switch, on the inside of the rear cover you should then see a 12 digit code written on a silver sticker (MAC Code), as seen below: https://en.racelogic.support//Product_Info/Video_Data_Loggers/VBOX_Video_HD2/VBOX_Video_HD2_User_Guide/04_-...
- Page 35 The pairing file is deleted from the card once installed onto VBOX Video HD2, we suggest you back up a copy before loading into the unit, in case for any reason you need to re-pair the Bluetooth switch. Should you not have a backup and require a new file to pair, please contact support@racelogic.co.uk.
- Page 36 Note: The HD2 will still follow the set logging conditions. Click here for more information on logging settings. Pressing 'RECORD' on the Bluetooth button should always act as a manual override to control the logging of the HD2, in https://en.racelogic.support//Product_Info/Video_Data_Loggers/VBOX_Video_HD2/VBOX_Video_HD2_User_Guide/04_- _HD2_Logging...
- Page 37 Bluetooth button will flash regularly. HD2 unit recording No media fitted to HD2 – unable to record Event Marking To mark an event, press 'MARK' on the Bluetooth button. This will cause the MARK LED to flash green once, and an https://en.racelogic.support//Product_Info/Video_Data_Loggers/VBOX_Video_HD2/VBOX_Video_HD2_User_Guide/04_- _HD2_Logging...
- Page 38 Battery life – continuous use* Approx. 900 hours Battery life – standby use** Approx. 3 years Bluetooth range Approx. 2 m *Continuous use means that the Bluetooth button is displaying a logging state, so the logging LED would be illuminated https://en.racelogic.support//Product_Info/Video_Data_Loggers/VBOX_Video_HD2/VBOX_Video_HD2_User_Guide/04_- _HD2_Logging...
-
Page 39: Battery Replacement
‘asleep’. The button can be ‘woken up’ at any time via a button press. Battery replacement Click case apart using bottom indent. Allow the battery to slide out by gently pulling the two tabs highlighted below forwards. Insert the new battery and snap the case shut. https://en.racelogic.support//Product_Info/Video_Data_Loggers/VBOX_Video_HD2/VBOX_Video_HD2_User_Guide/04_- _HD2_Logging... - Page 40 Note: As an extra feature, if there is an SD card present in the unit, the HD2 will revert logging back to the SD card should the USB stick become full during use or if the USB stick is absent/missing and recording is initiated. https://en.racelogic.support//Product_Info/Video_Data_Loggers/VBOX_Video_HD2/VBOX_Video_HD2_User_Guide/04_- _HD2_Logging...
- Page 41 Windows macOS https://en.racelogic.support//Product_Info/Video_Data_Loggers/VBOX_Video_HD2/VBOX_Video_HD2_User_Guide/04_- _HD2_Logging...
-
Page 42: Hardware Connection
These notes are specifically for OLED use with VBOX Video HD2. The full OLED manual can be accessed here. Hardware Connection The OLED display uses a serial connection to display information from the VBOX Video HD2, so the CAN/SER ports on both the HD2 and the OLED must be used. Automatic Track Recognition... -
Page 43: Serial Settings
Multiple Scene Selection The VBOX Video HD2 can store up to eight user defined scenes. They are loaded by placing all files in the root directory of logging media (SD Card or USB stick) and inserting them into the HD2 unit when it is powered on. The HD2 will load all scenes from the media device and save them to its internal memory. - Page 44 Predictive Lap Timing screen is being displayed on the OLED. • Reference lap time: Displays the current active reference lap time, which will update when the reference lap is superseded by a faster lap-time, unless the Reference Lap is Fixed. https://en.racelogic.support//Product_Info/Video_Data_Loggers/VBOX_Video_HD2/VBOX_Video_HD2_User_Guide/05_- _HD2_Using_with_OLED_Display...
- Page 45 06 - HD2 Connecting to the Vehicle CAN Bus VBOX Video HD2 has the ability to capture up to 80 CAN channels from Racelogic modules and/or from a vehicle CAN bus system. As well as Software Configuration (Windows / macOS), a hardware connection must be made to the vehicle’s CAN bus system.
- Page 46 Most often you can find the OBDII connector somewhere below the steering column, either above the pedals or perhaps inside a fuse box by the driver's knee. The OBDII connector will probably be in plain view, but some connectors are covered. https://en.racelogic.support//Product_Info/Video_Data_Loggers/VBOX_Video_HD2/VBOX_Video_HD2_User_Guide/06_- _HD2_Connecting_to_the_Vehicle_CAN_Bus...
-
Page 47: Software Setup
07 - HD2 HDMI Output VBOX Video HD2 is available with an HDMI video/audio output, located on the side of the unit, which allows users to stream real-time video from the HD2 to an HDMI compatible monitor, recorder or streaming device. - Page 48 This menu enables the VBOX Video HD2 HDMI variant (V6) to stream real time video and audio from the HD2 to an HDMI compatible monitor, recorder or streaming device. The dropdown menu at the bottom of the screen allows you to choose to output from Camera 1 (without graphics), Camera 2 (without graphics) or Camera 1 and 2 (with graphics).
- Page 49 - HDMI output is only available when frame rate is selected as 30 fps within the Video Settings. If Camera 1 and 2 (with graphics) is selected, there is then the option to enable or disable the audio output (enabled by default). https://en.racelogic.support//Product_Info/Video_Data_Loggers/VBOX_Video_HD2/VBOX_Video_HD2_User_Guide/07_- _HD2_HDMI_Output...
-
Page 50: App Setup
This menu enables the VBOX Video HD2 HDMI variant (V6) to stream real time video and audio from the HD2 to an HDMI compatible monitor, recorder or streaming device. Selecting enables you to choose to output from Camera 1 (without graphics), Camera 2 (without graphics) or Camera 1 and 2 (with graphics). - Page 51 08 - HD2 Setup Software Overview - Windows The full VBOX Video HD2 Setup Software Guide for Microsoft Windows can be viewed here. As well as having the ability to adjust settings within the HD2 unit, VBOX Video Setup Software provides full graphical overlay user configurability.
- Page 52 _HD2_Setup_Software_Overview_-_Windows...
-
Page 53: Settings Button
The settings button in the top left hand corner of the software allows the user to move between the main setup screens within VBOX Video Software. Clicking on any of the options here will clear the scene designer and populate the screen with settings options. https://en.racelogic.support//Product_Info/Video_Data_Loggers/VBOX_Video_HD2/VBOX_Video_HD2_User_Guide/08_- _HD2_Setup_Software_Overview_-_Windows... - Page 54 Clicking on the setting button will show the different settings windows. Select the settings option of interest. This will change the screen layout to display the selected settings options. To return to the scene designer, the settings button can be used again, or the quick access button, highlighted below. https://en.racelogic.support//Product_Info/Video_Data_Loggers/VBOX_Video_HD2/VBOX_Video_HD2_User_Guide/08_- _HD2_Setup_Software_Overview_-_Windows...
-
Page 55: Top Panel Buttons
Top panel buttons These buttons are used to save and load scene files, access the library of scenes and elements, as well as set up lap timing, access online help and set the software language. https://en.racelogic.support//Product_Info/Video_Data_Loggers/VBOX_Video_HD2/VBOX_Video_HD2_User_Guide/08_- _HD2_Setup_Software_Overview_-_Windows... - Page 56 File menu This menu is focussed around saving and loading scene files. Click here for more information on loading and saving scene files. https://en.racelogic.support//Product_Info/Video_Data_Loggers/VBOX_Video_HD2/VBOX_Video_HD2_User_Guide/08_- _HD2_Setup_Software_Overview_-_Windows...
- Page 57 Save to SD This allows the user to save a scene file to an SD card or USB stick to allow it to be uploaded to the VBOX Video HD2. Ensure that scene file the on the root directory of an SD card (not in the media or any other folder).
- Page 58 VBOX Video software will automatically check for any updates every time it is started up on a PC with an internet connection. This feature can be disabled here – we would recommend keeping this turned on. If 'Automatically check for updates' has been disabled, you can manually check for updates by clicking on 'Check for updates'. https://en.racelogic.support//Product_Info/Video_Data_Loggers/VBOX_Video_HD2/VBOX_Video_HD2_User_Guide/08_- _HD2_Setup_Software_Overview_-_Windows...
- Page 59 Contextual help access is also available in different areas of the software – clicking on the icon anywhere in the software will take you to the help page for the currently selected item. The about option listed within the help menu will display the current software version and circuit database version being used. https://en.racelogic.support//Product_Info/Video_Data_Loggers/VBOX_Video_HD2/VBOX_Video_HD2_User_Guide/08_- _HD2_Setup_Software_Overview_-_Windows...
-
Page 60: Mouse Navigation
When no element is selected, the dynamic settings panel will show settings for mouse navigation. See the ‘hotkeys’ table below for all mouse functions. Left mouse button options By default, the left mouse button is set to ‘select’ mode. This allows for easy selection of multiple elements when creating a temporary or fixed group. https://en.racelogic.support//Product_Info/Video_Data_Loggers/VBOX_Video_HD2/VBOX_Video_HD2_User_Guide/08_- _HD2_Setup_Software_Overview_-_Windows... - Page 61 'Select' mode (default) Click and dragging the left mouse button will select elements. ‘Pan’ mode This allows the user to click and drag to pan around the scene. https://en.racelogic.support//Product_Info/Video_Data_Loggers/VBOX_Video_HD2/VBOX_Video_HD2_User_Guide/08_- _HD2_Setup_Software_Overview_-_Windows...
- Page 62 Mouse Wheel options There are three options with regards to the mouse wheel function. The default setting is ‘zoom’ – this is highlighted in the image below. Allows the mouse wheel to zoom in/out on the main view window. https://en.racelogic.support//Product_Info/Video_Data_Loggers/VBOX_Video_HD2/VBOX_Video_HD2_User_Guide/08_- _HD2_Setup_Software_Overview_-_Windows...
-
Page 63: Grid Settings
This setting can be turned on to aid with aligning text elements more easily. It is not recommended to leave this setting on all the time, as it will move elements slightly to snap to the grid every time they are re-located. https://en.racelogic.support//Product_Info/Video_Data_Loggers/VBOX_Video_HD2/VBOX_Video_HD2_User_Guide/08_- _HD2_Setup_Software_Overview_-_Windows... - Page 64 Order Elements When elements are included within the scene, you can use the 'Bring to front' or 'Send to back' buttons to arrange the order in which they are viewed when overlapping each other. https://en.racelogic.support//Product_Info/Video_Data_Loggers/VBOX_Video_HD2/VBOX_Video_HD2_User_Guide/08_- _HD2_Setup_Software_Overview_-_Windows...
- Page 65 Note: If snap to grid is on and the user manually enters the new location, the location will snap to the nearest value below the entered value that aligns to the grid. For example a grid spacing of 20 will snap to 0 for any value below 20, it https://en.racelogic.support//Product_Info/Video_Data_Loggers/VBOX_Video_HD2/VBOX_Video_HD2_User_Guide/08_- _HD2_Setup_Software_Overview_-_Windows...
- Page 66 Changes can also be undone/ redone by right clicking on an empty area within the scene and selecting either 'Undo' or 'Redo'. Note: These options will not undo or redo any configuration settings changes made. https://en.racelogic.support//Product_Info/Video_Data_Loggers/VBOX_Video_HD2/VBOX_Video_HD2_User_Guide/08_- _HD2_Setup_Software_Overview_-_Windows...
- Page 67 Mouse wheel + Ctrl Scroll left/right Ctrl + C Copy selected element Ctrl + V Paste copied element Ctrl + Y / Ctrl + shift + Z Redo Ctrl + Z Undo Delete key Delete selected element *Configurable https://en.racelogic.support//Product_Info/Video_Data_Loggers/VBOX_Video_HD2/VBOX_Video_HD2_User_Guide/08_- _HD2_Setup_Software_Overview_-_Windows...
- Page 68 09 - HD2 Setup Software Overview - macOS The full VBOX Video HD2 Setup Software Guide for Apple macOS can be viewed here. As well as having the ability to adjust settings within the HD2 unit, VBOX Video Setup Software provides full graphical overlay user configurability.
- Page 69 Once a scene has been loaded, the main areas of the software are shown below: https://en.racelogic.support//Product_Info/Video_Data_Loggers/VBOX_Video_HD2/VBOX_Video_HD2_User_Guide/09_- _HD2_Setup_Software_Overview_-_macOS...
- Page 70 Note: Any changes made to the general scene settings within the 'dynamic settings panel' on the right will be saved by the software when it is closed. https://en.racelogic.support//Product_Info/Video_Data_Loggers/VBOX_Video_HD2/VBOX_Video_HD2_User_Guide/09_- _HD2_Setup_Software_Overview_-_macOS...
-
Page 71: Settings Bar
General Settings area, enabling you to define logging conditions, filenames, smoothing, video quality, audio behaviour, serial and Bluetooth settings. More information on this can be found here. To return to the scene designer, press the button in the top left corner of the General Settings area. https://en.racelogic.support//Product_Info/Video_Data_Loggers/VBOX_Video_HD2/VBOX_Video_HD2_User_Guide/09_- _HD2_Setup_Software_Overview_-_macOS... - Page 72 Selecting the button in the top left corner will take you back to the Scene Selector. If you have made any changes within your current scene, a popup will urge you to save any unsaved changes. https://en.racelogic.support//Product_Info/Video_Data_Loggers/VBOX_Video_HD2/VBOX_Video_HD2_User_Guide/09_- _HD2_Setup_Software_Overview_-_macOS...
- Page 73 Save to SD button allows you to save a scene file to an SD card or USB stick, which can then be uploaded to the VBOX Video HD2. IMPORTANT – Scenes cannot be named as 'default'. Note: If a scene is saved and a file with the same name exists on the card/stick, the original will automatically have the file type suffix changed from '.vvhsn' to '.bak' and the new one will be saved as normal.
-
Page 74: Channel Settings
Channel settings button opens up a Channel Settings window where you can configure CAN, OBD and Performance tests channels. For more information on each of these settings area, click on the relevant options below: • • • Performance tests https://en.racelogic.support//Product_Info/Video_Data_Loggers/VBOX_Video_HD2/VBOX_Video_HD2_User_Guide/09_- _HD2_Setup_Software_Overview_-_macOS... - Page 75 Elements can be selected by clicking and dragging the left mouse button. Once selected, they can also be moved by holding the left mouse button and manually dragging to a new location, or by using the keyboard arrow keys as explained below. https://en.racelogic.support//Product_Info/Video_Data_Loggers/VBOX_Video_HD2/VBOX_Video_HD2_User_Guide/09_- _HD2_Setup_Software_Overview_-_macOS...
- Page 76 Empty area options Manual zoom controls There are manual zoom options available at all times at the bottom of the software. Here, you are able to zoom in, zoom out, or return to full screen mode at any time. https://en.racelogic.support//Product_Info/Video_Data_Loggers/VBOX_Video_HD2/VBOX_Video_HD2_User_Guide/09_- _HD2_Setup_Software_Overview_-_macOS...
-
Page 77: Scene Settings
Scene settings When no element is selected, the dynamic settings panel will show general settings for the scene editor. https://en.racelogic.support//Product_Info/Video_Data_Loggers/VBOX_Video_HD2/VBOX_Video_HD2_User_Guide/09_- _HD2_Setup_Software_Overview_-_macOS... - Page 78 This setting can be turned on to aid with aligning text elements more easily. It is not recommended to leave this setting on all the time, as it will move elements slightly to snap to the grid every time they are re-located. https://en.racelogic.support//Product_Info/Video_Data_Loggers/VBOX_Video_HD2/VBOX_Video_HD2_User_Guide/09_- _HD2_Setup_Software_Overview_-_macOS...
- Page 79 When elements are included within the scene, you can use the 'Bring to front' or 'Send to back' buttons at the bottom of the settings bar to arrange the order in which they are viewed when overlapping each other. Bring to front button Send to back button https://en.racelogic.support//Product_Info/Video_Data_Loggers/VBOX_Video_HD2/VBOX_Video_HD2_User_Guide/09_- _HD2_Setup_Software_Overview_-_macOS...
- Page 80 Elements can also be ordered by right clicking on the element(s). Right click order options Menu Bar The Apple menu bar contains software version information and a list of software functions. https://en.racelogic.support//Product_Info/Video_Data_Loggers/VBOX_Video_HD2/VBOX_Video_HD2_User_Guide/09_- _HD2_Setup_Software_Overview_-_macOS...
- Page 81 VBOX Video This menu contains an 'About' option which will display the current software version being used. https://en.racelogic.support//Product_Info/Video_Data_Loggers/VBOX_Video_HD2/VBOX_Video_HD2_User_Guide/09_- _HD2_Setup_Software_Overview_-_macOS...
- Page 82 These menus contain a list of functions and their corresponding hotkeys/ shortcuts that can be used within the software. More information on these can be found here. Help Selecting 'VBOX Video Help' will open this software manual online within the Racelogic Support Centre. https://en.racelogic.support//Product_Info/Video_Data_Loggers/VBOX_Video_HD2/VBOX_Video_HD2_User_Guide/09_- _HD2_Setup_Software_Overview_-_macOS...
- Page 83 Move selected element up Down arrow ↓ Move selected element down Command + Left arrow ← Move selected element left slowly Command + Right arrow → Move selected element right slowly Command + Up arrow ↑ Move selected element up slowly https://en.racelogic.support//Product_Info/Video_Data_Loggers/VBOX_Video_HD2/VBOX_Video_HD2_User_Guide/09_- _HD2_Setup_Software_Overview_-_macOS...
- Page 84 Quit VBOX Video Command + S Save scene to library Command + U Ungroup selected elements Command + V Paste copied element Command + X Cut selected element Command + Z Undo Command + Shift + Z Redo https://en.racelogic.support//Product_Info/Video_Data_Loggers/VBOX_Video_HD2/VBOX_Video_HD2_User_Guide/09_- _HD2_Setup_Software_Overview_-_macOS...
- Page 85 Controls Function Magic mouse double tap Zoom in/ out • Swipe left/ right through general settings Magic mouse swipe • Pan when zoomed in https://en.racelogic.support//Product_Info/Video_Data_Loggers/VBOX_Video_HD2/VBOX_Video_HD2_User_Guide/09_- _HD2_Setup_Software_Overview_-_macOS...
- Page 86 10 - HD2 Technical Properties VBOX Video HD2 - Cable VBOX Video HD2 - CAN Output Identification Format VBOX Video HD2 - Technical VBOX Video HD2 - PIN OUTS Specification VBOX Video HD2 - Upgrading The Firmware and Software https://en.racelogic.support//Product_Info/Video_Data_Loggers/VBOX_Video_HD2/VBOX_Video_HD2_User_Guide/10_-...
- Page 87 VBOX Video HD2 - Cable Identification Click here for a printable PDF. https://en.racelogic.support//Product_Info/Video_Data_Loggers/VBOX_Video_HD2/VBOX_Video_HD2_User_Guide/10_- _HD2_Technical_Properties/VBOX_Video_HD2_-_Cable_Identification...
- Page 88 VBOX Video HD2 - CAN Output Format Data format: Motorola Baud rate: 500 kbit/s Data Bytes Update ID** Rate 0x301 100 ms (2) Time since midnight UTC (3) Position – Latitude MMMM.MMMMM Sats 0x302 100 ms (4) Position – Longitude MMMM.MMMMM (5) Velocity (kts) (6) Heading (°)
- Page 89 22. Video file primary number is the number which matches the .vbo file number. 23. Video file fragment number is the number of video files since logging started. 24. Video time is the number of milliseconds since the video file started. https://en.racelogic.support//Product_Info/Video_Data_Loggers/VBOX_Video_HD2/VBOX_Video_HD2_User_Guide/10_- _HD2_Technical_Properties/VBOX_Video_HD2_-_CAN_Output_Format...
- Page 90 Logging (set when 0x10 logging) 0x20 Memory full (set when the 0x40 currently active media is too full for logging) Media fitted (set when there is at least one 0x80 media device available, even if it’s full) https://en.racelogic.support//Product_Info/Video_Data_Loggers/VBOX_Video_HD2/VBOX_Video_HD2_User_Guide/10_- _HD2_Technical_Properties/VBOX_Video_HD2_-_CAN_Output_Format...
- Page 91 Second Status Flags (11) Mask Description 0x01 Alive (always set) 0x02 0x04 0x08 0x10 0x20 DGPS corrections active 0x40 Eastern hemisphere 0x80 Southern hemisphere https://en.racelogic.support//Product_Info/Video_Data_Loggers/VBOX_Video_HD2/VBOX_Video_HD2_User_Guide/10_- _HD2_Technical_Properties/VBOX_Video_HD2_-_CAN_Output_Format...
- Page 92 VBOX Video HD2 - PIN OUTS Rear View of VBOX Video HD2 Connector 1 - POWER (Lemo 2 PIN) Function Power+ Ground https://en.racelogic.support//Product_Info/Video_Data_Loggers/VBOX_Video_HD2/VBOX_Video_HD2_User_Guide/10_- _HD2_Technical_Properties/VBOX_Video_HD2_-_PIN_OUTS...
- Page 93 Function Chassis Ground https://en.racelogic.support//Product_Info/Video_Data_Loggers/VBOX_Video_HD2/VBOX_Video_HD2_User_Guide/10_- _HD2_Technical_Properties/VBOX_Video_HD2_-_PIN_OUTS...
- Page 94 Connector 2 / 3 - Camera Inputs (Lemo 9 PIN) Function Ground Data Data Ground Camera Power (4V) Chassis Data Data Camera Power (4V) https://en.racelogic.support//Product_Info/Video_Data_Loggers/VBOX_Video_HD2/VBOX_Video_HD2_User_Guide/10_- _HD2_Technical_Properties/VBOX_Video_HD2_-_PIN_OUTS...
- Page 95 Connector 4 - CAN / SER (Lemo 5 PIN) Function RS232 Tx RS232 Rx CAN High CAN Low +V Power https://en.racelogic.support//Product_Info/Video_Data_Loggers/VBOX_Video_HD2/VBOX_Video_HD2_User_Guide/10_- _HD2_Technical_Properties/VBOX_Video_HD2_-_PIN_OUTS...
- Page 96 Connector 5 - USB (Lemo 5 PIN) Function USB - ID Ground USB 5 V https://en.racelogic.support//Product_Info/Video_Data_Loggers/VBOX_Video_HD2/VBOX_Video_HD2_User_Guide/10_- _HD2_Technical_Properties/VBOX_Video_HD2_-_PIN_OUTS...
- Page 97 Connector 6 - MIC (Lemo 4 PIN) Function Microphone - left channel Ground Ground Microphone - right channel https://en.racelogic.support//Product_Info/Video_Data_Loggers/VBOX_Video_HD2/VBOX_Video_HD2_User_Guide/10_- _HD2_Technical_Properties/VBOX_Video_HD2_-_PIN_OUTS...
- Page 98 Connector 7 - GPS Antenna Function Centre RF Signal Chassis Ground https://en.racelogic.support//Product_Info/Video_Data_Loggers/VBOX_Video_HD2/VBOX_Video_HD2_User_Guide/10_- _HD2_Technical_Properties/VBOX_Video_HD2_-_PIN_OUTS...
-
Page 99: Gps Specification
VBOX Video HD2 - Technical Specification Camera specifications are available here. GPS Specification Velocity Accuracy 0.1 km/h (averaged over 4 samples) Units km/h or mph Update Rate 10 Hz Maximum Velocity 1000 mph Minimum Velocity 0.5 km/h Resolution 0.01 km/h... - Page 100 0.01 s Definitions * Circle of Error Probable (CEP): 95 % of the time the position readings will fall within a circle of the stated diameter ** Not using DGPS and crossing the start/finish line at 100 km/h https://en.racelogic.support//Product_Info/Video_Data_Loggers/VBOX_Video_HD2/VBOX_Video_HD2_User_Guide/10_- _HD2_Technical_Properties/VBOX_Video_HD2_-_Technical_Specification...
-
Page 101: Recording Options
Standard library of gauges, fonts etc User definable gauges, fonts etc Alerts: Text and images can change when a parameter is over / under a desired limit Resolution 1920 x 1080p at 30 or 60 frames per second https://en.racelogic.support//Product_Info/Video_Data_Loggers/VBOX_Video_HD2/VBOX_Video_HD2_User_Guide/10_- _HD2_Technical_Properties/VBOX_Video_HD2_-_Technical_Specification... -
Page 102: Compression Options
7 GB per hour (high); 5.25 GB per hour (medium); 3.5 GB per hour (low). Typical values - can vary according to conditions Storage Options SD card (Fast SD card required) - up to 512 GB supported Optional USB adaptor for USB flash drives (fast USB drive required) https://en.racelogic.support//Product_Info/Video_Data_Loggers/VBOX_Video_HD2/VBOX_Video_HD2_User_Guide/10_- _HD2_Technical_Properties/VBOX_Video_HD2_-_Technical_Specification... - Page 103 HDMI Output (V6 HDMI unit) Version HDMI 1.3 with EIA/CEA-861-D video format support Maximum Video Pixel Rate 74.25 MHz at output resolution of 1920 x 1080 30 Hz Audio Channels Stereo LPCM 16 bit Audio Sample Rate 48 kHz https://en.racelogic.support//Product_Info/Video_Data_Loggers/VBOX_Video_HD2/VBOX_Video_HD2_User_Guide/10_- _HD2_Technical_Properties/VBOX_Video_HD2_-_Technical_Specification...
-
Page 104: Environmental And Physical
• Recorder: 0 – 65°C (for temperatures of 50 – 65°C, the Harsh Environment Fan Accessory recommended) Operating Temperature • Camera: -10°C to +60°C IMPORTANT - The ambient operating temperature should not exceed 65°C Storage Temperature -20°C to +85°C https://en.racelogic.support//Product_Info/Video_Data_Loggers/VBOX_Video_HD2/VBOX_Video_HD2_User_Guide/10_- _HD2_Technical_Properties/VBOX_Video_HD2_-_Technical_Specification... - Page 105 VBOX Video HD2 - Updating the Firmware and Software Upgrading HD2 Firmware Occasionally Racelogic will release new versions of firmware (internal code) for the HD2, often to introduce new features, information about the newest firmware update can be found here.
- Page 106 If you own more than one set of cameras, e.g. as part of a 2nd car HD2 accessory kit, you will have to update the firmware with each set of cameras plugged into the unit, using the same firmware upgrade file. https://en.racelogic.support//Product_Info/Video_Data_Loggers/VBOX_Video_HD2/VBOX_Video_HD2_Updates/ VBOX_Video_HD2_-_Updating_the_Firmware_and_Software...
- Page 107 The latest database file can be downloaded from here. To update your VBOX Video HD2 with the latest track database, please download the file and install it by following this procedure: •...
- Page 108 To view the latest track list, click on the image below. https://en.racelogic.support//Product_Info/Video_Data_Loggers/VBOX_Video_HD2/VBOX_Video_HD2_Updates/ VBOX_Video_HD2_-_Updating_the_Firmware_and_Software...
- Page 109 It will then give the option to download and install the update. IMPORTANT – Microsoft Windows 7 SP1 and VBOX Video HD2 Firmware version V1.3.72 or newer is required Upgrading Circuit Tools Software For information on upgrading Circuit Tools software, click here.
Need help?
Do you have a question about the VBOX Video HD2 and is the answer not in the manual?
Questions and answers