Advertisement
Quick Links
Quick Start Guide – VBOX Video HD2 (v1-5)
Introduction
The VBOX Video HD2 system is a twin camera 1080p video system, with a live time graphical overlay display. The HD2
is compatible with existing OLED systems, as well as Racelogic modules such as the Micro Input Module and Mini Input
Module.
The system is supplied with VBOX Video HD2 setup software, which allows the user to fully customise the graphical
overlay and configure CAN channels to be captured from a connected vehicle CAN bus, or Racelogic module.
VBOX Video Registration
So that Racelogic can continue to provide you with notification of the latest software releases, firmware upgrades and to
offer technical support, please register your VBOX Video.
Please register your unit here.
What's included in the kit
The standard inventory and optional extras available for the VBOX Video HD2 are listed below.
VBOX Video HD2 Standard Inventory
Description
VBOX Video HD2 Unit
VBOX Video 1080p Camera (3 m),
IP65 Rated
Mono Microphone (2.5 m)
Lightweight Windscreen Suction
Mount
VBOX_Video_HD2_(v1-5)/Quick_Start_Guide_%E2%80%93_VBOX_Video_HD2_(v1-5)/Quick_Start_Guide_%E2%80%93_VBOX_Video_HD2_(v1-5)
Quantity
1
1 or 2 (dependent on package)
1
2
https://en.racelogic.support//Product_Info/Video_Data_Loggers/VBOX_Video_HD2/
Product Code
VBVDHD2
RLACS222
RLACS221
RLACS287
1
Advertisement

Related Manuals for Racelogic VBVDHD2


Summary of Contents for Racelogic VBVDHD2
- Page 1 The VBOX Video HD2 system is a twin camera 1080p video system, with a live time graphical overlay display. The HD2 is compatible with existing OLED systems, as well as Racelogic modules such as the Micro Input Module and Mini Input Module.
- Page 2 RLVBMICIN01L Mini Input Module RLVBMIM01 CAN Gateway RLVBCGW01 CAN Cables – OBD/Unterminated RLCAB069L RLCAB015L Clip on CAN bus Interface RLACS182-L Bluetooth Remote Start/Stop Logging Switch RLACS224 Heavy-Duty Camera Clamp RLACS270 Roll Cage Mount RLACS286 Roll Cage Bracket RLACS267 https://en.racelogic.support//Product_Info/Video_Data_Loggers/VBOX_Video_HD2/ VBOX_Video_HD2_(v1-5)/Quick_Start_Guide_%E2%80%93_VBOX_Video_HD2_(v1-5)/Quick_Start_Guide_%E2%80%93_VBOX_Video_HD2_(v1-5)
-
Page 3: Hardware Overview
Quick Release Unit Mounting Bracket RLACS258 Roll Cage Unit Mount RLACS268 Harsh Environment Fan RLACS247 Second Car Kit RLACS274 Tyre Temperature Monitoring System RLACS272 Tyre Temperature Monitoring System RLACS182L Clip-on CAN bus Interface RLACS298 LIVEU Solo HDMI RLACS333-L Hardware Overview https://en.racelogic.support//Product_Info/Video_Data_Loggers/VBOX_Video_HD2/ VBOX_Video_HD2_(v1-5)/Quick_Start_Guide_%E2%80%93_VBOX_Video_HD2_(v1-5)/Quick_Start_Guide_%E2%80%93_VBOX_Video_HD2_(v1-5) -
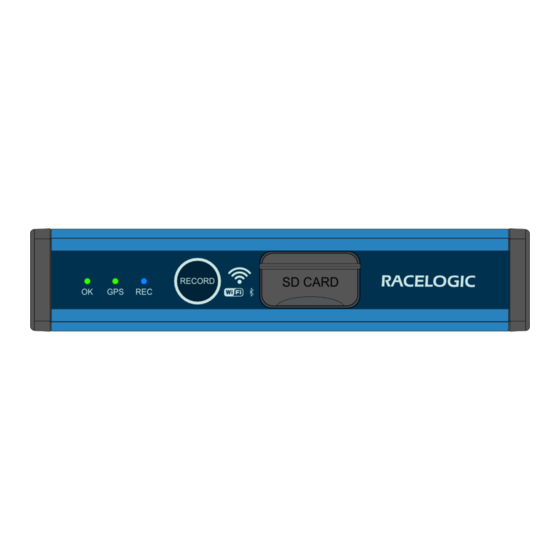
Page 4: Front Panel
If two solid green LEDs are shown, the system is ready to record. If the system is permanently fitted to a vehicle, it should be possible to view the front panel when it is mounted. A brief overview of the LED behaviour is below. https://en.racelogic.support//Product_Info/Video_Data_Loggers/VBOX_Video_HD2/ VBOX_Video_HD2_(v1-5)/Quick_Start_Guide_%E2%80%93_VBOX_Video_HD2_(v1-5)/Quick_Start_Guide_%E2%80%93_VBOX_Video_HD2_(v1-5) - Page 5 LED works on a simple ‘traffic light’ style system. Status LED System Error Not ready to record (either no GPS or no SD Card USB Orange Memory OK) Green Ready to record – system all OK Blue Recording – DO NOT REMOVE MEDIA https://en.racelogic.support//Product_Info/Video_Data_Loggers/VBOX_Video_HD2/ VBOX_Video_HD2_(v1-5)/Quick_Start_Guide_%E2%80%93_VBOX_Video_HD2_(v1-5)/Quick_Start_Guide_%E2%80%93_VBOX_Video_HD2_(v1-5)
-
Page 6: Hardware Setup
20 cm between the radio system and the camera units and cables to avoid any video interference problems. 1. Mount the GPS antenna in the centre of the roof of the vehicle, away from roof bars and other antennas. For more information on antenna mounting positions, click here. https://en.racelogic.support//Product_Info/Video_Data_Loggers/VBOX_Video_HD2/ VBOX_Video_HD2_(v1-5)/Quick_Start_Guide_%E2%80%93_VBOX_Video_HD2_(v1-5)/Quick_Start_Guide_%E2%80%93_VBOX_Video_HD2_(v1-5) - Page 7 VBOX_Video_HD2_(v1-5)/Quick_Start_Guide_%E2%80%93_VBOX_Video_HD2_(v1-5)/Quick_Start_Guide_%E2%80%93_VBOX_Video_HD2_(v1-5)
- Page 8 2. Connect the GPS antenna to the VBOX Video HD2. 3. Attach one of the cameras to the windscreen using the forward facing camera mount. Keep the camera level by ensuring ‘Racelogic’ faces upwards. https://en.racelogic.support//Product_Info/Video_Data_Loggers/VBOX_Video_HD2/ VBOX_Video_HD2_(v1-5)/Quick_Start_Guide_%E2%80%93_VBOX_Video_HD2_(v1-5)/Quick_Start_Guide_%E2%80%93_VBOX_Video_HD2_(v1-5)
- Page 9 4. Connect this camera to ‘CAM1’ 5. Connect the second camera to the window, or desired mounting position. https://en.racelogic.support//Product_Info/Video_Data_Loggers/VBOX_Video_HD2/ VBOX_Video_HD2_(v1-5)/Quick_Start_Guide_%E2%80%93_VBOX_Video_HD2_(v1-5)/Quick_Start_Guide_%E2%80%93_VBOX_Video_HD2_(v1-5)
- Page 10 6. Connect this camera to ‘CAM2’. 7. Connect the microphone to the ‘MIC’ input. https://en.racelogic.support//Product_Info/Video_Data_Loggers/VBOX_Video_HD2/ VBOX_Video_HD2_(v1-5)/Quick_Start_Guide_%E2%80%93_VBOX_Video_HD2_(v1-5)/Quick_Start_Guide_%E2%80%93_VBOX_Video_HD2_(v1-5)
- Page 11 8. Connect the power via the 'POWER' socket, the HD2 takes about 45 seconds to fully boot. IMPORTANT The HD2 will draw an initial current of approximately 2 A on start-up, for the unit to function correctly, please ensure that your power supply can provide this. https://en.racelogic.support//Product_Info/Video_Data_Loggers/VBOX_Video_HD2/ VBOX_Video_HD2_(v1-5)/Quick_Start_Guide_%E2%80%93_VBOX_Video_HD2_(v1-5)/Quick_Start_Guide_%E2%80%93_VBOX_Video_HD2_(v1-5)
- Page 12 VBOX_Video_HD2_(v1-5)/Quick_Start_Guide_%E2%80%93_VBOX_Video_HD2_(v1-5)/Quick_Start_Guide_%E2%80%93_VBOX_Video_HD2_(v1-5)
- Page 13 For customers not on the latest version of Firmware (V 1.2.45 onwards), the SSID of the unit will be 'VBoxVideo' followed by the serial number and the password is ‘racelogic’. Note: We recommend that customers update to the latest firmware version as the Apps are not fully backwards compatible.
- Page 14 11. Take the car outside and wait for the VBOX Video HD2 to gain satellite lock. The GPS LED should show solid Green. https://en.racelogic.support//Product_Info/Video_Data_Loggers/VBOX_Video_HD2/ VBOX_Video_HD2_(v1-5)/Quick_Start_Guide_%E2%80%93_VBOX_Video_HD2_(v1-5)/Quick_Start_Guide_%E2%80%93_VBOX_Video_HD2_(v1-5)
- Page 15 If you have come to a stop, but the LED is on, press the 'RECORD' button to stop the video before removing the card. Sometimes, due to poor satellite visibility in a garage or close to a building, the box may start recording, even if the car is stationary. Always check the Blue LED before ejecting the card. https://en.racelogic.support//Product_Info/Video_Data_Loggers/VBOX_Video_HD2/ VBOX_Video_HD2_(v1-5)/Quick_Start_Guide_%E2%80%93_VBOX_Video_HD2_(v1-5)/Quick_Start_Guide_%E2%80%93_VBOX_Video_HD2_(v1-5)
- Page 16 It is recommended that any logging media used with a VBOX Video HD2 has a write speed of above 7 MB/s (4 MB/s absolute minimum) and a speed class of 10 (4 absolute minimum). Racelogic recommend good quality logging media to ensure best results.
Need help?
Do you have a question about the VBVDHD2 and is the answer not in the manual?
Questions and answers