
Related Manuals for Wohler SM 500


Summary of Contents for Wohler SM 500
- Page 1 Bedienungsanleitung Kondensatabscheidemodul Wöhler SM 500 Operating manual Wöhler SM 500 – condensate trap module Istruzioni d‘uso Filtro a graniglia per Wöhler SM 500...
-
Page 2: Table Of Contents
Inhalt Inhalt Allgemeines ........... 3 Informationen zur Bedienungsanleitung ..3 Bestimmungsgemäße Verwendung ....3 Herstelleranschrift ......... 3 Einbau des Kondensatabscheidemoduls ....4 Austausch der Kieselgel Perlen ..5 Garantie und Service ......6 Garantie ............6 Service ............6 Verbrauchsmaterial ......6... -
Page 3: Allgemeines
Für Schäden, die aufgrund der Nichtbeachtung dieser Bedienungsanleitung entstehen, überneh- men wir keine Haftung. Bestimmungsgemäße Das Kondensatabscheidemodul Wöhler SM 500 darf ausschließlich in das Wöhler SM 500 Staub- Verwendung messgerät eingebaut werden. Es ist mit dem Kieselgel in Perlform, Artikel 9522 zu befüllen. -
Page 4: Einbau Des
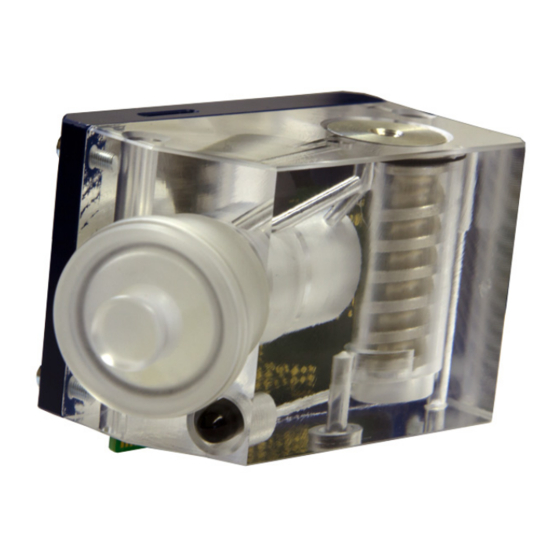
Montieren Sie das Kondensatabscheidemodul • wie folgt zwischen Gasweg und O Sensor. WARNUNG! Schalten Sie das Wöhler SM 500 vor dem Einbau des Kondensatabscheidemoduls aus! Lösen Sie mit einem Schlitzschraubenzieher • die beiden Metallstifte der Sensoren. Ziehen Sie das CO-Modul und das O -Modul •... -
Page 5: Austausch Der Kieselgel Perlen
Austausch der Kieselgel Perlen • Montieren Sie die beiden Sensormodule wie gewohnt über dem Kondensatabscheidemo- dul. HINWEIS! Das obere Modul ist das CO-Modul, das untere ist das O -Modul. Abb. 3: Kondensatabeidemodul zwischen Gasweg und O Sensor montiert Austausch der Kieselgel Perlen WARNUNG! Kieselgel nach Augenkontakt mit reichlich Wasser ausspülen. -
Page 6: Garantie Und Service
Garantie und Service Garantie und Service Garantie Jedes Kondensatabscheidemodul Wöhler SM 500 wird im Werk in allen Funktionen geprüft und ver- lässt unser Werk erst nach einer ausführlichen Qualitätskontrolle. Bei sachgemäßem Gebrauch beträgt die Garan- tiezeit auf das 12 Monate ab Verkaufsdatum. - Page 7 Contents Contents General Information ......8 Operation Manual Information ...... 8 Proper Use............. 8 Manufacturer..........8 Installing the condensate trap module Replacing silica gel beads ....10 Warranty and Service ......11 Warranty ............11 Service ............11 Consumables ........11...
-
Page 8: General Information
General Information General Information Operation Manual This operation manual allows you to safety work with the Wöhler SM 500 condensate trap module. Information Please keep this manual for your information. The Wöhler SM 500 condensate trap module should be used by trained professionals for its intended use only. -
Page 9: Installing The Condensate Trap Module
Install the condensate trap module as follows • between the gas path and O sensor. WARNING! Switch off the Wöhler SM 500 before installing the condensate trap module! • Using a flat-bladed screwdriver undo both metal pins securing the sensors. -
Page 10: Replacing Silica Gel Beads
Replacing silica gel beads Mount both sensor modules on top of the • condensate trap module in the usual manner. NOTE! The top module is the CO module; the lower mod- ule is the O module. Fig. 3: Condensate trap module installed between gas path and sensor Replacing silica gel beads... -
Page 11: Warranty And Service
Warranty and Service Warranty and Service Warranty Each Wöhler SM 500 condensate trap module will be tested in all functions and will leave our factory only after extensive quality control testing. The final control will be recorded in detail in a test re- port and delivered with any unit. - Page 12 Istruzioni sulle istruzioni ......13 Indicazioni nelle istruzioni ......13 Produttore ........... 13 Installazione del filtro a graniglia per Wöhler SM 500 ........14 Sostituzione die granuli silicagel ..15 Garanzia ed assistenza ...... 16 Garantie ............16 Assistenza tecnica........16 Materiale di consumo ......
-
Page 13: Informazioni Generali
Wöhler SM 500. Conservare le istruzioni sempre insieme allo strumento . Il filtro a graniglia per Wöhler SM 500 deve essere usato esclusivamente da personale qualificato per gli impiaghi previsti. Non rispondiamo per danni causati dall’inosservanza delle presenti istruzioni... -
Page 14: Installazione Del Filtro A Graniglia Per Wöhler Sm 500
• elettrochimiche O e CO nel Wöhler SM 500 ATTENZIONE! Spegne il Wöhler SM 500 e estrarre la spina dalla presa prima di incominciare con il montaggio del filtro a graniglia! Svitare le viti di fissaggio dei due moduli con •... -
Page 15: Sostituzione Die Granuli Silicagel
Sostituzione die granuli silicagel • Rimontare i due moduli sensori CO e O sopra il filtro a graniglia e fissare le loro viti senza troppa forza. INDICAZIONI! Il modulo superiore è quello del sensore CO, quel- lo inferiore il modulo O Fig. -
Page 16: Garanzia Ed Assistenza
Garanzia ed assistenza Garanzia ed assistenza Garantie Ogni filtro per Wöhler SM 500 viene controllato in fabbrica sulla sua funzione e lascia lo stabilimento solo dopo un accurato controllo di qualità. Il con- trollo finale viene riportato nel certificato di cali- brazione. -
Page 17: Points Of Sale And Service
Gneisenaustr.12 www.woehler.de 80992 München Tel.: +49 89 1589223-0 Fax: +49 89 1589223-99 sued@woehler.de Czech Republic Wohler USA Inc. Wöhler Bohemia s.r.o. 5 Hutchinson Drive Za Naspern 1993 Danvers, MA 01923 393 01 Pelhrimov Tel.: +1 978 750 9876 Tel.: +420 565 323 076 Fax.: +1 978 750 9799...
Need help?
Do you have a question about the SM 500 and is the answer not in the manual?
Questions and answers