Table of Contents
Advertisement
Quick Links
VIS 2000
Contents
1.
Introduction ............................... 2
2.
Components and Controls ... 3
3.
Technical Specifications ...... 5
4.
Getting Started ......................... 6
5.
Using the KEY Menus ............ 7
6.
Capturing Images ................... 8
7.
Reviewing Images and
Videos ....................................... 10
PRO
DC Monitor
INNOVATION - QUALITY - VALUE
q
8.
Using the Gallery Menu .......... 11
9.
11. Troubleshooting ....................... 19
12. Warranty ..................................... 22
Advertisement
Table of Contents

Related Manuals for Wohler VIS 2000 PRO


Summary of Contents for Wohler VIS 2000 PRO
-
Page 1: Table Of Contents
VIS 2000 DC Monitor Contents Introduction ....... 2 Using the Gallery Menu ..11 Components and Controls ... 3 Configuring the PRO Monitor 14 Technical Specifications ..5 10. Transferring Images to a PC 19 Getting Started ......6 11. Troubleshooting ....... 19 Using the KEY Menus .... -
Page 2: Introduction
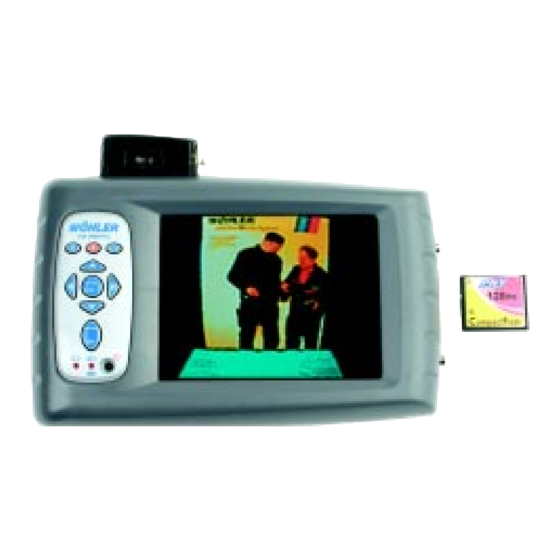
1. Introduction VIS 2000 DC Monitor 1. Introduction 1.1 About the Wöhler PRO DC monitor The PRO DC monitor (PRO) is a unique product that provides a convenient way of capturing still images or video clips to a removable CompactFlash card. It is compatible with both NTSC and PAL, composite or S-video signals, and a built-in LCD display allows you to preview the video before saving it to the memory card. -
Page 3: Components And Controls
2. Components and Controls VIS 2000 DC Monitor and ease of transport and has a flip out sun visor for outdoor viewing. The PRO monitor also comes with a power supply unit (PSU) for recharging the internal batteries or for direct 120V AC operation. - Page 4 2. Components and Controls VIS 2000 DC Monitor 2.2 Front Panel Controls The diagram below shows the function of each of the PRO monitor front panel controls and connections: Pro Monitor controls: Picture index Record picture or video Pause/freeze screen Mode menu (bright/contrast/color/spot) 5a,b,c,d...
-
Page 5: Technical Specifications
3. Technical Specifications VIS 2000 DC Monitor Inputs: Auto selecting Composite (CVBS)/ S-Video (Y/C) Connectors: Camera - 8 pin Composite – Phono S-Video – 4-pin mini-DIN Media: Flash memory: CompactFlash Type I & II cards (128 MB supplied) Capacity (max.): CompactFlash File system: Capacity: Root directory –... -
Page 6: Getting Started
4. Getting Started VIS 2000 DC Monitor 4. Getting Started This chapter provides a general overview of the PRO monitor to get you started as quickly as possible. More detailed instructions on the various menu features will be discussed in following chapters. -
Page 7: Using The Key Menus
5. Using the Key Menus VIS 2000 DC Monitor Woehler ( R E V 1 . 00F ) A U T O VIDEO IN V I D E O S I G N A L N T SC S – V I D E O N T SC C O M P O S I T E P A L... -
Page 8: Capturing Images
6. Capturing Images VIS 2000 DC Monitor To move between menu options ° ° ° ° ° Press v or b. To select an option ° ° ° ° ° Press n To exit from the current menu ° ° ° ° ° Press menu/esc. NOTE: NOTE: Pressing menu/esc at any stage generally exits from the current function and NOTE:... - Page 9 6. Capturing Images VIS 2000 DC Monitor 6.2 Freezing an image To freeze the video image: ° ° ° ° ° Press II (No. 3 Fig. 2) When the video image is frozen the display shows: S T I L L °...
-
Page 10: Videos
6. Capturing Images VIS 2000 DC Monitor ° ° ° ° ° Press OK and start recording. Alternatively, to cancel video capture press b to highlight CANCEL and press MODE/OK to select it, or press menu/esc. While video is being captured the display shows: R E C O R D I N G °... -
Page 11: Using The Gallery Menu
7. Reviewing Images and Videos VIS 2000 DC Monitor already displaying the most recent files in the current folder the filename indicator will wrap to the first image in the top left corner of the image gallery. 7.5 To display an image at full size, or replay a video clip °... - Page 12 8. Using the Gallery Menu VIS 2000 DC Monitor Option Description: MARK Allows you to mark several thumbnails and then apply a function to all the marked files. DELETE Deletes the selected file or marked files. MOVE Moves the selected file or marked files to another folder. COPY Copies the selected file or marked files to another folder.
- Page 13 8. Using the Gallery Menu VIS 2000 DC Monitor ° ° ° ° ° Proceed as described in the appropriate section below to perform the operation on the marked files. 8.2.1 To delete one or more files ° ° ° ° ° Highlight DELETE on the Gallery menu and press OK to select it. A DELETE menu will be displayed to allow you to confirm that you want to delete the selected file or marked files.
-
Page 14: Configuring The Pro Monitor
9. Configuring the PRO-Monitor VIS 2000 DC Monitor 8.2.4 To change the current folder ° ° ° ° ° Highlight FOLDER in the Gallery menu and press OK to select it. A SELECT FOLDER menu will show a list of the names of the folders on the CompactFlash card. °... - Page 15 9. Configuring the PRO-Monitor VIS 2000 DC Monitor To scroll up and down the main menu selections use the v and b keys. To enter a selection and to view the submenu: ° Press Video settings The VIDEO STANDARD, IMAGE FREEZE, and RECORD TIME options on the Main Menu allow you to configure the video operation of the PRO monitor.
- Page 16 9. Configuring the PRO-Monitor VIS 2000 DC Monitor 9.2.3 To specify the record time This option allows you to select the maximum length of video clips. LONG allows maximum recording time but clips will only replay correctly in half-size image mode under QuickTime. SHORT limits the recording time to half that of LONG clips, but clips will replay correctly in any QuickTime mode.
- Page 17 9. Configuring the PRO-Monitor VIS 2000 DC Monitor M A I N M E N U – – – – – – – – – D I S P L A Y O R I E N T A T I O N > S e l e c t —...
- Page 18 9. Configuring the PRO-Monitor VIS 2000 DC Monitor File System Utilities The next group of options on the Main Menu allow you to format a CompactFlash card, and work with the folders on a card. M A I N M E N U –...
-
Page 19: Transferring Images To A Pc
9. Configuring the PRO-Monitor VIS 2000 DC Monitor Toggle to the line you wish from the menu. ° ° ° ° ° Press OK to enter and toggle between ON, OFF using the v or b keys. ° ° ° ° ° Use OK to select. The choice will immediately show on the screen and the submenu will disappear. - Page 20 11. Troubleshooting VIS 2000 DC Monitor 11.1 Why can’t I display images from the gallery? Images can only be displayed if they were captured using the same video standard as the current setting of the PRO monitor. Either switch off the PRO monitor, connect an appropriate video source, and switch it on again so the auto-detection selects the new video standard, or set the VIDEO STANDARD option to NTSC or PAL;...
- Page 21 11. Troubleshooting VIS 2000 DC Monitor O O Indicates a bad battery. Please contact Wöhler USA. ¤ O Short beep, fast flash New battery/temp. test 3 sec. ¤ O Slow Flash Softstart charge 3-4 min. • ¤ Steady ON / slow flash Main charge 3-4 hrs.
-
Page 22: Warranty
DC Monitor 12. Warranty – Please read fully! Warranty VIS 2000 PRO DC Monitor VIS2000 PRO DC Hardware: WöhlerUSA Inc. warrants to the original end user (Customer) that this product will be free from defects in workmanship and materials, under normal use, for one year from the date of original purchase from WöhlerUSA Inc. - Page 23 12. Warranty VIS 2000 DC Monitor Warranties Exclusive: If this product does not operate as warranted above, the Customer’s sole remedy for breach of that warranty shall be replacement or repair of the product or part. To the full extent allowed by law, the foregoing warranties and remedies are exclusive and are in lieu of all other warranties, terms, or conditions, express or implied, either in fact or by operation of law, statutory or otherwise, including warranties, terms, or conditions of merchantability, fitness for a particular purpose, satisfactory quality, correspondence with...
Need help?
Do you have a question about the VIS 2000 PRO and is the answer not in the manual?
Questions and answers