Wohler VIS 250 Operating Manual
Service camera
Hide thumbs
Also See for Wohler VIS 250:
- Operating manual (45 pages) ,
- Operating manual (45 pages) ,
- Operating manual (40 pages)

Related Manuals for Wohler Wohler VIS 250


Summary of Contents for Wohler Wohler VIS 250
- Page 1 Test Equipment Depot - 800.517.8431 - 99 Washington Street Melrose, MA 02176 TestEquipmentDepot.com Operating manual Service Camera Wöhler VIS 200 / 250 Wöhler VIS 300 / 350 The measure of technology...
-
Page 2: Table Of Contents
Contents Contents General Information ......5 Information about the operating instructions . 5 Notes ............. 5 Proper use ............. 6 Scope of supply ..........6 Transporting ..........7 Information on disposal ......... 7 Manufacturer's address ......... 7 Important information ......8 Camera Models ........ - Page 3 Contents Selecting the unit: Wöhler VIS 200 ....27 Getting started ........28 Rechargeable battery status and recharging28 Working position .......... 30 Working with the camera ....30 Switching on the system and monitor ..30 Memory (Wöhler VIS 250 / 350) ....32 Inspection ............
- Page 4 Contents Warranty Wohler VIS Service Camera ..............46 Points of sale and service ......49...
-
Page 5: General Information
General Information General Information Information about the Read these operating instructions carefully. They will enable you to operate the Wöhler VIS 200/250 operating instructions and VIS 300/350 safely. Keep this manual for your information This manual refers to different camera models. Therefore it may include instructions which do not apply to your camera. -
Page 6: Proper Use
General Information Proper use The Camera is designed to visually inspect and document the condition of pipes and shafts, for example in flue gas systems, ventilation systems as well as for inspecting underground pipes etc. The device is designed to be used by trained pro- fessionals only. -
Page 7: Transporting
General Information Transporting To avoid damage occurring during transport it is imperative that the instrument is transported in the original case designed for the purpose. Information on disposal Do not dispose of electronic equipment in domes- tic waste. Dispose of electronic equipment in ac- cordance with applicable environmental regula- tions. -
Page 8: Important Information
Important information Important information Eye protection WARNING! Never point a connected camera head at your own or somebody else's eyes when the camera is switched on. The LEDs are extremely bright and can cause eye damage. WARNING! Guide the rod with due care and attention. As the rod is made of flexible material, it can make whip- ping movements if it slips. - Page 9 Important information Resistance to water CAUTION! Only the camera head and the rod are waterproof. Keep the camera system dry and away from wa- ter! Resistance to impacts CAUTION! The camera system is not impact resistant. Do not throw or allow the case to fall! Accessories CAUTION! Use only original Wöhler accessories and spare...
-
Page 10: Camera Models
Camera Models Camera Models Different camera models Wöhler VIS can be acquired. The difference between the mod- els described in this version are as follows: VIS 200 VIS 350 VIS 300 VIS 250 Camera head Ø 1 ½ " Ø 1 ½ " Ø... -
Page 11: Technical Data
Technical data Technical data Monitor Description Details TFT display 7"/ 16:9 and 4:3 format (Default 16:9) Weight 14 oz Dimensions housing 6,9 x 4,5 x 1,3 " Video output FBAS signal Power supply via camera system Voltage 12 V Fig. 1: Monitor Operating tempera- 32 ... -
Page 12: Miniature Camera Head (Wöhler Vis 300/350)
Technical data Miniature Camera Head Description Details (Wöhler Type: 1/3" COLOR CMOS VIS 300/350) Light sensitivity 12 V, Lux sec Lens: f = 0.09", F = 0.10" Viewing angle: 120° Light source: 12 white LEDs Dimensions Ø 1 ½ " x 2.4 mm Fig. -
Page 13: Push Rod
Push rod Description Details Length: 787" optional 1181" Diameter 0.3 mm (VIS 3xx) 0.2 mm (VIS 2xx) Electronic distance Description Details counter Resolution: 1.5" Maximum Deviation 10 % of reading Memory Description Details (Wöhler VIS 250 / 350) Memory card If you are using a memory card other than the one included... -
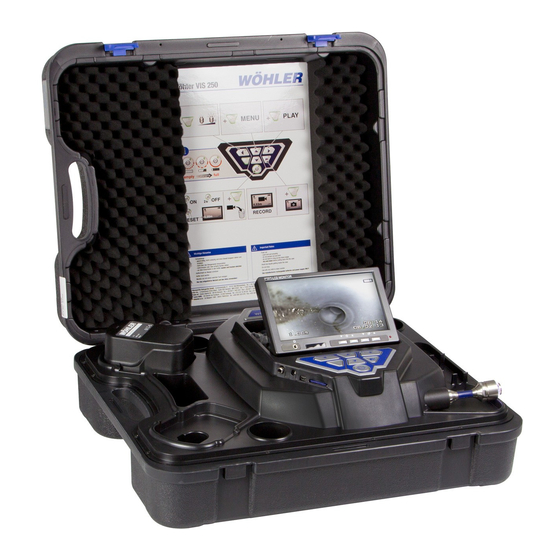
Page 14: Design And Function
Design and function Design and function Video inspection system Fig. 6: Case (Wöhler VIS 350) - Page 15 Design and function Legend Monitor Monitor controls - Brightness / contrast - Color Camera control with record and play - function (Wöhler VIS 250 / VIS 350) home function aligns the camera head to a straight position and menu for the monitor settings (Wöhler VIS 350) camera head, waterproof: Wöhler VIS 300 / VIS 350: pan and tilt color camera head 40 mm Ø...
-
Page 16: Control Panel
Design and function Control panel VIS 200 Control Panel Wöhler VIS 200 with ON/OFF-key Fig. 7: Control Panel Wöhler VIS 200 VIS 300 Control Panel Wöhler VIS 300 with ON/OFF-key and control keys for the pan and tilt camera head Fig. - Page 17 Design and function The keys on the control panel have the following functions: Wöhler VIS 200/250/300/350 ON/OFF key turns the whole camera system on/off (monitor and camera head). NOTE! The ON/OFF key is framed by a green light when the system is switched on and the battery is charged.
- Page 18 Design and function Wöhler VIS 250 / 350 VIDEO key Start/stop recording video SHIFT key Activates the key functions depicted by green icons on the top right corners of the keys. NOTE! When SHIFT MODE is activate, the SHIFT key lights up and an S is displayed in the bottom mid- dle of the screen.
-
Page 19: Monitor
Design and function IMAGE key Capture image / snapshot NOTE! Images are saved in .jpg format. It is possible to display the images on a PC from the SD card. DELETE key Delete an image or video selected in PLAY mode. Monitor Adjusting the Color 6.3.1... -
Page 20: Transition From 16:9 Screen To 4:3 Screen
Making settings via the camera menu 6.3.2 Transition from 16:9 Screen to 4:3 Screen The screen format of the monitor can be changed from 16:9 to 4:3 or vice versa. Switch off the camera system. Press the left monitor key and the ON/OFF-key of the camera at the same time. - Page 21 Making settings via the camera menu The menu opposite is displayed on the screen with 5 sub-menus. Icon Menu SETUP menu CALENDAR menu Fig. 15: SETUP menu Wöhler VIS 250 / 350 VIDEO menu (If you work with the camera head Ø 51 mm, there will be no video menu) INFO menu...
-
Page 22: Setup-Menü
Making settings via the camera menu your settings will be saved automatically when you exit the menu. The user can select the following parameter set- tings: 7.1.1 SETUP-Menü Video Setting 1 – 3 The user can switch between 3 pre-defined video settings. - Page 23 Making settings via the camera menu In the menu view, use the up arrow key to navigate to the submenu line and then use the right arrow key to select the VIDEO tab. Adjust the settings as described in section 7.1.3 ...
-
Page 24: Calendar Menu
Making settings via the camera menu transmitter is switched off. However, it is not pos- sible to locate the camera head when the transmit- ter is switched off. UNIT METER/FEET Select Meter or Feet. DISPLAY ON/OFF This command allows the user to switch the on- screen display On or Off. -
Page 25: Video Menu
Making settings via the camera menu 7.1.3 VIDEO MENU The VIDEO menu will only be active, if the camera heads Ø 40 mm and 26 mm are used. In the video menu the user can define the video settings. These settings will be stored as video settings 3. -
Page 26: Info Menu
Making settings via the camera menu 7.1.4 INFO menu The INFO menu shows important information about your camera system. It is not possible to make any settings in this menu. FREE: Information about the free storage space on the memory card. TV FORMAT: TV format of the camera head (PAL or NTSC) VIS S/N: Serial number of the camera system... -
Page 27: Selecting The Unit: Wöhler Vis 200
Making settings via the camera menu The menu will appear on screen with 2 submenus: Icon Menu SETUP-menu to se- lect the unit INFO-menu Fig 23: Camera menu Wöhler VIS 300 Navigate in the menu as described in section 7 UNIT METER/FEET Select the distance unit which will be indicated in the display. -
Page 28: Getting Started
Getting started Getting started Rechargeable battery WARNING! status and recharging Risk of injury when handling the rechargeable batteries improperly! Never open the rechargeable battery housing. Do not throw rechargeable batteries into a fire or expose to high temperatures. There is a risk of explosion! If handled improperly, a liquid may emerge from rechargeable batteries that can cause skin irrita-... - Page 29 Getting started Rechargeable battery status in- When the camera is switched on, the battery sta- dicator tus indicator displays the charge status of the rechargeable battery in the top right corner of the display. The indicator flashes when the charge level of the batteries is low.
-
Page 30: Working Position
Working with the camera Working position WARNING! Only place the camera on firm level ground and ensure a secure position of camera and user, especially when working in high altitude, e.g. when working on the roof. Because of its weight the case can cause considerable harm to persons and objects when falling down. - Page 31 Working with the camera To switch on the device, briefly press the ON/OFF key at the bottom of the control pan- When the device is switched on, the light fram- ing the ON/OFF key lights up green. The video image is displayed on the monitor after about 5 seconds.
-
Page 32: Memory (Wöhler Vis 250 / 350)
Working with the camera Memory (Wöhler VIS 250 / 350) After switching on the device press the SHIFT key. The green light framing the SHIFT key lights up and an S is displayed in the middle at the bottom of the monitor. - Page 33 Working with the camera To define "Video 3" settings, proceed as follows: In the menu view, use the up arrow key to navigate to the MENU view and then use the right arrow key to select the Video tab. ...
- Page 34 Working with the camera Therefore the transmitter must always be switched on before locating the camera with the Wöhler L 200 Locator. OSD ON/OFF This command allows the user to switch the on- screen display On or Off. Select "ON" if you wish to display the battery status indicator and the date on-screen.
-
Page 35: Inspection
Working with the camera Inspection Pull the rod smoothly out of the case and push the camera head to the area to be inspected. CAUTION! Do not exceed rod end limit! Do not bend or drag across sharp edges! CAUTION! Dry and clean the rod with a cloth before pulling it back, so that no dirt and soot can enter! -
Page 36: Home Function (Only Wöhler Vis 350)
Working with the camera see section 9.2. NOTE! Briefly press the ON/OFF key to reset the distance counter to zero. This may be reasonable at the beginning of the pipe. Time and date The time and date are displayed in the bottom right corner. -
Page 37: Video Record (Wöhler Vis 250 / 350)
Working with the camera Video Record (Wöhler VIS 250 / 350) Record video To begin recording a video, press the Record video key. The RECORD VIDEO key is framed by a red flashing light when recording is in process, and a red dot is displayed on the screen. -
Page 38: Images (Wöhler Vis 250 / 350)
Images (Wöhler VIS 250 / 350) Images (Wöhler VIS 250 / 350) To capture an image, press the SHIFT key and then the PHOTO key. The image is saved as a .jpg file on the memory card. Delete a Video (Wöhler VIS 250 / 350) ... -
Page 39: Transferring Images And Videos To A Pc (Wöhler Vis 250/350)
Transferring images and videos to a PC (Wöhler VIS 250/350) Transferring images and videos to a PC (Wöhler VIS 250/350) Two options are available to transfer image files (.jpg) and video files (ASF): Read in the files on a PC from the SD memory card. -
Page 40: Video Playback At Pc (Wöhler Vis 250/350)
Video Playback at PC (Wöhler VIS 250/350) Video Playback at PC (Wöhler VIS 250/350) 13.1 Installing the Put the CD included in the camera system into the CD drive of the PC. (the VLC viewer is al- VLC viewer so available for download free of charge via the VLC web page). -
Page 41: Output Directory For Snapshots
13.3 Output directory for After launching the VLC Media Player, click "Tools" and then "Preferences". snapshots Select the "Video" symbol on the left. In the "Take video snapshots" area, click the "Browse ..." button and choose the folder in which you wish to store the snapshots. -
Page 42: Guide Accessories
Guide accessories Guide accessories This section contains some recommendations based on our experience about the se- lection of guide accessories for the inspection in tubes and ducts. As all pipes and chimney systems are different, the user has to decide about the guide accessory in every single case. -
Page 43: Faults
Faults Faults Fault description Possible cause To rectify Cannot start monitor. Rechargeable battery has Recharge battery or con- When the ON/OFF key is no charge left. nect monitor to electrical pressed, the light framing power supply. the key briefly lights up red. -
Page 44: Maintenance
Maintenance Maintenance 16.1 Regular maintenance Proper operation of the camera system requires regular maintenance. The following maintenance works can be done by the user himself. 16.2 Changing the dome of NOTE! the Camera Head Wöh- The Wöhler Camera Head VIS 300/350 is sup- ler VIS 300/350 plied ex-works protected by a plastic dome, which can be replaced if necessary. -
Page 45: Accessories
Accessories Accessories Wöhler VIS Guidance Set 70 Order No. 3883 J for miniature camera head Ø 26 mm Wöhler VIS Centering Brush Extension Order No. 3853 J Camera Roller Guide Order No. 3681 J Wöhler Protection Sleeve for camera head Ø 40 mm Order No.
Need help?
Do you have a question about the Wohler VIS 250 and is the answer not in the manual?
Questions and answers