Advertisement
Advertisement

Related Manuals for GoPowerBike GoCity


Summary of Contents for GoPowerBike GoCity
- Page 1 GOPOWERBIKE GoCity O wner’s Manual ...
- Page 3 Welcome Thank you for purchasing the GoCity from GoPowerbike. We take pride in bringing you a quality product that will offer years of enjoyment. Please read and understand this manual fully before assembling and riding your bike. If you have questions after reading this manual, please reference the ...
-
Page 4: Table Of Contents
Table of Contents Using This Manual General Info Assembly Instructions Battery Charging 24 24 Operation Maintenance Troubleshooting Warnings and Safety Limited Warranty... -
Page 5: Using This Manual
Keep this manual, along with any other documents that were included with your bike, for future reference, however all content in this manual is subject to change or withdrawal without notice. Gopowerbike makes every effort to ensure the accuracy of its documentation and assumes no responsibility or liability if any errors or inaccuracies appear within. -
Page 6: General Info
NOTICE: I f you do not have the experience, skill, and tools to complete assembly and fit, Gopowerbike highly recommends having a certified, reputable bike mechanic complete these procedures as well as any future adjustments or tuning. - Page 7 The throttle should provide smooth acceleration when gradually applied. If the throttle, brake lever cutoff switches, pedal assistance, or lighting are functioning abnormally, working intermittently, or not working, please discontinue using your ebike immediately and contact the Gopowerbike Product Support team for assistance.
- Page 8 Loose, worn, or damaged handlebar grips should be replaced before you ride and can be purchased from Gopowerbike. The seat and seatpost should be properly aligned, fitted to the user, and the seatpost quick release should be properly tightened, fully closed, and secured before riding.
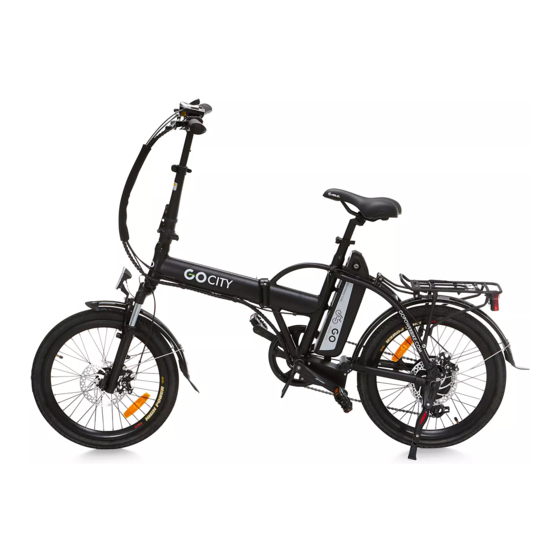
- Page 9 Fully Assembled GoCity Fully Assembled and Folded ...
-
Page 10: Assembly Instructions
m aterial protecting the bike frame and components. Please recycle packaging materials especially cardboard and foam whenever possible. Open the small box and carefully set out all contents . Ensure all the following pieces are included with the GoCity: ● Manual ●... - Page 11 2: Unfold the bike. T urn the front wheel slightly to the right until the frame is unfolded and both sides of Step the central hinge are touching. ...
- Page 12 S ecure central hinge. P ull directly upward on the quick release lever to lift the hinge pin and at the Step 3: same time push the bike frame together so the hinge is fully closed. ...
- Page 13 C omplete unfold. S wing the frame hinge quick release lever toward the front of the bike so it is parallel Step 4: to the frame. Fold the quick release lever upward to securely lock the frame hinge. ...
- Page 14 Step 5: Prepare folding arm. Remove the long screw and the front cover using Allen key. Step 6: Folding bar stem. Install the folding bar stem onto the fork with the folding lever to the side of the fork, as shown below.
- Page 15 Step 7: Fork cover. Install the front fork cover and long screw into the fork and tighten it with the Allen key. Make sure the cap is facing upward, as shown below. Step 8: Tighten the 2 screws located on the folding handlebar stem with Allen key, as shown below.
- Page 16 U nfold handlebar stem. A lign the handlebar stem so it is upright and the hinge is closed then fold the stem Step 9: clasp release lever up, as shown below. ...
- Page 17 C omplete handlebar installation. Install the handlebar onto the handlebar stem and close the clamp. Step 10: ...
- Page 18 R eady the derailleur protector. C ut the zip tie to take out the derailleur protector and remove two (2) screws Step 11: as shown below. ...
- Page 19 I nstall the derailleur protector. U sing the two (2) screws that were just removed, install the derailleur protector Step 12: by screwing it onto the frame. The bottom screw goes through the fender bracket, as shown below.
- Page 20 I nstall the pedals. Locate the pedal with a smooth pedal axle exterior and an “R” sticker, which indicates that it Step 13: is the right pedal. The right pedal goes on the crank on the right side of the bike (which has the drivetrain gears and is the same as a rider’s right side when riding).
- Page 21 The left pedal is reverse-threaded and tightens counterclockwise . T he pedal has an “L” sticker at the end of the axle indicating it is the left pedal. Carefully install washer in the axle and thread the pedal onto the left crank by hand slowly.
- Page 22 evenly seated around the rims. Use a pump with a Schrader valve and pressure gauge to inflate each tire to the recommended pressure indicated on the tire sidewall. D o not overinflate or underinflate the tire!
- Page 23 S et the desired seat height. O pen the quick release lever by hinging it open fully. Ensure the Step 15: seatpost clamp opening is aligned with the notch at the front of the seat tube. Adjust the seatpost up or down to a comfortable height, while ensuring the seatpost is inserted into the frame past the minimum insertion point.
- Page 24 NOTICE: I f you have any questions regarding the assembly of your bike, contact GoPowerbike. If you are not able to ensure all the assembly steps in the assembly video are performed properly, or you are unable to view the assembly video, please consult a certified, reputable local bike mechanic for assistance in addition to contacting GoPowerbike for help.
- Page 25 Adjusting the Seat Height For most users, the seat height should be set by placing the ball of their foot on the pedal when the crank is at its lowest point. In this orientation their leg should almost be fully extended, with a slight bend at the knee. The correct seat height should not allow leg strain from overextension and the hips should not rock from side to side when pedaling.
- Page 26 Adjusting the Seat Position and Angle To change the angle and horizontal position of the seat: 1) Use a 6 mm Allen wrench to loosen the seat adjustment bolt on the clamp positioned immediately underneath the seat (as shown below), above the rear wheel.
- Page 27 NOTICE: I f you have any questions regarding the proper fit of your bike please consult a certified, reputable local bike mechanic for assistance fitting the bike to a rider or contact GoPowerbike...
-
Page 28: Battery Charging
Battery Charging Charging Procedure Follow these steps for charging your bike from GoPowerbike: 1. Ensure the battery is off b y having the battery pack on the 0 button 2. Remove the rubber cover on the charging port o n the opposite side of the battery from the key 3. - Page 29 Battery Charging Information Check the charger, charger cables, and battery for damage b efore beginning each charge. Always charge in a safe area t hat is cool*, dry, indoors, away from direct sunlight, dirt, or debris, in a clear area away from potential to trip on the charging cords, or for damage to occur to the bike, battery, or charging equipment while parked and/or charging.
- Page 30 Use caution to avoid damage to battery connector terminals, which are exposed when the battery is unlocked and r emoved from the frame of the bike. In the case of damage to the terminals or battery mounts, please discontinue use and contact GoPowerbike Product Support immediately. When Installing the Battery onto the Bike Ensure the battery is off before sliding the battery onto the frame mount receptacle.
- Page 31 Do not charge the battery with any chargers other than the one originally supplied from GoPowerbike or a charger designed for use with your specific bike purchased directly from GoPowerbike.
- Page 32 Long-Term Battery Storage If storing your bike from GoPowerbike for longer than two weeks at a time, follow the instructions below to maintain the health and longevity of your battery. Charge (or discharge) the battery to approximately 75% charged. Power off the battery either locked to the frame or unlocked and removed from the frame for storage Store the battery in a dry, climate controlled, indoor location between 50 °F –...
-
Page 33: Operation
Contact GoPowerbike if you have any questions about assembly or operation. - Page 34 Handlebar Features Location on Handlebar Component LCD Display Remote LCD Display Shifter Throttle...
- Page 35 LCD Display Information The table and image below show the various features and information displayed on the LCD display. Location Information on Display Battery Charge Indicator Distance (Odometer, Trip Odometer) Distance Unit (kilometers (Km), miles (Mile)) Speed Unit (kilometers per hour (Km/h), miles per hour (MPH)) Operation Mode Watt Meter, Error Code Indicator...
- Page 36 LCD Display Operations Operation Directions Turn on bike Press and hold M button until power engages Turn on headlight, taillight, Press and hold up arrow until light illuminates Activate brake light When bike is on, squeeze brake lever Increase pedal assist (PAS) level Press and release up arrow Decrease pedal assist (PAS) level Press and release down arrow...
- Page 37 Start-Up Procedure After the bike has been properly assembled if all components are secured correctly, and you have read this entire manual, you may turn the bike on and select a power level following the steps outlined below: 1) Turn on the battery pack...
- Page 38 2) Press and hold the ‘’M’’ Button for 3 seconds...
- Page 39 ) Turn on the Headlight/Taillight press and hold the UP arrow for 3 seconds...
- Page 40 3. Begin riding carefully. W ith the proper safety gear and rider knowledge, Press the red button and you may now operate your bike from GoPowerbike. On a flat surface, in a low gear (1 or 2), most riders should be able to begin pedaling the bike with pedal assist level 1.
- Page 41 Brake Light Features and Operations Your ebike by GoPowerbike comes equipped with a taillight/brake light that is integrated into the electrical system. Anytime the bike is powered on, squeezing one or both brake levers on the handlebar will cause the brake light to illuminate.
- Page 42 Battery Charge Level Indicator The LCD display on the handlebars of your bike from GoPowerbike features a battery charge level indicator (like a fuel gauge on a car). This indicator calculates battery life based on the battery power output (instantaneous voltage reading) and can fluctuate while riding if power demand and/or output changes.
- Page 43 Driving Range The range of your bike from GoPowerbike is the distance the bike will travel on a single full charge of the onboard battery. The range values in this manual are estimates based on expected usage characteristics of bikes by GoPowerbike. Some of the factors that affect range include changes in elevation, speed, payload, acceleration, number of starts and stops, ambient air temperatures, tire pressure, and terrain.
- Page 44 Carrying Loads MAXIMUM PAYLOAD CAPACITY FOR GoCity The total maximum weight limit, or payload capacity, of the GoCity (265 LBS) includes the weight of the rider as well as clothing, T he GoCity is compatible with the optional rear rack and s afety gear, cargo, accessories, passengers, etc.
-
Page 45: Maintenance
Basic Bike Care To ensure safe riding conditions you must properly maintain your bike from GoPowerbike. Follow these basic guidelines and see a certified, reputable bike mechanic at regular intervals to ensure your bike is safe for use and fun to ride. See the Pre-Ride Safety Checklist and Recommended Service Intervals sections in this manual for more detailed information. - Page 46 Pre-Ride Safety Checklist Notice: B efore every ride, and after every 25-45 miles (40-72 km), we advise following the pre-ride safety checklist. Safety Check Basic Steps 1. Brakes Ensure front and rear brakes work properly. Check brake pads for wear and ensure they are not overworn. Ensure brake pads are correctly positioned in relation to the rims.
- Page 47 Check that the frame and fork are not bent or broken. 8. Frame, Fork, If either frame or fork are bent or broken, they should be replaced. and Seat Check that the seat is adjusted properly, and seatpost quick release lever is securely tightened. Ensure hub motor is spinning smoothly and motor bearings are in good working order.
- Page 48 Error Detection Your bike from GoPowerbike is equipped with an error detection system integrated into the display and controller. In the case of an electronic control system fault an error code should display.If your bike has an error code displayed at...
-
Page 49: Warnings And Safety
General Operating Rules Notice: P ay special attention to all the general operating rules below before operating your bike from GoPowerbike. ● When riding, obey the same road laws as all other road vehicles as applicable by law in your area. - Page 50 Safety Notes The following safety notes provide additional information on the safe operation of your bike from GoPowerbike and should be closely reviewed. Failure to review these notes can lead to serious injury or death. ● All users must read and understand this manual before riding their bike from GoPowerbike. Additional manuals for components used on the bike may also be provided and should be read before installing or using those components.
- Page 51 Wet Weather I t is recommended to not ride in wet weather if avoidable. Ride in wet weather only if necessary. This electric bike is not meant for use in puddles, heavy rain, or streams. Never immerse or submerge this product in water or liquid as the electrical system may be damaged.
- Page 52 ● Any aftermarket changes to your bike from GoPowerbike not expressly approved by GoPowerbike could void the warranty and create an unsafe riding experience.
- Page 53 Helmets It is strongly advised that a rider and child passenger always wear a properly fitting and approved bicycle safety helmet when riding. Once safely dismounted from the bike, a child’s helmet should be removed. Bicycle helmets should only and always be used for bicycle riding.
-
Page 54: Limited Warranty
Limited Warranty Warranty Info Every bike by GoPowerbike is covered under a manufacturer's one-year all-inclusive warranty for the original owner against all manufacturing defects. GoPowerbike warrants this product, including all individual components against defects in material or workmanship as follows:... - Page 55 Components of the GoCity are subject to higher wear when compared to bikes without power assistance. This is because the GoCity can travel at higher average speeds than regular bicycles and has a greater weight. Higher wear is not a defect in the product and is not subject to warranty.
- Page 56 We are here to help! If you have questions, please: Contact us directly by email to elp@gopowerbike.com o r Call GoPowerbike Product Support 9 17-900-1110 V5.002...
- Page 57 GOPOWERBIKE Manuel d'Utilisation GoCity O wner’s Manual ...
- Page 58 Ne pas retourner au magasin! Si vous avez besoin d'aide avec votre nouveau GoCity, qu'il s'agisse de pièces manquantes ou d'un besoin d'aide pour l'assemblage, contactez nous par e-mail à help@gopowerbike.com ou appelez nous au 917-900-1110. Vous recevrez une réponse dans...
- Page 59 Merci d'avoir acheté le GoCity de GoPowerbike. Thank you for purchasing the GoCity from GoPowerbike. Nous sommes fiers de vous présenter un produit de qualité qui vous offrira des années de plaisir. We take pride in bringing you a quality product that will offer years of enjoyment. Please read and understand Veuillez lire et comprendre entièrement ce manuel avant d'assembler et d'utiliser votre vélo.
- Page 60 Table of Contents Using This Manual Table des matières General Info Assembly Instructions Battery Charging Operation Utiliser ce manuel Maintenance Informations générales Troubleshooting Instructions de montage Warnings and Safety Chargement de la batterie Limited Warranty Fonctionnement Entretien Dépannage Avertissements et sécurité Garantie limitée...
- Page 61 Gopowerbike makes every effort to ensure tout le contenu de ce manuel est susceptible d'être modifié ou retiré sans préavis. Gopowerbike met tout en œuvre pour assurer l'exactitude de ses documents et n'assumerait aucune responsabilité si des erreurs ou des inexactitudes y étaient relevées.
- Page 62 REMARQUE: Si vous ne disposez pas de l'expérience, des compétences et des outils nécessaires pour NOTICE: I f you do not have the experience, skill, and tools to complete assembly and fit, Gopowerbike highly terminer l'assemblage et l'ajustement, Gopowerbike recommande vivement de faire effectuer recommends having a certified, reputable bike mechanic complete these procedures as well as any future ces procédures par un mécanicien certifié, ainsi que tout ajustement ou réglage futur.
- Page 63 Si l'accélérateur, les interrupteurs de coupure du levier de frein, fonctionnement correct. L’accélérateur doit fournir une accélération douce lorsqu'elle est discontinue using your ebike immediately and contact the Gopowerbike Product Support team for assistance. l'assistance à la pédale ou l'éclairage fonctionnent anormalement, fonctionnent par appliquée progressivement.
- Page 64 Gopowerbike. The seat and seatpost should be properly aligned, fitted to Gopowerbike. Le siège et la tige de selle doivent être correctement alignés, adaptés à l'utilisateur, et le dispositif de blocage the user, and the seatpost quick release should be properly tightened, fully closed, and secured before riding.
- Page 65 GoCity entièrement monté Fully Assembled GoCity Fully Assembled and Folded Entièrement Monté et Plié ...
- Page 66 G oCity f rom the bike box. C arefully remove soulever en toute sécurité un objet lourd, retirez le GoCity de la boîte. Retirez soigneusement le matériau d'emballage protégeant le cadre et les composants du vélo.
- Page 67 Étape 2: dépliez le vélo. Tournez légèrement la roue avant vers la droite jusqu'à ce que le 2: Unfold the bike. T urn the front wheel slightly to the right until the frame is unfolded and both sides of Step cadre soit déplié...
- Page 68 Étape 3: Fixez la charnière centrale. Tirez directement vers le haut sur le levier de dégagement rapide pour soulever l'axe de S ecure central hinge. P ull directly upward on the quick release lever to lift the hinge pin and at the Step 3:...
- Page 69 C omplete unfold. S wing the frame hinge quick release lever toward the front of the bike so it is parallel Step 4: Étape 4: Terminez le dépliage. Faites pivoter le levier de dégagement rapide de la charnière du cadre vers l'avant du vélo pour qu'il soit parallèle au cadre.
- Page 70 Étape 5: Préparez le bras pliant. Retirez la longue vis et la couverture avant à l'aide de la clé Allen. P repare folding arm. Remove the long screw and the front cover using Allen key. Step 5: F olding bar stem. I nstall the folding bar stem onto the fork with the folding lever to the side of the fork, as shown Step 6:...
- Page 71 F ork cover. Install the front fork cover and long screw into the fork and tighten it with allen key, as shown below. Step 7: Étape 7: Couvre-fourche. Installez le couvercle de fourche avant et la longue vis dans la fourche puis serrez-les avec la clé Allen, comme illustré ci-dessous. Step 8:...
- Page 72 Step 9: U nfold handlebar stem. A lign the handlebar stem so it is upright and the hinge is closed then fold the stem Étape 9: Dépliez la potence du guidon. Alignez la potence du guidon pour qu'elle soit à la verticale et que la charnière soit fermée, puis rabattez le levier de dégagement du fermoir de potence, comme illustré...
- Page 73 C omplete handlebar installation. Install the handlebar onto the handlebar stem and close the clamp. Step 10: Étape 10: Terminez l'installation du guidon. Installez le guidon sur la potence et fermez la pince. ...
- Page 74 R eady the derailleur protector. C ut the zip tie to take out the derailleur protector and remove two (2) screws Step Étape 11: Préparez le protecteur de dérailleur. Coupez l'attache zippée pour retirer le protecteur de dérailleur et retirez les deux (2) vis 11:...
- Page 75 Étape 12: Installez le protecteur de dérailleur. À l'aide des deux (2) vis qui viennent d'être retirées, installez le protecteur de dérailleur I nstall the derailleur protector. U sing the two (2) screws that were just removed, install the derailleur protector Step 12:...
- Page 76 I nstall the pedals. Locate the pedal with a smooth pedal axle exterior and an “R” sticker, which indicates that it Step 13: Étape 13: Installez les pédales. Localisez la pédale avec un extérieur d'axe de pédale lisse et un autocollant «R», qui indique qu'il s'agit de la pédale droite.
- Page 77 35 Nm of torque. NOTICE: G oCity p edals are designed to fold by pressing the REMARQUE: les pédales GoCity sont conçues pour se plier en appuyant sur l'extrémité pedal end directly toward the crank and then folding. Use caution de la pédale directement vers la manivelle, puis en se repliant.
- Page 78 evenly seated around the rims. Use a pump with a Schrader valve and pressure gauge to inflate each tire to the soient uniformément assis autour des jantes. Utilisez une pompe avec une valve Schrader et un manomètre recommended pressure indicated on the tire sidewall. D o not overinflate or underinflate the tire! pour gonfler chaque pneu à...
- Page 79 Étape 15: Réglez la hauteur d'assise souhaitée. Ouvrez complètement le levier de dégagement rapide. Assurez-vous que S et the desired seat height. O pen the quick release lever by hinging it open fully. Ensure the Step 15: l'ouverture du collier de la tige de selle est alignée avec l'encoche à l'avant du tube de selle. Réglez la tige de selle vers le haut seatpost clamp opening is aligned with the notch at the front of the seat tube.
- Page 80 NOTICE: I f you have any questions regarding the assembly of your bike, contact GoPowerbike. If you are not REMARQUE: si vous avez des questions concernant l'assemblage de votre vélo, contactez GoPowerbike. Si vous ne parvenez able to ensure all the assembly steps in the assembly video are performed properly, or you are unable to view pas à...
- Page 81 Réglage de la Hauteur du Siège Adjusting the Seat Height For most users, the seat height should be set by placing the ball of their foot on the pedal when the crank is at its Pour la plupart des utilisateurs, la hauteur du siège doit être réglée en plaçant la pointe de leur pied sur la pédale lorsque la manivelle est à...
- Page 82 Réglage de la position et de l'angle du siège Adjusting the Seat Position and Angle Pour modifier l'angle et la position horizontale du siège: To change the angle and horizontal position of the seat: 1) Use a 6 mm Allen wrench to loosen the seat adjustment bolt on the clamp 1) Utilisez une clé...
- Page 83 GoPowerbike. NOTICE: I f you have any questions regarding the proper fit of your bike please consult a certified, reputable...
- Page 84 Charging Procedure Procédure de charge Follow these steps for charging your bike from GoPowerbike: Suivez ces étapes pour charger votre vélo depuis GoPowerbike: 1. Ensure the battery is off b y having the battery pack on the 0 button 1.
- Page 85 Informations sur la charge de la batterie Informations sur la charge de la batterie Informations sur la charge de la batterie Battery Charging Information Informations sur la charge de la batterie Vérifiez que le chargeur, les câbles du chargeur et la batterie ne sont pas endommagés avant de commencer chaque charge. Vérifiez que le chargeur, les câbles du chargeur et la batterie ne sont pas endommagés avant de commencer chaque charge.
- Page 86 En cas d'endommagement des bornes ou des supports de batterie, veuillez cesser r emoved from the frame of the bike. In the case of damage to the terminals or battery mounts, please discontinue use l'utilisation et contacter immédiatement l'assistance produit GoPowerbike. and contact GoPowerbike Product Support immediately.
- Page 87 Ne chargez pas la batterie avec des chargeurs autres que celui fourni à l'origine par Do not charge the battery with any chargers other than the one originally supplied from GoPowerbike or a charger GoPowerbike ou un chargeur conçu pour être utilisé avec votre vélo spécifique acheté directement auprès de GoPowerbike. Le designed for use with your specific bike purchased directly from GoPowerbike.
- Page 88 Équilibrer la batterie When you first receive your bike and for the first three times you charge your battery from GoPowerbike, follow the Lorsque vous recevez votre vélo pour la première fois et pour les trois premières fois que vous chargez votre batterie à partir procedure outlined below to ensure the cells that power the battery are balanced and operating as efficiently as possible.
- Page 89 Long-Term Battery Storage If storing your bike from GoPowerbike for longer than two weeks at a time, follow the instructions below to maintain the Si vous stockez votre vélo de GoPowerbike pendant plus de deux semaines à la fois, suivez les instructions ci-dessous pour health and longevity of your battery.
- Page 90 Contactez GoPowerbike si vous avez des questions injury to you and others, damage to the bike, damage to property, injury, or death. Contact GoPowerbike if you sur l'assemblage ou le fonctionnement.
- Page 91 Handlebar Features Position sur le guidon Location on Handlebar Component Composante LCD Display Remote Contrôle Écran LCD LCD Display Ecran LCD Shifter Commande Throttle Accélérateur...
- Page 92 LCD Display Information Informations sur l'écran LCD The table and image below show the various features and information displayed on the LCD display. Le tableau et l'image ci-dessous montrent les différentes fonctions et informations affichées sur l'écran LCD. Location Information on Display Emplacement Informations affichées Battery Charge Indicator...
- Page 93 Opérations d'affichage LCD LCD Display Operations Operation Directions Action Instructions Turn on bike Press and hold M button until power engages Appuyez sur le bouton M et maintenez-le jusqu'au démarrage Allumer le vélo Turn on headlight, taillight, Press and hold up arrow until light illuminates Allumer le phare, le feu arrière Appuyez et maintenez la flèche haut jusqu'à...
- Page 94 Procédure de démarrage Start-Up Procedure After the bike has been properly assembled if all components are secured correctly, and you have read this entire manual, Une fois que le vélo a été correctement assemblé, si tous les composants sont correctement fixés et que vous avez lu tout ce you may turn the bike on and select a power level following the steps outlined below: manuel, vous pouvez allumer le vélo et sélectionner un niveau de puissance en suivant les étapes décrites ci-dessous: 1) Turn on the battery pack...
- Page 95 2) Press and hold the ‘’M’’ Button for 3 seconds 2) Appuyez sur le bouton «M» et maintenez-le enfoncé pendant 3 secondes 3) To Activate the motor and accelerate press the red button 3) Pour activer le moteur et accélérer, appuyez sur le bouton rouge...
- Page 96 4) Turn on the Headlight/Taillight press and hold the UP arrow for 3 seconds 4) Allumez le phare/feu arrière appuyez et maintenez la flèche HAUT pendant 3 secondes...
- Page 97 2), la plupart des cyclistes devraient pouvoir commencer à pédaler avec l'assistance au pédalage de niveau 1. Vous pouvez your bike from GoPowerbike. On a flat surface, in a low gear (1 or 2), most riders should be able to begin pedaling the également utiliser l'accélérateur pour accélérer et maintenir la vitesse désirée.
- Page 98 Your ebike by GoPowerbike comes equipped with a taillight/brake light that is integrated into the electrical system. Anytime Votre vélo électrique de GoPowerbike est équipé d'un feu arrière/feu stop intégré au système électrique. Chaque fois que le the bike is powered on, squeezing one or both brake levers on the handlebar will cause the brake light to illuminate.
- Page 99 L'écran LCD sur le guidon de votre vélo de GoPowerbike dispose d'un indicateur de niveau de charge de la batterie (comme The LCD display on the handlebars of your bike from GoPowerbike features a battery charge level indicator (like a fuel gauge on une jauge de carburant sur une voiture).
- Page 100 Autonomie The range of your bike from GoPowerbike is the distance the bike will travel on a single full charge of the onboard battery. The L'autonomie de votre vélo de GoPowerbike correspond à la distance parcourue par le vélo avec une seule charge complète de range values in this manual are estimates based on expected usage characteristics of bikes by GoPowerbike.
- Page 101 La limite de poids maximale totale, ou capacité de charge utile, du GoCity (265 LBS) comprend le poids du pilote ainsi que les front rack accessories that are not included in the base price of the bike and are available for purchase from vêtements, l'équipement de sécurité, le chargement, les accessoires, les passagers, etc.
- Page 102 Pour garantir des conditions de conduite sûres, vous devez entretenir correctement votre vélo de GoPowerbike. Suivez ces Pour garantir des conditions de conduite sûres, vous devez entretenir correctement votre vélo de GoPowerbike. Suivez ces directives de base et consultez directives de base et consultez un mécanicien vélo certifié et réputé à intervalles réguliers pour vous assurer que votre vélo est directives de base et consultez un mécanicien vélo certifié...
- Page 103 Liste de contrôle de sécurité avant l'utilisation Pre-Ride Safety Checklist Remarque: avant chaque sortie et tous les 40 à 72 km (25 à 45 miles), nous vous conseillons de suivre la liste de contrôle de sécurité avant la conduite. Notice: B efore every ride, and after every 25-45 miles (40-72 km), we advise following the pre-ride safety checklist. Safety Check Basic Steps Contrôle...
- Page 104 Check that the frame and fork are not bent or broken. 8. Frame, Fork, Vérifiez que le cadre et la fourche ne sont pas pliés ou cassés. 8. Cadre, fourche, If either frame or fork are bent or broken, they should be replaced. Si le cadre ou la fourche sont pliés ou cassés, ils doivent être remplacés.
- Page 105 Your bike from GoPowerbike is equipped with an error detection system integrated into the display and controller. In Votre vélo de GoPowerbike est équipé d'un système de détection d'erreur intégré dans l'écran et le contrôleur. En cas de the case of an electronic control system fault an error code should display.If your bike has an error code displayed at panne du système de commande électronique, un code d'erreur doit s'afficher.
- Page 106 ● Lorsque vous roulez, respectez les mêmes lois routières que tous les autres véhicules routiers applicables par la loi dans Notice: P ay special attention to all the general operating rules below before operating your bike from GoPowerbike. Remarque: prêtez une attention particulière à toutes les règles générales d'utilisation ci-dessous avant d'utiliser votre vélo depuis GoPowerbike.
- Page 107 ● Assurez-vous que les poignées du guidon ne sont pas endommagées et correctement installées. Des poignées desserrées que GoPowerbike Bikes n'a pas testés pour la sécurité et la compatibilité et ont vérifié comme étant sûrs et compatibles avec le not tested for safety and compatibility and have verified as safe and compatible with the bike. Contact GoPowerbike ou endommagées peuvent vous faire perdre le contrôle et tomber.
- Page 108 Wet Weather Temps de pluie Il est recommandé de ne pas rouler par temps humide si cela est évitable. Roulez par temps humide uniquement si nécessaire. I t is recommended to not ride in wet weather if avoidable. Ride in wet weather only if necessary. Ce vélo électrique n'est pas conçu pour être utilisé...
- Page 109 à l'aise avec le vélo et que vous soyez confiant dans le contrôle de la puissance. ● Any aftermarket changes to your bike from GoPowerbike not expressly approved by GoPowerbike could void the ● Les vélos électriques étant plus lourds et plus rapides que les vélos normaux, ils nécessitent une prudence et des soins ●...
- Page 110 Casques Helmets It is strongly advised that a rider and child passenger always wear a properly fitting and approved bicycle safety helmet when Il est fortement conseillé aux cyclistes et aux enfants passagers de toujours porter un casque de sécurité pour vélo riding.
- Page 111 GARANTIE LIMITÉE GOPOWERBIKE 1 AN Composants de vélo GoPowerbike, y compris le cadre, les fourches, la potence, le guidon, le casque, la tige de selle, le siège, GoPowerbike bike components including frame, forks, stem, handlebar, headset, seatpost, seat, brakes, lights, bottom les freins, les lumières, le boîtier de pédalier, le pédalier, les pédales, les jantes, le moyeu de roue, la roue libre, le dérailleur, le...
- Page 112 Les composants du GoCity sont soumis à une usure plus élevée par rapport aux vélos sans assistance électrique. En effet, le GoCity can travel at higher average speeds than regular bicycles and has a greater weight. Higher wear is not a defect in the GoCity peut voyager à...
- Page 113 If you have questions, please: Si vous avez des questions, veuillez: Contact us directly by email to elp@gopowerbike.com o r Nous contacter directement par email à help@gopowerbike.com ou Appeler l'assistance produit GoPowerbike 917-900-1110 Call GoPowerbike Product Support 9 17-900-1110...
Need help?
Do you have a question about the GoCity and is the answer not in the manual?
Questions and answers