Table of Contents
Advertisement
Quick Links
I
& S
M
NSTALLATION
ERVICING
ANUAL FOR
R
O
F
C
H
EZNOR
IL
IRED
ABINET
EATER
WARNINGS
Reznor equipment must be installed and maintained in accordance with the current OFTEC
Regulations for oil fired products. Due account should also be taken of any obligations
arising from the Health and Safety at Works Act 1974 or relevant codes of practice. In
addition the installation must be carried out in accordance with the current IEE wiring
regulations (BS 7671), BS 6896 (Industrial & Commercial) and any other relevant British
Standards and Codes of Practice by a qualified installer. All external wiring MUST comply
with the current IEE wiring regulations.
Part No. 701145
Advertisement
Table of Contents

Related Manuals for Nortek Reznor 30


Summary of Contents for Nortek Reznor 30
- Page 1 & S NSTALLATION ERVICING ANUAL FOR EZNOR IRED ABINET EATER WARNINGS Reznor equipment must be installed and maintained in accordance with the current OFTEC Regulations for oil fired products. Due account should also be taken of any obligations arising from the Health and Safety at Works Act 1974 or relevant codes of practice. In addition the installation must be carried out in accordance with the current IEE wiring regulations (BS 7671), BS 6896 (Industrial &...
- Page 2 Introduction. on these heaters due care and attention is required to ensure that working at height regulations are adhered to at the elcome to the Oil Fired Cabinet Heater Range. mounting heights specifi ed. Local regulations may vary in the country of use and it is the installers responsibility to ensure that such regulations are All Dimensions shown are in mm unless satisfi ed...
- Page 3 Document Index. 3.3 Commissioning - air delivery system. 1 Installation requirements. 3.4 Commissioning - hand over 1.1 Compliance notices. 1.2 Certifi cates of conformity. 1.3 General product information. 4 Servicing instructions 1.4 General requirements. 4.1 Planned servicing. 1.5 Delivery and pre-installation checks. 4.2 Servicing procedure - Major component parts 1.6 Warranty.
-
Page 4: Installation Requirements
1. Installation Requirements. The manufacturer has a commitment to continuous improvement and therefore reserve the right to amend or change the specifi cation of Cabinet Heaters subject to Compliance notices compliance with the appropriate European, national and local regulations he Oil Fired Cabinet Heater range detailed herewith are manufactured within a strictly controlled quality Contained within the text of the manual, the words ‘Caution’... - Page 5 General product information • The position of the heater relative to the route of the fl ue • The position of the heater relative to the supply of fuel The Oil Fired Cabinet Heater models have an output range from approximately 32.0 kW to 381kW, and are available in a •...
-
Page 6: Health And Safety
Health and Safety Note (i) The warranty may be invalidated if - The Oil Fired Cabinet Heater range must be installed in • The installation is not in accordance with the general accordance with the current OFTEC regulations for oil fi red requirements of this manual. -
Page 7: Fuel Supply - General
The location must also allow for adequate clearance for the 1.9.1 Fuel air supply, return air circulation, oil supply and electrical supply, whilst also providing good and safe working access. In order to promote trouble free operating it is necessary that The heater must be installed on a fl at and level surface made the oil within the storage tank and oil line does not fall below from non-combustible material, which is suffi ciently robust... -
Page 8: Single Pipe System (Gravity Feed)
It is advisable to leave the tank unpainted on the inside, but siphon out of the tank if the return pipe is disconnected at the to paint the outside with a proprietary grade of anti-corrosive pump during maintenance or servicing and if the none return paint. - Page 9 Typical arrangement of oil storage tank and single pipe system Pressurised oil feed system Burner oil pump details for heater models 30 - 180 oil lines L metres H(m) 8mm I.D 10mm I.D 10.0 20.0 20.0 40.0 40.0 80.0 60.0 100.0...
- Page 10 Burner oil pump details for heater models 30 - 180 oil lines L metres H(m) 8mm I.D 10mm I.D 35.0 100.0 30.0 100.0 25.0 100.0 20.0 90.0 15.0 70.0 30.0 20.0 Burner oil pump details 205-375 gravity feed from bottom of tank L metres H(m) 8mm I.D...
-
Page 11: Electrical Supply
1.10 Electrical supply 1.11 Air supply Wiring external to the cabinet heater must be installed in Consideration must be given to the provision of air for the accordance with any local, national, and European regulations, purposes of combustion and ventilation of the heated space, as well as meeting the appropriate requirements of IEE plant room or enclosure where heaters are to be installed. - Page 12 openings (sections 1.11.2.1 refers to plant room applications Minimum Free Area of ventilation and sections 1.11.2.2 refers to enclosure applications). opening Alternatively the plant room or enclosure may be Model High Level cm² Low Level cm² mechanically ventilated (section 1.11.2.3 refers). None 1.11.2.1 Natural Ventilation Openings to Plant Rooms None...
- Page 13 • At high level 5 cm2 for each kW of rated heat It is necessary to provide an automatic means to safely inhibit input. heater(s) operation should mechanical air supply fail for any reason • At low level 10 cm2 for each kW of rated heat input.
-
Page 14: Flue System
such that the air circulation fan does not interfere with the and 2, are used as consultative documents when considering operation of the fl ue. fl ue requirements. The return air intake and warm air outlet should therefore be Care should be taken to ensure that the fl ue terminal is not fully ducted to and from the heater, respectively, within the situated in a high-pressure area, the proximity of buildings compartment or plant room. - Page 15 Note: especially if an approved method of sealing has not been used, or if the design of the fl ue has not made provision for It should be noted that claims made under warranty and possible condensation problems. attributed to the ingress of water may not be considered Flat roof with parapet Flat roof envelope method Flat roof where the fl ue height is more than 10 Heights (H) away from all structures...
- Page 16 Flat roof with no parapet Flat roof with structure close to fl ue outlet Pitched roof not greater than 45°...
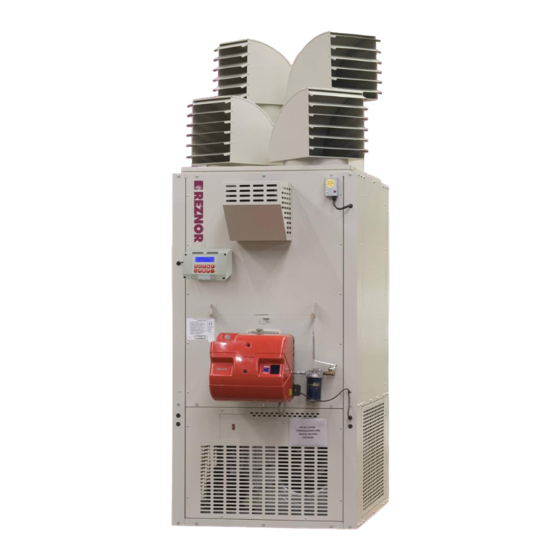
- Page 17 1.14 Dimensions Front View Side View Top View - Nozzle Outlet Top View - Duct Outlet (also showing spigot Ø )
- Page 18 Dimensions for Vertical Cabinet Heaters (all dims in mm) Model 30 Unit height 1650 1650 1900 1900 2025 2025 2120 2120 2110 2110 2667 1000 1000 1100 1100 1244 Unit width 1085 1085 1282 1282 1550 1550 1550 Unit depth Flue outlet ctr Flue Spigot Ø...
- Page 19 Dimensions for Horizontal Cabinet Heaters (all dims in mm) Model 85 Unit length 1865 1960 2057 2076 2667 1000 1100 1244 Unit height 1085 1282 1550 1550 Unit width Flue outlet ctr to front Outlet nozzle width 1660 1761 1858 1823 2426 Flue outlet ctr/l to end...
- Page 20 Dimensions for Downturn Cabinet Heaters (all dims in mm) Model 85 Unit height 1865 1960 2057 2076 2667 1000 1100 1244 Unit width 1085 1282 1550 1550 Unit depth Flue outlet ctr to front Outlet nozzle height 1660 1761 1858 1823 2426 Flue outlet ctr/l to top...
- Page 21 1.15 Technical Details Model kW/hr 32.02 42.92 59.6 82.22 Heat Output (max) Btu/hr 109,252 146,443 203,335 280,534 kW/hr 36.9 50.2 69.5 96.1 Heat Input (Gross) Btu/hr 125,902 171,300 237,100 334,000 kW/hr 34.64 47.07 65.2 90.16 Heat Input (Nett) Btu/hr 118,192 160,603 222,462 307,626...
- Page 22 Model kW/hr 122.51 137.51 183.5 207.85 Heat Output (max) Btu/hr 418,004 469,184 626,102 709,184 kW/hr 143.0 160.8 Heat Input (Gross) Btu/hr 487,900 548,600 713,100 822,300 kW/hr 134.22 150.93 196.16 225.71 Heat Input (Nett) Btu/hr 457,958 514,973 669,298 770,122 Nett Effi ciency 91.27 91.11 93.55...
- Page 23 Model kW/hr 247.22 286.9 Heat Output (max) Btu/hr 843,514 979,000 1,300,000 kW/hr 483.5 Heat Input (Gross) Btu/hr 979,200 1,230,000 1,650,000 kW/hr 269.16 339.62 435.58 Heat Input (Nett) Btu/hr 918,374 1,160,377 1,486,200 Nett Effi ciency 91.9 91.11 90.1 Burner Type Riello RL34.1 RL34.1 RL44...
-
Page 24: Reference Information
1.15.1 Reference Information Doc/Ref Title/Subject BS 5410-1 & -2 Code of Practice for Oil fi ring BS EN 292-1 &-2 Safety of Machinery BS EN 60204-1 Safety of Machinery - Electrical BS EN 60335-1 Safety of Electrical Appliances BS EN 55014 Electromagnetic Compatibility BS EN 50165 Safety of Electrical Equipment... -
Page 25: Installation
2. Installation. Assembly The following sub-assembly parts should be assembled to t is strongly advised that the installer reads Section 1 of allow installation to continue. this manual prior to starting any installation work. It is a requirement that only qualifi ed and competent personnel undertake installation, commissioning, and servicing. -
Page 26: Oil Installation/Connection
Oil Installation/connection Warning Always isolate from mains electrical supply before The oil tank must be positioned so that there is a fall of 7.5mm commencing work on the heater. (+/- 2.5mm) for every 30mm away from the outlet and towards the sludge/drain valve, which must be sited at the lowest Warning point in the tank. -
Page 27: Heater Control Installation
2.10 Heater Control Installation Warning Isolate heater from mains before undertaking any electrical work. Unless specifi ed all Cabinet Heaters are manufactured and supplied with a pre-wired Control panel as standard. Optional remote controllers are available to be wired back to the cabinet heater. - Page 28 Wiring Diagram 20-45-600 30 - 40 ON/OFF Riello Burner Integral SC³-SZ 230/50/1ph...
- Page 29 Wiring Diagram 20-45-601 60 - 85 ON/OFF Riello Burner Integral SC³-SZ 230/50/1ph...
- Page 30 Wiring Diagram 20-45-602 120 - 135 ON/OFF Riello Burner Integral SC³-SZ 230/50/1ph...
- Page 31 Wiring Diagram 20-45-603 60 - 300 ON/OFF Riello Burner Integral SC³-SZ 415/50/3ph...
- Page 32 Wiring Diagram 20-45-616 30 - 40 ON/OFF Riello Burner Remote SC³-SZ 230/50/1ph...
- Page 33 Wiring Diagram 20-45-617 60 - 85 ON/OFF Riello Burner Remote SC³-SZ 230/50/1ph...
- Page 34 Wiring Diagram 20-45-618 120 - 135 ON/OFF Riello Burner Remote SC³-SZ 230/50/1ph...
- Page 35 Wiring Diagram 20-45-619 60 - 300 ON/OFF Riello Burner Remote SC³-SZ 415/50/3ph...
- Page 36 Wiring Diagram 20-45-604 30 - 40 ON/OFF Riello Burner Integral CP4 230/50/1ph...
- Page 37 Wiring Diagram 20-45-605 60 - 85 ON/OFF Riello Burner Integral CP4 230/50/1ph...
- Page 38 Wiring Diagram 20-45-606 120 - 135 ON/OFF Riello Burner Integral CP4 230/50/1ph...
- Page 39 Wiring Diagram 20-45-607 60 - 300 ON/OFF Riello Burner Integral CP4 415/50/3ph...
- Page 40 Wiring Diagram 20-45-620 30 - 40 ON/OFF Riello Burner Remote CP4 230/50/1ph...
- Page 41 Wiring Diagram 20-45-621 60 - 85 ON/OFF Riello Burner Remote CP4 230/50/1ph...
- Page 42 Wiring Diagram 20-45-622 120 - 135 ON/OFF Riello Burner Remote CP4 230/50/1ph...
- Page 43 Wiring Diagram 20-45-623 60 - 300 ON/OFF Riello Burner Remote CP4 415/50/3ph...
- Page 44 Wiring Diagram 20-45-612 30 - 40 ON/OFF Riello Burner No Controls 230/50/1ph...
- Page 45 Wiring Diagram 20-45-613 60 - 85 ON/OFF Riello Burner No Controls 230/50/1ph...
- Page 46 Wiring Diagram 20-45-614 120 - 135 ON/OFF Riello Burner No Controls 230/50/1ph...
- Page 47 Wiring Diagram 20-45-615 60 - 300 ON/OFF Riello Burner No Controls 415/50/3ph...
- Page 48 Wiring Diagram 20-45-292 HI/LOW option Riello Burner CP4 Control Wiring Diagram 20-45-425 HI/LOW option Riello Burner SC3-MZ...
- Page 49 3. Commissioning. this sample point can be plugged and sealed after commissioning. (k) Check that the fan stat settings has not been disturbed. Warning (l) Remove lower panel and check motor and fan drive system It is a requirement that only suitably qualifi ed and for integrity of joints, check pulley alignment, fan rotation, and competent personnel are allowed to undertake the belt tension (see section 3.2).
- Page 50 (section B) Note (ii) (j) Repeat steps 3.1 q, and 3.2 c,e,f. The gross effi ciency must be approximately 80% sample taken at 1m above the fl ue spigot point. ----------- O R ---------- Note (iii) All Cabinet Heaters are test fi red and pre-commissioned as 3 >15s Burner ignition...
-
Page 51: Commissioning - Hand Over
(b) If the current drawn is greater than the stated running Warning current, in most probability this will be caused by insuffi cient It is a requirement that only suitably qualifi ed and competent static pressure within the ductwork, in which case system persons are allowed to undertake servicing. -
Page 52: Servicing Procedure - Major Component Parts
(i) Burner Check that the bearings do not show signs of excessive wear. It should be noted that these bearings do not require (j) Air delivery system lubricating. (k) Flue If the bearings require replacing the following procedure (l) Report should be followed. -
Page 53: Service Re-Commissioning
secure, and free from corrosion. Note: The maximum displacement at the mid point of the top edge Terminals and connections should also be checked to ensure of the belt must not be greater than 16mm per metre of span, that no stray strands are bridging terminals. when a force of 3kg is applied in a plane perpendicular to the belt. - Page 54 Turbulator Positions in Heat Exchanger 60 Cabinets. 11 off Turbulator Positions in Heat Exchanger 85 Cabinets. 22 off Turbulator Positions in Heat Exchanger 120 & 135 Cabinets. 18 off Turbulator Positions in Heat Exchanger 180 & 205 Cabinets. 40 off Turbulator Positions in Heat Exchanger 235 &...
-
Page 55: Parts Lists
5 Parts Lists... - Page 56 Heater Size / Item Description Burner 35s 29-99-452 29-99-452 29-99-453 29-99-453 29-99-454 29-99-455 Burner 28s 29-99-452 29-99-452 29-99-453 29-99-453 29-99-454 29-99-454 Burner Gasket 30-05-787 30-05-787 30-05-795 30-05-795 30-05-813 30-05-813 Nozzle 35s 27-00-410 27-00-427 27-00-032 27-00-044 27-00-048 27-00-418 27-00-020 Nozzle 28s 27-00-413 27-00-430 27-00-445...
- Page 57 Heater Size / Item Description HTX Assy Aluminised 31-28-128 31-28-128 20-45-154 20-45-154 20-46-283 20-46-283 S/Steel 31-28-159 31-28-159 20-45-164 20-45-164 20-46-281 20-46-281 Turbulators 20-45-485 20-45-485 20-45-780 20-45-780 Burner Spigot 31-28-080 31-28-080 31-40-156 31-40-156 31-27-121 31-27-121 Gasket Stackbox 31-28-078 31-28-078 31-24-074/Z 31-27-123/Z 37-27-123/Z 31-27-123/Z Assembly Painted Pressure Relief 31-28-080 31-28-080 31-27-121...
- Page 58 Heater Size / Item Description Burner 35s 29-99-455 29-99-554 29-99-554 29-99-554 29-99-556 Burner 28s 29-99-454 29-99-554 29-99-554 29-99-554 29-99-556 Burner Gasket 30-05-813 30-03-817 30-03-817 30-03-817 30-03-817 27-01-066 & 27-01-065 & 27-00-052 & 27-00-267 x2 Nozzle 35s 27-00-055 27-01-069 27-01-067 27-01-068 27-00-276 &...
- Page 59 Heater Size / Item Description Heat Exchanger 20-46-355 20-46-355 20-47-405 20-47-405 20-28-211 Assembly 20-46-400 20-46-400 20-47-421 20-47-421 20-28-039 Turbulators 20-46-781 20-46-781 20-47-763 20-47-763 20-47-763 Burner Spigot 31-27-121 31-27-121 31-29-046 31-29-046 31-29-046 Gasket Stackbox 20-46-307/Z 20-46-307/Z 20-47-425/Z 20-47-425/Z 20-28-086/Z Assembly Painted Pressure Relief 20-46-354 20-46-354...
-
Page 60: Fault Finding Guide
6 Fault Finding Guide Check isolator No Power Check fuse Burner lockout Burner fails Fan/limit to run thermostat Room stat Timer No Demand Check controls Heat/vent switch On/ off switch Check that head Check oil Fuel Feed of gravity is pressure is incorrect suffi cient... - Page 61 Adjust air damper Air / fuel Adjust air mix ratio damper incorrect Check for air in fuel line Burner gives Check nozzle a sparky Too much air fl ame Check fi lter Fuel feed Check fuel lines restricted Check valves Check oil pressure Insuffi cient...
- Page 62 Check burner Foreign matter fan motor in fan Worn / dry bearings Burner giving Suction lift Insecure burner excessive to great noise Water in fuel line Check burner Fuel feed oil pump restriction Adjust warm Warm air short air discharge / Check for high circuit cool air inlet...
-
Page 63: Replacement Parts
R40 series: Replacement Parts. • Using an 13mm spanner, remove the nut holding the unit to the burner fl ange. Note • Withdraw the burner from the throat of the heat It is recommended that only suitably competent persons are exchanger, support on bracket/fl ange lugs. -
Page 64: Oil Pump
For Overload: • Disconnect all wiring to the to the overload noting Photocell which cables are connected to which terminals • Loosen the three screws in contactor terminals 2, 4 and 6 • Disconnect electrical supply. • Pull the overload in a downwards movement and unclip from the back of the contactor. -
Page 65: Fan Belts
7.12 Fan Blower 7.10 Fan Belts Note The fan blower is removed form the rear of the cabinet heater The maximum displacement at the mid point of the top edge (opposing side to burner). Ensure there is enough room to of the belt must not be greater than 16mm per metre of span, work in and to withdraw the fan blower. - Page 66 Notes:...
- Page 67 Notes:...
- Page 68 Registered in England No. 1390934. Registered office: 10 Norwich Street, London, EC4A 1BD Nortek Global HVAC is a registered trademark of Nortek Global HVAC Limited. Because of continuous product innovation, Nortek Global HVAC reserves the right to change product specification without due notice.
Need help?
Do you have a question about the Reznor 30 and is the answer not in the manual?
Questions and answers