Table of Contents
Advertisement
Quick Links
Advertisement
Table of Contents

Related Manuals for Adaptec 2126700


Summary of Contents for Adaptec 2126700
- Page 1 Adaptec ASH-1233 ATA Adapter Installation Guide...
-
Page 2: Table Of Contents
Mounting ATA Disk Drives and Connecting Cables Installing the Device Driver Registering Your Adaptec ASH-1233 Adapter This Installation Guide explains how to install the Adaptec ASH-1233 adapter, connect ATA hard disk drives to it, and install the device drivers for your operating system. -
Page 3: System Requirements
System Requirements The minimum system requirements for the ASH-1233 adapter are: Pentium II-266 MHz Processor or higher ® Microsoft Windows Windows XP Available PCI slot with bus-mastering enabled Note: Refer to your system or motherboard documentation for information on enabling bus-mastering. At least one ATA drive and IDE cable CD-ROM or DVD-ROM drive ®... -
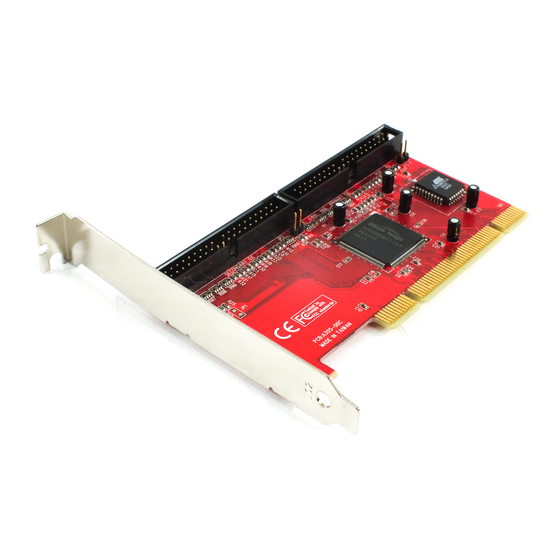
Page 4: This Is Your Adaptec Ash-1233 Adapter
This is Your Adaptec ASH-1233 Adapter Installation Checklist To successfully install your Adaptec ASH-1233 adapter and ATA disk drives, perform these tasks, in order: 1 Install the ASH-1233 adapter. (See 2 Prepare your disk drives. (See 3 Connect your disk drives to the ASH-1233 adapter. (See 4 Mount your disk drives and connect the cables. -
Page 5: Installing Your Adaptec Ash-1233 Adapter
Installing Your Adaptec ASH-1233 Adapter You can install your Adaptec ASH-1233 adapter into a 32-bit or 64-bit PCI expansion slot. Note: If you are installing the adapter into an existing system, back up all data before continuing. To install the ASH-1233 adapter:... - Page 6 3 Locate an unused expansion slot and remove the slot cover. Save the slot cover screw for use in Step Slot cover screw Expansion slot cover 64-bit PCI expansion slots 32-bit PCI expansion slots...
- Page 7 4 Insert the ASH-1233 adapter in the PCI expansion slot. Press down firmly until the adapter clicks into place. When installed properly, the adapter should appear level with the expansion slot. Note: Depending on the tightness of the PCI slot, gentle but firm force may be required to insert the adapter.
-
Page 8: Preparing Your Ata Disk Drives
Preparing Your ATA Disk Drives Because setup can vary from device to device or computer to computer, always refer to your ATA disk drive and computer documentation for specific instructions. Note: If you refer to the ATA drive’s documentation for installation instructions, return to this document to continue with installation of the software included in your kit. -
Page 9: Connecting Your Ata Disk Drives
Connect each ATA disk drive to the ASH-1233 adapter using the proper 40-pin IDE cable. Note: The Adaptec ASH-1233 adapter does not support Cable Select (CSEL) settings. You must change the jumper settings to set disk drives as master or slave. - Page 10 Connecting One ATA Disk Drive on a Cable When you connect only one ATA disk drive to a cable, that disk drive must be set as a master drive. (See page 7 for more information.) To connect one ATA drive to the ASH-1233 adapter: 1 Connect the IDE cable to an IDE connector on the ASH-1233 adapter (as shown below), being careful to match pin 1 of the cable to pin 1 of the connector.
- Page 11 2 Connect the other end of the IDE cable to a master drive, as shown below on the left. 3 Repeat Step 1 IDE connector on the ASH-1233 adapter, as shown above on the right. Both disk drives must be set as master drives. Continue with Mounting ATA Disk Drives and Connecting Cables on page...
- Page 12 Connecting Two ATA Disk Drives to the Same Cable When you connect two ATA disk drives to a cable, one disk drive must be set as the master, the other must be set as the slave. (See on ATA Disk Drives on page 7 To connect two disk drives to the same cable: 1 Connect the IDE cable to an IDE connector on the ASH-1233 adapter.
-
Page 13: Mounting Ata Disk Drives And Connecting Cables
Mounting ATA Disk Drives and Connecting Cables To complete the hardware installation: 1 Mount each ATA disk drive in an available drive bay inside your computer (as shown below). Refer to your computer and device documentation for instructions on installing devices inside your computer. 2 Connect a power cable from your computer’s power supply to each ATA disk drive. -
Page 14: Installing The Device Driver
When you power on your computer, Windows automatically detects the new adapter and opens the New Hardware Installation Wizard. To complete the device driver installation: 1 Insert the Adaptec ASH-1233 CD into your CD-ROM drive. 2 In the Wizard, click Install the software automatically..., then click Next. - Page 15 New Hardware Installation Wizard. To complete the device driver installation: 1 Insert the Adaptec ASH-1233 CD into your CD-ROM drive. 2 In the Wizard, click Next. 3 Select Search for a suitable driver..., then click Next.
-
Page 16: Registering Your Adaptec Ash-1233 Adapter
New Hardware Installation Wizard. To complete the device driver installation: 1 Insert the Adaptec ASH-1233 CD into your CD-ROM drive. 2 In the Wizard, click Next. 3 Click Search for the best driver..., then click Next. - Page 17 Adaptec, Inc. 691 South Milpitas Boulevard Milpitas, CA 95035 USA ©2004 Adaptec, Inc. All rights reserved. Adaptec and the Adaptec logo are trademarks of Adaptec, Inc. which may be registered in some jurisdictions. Part Number: 513908-06, Ver. AA LB 04/04...
Need help?
Do you have a question about the 2126700 and is the answer not in the manual?
Questions and answers