Advertisement
Quick Links
Advertisement

Related Manuals for Hay WOODY COLOUMN LOW


Summary of Contents for Hay WOODY COLOUMN LOW
- Page 1 > I N ST R U C T I O N M A N U A L < W O O D Y B y H A Y...
- Page 3 > I N T R O D U C T I O N <...
- Page 5 > C A R E A N D M A I N T E N A N C E <...
- Page 6 CON T EN TS WOODY - COLOUMN LOW PAGE 8-15 WOODY - COLOUMN HIGH PAGE 16-23...
- Page 7 CON T EN TS WOODY - LOW PAGE 24-31 WOODY - HIGH PAGE 32-38...
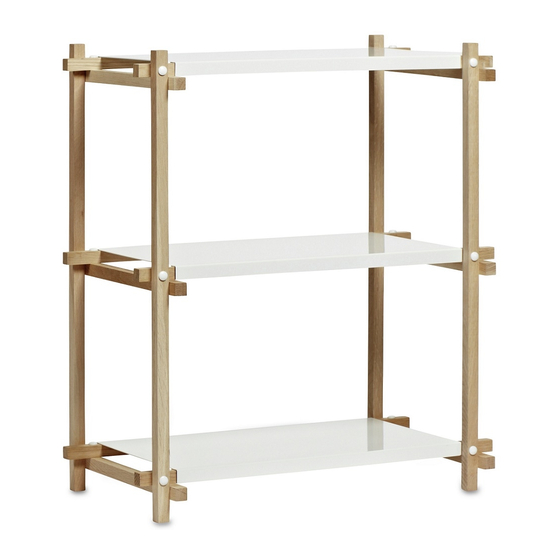
- Page 8 INSTRUCTION M A NUA L Woody Column low...
- Page 9 > PA R TS < A X 4 B X 6 C X 6 D X 3 F X 3 6 G X 1 E X 3 6...
- Page 10 Place the 6 B parts on the A parts and tighten the screw gently. AT T E N T ION B OT TO M DISTA N CE 52,5 m m = = = = = = Please wait to fully tighten the screws until step 3.
- Page 11 Place the 6 C parts on top of the B parts and gently tighten the screw. 37,5mm 62,5mm Please make sure to place all C parts in the same direction...
- Page 12 Place the screws to connect the A part and C part. Tighten the screw gently. When all screws are placed and fully tightened, place the F on the screw heads. Please make sure to tighten all screws fully before placing the F part.
- Page 13 Place the D parts on top of the C parts.
- Page 16 INSTRUCTION M A NUA L Woody Column High...
- Page 17 > PA R TS < A X 4 B X 1 2 C X 1 2 D X 6 F X 7 2 G X 1 E X 7 2...
- Page 18 Place the 12 x B parts on the A parts and tighten the screw gently. AT TEN T IO N TOP D I STA N CE 37,5 m m AT T EN TIO N B OT TO M DISTA N C E 52 , 5mm Please wait to fully tighten the screws until step 3.
- Page 19 Place the 12 x C parts on top of the B parts and gently tighten the screw. 2 persons are recommended to complete this step. 37,5mm 62,5mm Please make sure to place all C parts in the same direction...
- Page 20 Place the screw to connect the A part and C part. Tighten the screw gently. When all screws are placed and fully tightened, place the F on the screw heads. Please make sure to tighten all screws fully before placing the F part.
- Page 21 Place the D parts on top of the C parts.
- Page 24 INSTRUCTION M A NUA L Woody...
- Page 25 > PA R T S < A X 8 B X 1 2 C X 6 D X 9 F X 7 2 G X 1 E X 7 2...
- Page 26 Place the 12 x B parts on the A parts and tighten the screw gently. AT TEN T IO N TOP D I STA N CE 37,5 m m = = = = = = = = = = = = AT T EN TIO N B OT TO M DISTA N C E 52 , 5mm...
- Page 27 Place the 6 x C parts and gently tighten the screw. 2 persons are recommended to complete this step. 37,5mm 62,5m Please make sure to place all C parts in the same direction...
- Page 28 Place the screw to connect the A part and C part. Tighten the screw gently. When all screws are placed and fully tightened, place the F part on the screw heads. Please make sure to tighten all screws fully before placing the F part.
- Page 29 Place the D parts on top of the C parts.
- Page 32 INSTRUCTION M A NUA L Woody High...
- Page 33 > PA R T S < A X 8 B X 24 C X 1 2 D X 1 8 E X 1 4 4 F X 1 4 4 G X 1...
- Page 34 Place the 24 x B parts on the A parts and tighten the screw gently. AT TEN T IO N TOP D I STA N CE 37,5 m m AT T EN TIO N B OT TO M DISTA N C E 52 , 5mm Please wait to fully tighten the screws until step 3.
- Page 35 Place the 12 x C parts and gently tighten the screw. 2 persons are recommended to complete the following steps 37,5mm 62,5m Please make sure to place all C parts in the same direction...
- Page 36 Place the screw to connect the A part and C part. Tighten the screw gently. When all screws are placed and fully tightened, place the F part on the screw heads. Please make sure to tighten all screws fully before placing the F part.
- Page 37 Place the D parts on top of the C parts.
- Page 40 Havnen 1 8700 Horsens Denmark +45 4282 0282 / hay@hay.com ITEM NO. 706354 710441 245872...
Need help?
Do you have a question about the WOODY COLOUMN LOW and is the answer not in the manual?
Questions and answers