Advertisement
Advertisement

Related Manuals for Aim-TTI CPX200D


Summary of Contents for Aim-TTI CPX200D
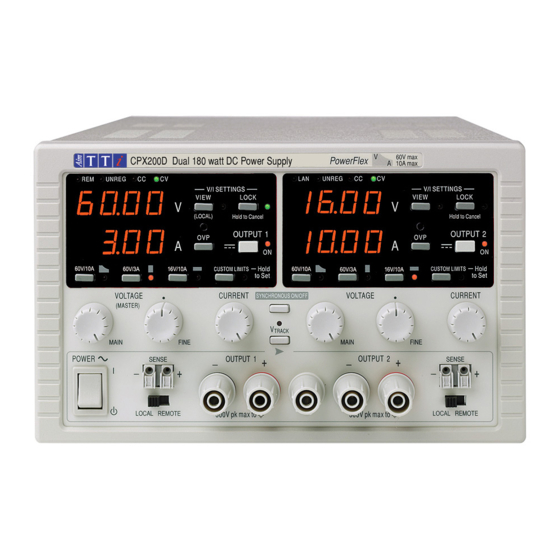
- Page 1 CPX200D & DP PowerFlex Dual DC Power Supply INSTRUCTION MANUAL...
-
Page 2: Table Of Contents
Table of Contents Specification Safety Installation Connections Manual Operation Remote Interface Operation (CPX200DP only) Remote Commands (CPX200DP only) Maintenance Note: The latest revisions of this manual, device drivers and software tools can be downloaded from: http://www.aimtti.com/support. This manual is 48511-1720 Issue 8... -
Page 3: Specification
OCP Range: Measure-and-compare over-current protection is implemented in firmware and can only be set via the remote interfaces (CPX200DP only). Setting resolution: 10mA. Accuracy: ± (0.3% of setting ± 30mA). Response time: typically 500ms. For CPX200D, OCP is fixed at 11A. - Page 4 Over-temperature The output will be tripped off if a fault causes the internal temperature to rise Protection: excessively. Line Regulation: Change in output for a 10% line change: Constant voltage: <0.01% of maximum output Constant current: <0.01% of maximum output Load Regulation: Change in output for any load change within PowerFlex envelope, remote sense connected:...
- Page 5 DIGITAL INTERFACES (CPX200DP only) Full digital remote control facilities are available through the RS232, USB, LAN and GPIB interfaces. Voltage Setting: 16-bit, Resolution 10mV, Accuracy ± (0·05% +10mV) Current Setting: 16-bit, Resolution 1mA, Accuracy ± (0·3% + 0·005A) RS232: Standard 9-pin D-connector. Baud rate 9600. GPIB: Conforming with IEEE488.1 and IEEE488.2 USB:...
-
Page 6: Safety
Safety This power supply is a Safety Class I instrument according to IEC classification and has been designed to meet the requirements of EN61010-1 (Safety Requirements for Electrical Equipment for Measurement, Control and Laboratory Use). It is an Installation Category II instrument intended for operation from a normal single phase supply. -
Page 7: Installation
Installation Mains Operating Voltage This instrument has a universal input range and will operate from a nominal 115V or 230V mains supply without adjustment. Check that the local supply meets the AC Input requirement given in the Specification. Mains Lead Connect the instrument to the AC supply using the mains lead provided. -
Page 8: Connections
Connections Front Panel Connections The load should be connected to the positive (red) and negative (black) terminals marked OUTPUT. The OUTPUT terminals are rated at 30A. Remote sense connections to the load, if required, are made from the positive (+) and negative (−) SENSE terminals. - Page 9 The output and sense terminals for OUTPUT1 and OUTPUT2 are duplicated on the rear panel − , +S and −S. These connections are paralleled with their terminal blocks and are marked front panel equivalents. Switch the LOCAL/REMOTE switch to REMOTE when remote sensing is required. When the rear panel Output terminals are used, the use of remote sense is always recommended to ensure that output regulation is maintained within specification;...
-
Page 10: Manual Operation
Manual Operation The operation of both outputs is identical; the following description applies to both. Switching On The power switch is located at the bottom left of the front panel. When the POWER switch is turned on ( ), the lower meter of Output 1 briefly indicates the instrument firmware revision;... - Page 11 To set new CUSTOM LIMITS turn the output off and select the 60V/10A range; preset limits are shown in the display. Use the VOLTAGE controls and the CURRENT control to set, MAIN FINE precisely, the new custom limits required. Press and hold the CUSTOM LIMITS key; the displays flash the new limits for ~2s, after which the lower (A) display shows to indicate that the new limits have been stored.
- Page 12 load, 5 Amps will flow and the supply will be in CV mode. As the voltage across the load is increased, the power into the load increases until, at about 27V, the power limit is exceeded and the supply changes from CV to UNREG. Connection to the Load The load should be connected to the positive (red) and negative (black) front panel OUTPUT terminals.
- Page 13 Protection Overvoltage protection (OVP) is fully variable within the range 1V to 66V. For CPX200D and CPX200DP in Local mode the OVP limit is set via the screwdriver adjustable OVP preset potentiometer, accessible through a hole in the front panel immediately above the OVP key.
- Page 14 View Settings The set voltage and current limit are always shown when the output is off but can also be viewed when the output is on by pressing the VIEW key; the VIEW lamp is lit whilst the VIEW key is pressed.
- Page 15 TRACK Note that for CPX200D an OVP (over-voltage protection) trip on one output in Voltage Tracking mode will only trip that output off, leaving the other output on; this is also the default mode for CPX200DP.
-
Page 16: Remote Interface Operation (Cpx200Dp Only)
Remote Interface Operation (CPX200DP only) The instrument can be remotely controlled via its RS232, USB, LAN or GPIB interfaces. USB remote control operates in a similar way to RS232 but via the USB connector. Software supplied with the instrument sets up the controlling computer to treat the USB connection as a virtual COM port. - Page 17 Remote/Local Operation At power-on the instrument will be in the local state with the REMote indicator off. In this state all front panel operations are possible. When the instrument is addressed to listen and a command is received the remote state will be entered and REMote will be turned on. In this state the front panel is locked out and remote commands only will be processed.
- Page 18 Baud Rate for this instrument is fixed at 9600; the other parameters are fixed as follows: Start Bits: 1 Parity: None Data Bits: 8 Stop Bits: 1 RS232 Character Set Because of the need for XON/XOFF handshake it is possible to send ASCII coded data only; binary blocks are not allowed.
- Page 19 or, if DHCP times out (30 seconds), via Auto-IP. In the very unlikely event that an Auto-IP address cannot be found a static IP address of 192.168.0.100 is assigned. Resetting the LAN removes any password protection. For more information on LXI standards refer to www.lxistandard.org/home . LAN Connection To use the LAN interface, the IP address of the unit must be known.
- Page 20 mDNS and DNS-SD Support Multicast DNS provides DNS services even on networks without a central DNS server (or DHCP server). This simplifies the setting up of a simple LAN using meaningful hostnames instead of a raw IP address. With service discovery it becomes straightforward for the device to be discovered and the services it provides.
- Page 21 GPIB Subsets This instrument contains the following IEEE 488.1 subsets: Source Handshake Acceptor Handshake Talker Listener Service Request Remote Local Parallel Poll Device Clear Device Trigger Controller Electrical Interface GPIB IEEE Std. 488.2 Error Handling – Query Error Register The IEEE 488.2 error (addressed to talk with nothing to say) is handled as follows.
- Page 22 bit 3 = Sense sense of the response bit; 0 = low, 1 = high bit 2 = bit 1 = bit position of the response bit 0 = Example. To return the RQS bit (bit 6 of the Status Byte Register) as a 1 when true and a 0 when false in bit position 1 in response to a parallel poll operation send the following commands *PRE 64 then PPC followed by 69H (PPE)
- Page 23 Execution Error Register This register contains a number representing the last error encountered over the current interface. The Execution Error Register is read and cleared using the ‘EER?’ command. On power up this register is set to 0 for all interface instances. Error messages have the following meaning: No error encountered 1-9:...
- Page 24 Bit 7 - Not used. Bit 6 - RQS/MSS. This bit, as defined by IEEE Std. 488.2, contains both the Requesting Service message and the Master Status Summary message. RQS is returned in response to a Serial Poll and MSS is returned in response to the *STB? command. Bit 5 - ESB.
- Page 25 Power-on and Remote Operation Default Settings The following instrument status values are set at power on: Status Byte Register Service Request Enable Register † Standard Event Status Register = 128 (pon bit set) Standard Event Status Enable Register † Execution Error Register Query Error Register Parallel Poll Enable Register †...
-
Page 26: Remote Commands (Cpx200Dp Only)
Remote Commands (CPX200DP only) RS232/USB Remote Command Format RS232 input to the instrument is buffered in a 256 byte input queue which is filled, under interrupt, in a manner transparent to all other instrument operations. The instrument will send XOFF when approximately 200 characters are in the queue. - Page 27 Each query produces a specific which is listed along with the command in <RESPONSE MESSAGE> the remote commands list. is ignored except in command identifiers. e.g. '*C LS' is not equivalent to '*CLS'. <WHITE SPACE> is defined as character codes 00H to 20H inclusive with the exception of the NL <WHITE SPACE>...
- Page 28 I< >? Returns the set current limit of output < > The response is I < > < 2>< > where < 2> is in Amps OVP< >? Returns the voltage trip setting for output < > The response is VP< >...
- Page 29 CONFIG? Reports the operating mode. The response is < 1>< >, where < 1> is 2 for outputs operating independently and 0 for voltage tracking mode. RATIO < > Set the ratio of output 2 (slave) to output 1 (master) in tracking mode to < >, where <...
- Page 30 Interface Management Commands LOCAL Go to local. This does not release any active interface lock so that the lock remains with the selected interface when the next remote command is received. IFLOCK Request Instrument ‘lock’. This command requests exclusive access control of the instrument.
-
Page 31: Maintenance
Miscellaneous Commands *IDN? Returns the instrument identification. The exact response is determined by the instrument configuration and is of the form <NAME>,<model>, 0, <version>< > where <NAME> is the manufacturer's name, <model> defines the type of instrument and <version> is the revision level of the software installed. - Page 32 Thurlby Thandar Instruments Ltd. Glebe Road • Huntingdon • Cambridgeshire • PE29 7DR • England (United Kingdom) Telephone: +44 (0)1480 412451 • Fax: +44 (0)1480 450409 International web site: www.aimtti.com • UK web site: www.aimtti.co.uk Email: info@aimtti.com Aim Instruments and Thurlby Thandar Instruments...
Need help?
Do you have a question about the CPX200D and is the answer not in the manual?
Questions and answers