SGM P Series User Manual
Hide thumbs
Also See for P Series:
- User manual (24 pages) ,
- User manual (13 pages) ,
- User manual (24 pages)
Table of Contents
Advertisement
Quick Links
Advertisement
Table of Contents

Related Manuals for SGM P Series


Summary of Contents for SGM P Series
- Page 1 USER MANUAL P-S E R I E S P-S E R I E S P-6 P O I P-6 P O I...
-
Page 2: P-6 Series Dimensions
P-6 SERIES USER MANUAL REV. D © 2021 SGM Light A/S ® . The information in this document is subject to change without notice. SGM and all affiliated companies disclaim liability for any injury, damage, direct or indirect loss, consequential or economic loss, or any other loss occasioned by the use of, inability to use, or reliance on the information contained in this manual. -
Page 3: Table Of Contents
Unpacking ..........................................7 Location/ application ......................................7 Transportation ........................................7 Installing/ rigging the P-6 Series ..........................7 Rigging process using SGM Omega brackets ..............................8 Tilt Lock ..................................8 Angle indicator ........................................8 Connecting AC power ............................... 9 Configuring the device .............................. 9 Connecting to a DMX control device ........................ -
Page 4: Safety Information
Read the following safety precautions carefully before unpacking, installing, powering, or operating the device. SGM fixtures are intended for professional use only. They are not suitable for household use. Les luminaires SGM sont impropre à l’usage domestique. Uniquement à usage professionnel. -
Page 5: Before Installing This Product
External cleaning and visual inspection of the fixture All users of SGM fixtures should regularly clean those parts of the fixture directly exposed to the elements, such as the external housing and front lenses. Additionally, all owners of SGM fixtures must periodically check the external housing of the fixture for structural breaks, components in bad shape, cracked lenses, or loose screws. -
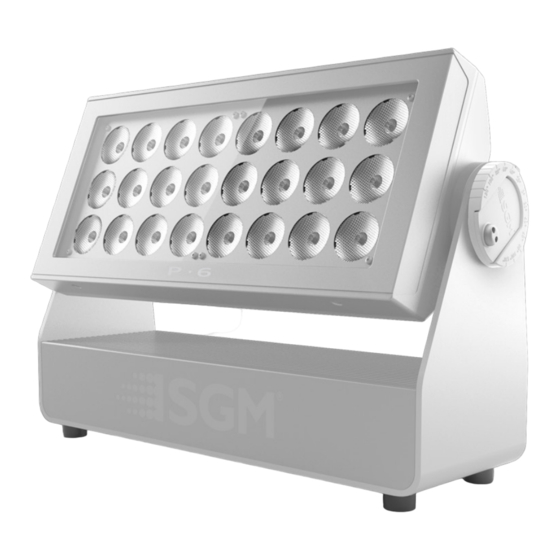
Page 6: Overview
Overview The P-6/ P-6 POI is an RGBW LED fixture with high output, designed for multiple applications, including applications where wireless operation is essential. P-6 Series’ features: • Powerful RGBW LED fixture, with 24RGB x 24White LEDs divided into six individually controllable segments, weighing around 12 kg. -
Page 7: Preparing For Installation
Installing / rigging the P-6 Series 106 mm All SGM fixtures have locking points at the base for installation and rigging. In both [ 4,2in ] standard and POI fixtures, the distance between the points from center to center is always 106 mm. -
Page 8: Rigging Process Using Sgm Omega Brackets
The angle indicator in the wheel shows the current angle of inclination. NOTE: In POI versions, SGM provides a POI Spanner with a pig-nose key for tilt adjustment. Either use the large or the small pig-nose key, depending on the type of fixture. See “POI Tilt lock” on page 17 to know more about the tilt lock in P-6 POI. -
Page 9: Connecting Ac Power
The protective caps must be securely mounted on any unused DMX connector, in order to maintain the ingress protection (IP rating). In POI versions, SGM supplies a power cable with bare ends. Connect the fixture to power by mounting a power connector to the bare ended mains cable. -
Page 10: Connecting To A Dmx Control Device
IP rating. For POI versions, please refer to “Connecting DMX and AC power in POI” on page 18. NOTE: SGM fixtures provide a passive DMX Thru signal as DMX Out, instead of an active output signal. Connecting a wireless transmitter The P-6 is designed to look for wireless transmitters in ‘connect’... -
Page 11: Configuring The Device For Dmx Control
Configuring the device for DMX control About DMX The P-6 Series can be controlled using signals sent by a DMX controller on a number of DMX channels. DMX is the USITT DMX512-A standard, based on the RS-485 standard. The signal is sent as DMX data from a console (or a controller) to the fixtures via a shielded twisted pair cable designed for RS-485 devices. -
Page 12: P-6 Connection Diagram
• P-6 Connection Diagram CONNECTION DIAGRAM Max. 5 units/16 A circuit 115 - 277V AC 115 - 277V AC 115 - 277V AC 50-60 Hz 50-60 Hz 50-60 Hz 630 W 630 W Max. 32 units/DMX line 630 W 120 Ohm +/- 5% Figure 11: P-6 connection diagram (see “P-6 POI connection diagram”... -
Page 13: Fixture Properties
Fixture properties Factory default When restoring factory defaults in the P-6, the following settings will be set: • Set DMX address to 1. • Set 6 Channel CTC DMX mode. • Set screensaver to Dimmed. • Set flip screen to not-flipped. •... -
Page 14: Control Menu
Info Product Type Display product type. Firmware Version Display installed firmware version. Serial Number Display SGM serial #. RDM ID Display RDM ID. (Unique RDM ID for identification). DMX View Up to 504 DMX addresses Display received DMX levels. Temperatures... -
Page 15: Rdm
Level 1 Level 2 Level 3 Function Info Temperatures LED Right 1 LED Right 2 Display fixture temperatures. LED Right 3 Humidity head Display humidity in the head. Wireless signal Display wireless signal strength. Wireless paired Shows if wireless is paired. Light pwm Display light outpout level. -
Page 16: Troubleshooting
This tool is available for download at www.sgmlight.com, and has to be used with the SGM USB 5-Pin-XLR Uploader cable POI if the luminaire does not use XLR connectors in the DMX cable, or the SGM USB uploader cable if the luminaire uses XLR 5-pin DMX... - Page 17 M-10 nuts for M-10 screws. The M-10 screws are included in the package in the same amount as the number of M-10 nuts in the base. The P-6 POI base has six M-10 nuts that can be used for installation and rigging. The SGM Omega bracket (not included) or a customized bracket is needed to install the fixture.
- Page 18 Figure 19: Connecting DMX and AC Power in P-6 POI Connecting a wireless transmitter in POI In POI versions with wireless, it is necessary to pair the fixture with a new transmitter (by default, the fixture is linked to the SGM factory transmitter).
-
Page 19: Accessories
Accessories The P-6 can be used with various accessories such as cables, barndoors, filter frames, and anti-glare shields. To get to know all the available P-6 accessories, visit www.sgmlight.com or contact your local SGM dealer. Barndoors The P-6 features 4-way and 8-way barndoors. The barndoors are designed and intended to be mounted on the fixture without the use of any tools. - Page 20 Note: The studio accessories are not suitable for long-term outdoor use. Figure 23: Spigot adapter for omega bracket Figure 24: DoPchoice Snapbag (R) for Q-8 / P-6 Figure 25: DoPchoice Snapgrid (R) for Q-8 / P-6 For further information and other possibilities visit www.sgmlight.com or contact your local SGM dealer.
-
Page 21: Maintenance
We recommend that the fixture’s firmware is always up-to-date. The latest firmware version is available for download under the respective product at www.sgmlight.com. To update your P-6 Series with the latest firmware, use an SGM USB uploder cable, and a Windows-based computer with the SGM Firmware Tool software installed (available for download at www.sgmlight.com). -
Page 22: Fixtures And Accessories
Fixtures and accessories The P-6 Series can be used with a variety of accessories. Contact your local SGM dealer to get the latest pricing and news about available accessories. Please note: the products listed below are subject to change without notice. -
Page 23: User Notes
User Notes... - Page 24 SGM Light A/S Sommervej 23 8210 Aarhus V Denmark Tel: +45 70 20 74 00 info@sgmlight.com www.sgmlight.com...
Need help?
Do you have a question about the P Series and is the answer not in the manual?
Questions and answers