Table of Contents
Advertisement
Advertisement
Table of Contents

Related Manuals for newell DYMO LabelManager 210D+


Summary of Contents for newell DYMO LabelManager 210D+
- Page 1 LabelManager 210D+ User Guide...
- Page 2 Copyright © 2021 Newell Rubbermaid Europe, LLC. All rights reserved. Rev. 6/21 No part of this document may be reproduced or transmitted in any form or by any means or translated into another language without the prior written consent of Newell Rubbermaid Europe, LLC.
-
Page 3: Table Of Contents
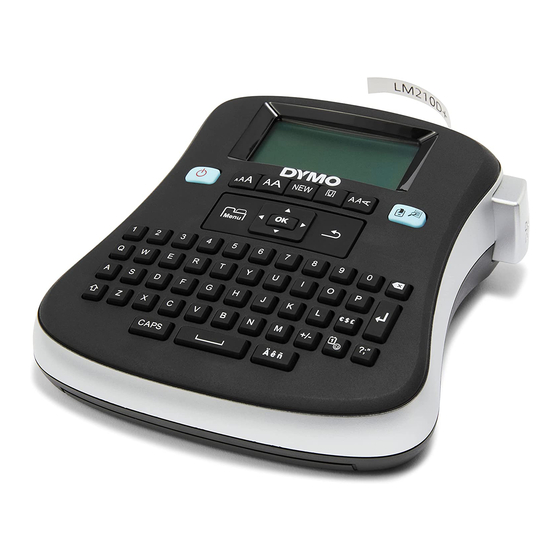
Contents About Your New Label Maker Product Registration Getting Started Connecting the Power Inserting the Batteries Connecting the Optional Power Adapter Inserting the Label Cassette Using the Label Maker for the First Time Getting to Know the Label Maker Power LCD Display Navigation Keys CAPS... - Page 4 Figure 1DYMO LabelManager 210D+ Label Maker AC power connector 17 Space bar LCD display 10 Backspace 18 CAPS New label 11 Return 19 Shift Underline/Boxes 12 Currency 20 Navigation Style 13 Symbols 21 Menu Cutter button 14 Clip art 22 On/Off Print/Print preview 15 Math 23 Font size...
-
Page 5: About Your New Label Maker
About Your New Label Maker LabelManager 210D + electronic label maker, you can create a ® With the DYMO wide variety of high-quality, self-adhesive labels. You can choose to print your labels in many different font sizes and styles. The label maker uses DYMO D1 label cassettes in widths of 1/4”... -
Page 6: Connecting The Optional Power Adapter
Connecting the Optional Power Adapter An optional 9 Volt, 2 Amp power adapter can also be used to power the label maker. Connecting the AC adapter to the label maker disconnects the batteries as a power source. Use only power the adapter listed in this user guide: Adapter model DSA-18PFM-09 Fc 090200 (note: “c”... -
Page 7: Getting To Know The Label Maker
You are now ready to print your first label. To print a label Enter text to create a simple label. Press Select the number of copies. Press to print. Press the cutter button to cut the label. Congratulations! You printed your first label. Continue reading to learn more about the options available for creating labels. -
Page 8: Navigation Keys
Navigation Keys You can review and edit your label using the left and right navigation keys. You can move through menu selections using all four navigation keys, and then press to make a selection. CAPS The CAPS key toggles between upper and lower case character entry. The default is lowercase. -
Page 9: Print
Print key prints your label after asking you how many copies you want to print. The maximum number of copies you can print is 9. Pressing will display a preview of the label. Formatting Your Label You can choose from several format options to enhance the appearance of your labels. -
Page 10: Adding Borders And Underline Styles
Adding Borders and Underline Styles You can highlight your text by choosing a border or underline style. Underline Parchment Square Call Out Rounded Flowers Edged Crocodile Pointed To add a box or underline Press until the desired box or underline style is displayed and press A label can be underlined or enclosed within a box, but not both together. -
Page 11: Adding Special Characters
Adding Special Characters Symbols, clip art, and other special characters can be added to your labels. Adding Symbols and Punctuation The complete list of symbols available is shown on page 16. The short cut keys will take you quickly to the type of symbol you are looking for. Pressing the symbols short cut key takes you quickly to the first row of the symbols table which begins with the punctuation symbols. -
Page 12: Creating Fixed-Length Labels
Creating Fixed-Length Labels Normally, the length of the label is determined by the length of the text. However, you can choose to set the length of the label for a specific application. If the text you entered does not fit within the fixed label length, a message is displayed showing the smallest possible label length for this text. -
Page 13: Caring For Your Label Maker
Caring for Your Label Maker Your label maker is designed to give you long and trouble-free service, while requiring very little maintenance. Clean your label maker from time to time to keep it working properly. Clean the cutter blade each time you replace the label cassette. -
Page 14: Symbols
Symbols Short Cut Key LabelManager ® 210D+ User Guide... -
Page 15: Clip Art
Clip Art © ® ™ ... -
Page 16: Environmental Information
Environmental Information The equipment that you have bought requires the extraction and use of natural resources for its production. It may contain substances that are hazardous to health and the environment. In order to avoid the dissemination of those substances in our environment, and to diminish the pressure on natural resources, we encourage you to use the appropriate take-back systems. - Page 17 LabelManager ® 210D+ User Guide...
- Page 18 LabelManager ® 210D+ User Guide...
Need help?
Do you have a question about the DYMO LabelManager 210D+ and is the answer not in the manual?
Questions and answers