Table of Contents
Advertisement
Quick Links
Advertisement
Table of Contents

Related Manuals for newell DYMO RHINO 6000+


Summary of Contents for newell DYMO RHINO 6000+
- Page 1 6000 + RHINO ™ User Guide...
- Page 2 © 2021 Newell Office Brands All rights reserved. Rev: 6/21 No part of this document or the software may be reproduced or transmitted in any form or by any means or translated into another language without the prior written consent of Newell Office Brands.
-
Page 3: Table Of Contents
Contents About Your New Label Printer Registering Your Label Printer Getting Started Connecting the Power Inserting and Removing the Label Cartridge Removing the Label Backing Using Your Label Printer Power LCD Display Keypad Creating a Label Designing a Label Changing the Text Size Changing the Text Style Creating Multi-Line Labels Using International Characters... - Page 4 Collating Multiple Copies Hiding the Caption Bar Selecting a Language Setting the Units of Measure Adjusting the Display Contrast Adjusting the Print Contrast Reset Connecting the Label Printer to your Computer ™ Downloading and Installing DYMO ID Software Connecting to your Computer About DYMO ID Software Transferring Files Troubleshooting...
-
Page 5: About Your New Label Printer
About Your New Label Printer ® ™ With the DYMO RHINO 6000+ electronic label printer, you can design and print multiple label types, including barcode labels, panel labels, and heat shrink tubes. The label maker uses DYMO IND label cartridges in label widths of 1/4”, 3/8”, 1/2”, 3/4”, or 1”... -
Page 6: Connecting The Power
Connecting the Power The label maker can operate on battery or AC power. A power adapter and a rechargeable battery is included with your printer. To save power, the label maker will automatically turn off after five minutes of inactivity. Make sure to read the Safety Precautions for Rechargeable Battery on page Connecting the Power Adapter The printer uses a 110V-240V power adapter. -
Page 7: Inserting And Removing The Label Cartridge
Inserting and Removing the Label Cartridge Your label maker comes with a starter IND label cartridge. Visit www.dymo.com information about purchasing additional label cartridges. Each time you insert a label cartridge into the printer, you are prompted to set the label width so the printer knows what size label you are currently using. -
Page 8: Using Your Label Printer
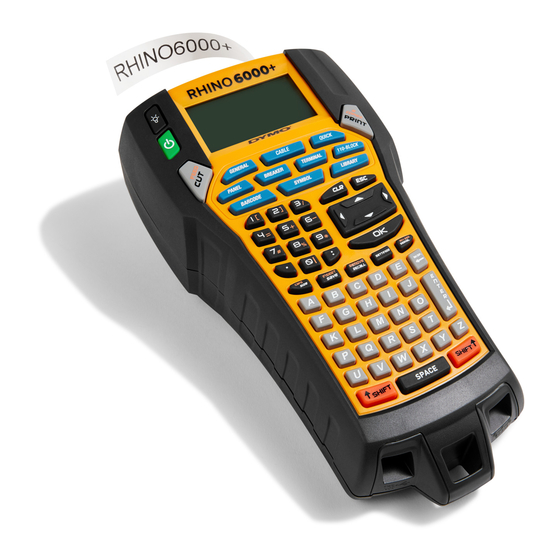
Using Your Label Printer Become familiar with the feature and function keys on your label printer. CABLE QUICK GENERAL BREAKER TERMINAL 110-BLOCK PANEL LIBRARY BARCODE SYMBOL Figure 5 1 Print/# of copies Settings 15 Size/Caps 2 Library Backspace 16 Symbols 3 Escape 10 Enter 17 Barcode... -
Page 9: Lcd Display
remembered; however, the current label file is lost and you will need to reset the label width when you reconnect the power and turn on the printer. LCD Display The label maker’s LCD display includes a caption bar across the top, showing the current label type, and feature indicators on the right side, showing which features are currently selected. - Page 10 Escape Key The ESC key returns you to the previous menu from within any menu without making a selection. Navigation Keys The navigation keys operate as follows: Function Moves one character to the left in the display Returns to the previous menu (can also press SHIFT , Moves one label to the left in the display Moves one character to the right in the display...
-
Page 11: Creating A Label
Creating a Label The label printer includes two types of basic labels: Quick and General. The current label type is shown in the display caption. A Quick label is the default label type. The length of the label is determined by the text and formatting you use. -
Page 12: Designing A Label
Designing a Label You can choose from a number of options to enhance the appearance of your labels. You can also add a barcode, symbols, and library text to your label. And, you can create a series of labels automatically using three different serialization methods. -
Page 13: Using International Characters
To create a multi-line label Enter the text for the first line, and press ENTER. Enter the text for the next line. Repeat these steps for each additional line. Using International Characters The label maker supports the extended Latin character set using RACE technology. -
Page 14: Adding Symbols
Adding a QR Code QR codes are limited to a maximum of 20 characters. For example, text or a phone number. To add a QR code Press BARCODE. Use the arrow keys to select the QR Code, and press OK. Enter the text for the QR code and press OK. -
Page 15: Using The Text Library
A complete list of the symbols can be found beginning on page 35. Some of the more popular symbols can be accessed from the number keys using SHIFT plus the number. For example, pressing SHIFT + 1 inserts an open bracket ([). Symbols added to a label can be formatted or deleted just like any other character you enter. -
Page 16: Creating A Series Of Labels
Deleting My Library Text You can delete custom text from My Library. To delete My Library text Press LIBRARY. Use the arrow keys to select My Library. Select the text to delete. Press . A confirmation message appears. Press OK to delete the text. Creating a Series of Labels You can automatically generate labels by creating a series. - Page 17 To use simultaneous serialization Enter the text for your label. Press ADV.SER. (SHIFT + SERIAL). Select Simultaneous and press OK. A box appears around the character where the cursor was positioned. Select the first character position you want to increment and press OK. Select the second character position you want to increment and press OK.
-
Page 18: Working With Label Files
Working with Label Files The printer creates and stores labels as label files. A label file can contain one or more labels. When you create a new label, you also create a new label file. You can then insert additional labels, remove labels, and store the group of labels as a label file in memory. -
Page 19: Printing A Label File
Printing a Label File When you print a label file, you choose whether to print all of the labels, the current label, or a range of labels in the file. To print labels Press PRINT. If your label file contains more than one label, a print menu is displayed. -
Page 20: Deleting A Label File From Memory
Deleting a Label File from Memory When you no longer need a stored label, you can delete it from memory. To delete a label from memory Press RECALL. The saved label files are displayed. Use the arrow keys to move to the label file you wish to delete. Press and then press OK to clear the memory location. -
Page 21: Using The Label Applications
Using the Label Applications You can quickly create labels for special industrial applications. Hot keys are available for each of the label types available. The current label type is displayed in the Caption bar. By default, the label type is Quick with no special formatting, text centered, and the length automatically determined by the amount of text. -
Page 22: Creating A Vertical Label
Creating a Vertical Label You can choose to print a label with the text running vertically. A label with multiple lines of text will print as multiple columns of text. To print a vertical label Press GENERAL. Select the Portrait as the orientation property. Select Done (ESC) to create the label. -
Page 23: Creating Laminated Cable Wrap Labels
The label properties you can set are: Cable type CAT 5/6, COAX, AWG: 4/0 - 2/0, AWG: 0 - 2, AWG: 3 - 5, AWG: 6+, or Custom Diameter Use when Custom is selected for Cable type. Minimum: 5/32” (4 mm) Maximum: 2”... -
Page 24: Creating Heat-Shrink Labels
Creating Heat-Shrink Labels The heat-shrink tube label is one of several cable management specific labels. Heat shrink tube labels can be printed on any continuous Heat-Shrink Tube labels. The label properties you can set are: Orientation Landscape (Default) Portrait Changing the label orientation removes any content on the label, creating a new blank label. -
Page 25: Creating A Distribution Panel Label
Label setup One label for all ports - Print groups of ports as one continuous label. One label per group - Print each group of ports as a separate label. (Default) Label layout Show label outline - Show label outline. Default is No. Show separator lines - Print a separator line between each port. -
Page 26: Vertical Breaker Label
Vertical Breaker Label The vertical breaker label is one of two types of labels for use on a breaker box. See Horizontal Breaker Label on page 22. Use serialization to automatically populate the breakers. When all the breakers are filled on the current label, a new label is created. See Creating a Series of Labels on page 12. -
Page 27: Creating Terminal Block Labels
Label layout Show label outline - Show label outline. Default is No. Show separator lines - Print a separator line between each port. (Default is Yes.) Match/leader trailer - Blank space is equal at the beginning and end of the label. Default is Yes. To create a horizontal breaker label Press BREAKER. -
Page 28: Creating 110-Block Labels
Creating 110-Block Labels The 110-block label is one of several datacom specific labels. You enter data into one of three pre-defined block formats depending on the block type you select. Use serialization to automatically populate the blocks. When all the blocks are filled on the current label, a new label is created. -
Page 29: Changing The Settings
Changing the Settings Text size, text style, Caps mode, and hide/show barcode text settings are described elsewhere in this user guide. You can change the following settings: Setting the Label Width Auto Cut Pausing to Cut between Labels ... -
Page 30: Pausing To Cut Between Labels
Pausing to Cut between Labels When Auto Cut is turned off, multiple labels will print continuously until all labels are printed. You can choose to pause printing between each label so you can manually cut each label as they print. To set the printer to pause between each label Press SETTINGS. -
Page 31: Selecting A Language
Selecting a Language Several language-related features on the label maker are determined by the language setting, such as special characters, menu text, and so on. By default the language is set to English. To select a language Press SETTINGS and select Language. Select the language. -
Page 32: Reset
Reset You can reset the printer to its default settings. All your previous settings and saved label files will be removed. To adjust the print contrast Press SETTINGS. Select Default reset and press OK. Use the arrow keys to select Yes. Press OK when prompted to remove user data. -
Page 33: Connecting The Label Printer To Your Computer
Connecting the Label Printer to your Computer The label printer can be used as a standalone label printer or you can print labels ™ directly from your computer using the latest version of DYMO ID software. ™ Using DYMO ID software is the recommended method for producing a high- volume of labels. -
Page 34: About Dymo Id Software
About DYMO ID Software ™ The following figure shows some of the major features available with DYMO ID software. Select a label printer to print or transfer labels Select a label cartridge Show or hide the Print a label Home screen Continue Open a editing the... -
Page 35: Troubleshooting
Troubleshooting Review the following possible solutions if you encounter a problem. Problem/Error Message Solution Battery Low Attach the power adapter. Battery Empty Recharge the battery. See Recharging the Battery on page 2. Poor Print Quality Clean the print head. See Cleaning the Print Head on page 32. ... -
Page 36: Caring For Your Printer
Caring for Your Printer Your label printer is designed to give you long and trouble-free service, while requiring very little maintenance. Clean your printer regularly to keep it working properly. Cleaning the Cutter Blade Periodically, the message Clean cutter will display. This is a reminder to clean any adhesive build up on the cutter blade so that your labels will continue to cut with no problems. -
Page 37: Safety Precautions For Rechargeable Battery
Safety Precautions for Rechargeable Battery Battery type: LiPolymer 7.4V 1400mAh 10.36Wh Inaccurate handling of a lithium-ion polymer rechargeable battery may cause leakage, heat, smoke, an explosion, or fire. This could cause deterioration of performance or failure. This may also damage the protection device installed in the battery. - Page 38 ™ RHINO 6000+ User Guide...
-
Page 39: Symbols
Symbols The following tables list the default symbols by category. Electrical Punctuation Home Electrical Ω Ø ² , ; ' " . : & \ ! ¡ ° ~ ? ¿ _ * + - ±... -
Page 40: Library Text
Library Text The following tables list the library text by category. Location ATTIC KITCHEN BACK LAUNDRY ROOM BASEMENT LEFT BATH LIBRARY BEDROOM LIVING ROOM BILLIARDS ROOM LOBBY CENTER LOWER CLOSET MAIN FLOOR DECK MASTER BATH DEMARC MASTER BEDROOM MEDIA ROOM DINING ROOM OFFICE DRESSING ROOM... - Page 41 Video CATV COMPONENT COMPOSITE RS-232 REMOTE S-VIDEO HDMI HDTV TOUCH SCREEN KEYPAD VESA MONITOR VIDEO NANNY CAM VIDEO GAME PROJECTOR Voice/ Data CABLE MODEM LAPTOP NETWORK DSLAM PHONE DEMARC PHONE SYSTEM DESKTOP VoIP INTERNET WIRELESS Security BACK DOOR HEAT DETECTOR CCTV HIGH WATER CAMERA...
Need help?
Do you have a question about the DYMO RHINO 6000+ and is the answer not in the manual?
Questions and answers