Table of Contents
Advertisement
Quick Links
Advertisement
Table of Contents

Subscribe to Our Youtube Channel
Related Manuals for newell Dymo LabelManager 420P


Summary of Contents for newell Dymo LabelManager 420P
- Page 1 LabelManager 420P ® User Guide...
- Page 2 Copyright © 2015 Newell Rubbermaid Europe, LLC. All rights reserved. Rev. 7/19 No part of this document may be reproduced or transmitted in any form or by any means or translated into another language without the prior written consent of Newell Rubbermaid Europe, LLC.
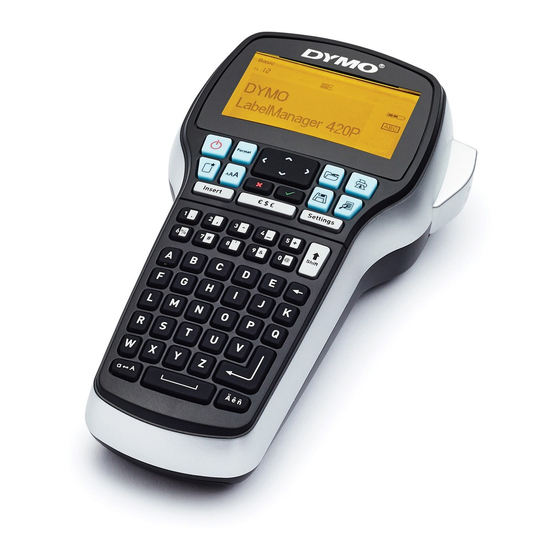
- Page 3 Insert – Shift Figure 1DYMO LabelManager 420P label maker Print Accented characters Format Preview Space bar LCD display Save Caps Cancel Settings Numeric keys Navigation Symbols Insert Shift Font Size Open Backspace New label/Clear Return On/Off...
-
Page 4: Table Of Contents
Contents About Your New Label Maker ............3 Product Registration . -
Page 5: About Your New Label Maker
About Your New Label Maker To recharge the battery Plug the charging adapter into the power connector on With the DYMO® LabelManager 420P electronic label the top of the label maker. maker, you can create a wide variety of high-quality, self- adhesive labels. -
Page 6: Using The Label Maker For The First Time
Using the Label Maker for the First Time LCD Display The display can show four lines of text at a time. The The first time you turn on the power, you are asked to select number of characters displayed on each line will vary due to the language, units of measure, and label width. -
Page 7: New Label/Clear
New Label/Clear Font Size Eight font sizes are available for your labels: key gives you a choice to clear all label text, just the text formatting, or both. Cancel key allows you to exit from a menu without making a selection or to cancel an action. Preview key displays a preview of your label layout. -
Page 8: Adding Borders
Adding Borders Aligning the Text You can highlight your text by choosing a border. You can align the text to print left or right justified on the label. The default alignment is centered. Square Parchment Use the left and right navigation keys to select the Rounded Call Out text alignment. -
Page 9: Using Clip Art, Symbols, And Special Characters
Using Clip Art, Symbols, and Adding Symbols Special Characters The label maker supports the extended symbol set shown below. Clip art, symbols, punctuation, and other special characters can be added to your labels. Adding Clip Art The label maker includes the clip art shown below. ↔... -
Page 10: Adding International Characters
Using Auto-Numbering Adding International Characters The label maker supports the extended Latin character set. You can print a series of up to 10 labels at a time using auto-numbering. After pressing the Accent key, , pressing a letter brings up a menu containing all the available variations of that letter. Adding Auto-Numbering For example, if French is selected as the language and You can add numeric, uppercase, or lowercase auto-... -
Page 11: Editing A Barcode
Caring for Your Label Maker Editing a Barcode You can edit the text for an existing barcode. Your label maker is designed to give you long and trouble- free service, while requiring very little maintenance. Clean To edit a barcode your label maker from time to time to keep it working Move the cursor anywhere within the barcode text. -
Page 12: About The Built-In Software
About the Built-In Software The built-in software resides on the label maker. You do not need to install additional software or drivers to use the label maker with your computer. The following figure shows some of the features available in the software. Choose to print Change the language Capture an area of... -
Page 13: Troubleshooting
Troubleshooting Review the following possible solutions if you encounter a problem while using your label maker. Problem/Error Message Solution No display • Ensure the label maker is turned on. • Attach the charging adapter to the label maker to recharge the battery pack. See “Recharging the Battery”. -
Page 14: Environmental Information
Environmental Information The equipment that you have bought requires the extraction and use of natural resources for its production. It may contain substances that are hazardous to health and the environment. In order to avoid the dissemination of those substances in our environment, and to diminish the pressure on natural resources, we encourage you to use the appropriate take-back systems.
Need help?
Do you have a question about the Dymo LabelManager 420P and is the answer not in the manual?
Questions and answers