Table of Contents
Advertisement
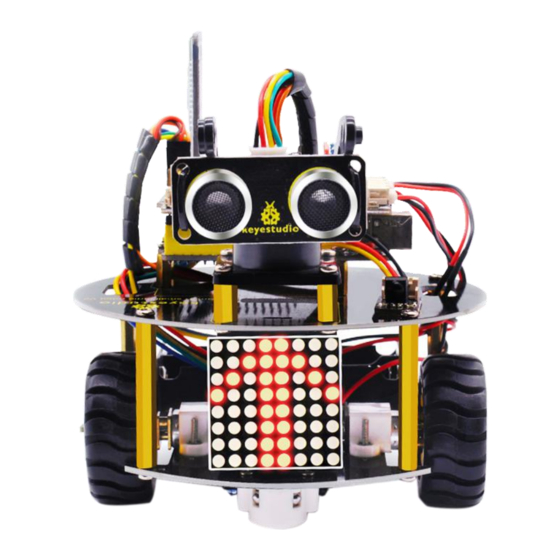
www.keyestudio.com
Thanks for your support on our products, we will continue to provide you
better quality and service!
About keyestudio ........................................................................................................... 3
*References and After-sales Service ......................................................................... 3
*Warning ........................................................................................................................... 4
*Copyright ......................................................................................................................... 4
1. Introduction ................................................................................................................. 5
2. Features ......................................................................................................................... 7
3. Specification ................................................................................................................ 7
4. Product Kit .................................................................................................................... 8
5. Assembly Guide ........................................................................................................ 13
Step 1: Bottom Motor Wheel ............................................................................ 13
Step 2:Assemble Parts ......................................................................................... 15
Step 3: Install Top PCB ........................................................................................ 20
Step 4: Mount Control Board ............................................................................ 21
Step 5: Servo Plastic Platform ........................................................................... 23
Step 6: Final Assembly ........................................................................................ 27
Step 7: Hook-up Guide ....................................................................................... 31
6. Getting Started with Arduino ............................................................................... 34
(1) Keyestudio V4.0 Development Board ...................................................... 36
Content
1
Advertisement
Table of Contents

Related Manuals for Keyestudio Smart Little Turtle Robot V3


Summary of Contents for Keyestudio Smart Little Turtle Robot V3
-
Page 1: Table Of Contents
Step 4: Mount Control Board ................21 Step 5: Servo Plastic Platform ................23 Step 6: Final Assembly ..................27 Step 7: Hook-up Guide ..................31 6. Getting Started with Arduino ................34 (1) Keyestudio V4.0 Development Board ............36... - Page 2 (2) Installing V4.0 board Driver ................ 39 (3) Install other visions of driver ..............45 (4) Arduino IDE Setting ..................48 (5) Start First Program ..................52 7. Add project Libraries ....................56 (1) What are Libraries ? ..................56 (2) How to Install a Library ? ................
-
Page 3: About Keyestudio
Project 15: Multi-purpose Bluetooth Robot ..........213 7. Resources ......................... 230 About keyestudio Keyestudio is a best-selling brand owned by KEYES Corporation, our product lines range from Arduino boards, shields, sensor modules, Raspberry Pi, micro:bit extension boards and smart car to complete starter kits designed for customers of any level to learn Arduino knowledge. -
Page 4: Warning
*Copyright The keyestudio trademark and logo are the copyright of KEYES DIY ROBOT co.,LTD. All products under keyestudio brand can ’ t be copied, sold and resold without authorization by anyone or company. If you’re interested in items,... -
Page 5: Introduction
1. Introduction... - Page 6 - activating a motor, turning on an LED, publishing something online. Based on this, Keyestudio team has designed a turtle robot. It has a processor which is programmable using the Arduino IDE, to mapped its pins to sensors and actuators by a shield that plug in the processor, it reads sensors and controls the actuators and decides how to operate.
-
Page 7: Features
2. Features 1. Multi-purpose function: Obstacle avoidance, follow, IR remote control, Bluetooth control, ultrasonic follow and displayed face emoticons. 2. Simple assembly: No soldering circuit required, complete assembly easily. 3. High Tenacity: Aluminum alloy bracket, metal motors, high quality wheels and tracks 4. -
Page 8: Product Kit
Motor speed: 5V 63 rpm/min Motor drive mode: dual H bridge drive Ultrasonic induction angle: <15 degrees Ultrasonic detection distance: 2cm-400cm Infrared remote control distance: 10M (measured) Bluetooth remote control distance: 50M(measured) Bluetooth control: support Android and iOS system... - Page 9 Product Name Picture Keyestudio V4.0 Board(UNO compatible) Keyestudio Quick Connectors Motor Driver Shield Keyestudio Quick Connectors IR Receiver Keyestudio Quick Connectors Line Tracking Sensor Keyestudio Quick Connectors 12FN20 Motor Connector A Keyestudio Quick Connectors 12FN20 Motor Connector B...
- Page 10 8x8 Dot Matrix Module Keyestudio Quick Connectors Ultrasonic Module Keyestudio Bluetooth Module(HC-06) Keyestudio JMFP-4 17 86*40*6.5MM Remote Control(without batteries) Double-head JST-PH2.0MM-5P 24AWG Blue-green-yellow-red-black Wire 15CM Double-head JST-PH2.0MM-4P 24AWG Blue-green-yellow-red-black Wire Double-head JST-PH2.0MM-3P 24AWG Yellow-red-black Wire...
- Page 11 Double-head JST-PH2.0MM-2P 24AWGred-black Wire 160mm Battery Holder with JST-PH2.0MM-2P Lead, 4 Slot AA Battery Holder M2*12MM Round Head Screws M2 Nickel Plated Nuts M3*6MM Round Head Screws M3*6MM Flat Head Screws M3 Nickel Plated Nuts M3*10MM Hexagon Copper Bush...
- Page 12 N20 Motor U Type Mount Black Plastic Platform 3PI MiniQ Universal Caster 304 Stainless Steel Black-yellow Handle 3*40MM Cross Screwdriver 1m Transparent Blue USB Cable Black 3*100MM Ties Keyestudio Smart Turtle Robot V2.0 Baseboard Keyestudio Smart Turtle Robot V2.0 Top Board...
-
Page 13: Assembly Guide
F-F 20CM/40P/2.54/10 Dupont Cable 2.54 3pin F-F 20cm Dupont Cable Keyestudio Red LED Module Decorative Board 5. Assembly Guide Note: Peel the plastic film off the board first when installing the smart car. To be honest, we never intend to send wood to you. - Page 14 M3*6MM Flat Head Screw *2 M3 Nickel Plated Nut *2 Bottom PCB*1 Tracking Sensor *1 Universal Caster *2...
-
Page 15: Step 2:Assemble Parts
Step 2:Assemble Parts Prepare the parts as follows: M3*6MM Round Head Screw *2 M2 Nut *4 12FN20 Motor *2 U-type Holder* 2 N20 Motor Wheel *2 2P Wire *2 5P Wire *1 ... - Page 16 www.keyestudio.com...
- Page 17 www.keyestudio.com...
- Page 18 www.keyestudio.com...
- Page 19 www.keyestudio.com...
-
Page 20: Step 3: Install Top Pcb
Step 3: Install Top PCB Prepare the parts as follows: Top PCB *1 M3 Nut *1 M3*6MM Round Head Screw *9 M3*10MM Hexagon Copper Bush *8 IR Receiver Sensor *1... -
Page 21: Step 4: Mount Control Board
Step 4: Mount Control Board Prepare the parts as follows: V4.0 Board*1 Motor Drive Shield V2*1 M3*6MM Round Head Screw *4... - Page 22 www.keyestudio.com...
-
Page 23: Step 5: Servo Plastic Platform
Step 5: Servo Plastic Platform Prepare the parts as follows: Servo *1 M2*4 Screw *1 Black Tie*2 Ultrasonic Sensor*1 Black Plastic Platform *1 M1.2*4 Tapping Screw *4 M2*8 Tapping Screw *2... - Page 24 www.keyestudio.com...
- Page 25 www.keyestudio.com...
- Page 26 www.keyestudio.com...
-
Page 27: Step 6: Final Assembly
Step 6: Final Assembly Prepare the parts as follows: M3*6MM Round Head Screw *12 M3*40MM Hexagon Copper Bush*4 8x8 Dot Matrix *1 Jumper Wire *4... - Page 28 www.keyestudio.com...
- Page 29 www.keyestudio.com...
- Page 30 www.keyestudio.com...
-
Page 31: Step 7: Hook-Up Guide
Step 7: Hook-up Guide... - Page 32 www.keyestudio.com...
- Page 33 www.keyestudio.com...
-
Page 34: Getting Started With Arduino
6. Getting Started with Arduino When we get control board, we need to download Arduino IDE and driver firstly. You could download Arduino IDE from the official website: https://www.arduino.cc/, click the SOFTWARE on the browse bar, click “DOWNLOADS” to enter download page, as shown below:... - Page 35 There are two versions of IDE for WINDOWS system, you can choose between the Installer (.exe) and the Zip packages. We suggest you use the first one that installs directly everything you need to use the Arduino Software (IDE), including the drivers. With the Zip package you need to install the drivers manually.
-
Page 36: Keyestudio V4.0 Development Board
(1) Keyestudio V4.0 Development Board We need to know keyestudio V4.0 development board, as a core of this smart car. Keyestudio V4.0 development board is an Arduino uno -compatible board, which is based on ATmega328P MCU, and with a cp2102 Chip as a UART-... - Page 37 It has 14 digital input/output pins (of which 6 can be used as PWM output s), 6 analog inputs, a 16 MHz quartz crystal, a USB connection, a power jack, 2 ICSP headers and a reset button.
- Page 38 It contains everything needed to support the microcontroller; simply conn ect it to a computer with a USB cable or power it via an external DC power jack (DC 7-12V) or via female headers Vin/ GND(DC 7-12V) to get started.
-
Page 39: Installing V4.0 Board Driver
LED_BUILTIN (2) Installing V4.0 board Driver Let’s install the driver of keyestudio V4.0 board. The USB-TTL chip on V4.0 board adopts CP2102 serial chip. The driver program of this chip is included in Arduino 1.8 version and above, which is convenient. Plug on USB port of board, the computer can recognize the hardware and automatically install the driver of CP2102. - Page 40 If install unsuccessfully, or you intend to install manually, open the device manager of computer. Right click Computer----- Properties----- Device Manager. There is a yellow exclamation mark on the page, which implies installing unsuccessfully. Then we double click the hardware and update the driver.
- Page 41 Click“OK”to enter the following page, click“browse my computer for updated driver software”, find out the installed or downloaded ARDUINO software. As shown below:...
- Page 42 There is a DRIVERS folder in Arduino software installed package ( ), open driver folder and you can see the driver of CP210X series chips. We click“Browse”, then find out the driver folder, or you could enter “driver” to search in rectangular box, then click“next”, the driver will be installed successfully.
- Page 43 Open device manager, we will find the yellow exclamation mark disappear. The driver of CP2102 is installed successfully.
- Page 44 www.keyestudio.com...
-
Page 45: Install Other Visions Of Driver
(3) Install other visions of driver If your development board is Arduino board, install the driver as follows: Step 1: Plug in the development board, click Computer----- Properties----- Device Manager, you could see the unknown device is shown. Step 2: Update the driver... - Page 46 Step 3: click“browse my computer for updated driver software” Step 4: find out the folder where the ARDUINO software is installed, click drivers folder and tap“Next”...
- Page 47 Step 5: the driver is installed successfully. The device manager shows the serial port of Arduino.
-
Page 48: Arduino Ide Setting
(4) Arduino IDE Setting Click icon,open Arduino IDE. - Page 49 To avoid the errors when uploading the program to the board, you need to select the correct Arduino board that matches the board connected to your computer. Then come back to the Arduino software, you should click Tools→Board, select the board. (as shown below)
- Page 50 Then select the correct COM port (you can see the corresponding COM port after the driver is successfully installed)
- Page 51 Before uploading the program to the board, let’s demonstrate the function of each symbol in the Arduino IDE toolbar.
-
Page 52: Start First Program
A- Used to verify whether there is any compiling mistakes or not. B- Used to upload the sketch to your Arduino board. C- Used to create shortcut window of a new sketch. D- Used to directly open an example sketch. - Page 53 Set board and COM port, the corresponding board and COM port are...
- Page 54 IDE. Click to start compiling the program, check errors.
- Page 55 Click to upload the program, upload successfully.
-
Page 56: Add Project Libraries
Upload the program successfully, the onboard LED lights on for 1s, lights off for 1s. Congratulation, you finish the first program. 7. Add project Libraries (1) What are Libraries ? Libraries are a collection of code that makes it easy for you to connect to a sensor,display, module, etc. -
Page 57: How To Install A Library
The built-in libraries and some of these additional libraries are listed in the reference. (2) How to Install a Library ? Here we will introduce the most simple way for you to add libraries . Step 1 : After downloading well the Arduino IDE, you can right-click the icon of Arduino IDE. - Page 58 Step 3: Next to find out the“libraries”folders of turtle robot(seen in the link: https://fs.keyestudio.com/KS0464), you just need to replicate and paste it into the libraries folder of Arduino IDE.
- Page 59 www.keyestudio.com...
- Page 60 Then the libraries of turtle robot are installed successfully, as shown below:...
-
Page 61: Projects
7. Projects The whole project begins with basic program. Starting from simple to... -
Page 62: Project 1: Led Blink
I reckon that you could hardly sit still and itch to have a go, let’s get started. Note: (G), marked on each sensor and module, is negative pole and connected to “G”, ”-”or “GND”on the sensor shield or control board ;... - Page 63 Control interface: digital port Working voltage: DC 3.3-5V Pin spacing: 2.54mm LED display color: red (3) Components (3) Wiring Diagram...
- Page 64 The expansion board is stacked on development board, -, “+” and S pins of LED module are respectively connected to G, 5V and D3 pins of shield. (4) Test Code keyestudio smart turtle robot lesson 1.1 Blink http://www.keyestudio.com void setup()
- Page 65 // the loop function runs over and over again forever digitalWrite(3, HIGH); // turn the LED on (HIGH is the voltage level) delay(1000); // wait for a second digitalWrite(3, LOW); // turn the LED off by making the voltage LOW delay(1000);...
- Page 66 Let’s modify the value of delay and remain the pin unchanged, then observe how LED changes. keyestudio smart turtle robot lesson 1.2 delay http://www.keyestudio.com void setup() // initialize digital pin 11 as an output. pinMode(3, OUTPUT); // the loop function runs over and over again forever void loop() digitalWrite(3, HIGH);...
-
Page 67: Project 2: Adjust Led Brightness
//***************************************************************** The LED flickers faster through the test result, therefore, pins and delay time could affect flash frequency. Project 2: Adjust LED Brightness (1) Description In previous lesson, we control LED on and off and make it blink. In this project, we will control LED... - Page 68 For the Arduino digital port voltage output, there are only LOW and HIGH, which correspond to the voltage output of 0V and 5V. You can define LOW as 0 and HIGH as 1, and let the Arduino output five hundred 0 or 1 signals within 1 second.
- Page 69 (3) Hook-up Diagram (4) Test Code: keyestudio smart turtle robot lesson 2.1 http://www.keyestudio.com...
- Page 70 = 3; // Define the LED pin at D3 int value; void setup () { pinMode (ledPin, OUTPUT); // initialize ledpin as an output. void loop () { for (value = 0; value <255; value = value + 1) analogWrite (ledPin, value);...
- Page 71 Upload test code successfully, LED gradually becomes brighter then darker, like human breath, rather than turn on and off immediately. (6) Code Explanation When we need to repeat some statements, we could use FOR statement. FOR statement format is shown below: FOR cyclic sequence: Round 1:1 →...
- Page 72 The two“for”statements make value increase from 0 to 255, then reduce from 255 to 0, then increase to 255,..infinitely loop There is a new function in the following ----- analogWrite() We know that digital port only has two state of 0 and 1. So how to send an analog value to a digital value? Here,this function is needed.
- Page 73 In the above figure, the green line represents a period, and value of analogWrite() corresponds to a percentage which is called Duty Cycle as well. Duty cycle implies that high-level duration is divided by low-level duration in a cycle. From top to bottom, the duty cycle of first square wave is 0% and its corresponding value is 0.
- Page 74 (7) Extension Practice: Let’s modify the value of delay and remain the pin unchanged, then observe how LED changes. keyestudio smart turtle robot lesson 2.2 http://www.keyestudio.com int ledPin = 3; // Define the LED pin at D3 void setup () { pinMode(ledPin, OUTPUT);...
-
Page 75: Project 3 : Line Tracking Sensor
During the process of detection, black is active at HIGH level, but white is active at LOW level. The detection height is 0-3 cm. Keyestudio 3-channel line tracking module has integrated 3 sets of TCRT5000 infrared tube on a single board, which is more convenient for... - Page 76 By rotating the adjustable potentiometer on the sensor, it can adjust the detection sensitivity of the sensor. (2) Specification: Operating Voltage: 3.3-5V (DC) Interface: 5PIN Output Signal: Digital signal Detection Height: 0-3 cm Special note: before testing, turn the potentiometer on the sensor to adjust the detection sensitivity.
- Page 77 (4) Connection Diagram: (5) Test Code keyestudio smart turtle robot lesson 3.1...
- Page 78 Line Track sensor http://www.keyestudio.com int L_pin = 6; //pins of left line tracking sensor int M_pin = 7; //pins of middle line tracking sensor int R_pin = 8; //pins of right line tracking sensor int val_L,val_R,val_M;// define the variable value of three sensors void setup() Serial.begin(9600);...
- Page 79 Serial.print("left:"); Serial.print(val_L); Serial.print(" middle:"); Serial.print(val_M); Serial.print(" right:"); Serial.println(val_R); delay(500);// delay in between reads for stability //**************************************************************************** (6) Test Result: Upload the code on development board, open serial monitor to check line tracking sensors. And the displayed value is 1(high level) when no signals...
- Page 80 (7) Code Explanation Serial.begin(9600)- Initialize serial port, set baud rate to 9600 pinMode- Define the pin as input or output mode digitalRead-Read the state of pin, which are generally HIGH and LOW level (8) Extension Practice...
- Page 81 After knowing its working principle, connect an LED to D3. We could control LED by line tracking sensor. Test Code keyestudio smart turtle robot lesson 3.2 Line Track sensor http://www.keyestudio.com int L_pin = 6; //pins of left line tracking sensor int M_pin = 7;...
- Page 82 Serial.begin(9600); // initialize serial communication at 9600 bits per second pinMode(L_pin,INPUT); // make the L_pin as an input pinMode(M_pin,INPUT); // make the M_pin as an input pinMode(R_pin,INPUT); // make the R_pin as an input pinMode(3, OUTPUT);...
-
Page 83: Project 4: Servo Control
Serial.println(val_R); delay(500);// delay in between reads for stability if ((val_L == LOW) || (val_M == LOW) || (val_R == LOW))//if left line tracking sensor detects signals Serial.println("HIGH"); digitalWrite(3, HIGH);//LED is off else//if left line tracking sensor doesn’t detect signals Serial.println("LOW");... - Page 84 (1) Description Servo motor is a position control rotary actuator. It mainly consists of housing, circuit board, core-less motor, gear and position sensor. Its working principle is that the servo receives the signal sent by MCU or receiver and produces a reference signal with a period of 20ms and width of 1.5ms, then compares the acquired DC bias voltage to the voltage of the...
- Page 85 1ms-2ms, but in fact, it's between 0.5ms-2.5ms. The width corresponds the rotation angle from 0° to 180°. But note that for different brand motor, the same signal may have different rotation angle. The corresponding servo angles are shown below: (2) Specification ...
- Page 86 Operating angle range: about 180 ° (at 500 → 2500 μsec) Pulse width range: 500 → 2500 μsec No-load speed: 0.12 ± 0.01 sec / 60 (DC 4.8V) 0.1 ± 0.01 sec / 60 (DC No-load current: 200 ± 20mA (DC 4.8V) 220 ± 20mA (DC 6V) ...
- Page 87 The servo has to be connected to external power due to its high demand for driving servo current. Generally, the current of development board is not enough. If without connected power, the development board could be burnt. (5) Test Code1: keyestudio smart turtle robot lesson 4.1 Servo http://www.keyestudio.com...
- Page 88 #define servoPin 10 //servo Pin int pos; //the angle variable of servo int pulsewidth; //pulse width variable of servo void setup() { pinMode(servoPin, OUTPUT); //set the pins of servo to output procedure(0); //set the angle of servo to 0 degree void loop() { for (pos = 0;...
- Page 89 //function to control servo void procedure(int myangle) { pulsewidth = myangle * 11 + 500; //calculate the value of pulse width digitalWrite(servoPin,HIGH); delayMicroseconds(pulsewidth); //The duration of high level is pulse width digitalWrite(servoPin,LOW); delay((20 - pulsewidth / 1000)); //the cycle is 20ms, the low level last for...
- Page 90 The library file of servo is used in the following code (6) Test Code2: keyestudio smart turtle robot lesson 4.2 servo http://www.keyestudio.com #include <Servo.h> Servo myservo; // create servo object to control a servo // twelve servo objects can be created on most boards int pos = 0;...
- Page 91 // attaches the servo on pin 9 to the servo object void loop() { for (pos = 0; pos <= 180; pos += 1) { // goes from 0 degrees to 180 degrees // in steps of 1 degree myservo.write(pos);...
-
Page 92: Project 5: Ultrasonic Sensor
(7) Test Result: Upload code successfully and power on, servo swings in the range of 0° to 180°. The result is same. We usually control it by library file. (8) Code Explanation #include <Servo.h> Arduino comes with (servo function and statement)... - Page 93 It comes complete with ultrasonic transmitter and receiver modules. The HC-SR04 or the ultrasonic sensor is being used in a wide range of electronics projects for creating obstacle detection and distance measuring application as well as various other applications.
- Page 94 Measuring Angle: 30 degree Trigger Input Pulse width: 10uS (3) Components (4) The principle of ultrasonic sensor As the above picture shown, it is like two eyes. One is transmitting end, the other is receiving end. The ultrasonic module will emit the ultrasonic waves after trigger signal.
- Page 95 1. Use method and timing chart of ultrasonic module: Setting the delay time of Trig pin of SR04 to 10μs at least, which can trigger it to detect distance. 2. After triggering, the module will automatically send eight 40KHz ultrasonic pulses and detect whether there is a signal return.
- Page 96 (5) Connection Diagram...
- Page 97 Wiring guide: Ultrasonic sensor keyestudio V5 sensor shield → 5v(V) Trig → 12(S) Echo → 13(S) → Gnd(G) (6) Test Code: keyestudio smart turtle robot lesson 5.1 Ultrasonic sensor http://www.keyestudio.com int trigPin = 12; // Trigger int echoPin = 13;...
- Page 98 OUTPUT); pinMode(echoPin, INPUT); void loop() { // The sensor is triggered by a HIGH pulse of 10 or more microseconds. // Give a short LOW pulse beforehand to ensure a clean HIGH pulse: digitalWrite(trigPin, LOW); delayMicroseconds(2); digitalWrite(trigPin, HIGH);...
- Page 99 Serial.print("cm"); Serial.println(); delay(250); //*************************************************************************** (7) Test Result Upload test code on the development board, open serial monitor and set baud rate to 9600. The detected distance will be displayed, the unit is cm and inch. Hinder the ultrasonic sensor by hand, the displayed distance...
- Page 100 (8) Code Explanation int trigPin- this pin is defined to transmit ultrasonic waves, generally output. int echoPin - this is defined as the pin of reception, generally input cm = (duration/2) / 29.1- inches = (duration/2) / 74- We can calculate the distance by using the following formula: distance = (traveltime/2) x speed of sound The speed of sound is: 343m/s = 0.0343 cm/uS = 1/29.1 cm/uS...
- Page 101 5.2 Ultrasonic LED http://www.keyestudio.com int trigPin = 12; // Trigger int echoPin = 13; // Echo long duration, cm, inches; void setup() { Serial.begin (9600); //Serial Port begin pinMode(trigPin, OUTPUT); //Define inputs and outputs...
- Page 102 INPUT); void loop() // The sensor is triggered by a HIGH pulse of 10 or more microseconds. // Give a short LOW pulse beforehand to ensure a clean HIGH pulse: digitalWrite(trigPin, LOW); delayMicroseconds(2); digitalWrite(trigPin, HIGH); delayMicroseconds(10); digitalWrite(trigPin, LOW);...
- Page 103 Serial.print("cm"); Serial.println(); delay(250); if (cm>=2 && cm<=10) Serial.println("HIGH"); digitalWrite(3, HIGH); else Serial.println("LOW"); digitalWrite(3, LOW); //***************************************************************** Upload test code to development board and block ultrasonic sensor by hand, then check if LED is on...
-
Page 104: Project 6: Ir Reception
Project 6: IR Reception (1) Description There is no doubt that infrared remote control is ubiquitous in daily life. It is used to control various household appliances, such as TVs, stereos, video recorders and satellite signal receivers. Infrared remote control is... - Page 105 When the remote control button is pressed, the remote control sends out an infrared carrier signal. When the IR receiver receives the signal, the program will decode the carrier signal and determines which key is pressed. The MCU decodes the received 01 signal, thereby judging what key is pressed by the remote control.
- Page 106 Operating Voltage: 3.3-5V(DC) Interface: 3PIN Output Signal: Digital signal Receiving Angle: 90 degrees Frequency: 38khz Receiving Distance: 10m (3) Components (4) Connection Diagram...
- Page 107 Respectively link “-” , “+” and S of IR receiver module with G(GND) , V (VCC) and A0 of keyestudio development board. Attention: On the condition that digital ports are not available, analog ports can be regarded as digital ports. A0 equals to D14, A1 is equivalent to digital 15.
- Page 108 #include <IRremote.h> //IRremote library statement int RECV_PIN = A1; //define the pins of IR receiver as A0 IRrecv irrecv(RECV_PIN); decode_results results; // decode results exist in the “result” of“decode results” void setup() Serial.begin(9600); irrecv.enableIRIn(); // Enable receiver void loop() { if (irrecv.decode(&results))//decode successfully, receive a set of infrared...
- Page 109 IR receiver and the corresponding value will be shown, if pressing so long, the error codes will appear. Below we have listed out each button value of keyestudio remote control. So you could keep it for reference.
- Page 110 (5) Code Explanation irrecv.enableIRIn(): after enabling IR decoding, the IR signals will be received, then function“decode()”will check continuously to make ure if decoding successfully. irrecv.decode(&results): after decoding successfully, this function will come back to “true”, and keep result in “results”. After decoding a IR signals, run the resume()function and continue to receive the next signal.
- Page 111 We could operate an experiment to affirm. Attach an LED to D3, then press the keys of remote control to make LED light up and off. keyestudio smart turtle robot lesson 6.2 IRremote http://www.keyestudio.com #include <IRremote.h>...
- Page 112 {Serial.begin(9600); irrecv.enableIRIn(); //Initialize the IR receiver pinMode(LED_PIN,OUTPUT);//set pin 4 of LED to OUTPUT void loop() { if (irrecv.decode(&results)) if(results.value==0xFF02FD && (a==0)) //according to the above key value, press“OK”on remote control , LED will be controlled Serial.println("HIGH");...
-
Page 113: Project 7: Bluetooth Remote Control
// receive the next value //******************************************************** Upload code to development board, press“OK”key on remote control to make LED on and off. Project 7: Bluetooth Remote Control (1) Description Bluetooth, a simple wireless communication module most popular since the last few decades and easy to use are being used in most of the battery-powered devices. - Page 114 Over the few years, there are many things changed including data transmission rate, power consumption with wearable and IoT Devices and Security System. Here we are going to learn about HM-10 BLE 4.0 with Arduino Board. The HM-10 is a readily available Bluetooth 4.0 module.
- Page 115 Transmission rate: Asynchronous: 6K bytes ; Synchronous: 6k Bytes Security feature: Authentication and encryption Supporting service: Central & Peripheral UUID FFE0, FFE1 Power consumption: Auto sleep mode, stand by current 400uA~800uA, 8.5mA during transmission. Power supply: 5V DC Working temperature: –5 to +65 Centigrade...
- Page 116 6. EN/BRK: break connect, it means breaking the Bluetooth connection, generally, keep it unconnected. Pay attention to the pin direction when inserting Bluetooth module, and don’t insert it before uploading test code (4) Test Code keyestudio smart turtle robot lesson 7.1 bluetooth http://www.keyestudio.com char ble_val;...
- Page 117 Bluetooth void setup() { Serial.begin(9600); void loop() { if(Serial.available() > 0) //make sure if there is data in serial buffer ble_val = Serial.read(); //Read data from serial buffer Serial.println(ble_val); //Print //*********************************************************************** (There will be contradiction between serial communication of code and communication of Bluetooth when uploading code, therefore, don’t link...
- Page 118 (5) Download APP The code is for reading the received signal, and we also need a stuff to send signal. In this project, we send signal to control robot car via cellphone. Then we need to download the APP.
- Page 119 2. Android system BLE Scanner and download. Enter Google Play to find out (Enable “location” in settings of your cellphone, otherwise, app may not be searched.) 3. After installation, open App and enable “ Location and Bluetooth ” permission.
- Page 120 5. After connecting to HMSoft, click it to get multiple options, such as device information, access permission, general and custom service. Choose “CUSTOM SERVICE”...
- Page 121 6. Then pop up the following page.
- Page 122 7. Click(Read,Notify,WriteWithoutResponse)to enter the following page...
- Page 123 8. Click Write Value to enter HEX or Text. 9. Open the serial monitor on Arduino,enter 0 or other characters on Text interface.
- Page 124 10. Then click“Write”, and open serial monitor to view if there is a“0” signal...
- Page 125 Arduino via serial port, then we could read data by “Serial.read()” (7) Extension Practice We could send a command via Bluetooth to turn on and off a LED. D3 is connected to a LED, as shown below: keyestudio smart turtle robot lesson 7.2...
- Page 126 Bluetooth http://www.keyestudio.com int ledpin=3; void setup() Serial.begin(9600); pinMode(ledpin,OUTPUT); void loop() int i; if (Serial.available()) i=Serial.read(); Serial.println("DATA RECEIVED:"); if(i=='1') digitalWrite(ledpin,1); Serial.println("led on");...
- Page 127 Serial.println("led off"); //**************************************************************************** Click“Write”on APP, when you enter 1, LED will be on, when you input 0, LED will be off. (Remember to remove the Bluetooth module after finishing...
-
Page 128: Project 8: Motor Driving And Speed Control
Project 8: Motor Driving and Speed Control (1) Description There are many ways to drive the motor. Our robot car uses the most commonly used L298P solution. L298P is an excellent high-power motor driver IC produced by STMicroelectronics. - Page 129 www.keyestudio.com...
- Page 130 (2) Specification Circuit Diagram for L298P Board 1) Logic part input voltage: DC5V 2) Driving part input voltage: DC 7-12V 3) Logic part working current: <36mA 4) Driving part working current: <2A 5) Maximum power dissipation: 25W (T=75℃) 6) Working temperature: -25℃~+130℃...
- Page 131 Motor(A) Motor(B) (PWM) (PWM) Rotate Go forward Rotate clockwise clockwise Rotate Rotate Go back HIGH HIGH anticlockwise anticlockwise Rotate Rotate Rotate HIGH anticlockwise anticlockwise clockwise Rotate Rotate Rotate clockwise HIGH clockwise anticlockwise Stop Stop Stop (4) Components (5) Connection Diagram...
- Page 132 (6) Test Code: keyestudio smart turtle robot lesson 8.1 motor driver shield http://www.keyestudio.com #define ML_Ctrl 2 //define the direction control pin of A motor #define ML_PWM 9 //define the PWM control pin of A motor #define MR_Ctrl 4 //define the direction control pin of B motor...
- Page 133 OUTPUT);//set direction control pin of A motor to output pinMode(ML_PWM, OUTPUT);//set PWM control pin of A motor to output pinMode(MR_Ctrl, OUTPUT);//set direction control pin of B motor to output pinMode(MR_PWM, OUTPUT);//set PWM control pin of B motor to...
- Page 134 2000ms //back digitalWrite(ML_Ctrl,HIGH);//set the direction control pin of A motor to HIGH level analogWrite(ML_PWM,200);// set the PWM control speed of A motor to digitalWrite(MR_Ctrl,HIGH);//set the direction control pin of B motor to HIGH level analogWrite(MR_PWM,200);//set the PWM control speed of B motor to delay(2000);//delay in 2000ms...
- Page 135 //right digitalWrite(ML_Ctrl,LOW);//set the direction control pin of A motor to LOW level analogWrite(ML_PWM,200);//set the PWM control speed of A motor to digitalWrite(MR_Ctrl,HIGH);// set the direction control pin of B motor to HIGH level analogWrite(MR_PWM,200);//set the PWM control speed of B motor to delay(2000);//delay in 2000ms...
- Page 136 PWM, and the pins that decide the speed of motor must be PWM pins. (8) Extension Practice Adjust the speed that PWM controls the motor, hook up in same way. keyestudio smart turtle robot lesson 8.2 motor driver http://www.keyestudio.com...
- Page 137 #define MR_PWM 5 //define the PWM control pin of B motor void setup() { pinMode(ML_Ctrl, OUTPUT);//set the direction control pin of A motor to OUTPUT pinMode(ML_PWM, OUTPUT);//set the PWM control pin of A motor to OUTPUT pinMode(MR_Ctrl, OUTPUT);//set the direction control pin of B motor to OUTPUT pinMode(MR_PWM, OUTPUT);//set the PWM control pin of B motor to...
- Page 138 //front delay(2000);//delay in 2000ms digitalWrite(ML_Ctrl,HIGH);//set the direction control pin of A motor to high level analogWrite(ML_PWM,100);//set the PWM control speed of A motor to digitalWrite(MR_Ctrl,HIGH);//set the direction control pin of B motor to high level analogWrite(MR_PWM,100);//set the PWM control speed of B motor to //back delay(2000);//delay in 2000ms...
- Page 139 //left delay(2000);//delay in 2000ms digitalWrite(ML_Ctrl,LOW);//set the direction control pin of A motor to LOW level analogWrite(ML_PWM,100);//100 set the PWM control speed of A motor to 100 digitalWrite(MR_Ctrl,HIGH);//set the direction control pin of B motor to HIGH level analogWrite(MR_PWM,100);//set the PWM control speed of B motor to //right delay(2000);//delay in 2000ms...
-
Page 140: Project 9: 8*8 Led Board
//************************************************************************ After uploading the code successfully, do you find the motors rotate faster? Project 9: 8*8 LED Board (1) Description A fun way to make a small display is to use an 8x8 matrix or a 4-digit 7-segment display. Matrices like these are 'multiplexed' - to control 64 LEDs you need 16 pins. - Page 141 (3) 8*8 Dot Matrix Composed of LED emitting tube diodes, LED dot matrix are applied widely to public information display like advertisement screen and bulletin board, by controlling LED to show words, pictures and videos, etc. Divided into single-color, double-color, and three-color lights according to emitting color , LED dot matrix could show red, yellow, green and even true color.
- Page 142 8×8 dot matrix contains 64pcs LEDs. The inner structure of 8×8 dot matrix is shown below. Every LED is installed on the cross point of row line and column line. When the voltage on some line increases, and the voltage on some column line is reduced, the LED on the cross point will light up.
- Page 143 The definition inner pins are shown below:...
- Page 144 For instance, to light up the LED on row 1 and column 1, increase the voltage of pin 9 and reduce the voltage of pin 13. (4) HT16K33 8X8 Dot Matrix The HT16K33 is a memory mapping and multi-purpose LED controller driver.
- Page 145 LED applications including LED modules and display subsystems. The HT16K33 is compatible with most microcontrollers and communicates via a two-line bidirectional I2C-bus. The working schematic of HT16K33 chip We design the drive module of 8*8 dot matrix based on the above principle.
- Page 146 4. Introduction for Modulus Tool The online version of dot matrix modulus tool: http://dotmatrixtool.com/# ① Open links to enter the following page. ② The dot matrix is 8*8 in this project, so set the height to 8, width to 8, as...
- Page 147 “Row major” Click Byte order to select ③ Generate hexadecimal data from the pattern As shown below, press the left mouse button to select, the right button to cancel, draw the pattern you want, click Generate, and the hexadecimal...
- Page 148 The generated hexadecimal code(0x00, 0x66, 0x00, 0x00, 0x18, 0x42, 0x3c, 0x00) is what we display, and save it. (6) Connection Diagram Note: The pin G, V, SDA and SCL of dot matrix module are separately connected to G, 5V, A4 and A5 of motor drive shield. Plug power to BAT...
- Page 149 (7) Test Code: keyestudio smart turtle robot lesson 9.1 Matrix http://www.keyestudio.com #include <Matrix.h> Matrix myMatrix(A4,A5); //set pins to communication pins // define an array uint8_t LedArray1[8]={0x00, 0x66, 0x00, 0x00, 0x18, 0x42, 0x3c, 0x00}; uint8_t LEDArray[8]; //define an array(by modulus tool) without initial...
- Page 150 // there is eight data, loop for eight times LEDArray[i]=LedArray1[i]; //Call the emoticon array data in the subroutine LEDArray for(int j=7; j>=0; j--) //Every data(byte) has 8 bit, therefore, loop for eight times if((LEDArray[i]&0x01)>0) //judge if the last bit of data is greater than...
- Page 151 // dot matrix shows //***************************************** (8) Test Result Upload code, plug in power and turn on the switch of the robot car. 8*8 dot matrix shows smile face pattern.
- Page 152 (9) Extension Practice: Let’s make dot matrix draw a heart, just enter the website and draw the following pattern. http://dotmatrixtool.com/# , Then we get the code of heart pattern Replace the above code of heart pattern, the complete code is shown...
- Page 153 9.2 Matrix http://www.keyestudio.com #include <Matrix.h> Matrix myMatrix(A4,A5); //set pins to communication pins //define an array uint8_t LedArray1[8]={0x66,0x99,0x81,0x81,0x42,0x24,0x18,0x00}; uint8_t LEDArray[8]; //define an array(by modulus tool) without initial value void setup(){ myMatrix.begin(0x70); //communication address myMatrix.clear();...
- Page 154 LEDArray for(int j=7; j>=0; j--) //Every data(byte) has 8 bits, therefore, loop for eight times if((LEDArray[i]&0x01)>0) //judge if the last bit of data is greater than myMatrix.drawPixel( j, i,1); //light up the corresponding point else //otherwise myMatrix.drawPixel( j, i,0); //turn off the corresponding point LEDArray[i] = LEDArray[i]>>1;...
- Page 155 Upload code, plug in power and turn on the switch of the robot car. 8*8 dot matrix shows the heart pattern.
-
Page 156: Project 10: Line Tracking Robot
Project 10: Line Tracking Robot (1) Description The previous projects are inclusive of the knowledge of multiple sensors and modules. Next, we will work on a little challenging task. We could make a line tracking car on top of the working principle of line... - Page 157 (2) Program Process: detects black line: HIGH Middle tracking sensor detects white line: detects black line:HIGH Detection Left tracking sensor detects white line: detects black line: HIGH Right tracking sensor detects white line: Condition Status 2 detecting the left and the...
- Page 158 Go front (Set PWM black line to 200) left and right tracking sensor detect Go front (Set PWM white line to 200) Only left line tracking sensor Rotate to left(Set PWM to 200)...
- Page 159 (3) Connection Diagram (4) Test Code...
- Page 160 10 Thacking turtle http://www.keyestudio.com int left_ctrl = 2;//define direction control pin of A motor int left_pwm = 9;//define PWM control pin of A motor int right_ctrl = 4;//define direction control pin of B motor int right_pwm = 5;//define PWM control pin of B motor...
- Page 161 B motor to OUTPUT pinMode(right_pwm,OUTPUT);//set PWM control pin of B motor to OUTPUT pinMode(sensor_l,INPUT);//set the pins of left line tracking sensor to INPUT pinMode(sensor_c,INPUT);//set the pins of middle line tracking sensor to INPUT pinMode(sensor_r,INPUT);//set the pins of right line tracking sensor to...
- Page 162 = digitalRead(sensor_r);//read the value of right line tracking sensor if(c_val == 1)//if the state of middle one is 1, which means detecting black line front();//car goes forward else if((l_val == 1)&&(r_val == 0))//if only left line tracking sensor detects black trace left();//car turns left...
- Page 163 Stop();//car stops void front()//define the status of going forward digitalWrite(left_ctrl,LOW); analogWrite(left_pwm,200); digitalWrite(right_ctrl,LOW); analogWrite(right_pwm,200); void back()//define the state of going back digitalWrite(left_ctrl,HIGH); analogWrite(left_pwm,200); digitalWrite(right_ctrl,HIGH); analogWrite(right_pwm,200); void left()//define the left-turning state...
- Page 164 Stop()//define the state of stop analogWrite(left_pwm,0); analogWrite(right_pwm,0); //********************************************************* (5) Test Result Upload the code to the development board, plug in power and turn on the...
-
Page 165: Project 11: Ultrasonic Follow Robot
Turtle car walks along black lines. Project 11: Ultrasonic Follow Robot (1) Description In this project, we detect the distance value of the obstacle to drive two motors so as to make robot car move and 8*8 dot matrix show smile face... - Page 166 The specific logic of ultrasonic follow robot car is as shown below: Measured distance of front distance Detection obstacles (unit: cm) Set servo to 90° Setting Make dot matrix show smile face pattern Condition Distance<8 Status Go back(PWM set to 200)...
- Page 167 (2) Hook-up Diagram...
- Page 168 (3) Test Code keyestudio smart turtle robot lesson 11 flowing turtle http://www.keyestudio.com int left_ctrl = 2;//define the direction control pin of A motor int left_pwm = 9;//define the speed control pin of A motor int right_ctrl = 4;//define the direction control pin of B motor...
- Page 169 = 5;//define the speed control pin of B motor #include "SR04.h" //define the function library of ultrasonic sensor #define TRIG_PIN 12// set the signal of ultrasonic sensor to D12 #define ECHO_PIN 13// set the signal of ultrasonic sensor to D13 SR04 sr04 = SR04(ECHO_PIN,TRIG_PIN);...
- Page 170 8 back();//go back else if((distance>=8)&&(distance<13))//if 8≤distance<13 Stop();//stop else if((distance>=13)&&(distance<35))//if 13≤distance<35 front();//follow else//otherwise Stop();//stop void front()//define the status of going front digitalWrite(left_ctrl,LOW); analogWrite(left_pwm,200);...
- Page 171 digitalWrite(right_ctrl,HIGH);...
- Page 172 Stop()//define the state of stop analogWrite(left_pwm,0); analogWrite(right_pwm,0); //********************************************************* (4) Test Result Upload the code to the development board, and plug in power. Adjust the servo on turtle robot car to 90°,dot matrix will display smile face pattern and follow the obstacle to move.(robot car only moves forward and...
-
Page 173: Project 12: Ultrasonic Avoiding Robot
Project 12: Ultrasonic Avoiding Robot (1) Description We’ve learned LED matrix, motor drive, ultrasonic sensor and servo in previous lessons. Next, we could make an ultrasonic avoiding robot! The measured distance between ultrasonic sensor and obstacle can be used to control servo to rotate so as to make robot car move. - Page 174 The specific logic of ultrasonic avoiding smart car is shown below: measured distance of front obstacle a(unit:cm) set servo to90° measured distance Detection of left obstacle(set a1(unit:cm) servo to 180°) measured distance of right obstacle a2(unit:cm) (set servo to 0°)...
- Page 175 PWM to 200 ) , and go font (set PWM to 200) Set the angle of servo to 90°, rotate to right for 400ms,(set a1≤a2 PWM to 200, and go front ( set PWM to 200) Condition 1 Status a≥10...
- Page 176 (2) Connection Diagram (3) Test Code keyestudio smart turtle robot lesson 12 avoiding turtle http://www.keyestudio.com #include <ks_Matrix.h> Matrix myMatrix(A4,A5);// set the pins of dot matrix to A4 and A5. //Array, used to store the data of pattern, can be calculated by yourself or...
- Page 177 LEDArray[8]; const int left_ctrl = 2;//define direction control pin of A motor const int left_pwm = 9;//define PWM control pin of A motor const int right_ctrl = 4;//define direction control pin of B motor...
- Page 178 { Serial.begin(9600);//open serial monitor and set baud rate to 9600 pinMode(left_ctrl,OUTPUT);//set direction control pin of A motor to OUTPUT pinMode(left_pwm,OUTPUT);//set PWM control pin of A motor to OUTPUT pinMode(right_ctrl,OUTPUT);//set direction control pin of B motor to OUTPUT pinMode(right_pwm,OUTPUT);//set PWM control pin of B motor to...
- Page 179 //obtain the value detected by ultrasonic sensor if((distance1 < 10)&&(distance1 != 0))//if the distance is greater than 0 and less than 10 car_Stop();//stop myMatrix.clear(); myMatrix.writeDisplay();//show stop pattern matrix_display(matrix_stop2); //show stop pattern delay(100); servopulse(servopin,180);//servo rotates to 180°...
- Page 180 > distance3)//compare the distance, if left distance is more than right distance car_left();//turn left myMatrix.clear(); myMatrix.writeDisplay(); matrix_display(matrix_left2); //display left-turning pattern servopulse(servopin,90);//servo rotates to 90 degree //delay(50); myMatrix.clear(); myMatrix.writeDisplay(); matrix_display(matrix_front2); //show forward pattern else//if the right distance is greater than the left car_right();//turn right...
- Page 181 //show forward pattern else//otherwise car_front();//go forward myMatrix.clear(); myMatrix.writeDisplay(); matrix_display(matrix_front2); // show forward pattern void servopulse(int servopin,int myangle)//the running angle of servo for(int i=0; i<20; i++) pulsewidth = (myangle*11)+500; digitalWrite(servopin,HIGH); delayMicroseconds(pulsewidth); digitalWrite(servopin,LOW); delay(20-pulsewidth/1000);...
- Page 182 analogWrite(left_pwm,200);...
- Page 183 //this function is used for dot matrix display void matrix_display(unsigned char matrix_value[]) for(int i=0; i<8; i++)
- Page 184 LEDArray[i] = LEDArray[i]>>1; myMatrix.writeDisplay(); (4) Test Result After uploading the code on the keyestudio V4.0 board, wire according to connection diagram. Turn on the switch of robot car, the smart car can automatically avoid obstacles.
-
Page 185: Project 13: Ir Remote Control Robot
Project 13: IR Remote Control Robot (1) Description In this project, we will make IR remote control robot car! Press the button on IR remote control to drive robot car to move, and the corresponding state pattern is displayed on the 8*16 LED matrix. - Page 186 Initial setup Dot matrix displays smile face Remote control Key Value Key state Go front(PWM set to 200) FF629D 8*8 LED matrix shows front icon Back(PWM set to 200) FFA857 8*8 LED matrix shows back icon Rotate to left(PWM set to 200)...
- Page 187 8*8 LED matrix shows rightward icon Flow Chart (2) Hook-up Diagram...
- Page 188 Note: IR receiver is connected to P4 interface. (3) Test Code keyestudio smart turtle robot lesson 13 remote control turtle http://www.keyestudio.com #include <ks_Matrix.h>...
- Page 189 Matrix myMatrix(A4,A5); //Array, used to store the data of pattern, can be calculated by yourself or obtained from the modulus tool uint8_t matrix_heart[8]={0x66,0x99,0x81,0x81,0x42,0x24,0x18,0x00}; uint8_t matrix_smile[8]={0x42,0xa5,0xa5,0x00,0x00,0x24,0x18,0x00}; uint8_t matrix_front2[8]={0x18,0x24,0x42,0x99,0x24,0x42,0x81,0x00}; uint8_t matrix_back2[8]={0x00,0x81,0x42,0x24,0x99,0x42,0x24,0x18}; uint8_t matrix_left2[8]={0x48,0x24,0x12,0x09,0x09,0x12,0x24,0x48}; uint8_t matrix_right2[8]={0x12,0x24,0x48,0x90,0x90,0x48,0x24,0x12}; uint8_t matrix_stop2[8]={0x18,0x18,0x18,0x18,0x18,0x00,0x18,0x18}; uint8_t LEDArray[8]; const int left_ctrl = 4;//define the direction control pin of A motor const int left_pwm = 5;//define the speed control of A motor...
- Page 190 Serial.begin(9600);// // In case the interrupt driver crashes on setup, give a clue // to the user what's going on. Serial.println("Enabling IRin"); irrecv.enableIRIn(); // Start the receiver Serial.println("Enabled IRin"); myMatrix.begin(112); myMatrix.clear(); void loop() if (irrecv.decode(&results)) irr_val = results.value;...
- Page 191 0xFFA857 : car_back(); myMatrix.clear(); myMatrix.writeDisplay(); matrix_display(matrix_back2); break; case 0xFF22DD : car_left(); myMatrix.clear(); myMatrix.writeDisplay(); matrix_display(matrix_left2); break; case 0xFFC23D : car_right(); myMatrix.clear(); myMatrix.writeDisplay(); matrix_display(matrix_right2); break;...
- Page 192 0xFF02FD : car_Stop(); myMatrix.clear(); myMatrix.writeDisplay(); matrix_display(matrix_stop2); break; irrecv.resume(); // Receive the next value void car_front()//define the state of going front digitalWrite(left_ctrl,LOW); analogWrite(left_pwm,200); digitalWrite(right_ctrl,LOW); analogWrite(right_pwm,200); void car_back()//define the status of going back digitalWrite(left_ctrl,HIGH); analogWrite(left_pwm,200); digitalWrite(right_ctrl,HIGH); analogWrite(right_pwm,200);...
- Page 193 //The function that dot matrix shows pattern void matrix_display(unsigned char matrix_value[])
- Page 194 LEDArray[i]=matrix_value[i]; for(int j=7; j>=0; j--) if((LEDArray[i]&0x01)>0) myMatrix.drawPixel( j, i,1); LEDArray[i] = LEDArray[i]>>1; myMatrix.writeDisplay(); (4) Test Result Upload code and press buttons on IR remote control to make turtle robot car to move.
-
Page 195: Project 14: Bluetooth Remote Control
Project 14: Bluetooth Remote Control (1) Description We’ve learned the basic knowledge of Bluetooth, in this lesson, we will make a Bluetooth remote smart car. In the experiment, we default the HM-10 Bluetooth module as a Slave and the cellphone as a Host. - Page 196 BT car is an APP rolled out by keyestudio team. You could control the robot car by it readily. (2) Test the key value of App Special Note: Before uploading the test code, you need to remove the Bluetooth module, otherwise the test code will fail to upload.
- Page 197 BLE_val = Serial.read(); Serial.println(BLE_val); Upload code to V4.0 development board, and connect to Bluetooth module, as shown below:...
- Page 198 Insert a Bluetooth module, LED indicator of Bluetooth module will flash. Next to download the App. Special note: RXD, TXD, GND and VCC of Bluetooth module are respectively connected to TX, RX, - ( GND) and + (VCC) . The STATE and BRK pins don’t need to be connected.
- Page 199 For iOS system Search keyes BT car in App store After installation, enter its interface. Click“Connect”to search and pair Bluetooth.
- Page 200 5.Click to enter the main page of turtle smart car.
- Page 201 For Android System Car(allow APP to access 1. Enter Google play store to search Turtle “location”, you could enable “location”in settings of your cellphone. 2. The app icon is shown below after installation. 3. Click app to enter the following page.
- Page 202 4. After connecting Bluetooth, plug in power and LED indicator of Bluetooth module will flicker. Tap to search Bluetooth. (4) Click“connect”below HMSoft, then the Bluetooth will be connected and its LED indicator will stay on.
- Page 203 After connecting Bluetooth module and open serial monitor to set baud rate to 9600. Press the button of the Bluetooth APP, and the corresponding characters are displayed as shown below:...
- Page 204 Pair HM-10 Bluetooth module Enter control page of Bluetooth Disconnect Bluetooth Press: F Press the button, robot goes Release: S front; release to stop Press: L Press the button, robot turns Release: S left; release to stop Click to send “S” Stop...
- Page 205 Click send Start line tracking function; click “X” Stop to exit We have read the character of each key on mobile APP via serial port and know the key function. Flow Chart...
- Page 206 (3) Connection Diagram (4) Test Code keyestudio smart turtle robot lesson 14.2 Bluetooth Control turtle http://www.keyestudio.com #include <ks_Matrix.h> Matrix myMatrix(A4,A5); //Array, used to store the data of pattern, can be calculated by yourself or obtained from the modulus tool...
- Page 207 LEDArray[8]; unsigned char data_line = 0; unsigned char delay_count = 0; const int left_ctrl = 2;//define direction control pin of A motor const int left_pwm = 9;//define PWM control pin of A motor...
- Page 208 BLE_val = Serial.read(); Serial.println(BLE_val); switch(BLE_val) case 'F': car_front(); myMatrix.clear(); myMatrix.writeDisplay(); matrix_display(matrix_front2); break; case 'B': car_back(); myMatrix.clear(); myMatrix.writeDisplay(); matrix_display(matrix_back2);...
- Page 209 'L': car_left(); myMatrix.clear(); myMatrix.writeDisplay(); matrix_display(matrix_left2); break; case 'R': car_right(); myMatrix.clear(); myMatrix.writeDisplay(); matrix_display(matrix_right2); break; case 'S': car_Stop(); myMatrix.clear(); myMatrix.writeDisplay(); matrix_display(matrix_stop2); break;...
- Page 210 right...
- Page 211 // the function that dot matrix shows patterns void matrix_display(unsigned char matrix_value[]) for(int i=0; i<8; i++) LEDArray[i]=matrix_value[i]; for(int j=7; j>=0; j--) if((LEDArray[i]&0x01)>0)
- Page 212 LEDArray[i] = LEDArray[i]>>1; myMatrix.writeDisplay(); //******************************************************* (5) Test Result Upload program to development board, insert Bluetooth module, open App to connect Bluetooth. Next, press icons on App to control turtle robot car to move. Special Note: you need to remove the Bluetooth module before uploading the test code, otherwise the test code will fail to upload.
- Page 213 Project 15: Multi-purpose Bluetooth Robot (1) Description In previous projects, the robot car only performs single function, however, in this lesson, we integrate all of function to control smart car via Bluetooth...
- Page 214 Here is a simple flow chart of multi-purpose robot car as for your reference. (2) Connection Diagram...
- Page 215 (3) Test Code keyestudio smart turtle robot lesson 15 Multifunctional turtle robot http://www.keyestudio.com #include <ks_Matrix.h> Matrix myMatrix(A4,A5); //Array, used to store the data of pattern, can be calculated by yourself or...
- Page 216 LEDArray[8]; #include "SR04.h" #define TRIG_PIN 12 #define ECHO_PIN 13 SR04 sr04 = SR04(ECHO_PIN,TRIG_PIN); long distance,distance1,distance2,distance3; const int left_ctrl = 2;...
- Page 217 = 10; int myangle; int pulsewidth; int val; char BLE_val; void setup() { Serial.begin(9600); //irrecv.enableIRIn(); // Start the receiver servopulse(servopin,90); pinMode(left_ctrl,OUTPUT); pinMode(left_pwm,OUTPUT); pinMode(right_ctrl,OUTPUT); pinMode(right_pwm,OUTPUT); pinMode(sensor_l,INPUT); pinMode(sensor_c,INPUT); pinMode(sensor_r,INPUT); myMatrix.begin(112); myMatrix.clear(); myMatrix.writeDisplay();...
- Page 218 { if(Serial.available()>0) BLE_val = Serial.read(); Serial.println(BLE_val); switch(BLE_val) case 'F': car_front(); myMatrix.clear(); myMatrix.writeDisplay(); matrix_display(matrix_front2); break; case 'B': car_back(); myMatrix.clear(); myMatrix.writeDisplay(); matrix_display(matrix_back2); break; case 'L': car_left(); myMatrix.clear(); myMatrix.writeDisplay(); matrix_display(matrix_left2);...
- Page 219 'R': car_right(); myMatrix.clear(); myMatrix.writeDisplay(); matrix_display(matrix_right2); break; case 'S': car_Stop(); myMatrix.clear(); myMatrix.writeDisplay(); matrix_display(matrix_stop2); break; case 'X': tracking(); break; case 'Y': follow_car(); break; case 'U': avoid(); break; void avoid()
- Page 220 = 0; while(track_flag == 0) distance1=sr04.Distance(); if((distance1 < 10)&&(distance1 != 0)) car_Stop(); myMatrix.clear(); myMatrix.writeDisplay(); matrix_display(matrix_stop2); delay(100); servopulse(servopin,180); delay(100); distance2=sr04.Distance(); delay(100); servopulse(servopin,0); delay(100); distance3=sr04.Distance();...
- Page 221 > distance3) car_left(); myMatrix.clear(); myMatrix.writeDisplay(); matrix_display(matrix_left2); servopulse(servopin,90); //delay(100); else car_right(); myMatrix.clear(); myMatrix.writeDisplay(); matrix_display(matrix_right2); servopulse(servopin,90); //delay(100); else...
- Page 222 BLE_val = Serial.read(); if(BLE_val == 'S') track_flag = 1; void follow_car() servopulse(servopin,90); int track_flag = 0; while(track_flag == 0)
- Page 223 = sr04.Distance(); if(distance<8) car_back(); myMatrix.clear(); myMatrix.writeDisplay(); matrix_display(matrix_back2); else if((distance>=8)&&(distance<13)) car_Stop(); myMatrix.clear(); myMatrix.writeDisplay(); matrix_display(matrix_stop2); else if((distance>=13)&&(distance<35)) car_front(); myMatrix.clear(); myMatrix.writeDisplay(); matrix_display(matrix_front2);...
- Page 224 BLE_val = Serial.read(); if(BLE_val == 'S') track_flag = 1; void servopulse(int servopin,int myangle) for(int i=0;i<20;i++)
- Page 225 = (myangle*11)+500; digitalWrite(servopin,HIGH); delayMicroseconds(pulsewidth); digitalWrite(servopin,LOW); delay(20-pulsewidth/1000); void tracking() myMatrix.clear(); myMatrix.writeDisplay(); matrix_display(matrix_smile); int track_flag = 0; while(track_flag == 0) l_val = digitalRead(sensor_l); c_val = digitalRead(sensor_c); r_val = digitalRead(sensor_r); if(c_val == 1) car_front2();...
- Page 226 == 1)&&(r_val == 0)) car_left(); myMatrix.clear(); myMatrix.writeDisplay(); matrix_display(matrix_left2); else if((l_val == 0)&&(r_val == 1)) car_right(); myMatrix.clear(); myMatrix.writeDisplay(); matrix_display(matrix_right2); else...
- Page 227 BLE_val = Serial.read(); if(BLE_val == 'S') track_flag = 1; void car_front() digitalWrite(left_ctrl,LOW); analogWrite(left_pwm,200); digitalWrite(right_ctrl,LOW); analogWrite(right_pwm,200);...
- Page 228 analogWrite(right_pwm,200);...
- Page 229 //the function that dot matrix shows patterns void matrix_display(unsigned char matrix_value[]) for(int i=0; i<8; i++) LEDArray[i]=matrix_value[i]; for(int j=7; j>=0; j--)
- Page 230 The turtle robot car can go forward and back , turn left and right. After connecting to Bluetooth successfully, we can use the mobile APP to control the smart car to move. 7. Resources Wiki page: https://wiki.keyestudio.com/Main_Page Official website: https://keyestudio.com/...
Need help?
Do you have a question about the Smart Little Turtle Robot V3 and is the answer not in the manual?
Questions and answers