Advertisement
Available languages
Available languages
Quick Links
MANUALE D'USO E INSTALLAZIONE
USE AND INSTALLATION MANUAL
MANUEL D'UTILISATION ET D'INSTALLATION
BEDIENUNGS- UND INSTALLATIONSANLEITUNG
MANUAL DE INSTRUCCIONES E INSTALACIÓN
VMF-E2D
VMF SYSTEM
PANNELLO COMANDI ELETTRONICO PER DUALJET
ELECTRONIC CONTROL PANEL FOR DUALJET
PANNEAU DE COMMANDE ELECTRONIQUE POUR DUALJET
ELEKTRONISCHE BEDIENTAFEL FÜR DUALJET
TABLERO DE MANDOS ELECTRÓNICO PARA DUALJET
pag.3
pag.9
pag.15
pag.21
pag.27
AVMFE2D 1406 - 6795755_01
Advertisement

Related Manuals for AERMEC VMF-E2D


Summary of Contents for AERMEC VMF-E2D
- Page 1 MANUALE D’USO E INSTALLAZIONE USE AND INSTALLATION MANUAL MANUEL D’UTILISATION ET D’INSTALLATION BEDIENUNGS- UND INSTALLATIONSANLEITUNG MANUAL DE INSTRUCCIONES E INSTALACIÓN VMF-E2D VMF SYSTEM PANNELLO COMANDI ELETTRONICO PER DUALJET ELECTRONIC CONTROL PANEL FOR DUALJET PANNEAU DE COMMANDE ELECTRONIQUE POUR DUALJET ELEKTRONISCHE BEDIENTAFEL FÜR DUALJET TABLERO DE MANDOS ELECTRÓNICO PARA DUALJET...
- Page 2 INDICE GENERALE Italiano English Français Deutsche Español...
- Page 3 Informazioni importanti Funzioni del pannello comandi Visualizzazioni per l’utente Installazione Schemi eletttrici INFORMAZIONI IMPORTANTI ATTENZIONE: VMF-E2D sono concepi- Quando si opera con unità sensibili danni irreparabili. ti per funzionare in ambienti interni. all’elettricità elettrostatica, assicu- REGOLARE CORRETTAMENTE LA rarsi che le persone,il posto di lavoro ATTENZIONE: il ventilconvettore è...
- Page 4 FUNZIONI DEL PANNELLO COMANDI Commutazione mandata dell’a- ria e modo di funzionamento mediante selettore sull’unità. • Mandata frontale per il f u n z i o n a m e n t o riscaldamento. • Mandata dall’alto per il f u n z i o n a m e n t o raffrescamento.
- Page 5 Accensione - Per avviare il ventilconvettore ruotare la manopola e scegliere una velocità di ventilazione. - Per spegnere il ventilconvettore ruotare la manopola fino alla posizione Il ventilconvettore è spento. Nella condizione di spento il termostato continua a funzionare. Qualora la temperatura ambiente scenda sotto i 7°C e le condizioni di impianto lo consentano, il termostato attiverà...
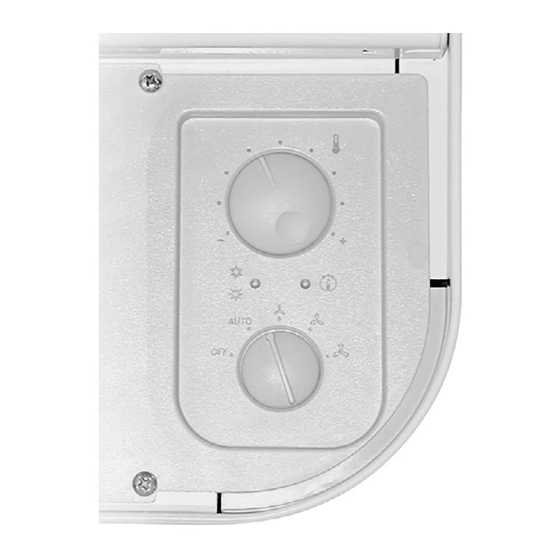
- Page 6 VISUALIZZAZIONI LUMINOSE PER L’UTENTE (CONFIGURAZIONE STANDARD) Il LED D indica la richiesta di ventilazione: GIALLO - (Acceso) Le condizioni ambientali richiedono il funzionamento del ventilatore (quando il selettore di velocità è in posizione AUTO, V1, V2, V3). - (Spento) Le condizioni ambientali non richiedono il funzionamento del ventilconvettore oppure il selettore è...
- Page 7 L’installazione del pannello comandi collegata alla scheda termostato sul lato deve essere eseguita prima di installare VMF-E2D prevede la sostituzione di un opposto. l’unità. elemento laterale dell’unità con uno dei L’accessorio VMF-E2D deve essere...
- Page 8 Installazione dell’accessorio Nota: Nella unità standard (con attacchi a della batteria a destra, seguire le indica- - Montare l’elemento appena assemblato sinistra) il pannello comandi deve essere zioni del manuale dell’unità per portare alla testata. Porre particolare attenzione posizionato a sinistra, mentre la scatola il termostato sulla fiancata sinistra.
- Page 9 CONTENTS Important information Control panel functions Visualisations for the user Installation information Wiring diagrams IMPORTANT INFORMATION ELECTROSTATIC CHARGES The room temperature should be WA R N I N G : V M F - E 2 D a r e adjusted in order to provide maxi- Earthing quality designed for indoor use.
- Page 10 CONTROL PANEL FUNCTIONS Switching the front air outlet or from the top, using the selector on the unit. • Front outlet for heating operation. • Outlet from the top for cooling operation. To access the control panel, lift the protection flap. –...
- Page 11 Starting - To start up the fan coil, turn the knob and choose a ventilation speed. - To switch off the fan coil, turn the knob to the position. The fan coil is switched off. In the OFF condition, the thermostat carries on working. If the room temperature falls below 7°C, and the system conditions allow it, the thermostat will activate ventilation (anti-freeze function).
- Page 12 INDICATOR LIGHTS FOR THE USER (STANDARD CONFIGURATION) LED D indicates a ventilation request: YELLOW - (ON) The ambient conditions require the use of the fan (when the speed selector is on AUTO, V1, V2, V3) - (OFF) The ambient conditions do not require the use of the fan, or the selector is in the OFF (standby) position, or the fin is closed - (slow flashing) Operation mode managed by the centralised system.
- Page 13 In the box VMF-E2D are 2 side pieces In case of installation with water valve to Installation with the attacks on the Cable connectors of the air temperature...
- Page 14 Accessory installation Important – On standard units (with left- nection to the right side follow the board. hand side water connections) the con- instructions of the unit manual to move - Mount the part just assembled to the trol panel must also be installed on the the thermostat to the left side.
- Page 15 Fonctions du panneau de commande Utilisation Affichages pour l'utilisateur Installation Schemas electriques INFORMATIONS IMPORTANTES VMF-E2D Lorsqu'on utilise des unités sensibles à La température ambiante doit être réglée ATTENTION : ont été conçus pour fonctionner à l'intérieur. l'électricité statique, s'assurer que de manière à...
- Page 16 FONCTIONS DU PANNEAU DE COMMANDE Commutation du refoulement de l'air frontal ou bien du haut au moyen du sélecteur de l'unité. • Refoulement frontal pour fonctionnement en mode Chauffage en hiver. • Refoulement du haut pour le fonctionnement en mode Refroidissement en été.
- Page 17 UTILISATION Mise en marche - Pour démarrer le ventilo-convecteur, tourner la molette et choisir une vitesse de ventilation. - Pour éteindre le ventilo-convecteur, tourner la molette jusqu'à la position Le ventilo-convecteur est éteint. Même lorsque le ventilo-convecteur est éteint, le thermostat continue à fonctionner. Si la température ambiante descend au-dessous de 7 °C et les conditions de l'équipement le permettent, le thermostat activera la ventilation (Fonction Antigel).
- Page 18 AFFICHAGES LUMINEUX POUR L'UTILISATEUR (RÉGLAGE ORDINAIRE) La DEL D indique la demande de ventilation : JAUNE - (allumée) Les conditions environnementales exigent le fonctionnement du ventilateur (lorsque le sélecteur de vitesse est en position AUTO, V1, V2, V3). - (Éteint) Les conditions environnementales n'exigent pas le fonctionnement du ventilo-convecteur, ou le sélecteur est en position OFF (veille), ou bien l'ailette est fermée.
- Page 19 être adaptée à la carte électronique. Dans le cas d'une installation avec vanne Dans la boîte de VMF-E2D sont deux pièces d'eau pour remplacer la série de capteur latérales (gauche et droite) à mettre en de température d'eau (L = 500 mm) avec place pour la mise en œuvre de la carte...
- Page 20 Installation de l’accessoire Remarque: Sur l’unité standard (avec les vez les instructions dans le manuel de Prêter une attention particulière à la posi- raccordements à gauche), le panneau de l’appareil pour régler le thermostat sur le tion du micro-interrupteur contrôle doit être positionné à gauche, côté...
- Page 21 Ansichten für den Bediener Installation Schaltpläne WICHTIGE HINWEISE lich reagieren, muss sichergestellt sein, Die Umgebungstemperatur muss so VMF-E2D ACHTUNG: sind für den dass die Personen, der Arbeitsplatz und geregelt werden, dass ein maximales Betrieb in Innenräumen konzipiert. das Gehäuse der Geräte ordnungsgemäß...
- Page 22 FUNKTIONEN DER BEDIENTAFEL Ausblasrichtung nach Vorn oder nach Oben, wählbar mittels Wahlschalter. • Ausblas nach Vorn für den Heizbetrieb. • Ausblas nach Oben für den Kühlbetrieb. F ü r d e n Z u g r i f f a u f d i e Bedientafel die Schutzklappe anheben.
- Page 23 GEBRAUCH Einschalten - Zum Anstarten des Gebläsekonvektors den Griff drehen und eine Gebläsedrehzahl auswählen. - Zum Ausschalten des Gebläsekonvektors den Griff bis in die Stellung drehen. Der Gebläsekonvektor ist ausgeschaltet. Im ausgeschalteten Zustand bleibt der Thermostat weiterhin in Betrieb. Sollte die Raumtemperatur unter 7°C absinken und der Zustand der Anlage es zulassen, aktiviert der Thermostat die Lüftung (Frostschutzfunktion).
- Page 24 LEUCHTANZEIGEN FÜR DEN BENUTZER (STANDARDKONFIGURATION) LED D zeigt die Lüftungsansteuerung an: GELB - (Eingeschaltet) Die Raumbedingungen erfordern den Gebläsebetrieb (bei Stellung des Drehzahlwahlschalters auf AUTO, V1, V2, V3). - (Ausgeschaltet) Die Raumbedingungen erfordern nicht den Betrieb des Gebläsekonvektors oder der Wahlschalter steht auf OFF (Stand-by) oder die Lamelle ist geschlossen - (Langsames Blinken) Betriebsart, die von der Zentralsteuerung gesteuert wird.
- Page 25 INSTALLATION ACHTUNG: VMF-E2D sind für den Betrieb und die dazu in der Lage sind, die Anlagen Nachstehend finden Sie wichtige Hinweise auf Sicherheit und Funktionalität zu für die richtige Installation der Geräte. in Innenräumen konzipiert. prüfen, ausgeführt werden (in diesem...
- Page 26 Zubehör-Einbau Hinweis: In der Standardeinheit (mit der Rechts liegenden Registeranschlüssen - Die Steckverbindung mit der Platine ver- linken Hand) auf dem Bedienfeld muss erfolgen muss, befolgen Sie die binden. auf der linken Seite positioniert wer- Anweisungen aus dem Handbuch, um - Das eben zusammen gebaute Element den, während das Thermostat-Box (VMF das Thermostat-Element auf die linke...
- Page 27 Esquemas eléctricos INFORMACIONES IMPORTANTES el puesto de trabajo y las envolven- en verano. ATENCIÓN: VMF-E2D han sido dise- tes de las unidades estén correc- En verano una temperatura demasiado ñados para funcionar en ambientes tamente conectados a tierra. De esta baja conlleva un mayor consumo eléc-...
- Page 28 FUNCIONES DEL TABLERO DE MANDOS Conmutación de la ventilación del aire frontal o superior mediante selector en la uni- dad. • Ventilación frontal para el f u n c i o n a m i e n t o calefacción. •...
- Page 29 Encendido - Para encender el fan coil, gire el mando y seleccione una velocidad de ventilación. - Para apagar el fan coil, gire el mando hasta la posición El fan coil está apagado. En la condición de apagado, el termostato continúa funcionando. Cuando la temperatura ambiente descienda por debajo de los 7°C y las condiciones de la instalación lo permitan, el termostato activará...
- Page 30 INDICACIONES LUMINOSAS PARA EL USUARIO (CONFIGURACIÓN ESTÁNDAR) El LED D indica la solicitud de ventilación: AMARILLO - (Encendido) Las condiciones ambientales requieren el funcionamiento del ventilador (cuando el selector de velocidad está en posición AUTO, V1, V2, V3). - (Apagado) Las condiciones ambientales no requieren el funcionamiento del fan coil o el selector está...
- Page 31 En caso de instalación con válvula de agua En el cuadro de VMF-E2D son 2 piezas para reemplazar la serie de sensor de laterales (izquierda y derecha) para temperatura de agua (L = 500 mm) con establecer para la implementación de la...
- Page 32 Instalación del accesorio Nota: En la unidad estándar(conexiones xiones de la batería a la derecha, sigue - Conecte el conector a la tarjeta. a izquierdas) el panel de control debe ser las instrucciones en el manual de la uni- - Coloque el ensamblado recientemente situado en la izquierda, mientras la caja dad para ajustar el termostato en el lado a la cabeza.
- Page 33 SCHEMI ELETTRICI • WIRING DIAGRAMS • SCHEMAS ELECTRIQUES • SCHALTPLÄNE • ESQUEMAS ELÉCTRICOS LEGENDA • READING KEY • LEGENDE • LEGENDE • LEYENDA CE = Contatto esterno Mise à terre = Componenti non forniti External contact Erdanschluss Components not supplied Contact extérieur Toma de tierra Composants non fournis...
- Page 34 SCHEMI ELETTRICI • WIRING DIAGRAMS • SCHEMAS ELECTRIQUES • SCHALTPLÄNE • ESQUEMAS ELÉCTRICOS DUALJET VMF-E2D VMF-E2D CN27 CN17 DUALJET CN7-B CN7-A VC/F BL NE MA RO Dis. 5152700_00 230V 50Hz DUALJET (master + slave) (---------------------------------------------------------------------------------------------------------- 30 m MAX ------------------------------------------------------------------------------------------------------) ÷...
- Page 36 AERMEC S.p.A. si riserva la facoltà di apportare in qualsiasi momento tutte le modifiche ritenute necessarie per il miglioramento del prodotto. Aermec S.p.A. se réserve le droit de modifier à tous moments les données considérées nécessaires à l’amelioration du produit.
Need help?
Do you have a question about the VMF-E2D and is the answer not in the manual?
Questions and answers