Advertisement
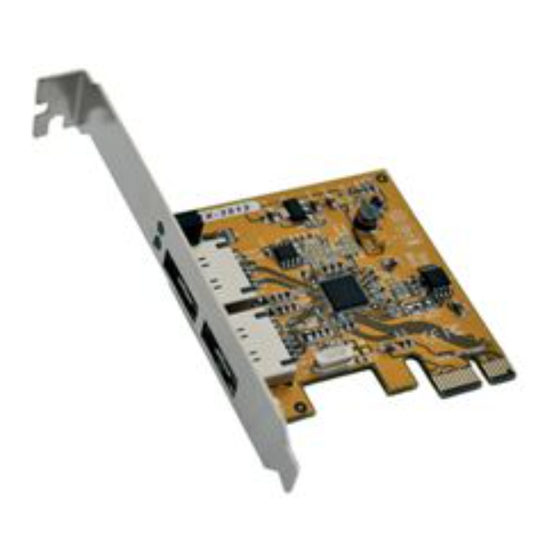
2-Port eSATA3 RAID PCIe Card
1. Introduction
Thank you for purchasing this 2-Port SATA3 RAID PCI PCIe Card. It is
designed to support up to 2 SATA3 ports in RAID 0 and RAID 1 modes.
It supports SATA3 hard drives with up to 6.0Gbps data rate. It is an
ideal solution to add new external SATA3 drives for your system.
Features:
Supports 1-lane 5.0Gb/s PCI Express Data Transfer Rate
✓
Built-in 2 eSATA3 Ports
✓
Supports RAID 0 and RAID 1 for the 2 SATA3 Ports
✓
Supports Windows based RAID GUI
✓
Supports SATA3 transfer rate up to 6.0Gb/s (600Mbytes/sec)
✓
Supports RAID 1 Rebuild by BIOS Setup Utility
✓
Supports Windows 2000, XP, Vista and Win 7
✓
2. Board Layout
External LEDs
External
eSATA Port 1
External
eSATA Port 0
3. Hardware Installation
1.
Power down the computer, remove the computer cover.
EX-3512
1
Advertisement
Table of Contents

Related Manuals for Exsys EX-3512


Summary of Contents for Exsys EX-3512
- Page 1 EX-3512 2-Port eSATA3 RAID PCIe Card 1. Introduction Thank you for purchasing this 2-Port SATA3 RAID PCI PCIe Card. It is designed to support up to 2 SATA3 ports in RAID 0 and RAID 1 modes. It supports SATA3 hard drives with up to 6.0Gbps data rate. It is an ideal solution to add new external SATA3 drives for your system.
- Page 2 2-Port eSATA3 RAID PCIe Card Choose an unused PCI Express bus slot, unscrew and remove the slot cover. Place the SATA3 RAID PCIe Card into the slot. Carefully press the board into the slot until it seats firmly. Secure the SATA3 RAID PCIe Card with the slot cover screw. Install the SATA cables from the SATA connectors to your SATA devices.
- Page 3 2-Port SATA3 RAID PCIe Card 4.1 Create a Disk Array: Under Free Physical Disks, use the <Space> key to select the hard drives to be included in the RAID array. The selected hard drive will be marked with an asterisk (*). After selecting the hard drives, press <Enter>...
- Page 4 2-Port eSATA3 RAID PCIe Card Stripe Size: Select the stripe block size. Options include 32 KB and 64 KB. Gigabyte Rounding: Select whether to permit the installation of a replacement drive that is smaller than the failed drive when performing a RAID 1 rebuild. Options include None, 1G, and 10G. Quick Init: Select whether to quickly erase old data on the hard drives when creating the array.
- Page 5 2-Port SATA3 RAID PCIe Card Please follow the following steps: driver installer (drvSetup.exe) folder \SATA3\88SE9128\Drivers to install the RAID drivers Reboot the system to let the drivers take effect. RAID installer (\SATA3\88SE9128\Utility\MRUSetup.exe) to install the RAID Utility. Note: After the installation, you must login the utility with the same account name and password that you use to login the operating system.
Need help?
Do you have a question about the EX-3512 and is the answer not in the manual?
Questions and answers