Advertisement
4-Port SATA3 Hardware RAID PCIe (x2) Card
1. Introduction
Thank you for purchasing this 4-Port SATA3 RAID PCI PCIe Card. It is designed to
support up to 4 SATA3 ports with a built-in SATA3 RAID controller. It supports 4
SATA3 hard drives (or SSD) over one single PCI Express Slot and provides hardware
RAID 0, 1, 10, 3, 5 modes for your system.
Features:
✓
Supports 2-lane PCIe Gen 2 up to 10Gb/s
✓
Provides 4 Internal SATA3 Drives with 2 Double Deck Connectors
✓
Supports Hardware RAID 0, 1, 10, 3, 5 Modes
✓
Supports Low Profile Form Factor
✓
Supports SATA3 transfer rate at 6.0Gb/s
✓
Provides Windows RAID GUI for RAID Management
✓
Co-resides with Motherboard IDE and SATA devices
✓
Supports Win 2003, 2008, XP, Vista, Win 7, 8.x, 10,
Linux and Mac OS
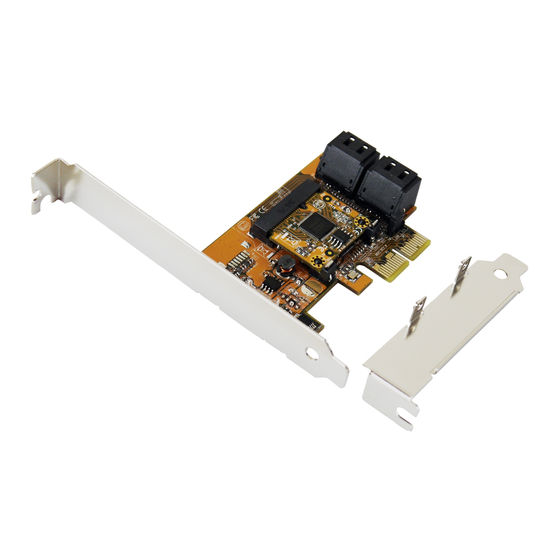
2. Board Layout
Up:
Down: Port 1
EX-3517R
Port 2
Up:
Down: Port 3
Gen 2 PCIe (x2)
Golden Fingers
1
Port 4
Low Profile
Bracket
Advertisement
Table of Contents

Related Manuals for Exsys EX-3517R


Summary of Contents for Exsys EX-3517R
- Page 1 EX-3517R 4-Port SATA3 Hardware RAID PCIe (x2) Card 1. Introduction Thank you for purchasing this 4-Port SATA3 RAID PCI PCIe Card. It is designed to support up to 4 SATA3 ports with a built-in SATA3 RAID controller. It supports 4 SATA3 hard drives (or SSD) over one single PCI Express Slot and provides hardware RAID 0, 1, 10, 3, 5 modes for your system.
- Page 2 4-Port SATA3 Hardware RAID PCIe (x2) Card 3. Hardware Installation Power down the peripherals, then the computer. Remove the computer cover and save the screws. Choose an unused PCI Express bus slot. Unscrew and remove the slot cover. Retain the screw; you will use it when you install the SATA3 PCIe RAID Card.
- Page 3 4-Port SATA3 Hardware RAID PCIe (x2) Card 4. Software Installations Win2000/XP/2003/Vista/Win7 Installation The SATA3 PCIe RAID Card supports Advanced Host Controller Interface (AHCI) mode which gives software developers and hardware designers a standard method for detecting, configuring, and programming SATA/AHCI adapters. It exposes SATA's advanced capabilities (such as hot swapping native command queuing)
- Page 4 4-Port SATA3 Hardware RAID PCIe (x2) Card Install the Hardware RAID Management Utility: Insert the driver DVD, run the setup.exe file on the DVD (as administrator), the location of the setup.exe file as follows: \SATA_RAID\JMB390\Windows_Utility...
- Page 5 4-Port SATA3 Hardware RAID PCIe (x2) Card Follow the onscreen instructions until the installation is completed. After reboot, you can run it by click its application icon in the notification tray located at the bottom right corner of the screen or simply double-click the short-cut icon on the desktop.
- Page 6 4-Port SATA3 Hardware RAID PCIe (x2) Card 5. Using JMB39X HW RAID Manager Once JMB39X HW RAID Manager is launched, the JMB39X HW RAID Manager GUI window will be opened. For the consideration of different user experiences and achieving the ease of navigation, the main GUI is divided into two modes (“Basic mode”...
- Page 7 4-Port SATA3 Hardware RAID PCIe (x2) Card Note: For detail operations of configuring your disk array with the RAID Manager, please read the JMB39X Raid manager user guide.pdf file included in the same folder as the software.
- Page 8 4-Port SATA3 Hardware RAID PCIe (x2) Card...
Need help?
Do you have a question about the EX-3517R and is the answer not in the manual?
Questions and answers