
Related Manuals for Exsys EX-41016-2WO


Summary of Contents for Exsys EX-41016-2WO
- Page 1 Anleitung EX-41016-2WO RS-232 PCI Karte mit 16 x 9 Pin Anschluss Vers. 1.0 / 28.10.15 Manual...
-
Page 2: Table Of Contents
EX-41016-2WO Inhaltsverzeichnis Beschreibung ······················································································ 3 Lieferumfang ······················································································ 3 Aufbau und Anschlüsse ······································································ 4-5 3.1 Aufbau······································································································ 4 3.2 Anschlüsse ······························································································ 4-5 Jumper Einstellungen ········································································· 5-6 Hardware Installation ············································································ 6 Treiber Installation ············································································· 7-8 Technische Daten ················································································ 8 Index Description ························································································· 9 Extent of Delivery ················································································... -
Page 3: Beschreibung
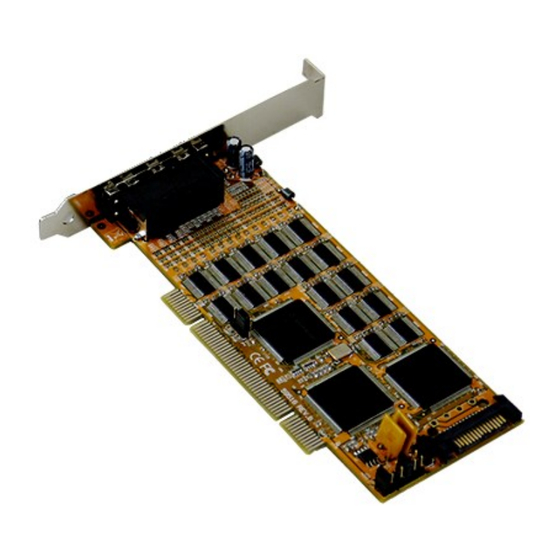
Deutsch 1. Beschreibung Die EX-41016-2WO ist eine PCI serielle RS-232 Karte mit 16 seriellen FIFO 16C95x Ports, für den Anschluss von High-Speed seriellen RS-232 Peripherie Geräten (z.B. Terminal, Modem, Plotter usw.). Der serielle PCI Bus unterstützt dabei optimal die Leis- tung des schnellen SystemBase Chipset mit 256byte FIFO Cache. -
Page 4: Aufbau Und Anschlüsse
(Netzteil oder PCI) JP5: Nur für Testzwe- JP4: Jumper zum einstellen JP2(S9-S16) & JP3(S1-S8): Jumper für Power auf PIN59 der Spannung am UART 3.2 Anschlüsse S1-S16: DB9 (EX-41016-2WO) DB9 (Device) 1 DCD 1 DCD 2 RXD 2 RXD 3 TXD 3 TXD... -
Page 5: Jumper Einstellungen
EX-41016-2WO Deutsch 3. Aufbau und Anschlüsse 3.2 Anschlüsse Bezeichnung Bezeichnung Bezeichnung 3.3 Volt 5 Volt 12 Volt (Orange) (pre-charge) (pre-charge) 3.3 Volt 5 Volt 12 Volt (Orange) (Rot) (Gelb) 3.3 Volt 5 Volt 12 Volt (pre-charge) (Rot) (Gelb) Ground Ground... -
Page 6: Hardware Installation
Wenn Sie die Karte installieren, beachten Sie bitte die folgenden Hinweise. Da es große Unterschiede zwischen PC‘s gibt, können wir Ihnen nur eine generelle Anleitung zum Einbau der EX-41016-2WO geben. Bei Unklarheiten halten Sie sich bitte an die Bedie- nungsanleitung Ihres Computersystems. -
Page 7: Treiber Installation
EX-41016-2WO Deutsch 6. Treiber Installation Windows 2000/ XP/ Vista/ 7/ 8.x/ 10/ Server 20xx Windows erkennt beim Start einen neuen “PCI Controller“ und öffnet automatisch den Windows Hardwareassistenten. Wählen Sie die manuelle Installation aus und legen Sie die Treiber CD in Ihr CD-ROM Laufwerk (z.B. Laufwerk D:). Geben Sie nun den Pfad "D:\IO\SYSTEMBASE\DRIVER\PCI"... -
Page 8: Technische Daten
Deutsch EX-41016-2WO 6. Treiber Installation SCO UNIX / LINUX Die Treiber für Linux befinden sich in folgendem Verzeichnis: "D:\IO\SYSTEMBASE\DRIVERS\PCI\SCO" Da sich die einzelnen Distributionen und Kernelversionen sehr voneinander unterschei- den, können wir Ihnen leider keine Installationsanweisung geben. Bitte halten Sie sich an die Installationsanweisung für Standard I/O Ports Ihrer Unix/Linux Version. -
Page 9: Description
Support Windows NT 4.0/ 9x/ 2000/ XP/ Vista/ 7/ 8.x/ 10/ Server 20xx/ Linux Certificate for CE / FCC / RoHS / WEEE DE97424562 2. Extent of Delivery Before you install the EX-41016-2WO in your PC, please check at first the contents of the delivery: EX-41016-2WO ... -
Page 10: Layout And Connections
JP5: Only for Test (Please not change) JP4: Jumper to set the volta- JP2(S9-S16) & JP3(S1-S8): Jumper for power to PIN59 at the UART 3.2 Connections S1-S16: DB9 (EX-41016-2WO) DB9 (Device) 1 DCD 1 DCD 2 RXD 2 RXD 3 TXD 3 TXD... -
Page 11: Jumper Settings
EX-41016-2WO English 3. Layout and Connections 3.2 Connections Assignment Assignment Assignment 3.3 Volt 5 Volt 12 Volt (Orange) (pre-charge) (pre-charge) 3.3 Volt 5 Volt 12 Volt (Orange) (Red) (Yellow) 3.3 Volt 5 Volt 12 Volt (pre-charge) (Red) (Yellow) Ground Ground... -
Page 12: Hardware Installation
If you are ready with the jumper settings, please proceed with the following installation instructions. Because there are large differences between PC’s, we can give you only a general installation guide for the EX-41016-2WO. Please refer to your computer’s refer- ence manual whenever in doubt. -
Page 13: Driver Installation
EX-41016-2WO English 6. Driver Installation Windows 2000/ XP/ Vista/ 7/ 8.x/ 10/ Server 20xx After starting Windows it recognizes a new “PCI Controller“ and opens the hardware assistant. Please choose manual installation and put the driver CD into your CD-Rom drive. -
Page 14: Technical Information
English EX-41016-2WO 6. Driver Installation CHECK THE INSTALLED DRIVER Click at >Start< >Programs< >Administrative Tools[Common]< >Windows NT- Diagnostics< then click at >Resource< >IRQ<. Here you should find the entry „09 o 0 PCI“. Then click at >I/O-Port< here you should see the entries „D400-D407 sysbase 0 PCI“...
Need help?
Do you have a question about the EX-41016-2WO and is the answer not in the manual?
Questions and answers