
Related Manuals for DAPAudio ZA-9120TU


Summary of Contents for DAPAudio ZA-9120TU
- Page 1 MANUAL ENGLISH ZA-9120TU Ordercode: D6153 Highlit e I nt ernat ional B.V. – Ves t as t raat 2 – 6468 EX – K erkrade – t he Net herlands...
-
Page 2: Table Of Contents
ZA-9120TU Table of contents Warning ................................2 Safety Instructions............................2 Operating Determinations ......................... 4 Connection with the mains ........................4 Return Procedure ............................4 Claims................................. 4 Description of the device ..........................5 Frontside ..............................6 Backside ..............................8 Tuner................................. 12 Audio Player ............................. -
Page 3: Warning
Save the carton and all packing materials. In the event that a device must be returned to the factory, it is important that the device is returned in the original factory box and packing. Your shipment includes: DAP Audio ZA-9120TU FM Antenna ... - Page 4 ZA-9120TU IMPORTANT: The manufacturer will not accept liability for any resulting damages caused by the non -observance of this manual or any unauthorized modification to the system. Never let the power cord come into contact with other cables! Handle the power cord and all connections with the mains with particular caution! ...
-
Page 5: Operating Determinations
ZA-9120TU Operating Determinations This system is not designed for permanent operation. Consistent operation breaks will ensure that the system will serve you for a long time without defects. If this system is operated in any other way, than the one described in this manual, the product may suffer damages and the warranty becomes void. -
Page 6: Description Of The Device
Description of the device Features The DAP ZA-9120TU is a 120W, 100V mixer amplifier with 7 selectable sources, 3 microphone inputs and 2 zones. All microphone inputs are equipped with phantom power and can also be selected as line input. -
Page 7: Frontside
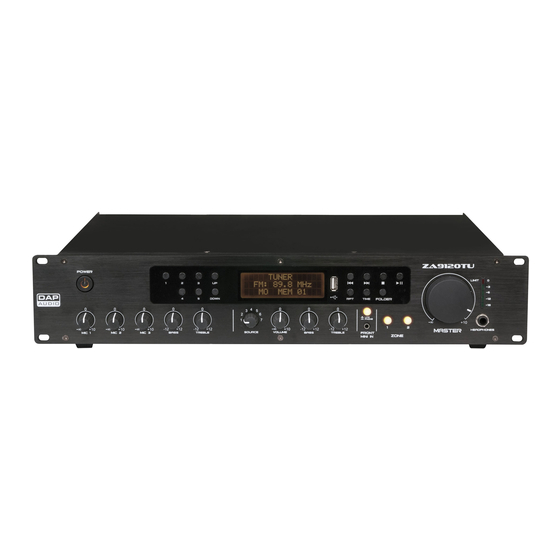
ZA-9120TU Frontside Fig. 01 Power switch ON/OFF Press the button to switch the device ON/OFF. Tuner/audio player See section Tuner, page 12 and section Audio Player, page 13. Master control Turn the control to adjust the master volume level, according to your preference. - Page 8 ZA-9120TU Fig. 02 Source selector Turn the control to set the desired signal source or the built -in audio player/tuner. The available sources are: 1. Tuner 2. USB front 3. USB back 4. CD 5. Video 6.
-
Page 9: Backside
Connect the device to the appropriate power supply. AC selector Before connecting your ZA-9120TU to the mains, make sure that the AC selector is set to the proper voltage which is used in your country. In case of doubt, consult a technician. - Page 10 ZA-9120TU Fig. 04 Gain level control – Mic 3 Adjust input level for Mic 3. Combo input – Mic 3 Combo input for Mic 3. Accepts balanced or unbalanced inputs. Mic 3 terminal connector IN Terminal input for Mic 3. Accepts balanced or unbalanced inputs.
- Page 11 ZA-9120TU Vox: If set to ON, the background music will be suppressed to the preset ducking level, whil e speaking into the microphone. Gain level control – Mic 1 Adjust input level for Mic 1. Combo input – Mic 1 Combo input for channel 1.
- Page 12 ZA-9120TU Fig. 05 USB connector A - Back Use this connector to connect a USB flash drive with MP3 or WAV files. Ducking level control Ducking level control for microphone/line input 2. When someone speaks into the microphone, other sound will either be muted or suppressed, depending on the setting of the ducking level. The DIP switch “Vox”...
-
Page 13: Tuner
ZA-9120TU Tuner Fig. 06 Preset 1 button Press this button to recall preset 1. Preset 2 button Press this button to recall preset 2. Preset 3 button Press this button to recall preset 3. UP button Press this button to select the desired station. Press and hold down the button for 2 seconds to automatically increase the FM frequency, until the radio is tuned. -
Page 14: Audio Player
ZA-9120TU Audio Player Fig. 07 LCD display In Audio Player mode, the display shows the current track’s name and number, playback time and the current playback mode. USB connector A - Front Use this connector to connect a USB flash drive with MP3 or WAV files. -
Page 15: Installation
ZA-9120TU Installation Remove all packing materials from the ZA-9120TU. Check if all foam and plastic padding is removed. Secure the equipment into a 19" rack if preferred. Connect all cables. Always disconnect from electric mains power supply before cleaning or servicing. -
Page 16: Storing A Radio Station In Memory
ZA-9120TU Storing a Radio Station in Memory 01) If you want to save a newly found radio station as one of the first 4 presets, press and hold down one of the preset buttons 1-4 (50/51/52/54). Release the button as soon as the desired preset number appears on the display. -
Page 17: Selecting Folders And Tracks
ZA-9120TU Selecting Folders and Tracks 01) While playback is active, press the Folder button (65). The display will show: 02) Press the buttons to select the desired folder. 03) Press the button to enter the selected folder/track. The display will show: 04) Press the buttons to select the desired folder/track within the folder. -
Page 18: Connecting Outputs
ZA-9120TU Connecting Outputs Speakers are connected by means of terminal connectors. See the examples below . Low Impedance Outputs You can use as many speakers as you want as long as the total impedance matches the amplifiers output. Example 1: Using the 8Ω output with an 8Ω speaker. -
Page 19: Connection Cables
ZA-9120TU Connection Cables Take care of your cables, always holding them by the connectors and avoiding knots and twists when coiling them: This gives the advantage of increasing their life and reliability. Periodically check your cables. A great number of problems (faulty contacts, ground hum, discharges, etc.) are caused entirely by using unsuitable or faulty cables. -
Page 20: Maintenance
ZA-9120TU Maintenance The DAP Audio ZA-9120TU requires almost no maintenance. However, you should keep the unit clean. Disconnect the mains power supply, and then wipe the cover with a damp cloth. Do not immerse in liquid. Do not use alcohol or solvents. -
Page 21: Product Specifications
ZA-9120TU Product Specifications Outputs Power consumption: 120W Zones: 2 100V & 8Ω: Terminals Line output: XLR Loop through: RCA Headphones: 6,3 mm jack Inputs 3 x Mic/Line: XLR/jack combo & terminals 3 x Line: RCA ... -
Page 22: Dimensions
ZA-9120TU Dimensions Ordercode: D6153... -
Page 23: Notes
ZA-9120TU Notes Ordercode: D6153... - Page 24 ©2016 DAP Audio...
Need help?
Do you have a question about the ZA-9120TU and is the answer not in the manual?
Questions and answers