
Related Manuals for Ricoh S-P3


Summary of Contents for Ricoh S-P3
- Page 1 M080 Training - Sincere-P3 MODEL S-P3 TRAINING Machine Code: M080 Version 1.0 This course is for the S-P3 printer. Modifications Started 28 March, 2011. First draft 11 April, 2011. Release version – 10 May, 2011.
- Page 2 M080 Training - Sincere-P3 M080 Series Training Model S-P3 1) Product Outline No additional notes. Date of change Version History Description 28-2-2008 New model added (S-P1L). The following slides were changed: Slides 2, 11 The following slides were added: Slides 20 to 27...
-
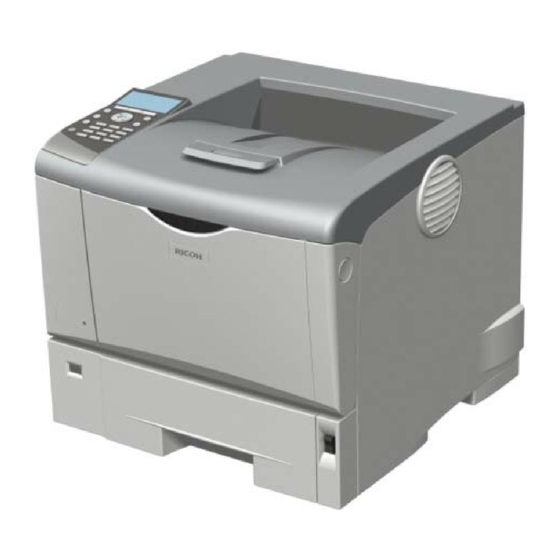
Page 3: Exterior Components
M080 Training - Sincere-P3 Exterior Components 1 1. Standard Paper Feed Tray 2. Paper Size Dial 3. Bypass Tray Extension 4. Bypass Tray 5. Operation Panel 6. Tray Extension 7. Standard Tray 8. Paper Exit Cover 9. Vents 10. Front Cover Release Button 11. - Page 4 M080 Training - Sincere-P3 Exterior Components 2 1. Controller Board 2. Rear Cover 3. Power Connector 4. Paper Tray Cover 5. Intake Vent 6. SD Card Slots 7. Optional Interface Board Slot 8. Ethernet Port 9. USB Port B 10. USB Port A (Descriptions below in the notes section) 1.
-
Page 5: Operation Panel
Operation Panel This is the new operation panel. Number key pad Upgraded Panel : 4-Line display Number keys standard Previous Model (S-P2) The S-P3 has a number key pad, which enables users to input numbers such as PIN codes easily. -
Page 6: Interior Components
M080 Training - Sincere-P3 Interior Components 1. Controller case 2. Main motor 3. Engine board 4. Relay clutch 5. By-pass feed clutch 6. Paper feed clutch 7. Registration clutch (behind harness guide and main motor board) No additional notes. - Page 7 M080 Training - Sincere-P3 Product Lineage & Changes Predecessor Models: Model S-P1c, Model S-P2 Current Model: Model S-P3 (M080) New to Model S-P3 (relative to Model S-P2) Operation panel » 10-Key standard, 4-Line display Eco sensor Firmware HDD (optional) » comes with data overwrite security and encryption unit Other service parts, including AIO, are common with S- No additional notes.
-
Page 8: Eco Night Sensor
M080 Training - Sincere-P3 Eco Night Sensor The printer will automatically go into Auto Off mode if the Eco Night Sensor detects a low amount of Menu light in the room. By default the Eco Night Sensor is inactive. It can be Sensor turned on via the Menu key. -
Page 9: Basic Specifications
M080 Training - Sincere-P3 Basic Specifications - 1 Warm up time: 19 seconds or less First print time: 6.9 seconds or less Optional HDD capacity: 80GB Built-in Connectivity USB 2.0 Ethernet Printing speed 36 ppm (A4-SEF) / 37 ppm (LT-SEF) Printer memory Standard: 256 MB Maximum: 512 MB... - Page 10 M080 Training - Sincere-P3 Basic Specifications - 2 Maximum print width: A4/LT Paper tray capacity 550 sheets (standard) 100 sheets (bypass tray) Output tray capacity: 250 sheets AIO Cartridge: Average 15K/cartridge (A4/5% coverage) Weight 17.5 kg / 38.6 lb (with AIO) 15.5 kg / 34.2 lb (without AIO) Paper tray and output tray capacities assume 75 g/m (20 lb) paper.
-
Page 11: Maintenance Kit
M080 Training - Sincere-P3 Maintenance Kit The Maintenance Kit consists of the following, which should be replaced at 90k intervals. Fusing Unit (one - for the main unit) Transfer Roller (one - for the main unit) Friction Pads (one each for standard and optional trays) Paper Feed Rollers (one each for standard and optional trays) The user or a technician can do the maintenance... - Page 12 M080 Training - Sincere-P3 M080 Series Training Model S-P3 2) Installation No additional notes.
- Page 13 M080 Training - Sincere-P3 Overview No additional notes.
- Page 14 M080 Training - Sincere-P3 Who is Responsible for Installation? The customer installs the printer, the optional paper feed and duplex units, and the controller options. No additional notes.
-
Page 15: Accessing Service Mode
M080 Training - Sincere-P3 Accessing Service Mode To enter Service Mode, (with the power already on and the machine warmed up) hold down both arrow keys for five seconds, release, and then press Enter. Alternately, hold down the Suspend/Resume and Escape buttons as the power is switched on (saving time under certain conditions). - Page 16 M080 Training - Sincere-P3 SP Settings Service Tel. No. Setting: SP5-812-001 and 002 001: Service station telephone number 002: Service station fax number. This number is printed on the counter list when meter charge mode is selected. This lets the user fax the counter data to the service station.
-
Page 17: Install The Printer
M080 Training - Sincere-P3 Install the Printer No additional notes. - Page 18 M080 Training - Sincere-P3 Install the Printer For instructions, refer to the Quick Installation Guide Obey all notes and cautions. Learn how to lift the printer correctly. Keep the cartridge level and do not shake it... when the tape is removed after you remove the tape when you put the cartridge in the machine.
- Page 19 M080 Training - Sincere-P3 Installing the Controller Options No additional notes.
- Page 20 M080 Training - Sincere-P3 Printer Control Board Options The following options are installed in or on the Printer Controller Board, shown at left 1. Optional memory Printer 2. SD card (VM Card, Controller or Data Storage Card) Board Unit 3. Interface board (IEEE 802.11b or Gigabit Ethernet) 4.
-
Page 21: Sd Card Slots
M080 Training - Sincere-P3 SD Card Slots Upper Slot Use for Data Overwrite Security installation. Upper SD Also, use for moving SD card Card Slot applications (SP5873). Lower Slot The VM Card or Data Storage Card goes here. » To install more than one of Lower SD Card Slot these, you must merge the... -
Page 22: Copying Applications
M080 Training - Sincere-P3 Copying Applications If you want to use more than one application in one slot, you must copy the application from the original card to another SD card. See the service manual for the detailed procedure. Service Tables - SD Card Application Move Basic point: Put the source card in slot 2 (lower slot), and copy it to the card in slot 1 (upper slot). - Page 23 M080 Training - Sincere-P3 Storing the Original SD Cards after Merging After you copy an application, the original SD card is deactivated. It can be re-activated with the ‘Undo Exec’ procedure in the service manual. » Put the original card in slot 2, and copy back from slot 1. But the customer must keep the original SD card as a proof of purchase.
- Page 24 M080 Training - Sincere-P3 Installing the Controller Options General Notes Unplug the machine's power cord before you install a controller option. After you install a controller option, check that the machine can detect it. » Menu Key > List/Test Print > Config. Page »...
- Page 25 M080 Training - Sincere-P3 Install the Memory Options Try installing the options. The procedures are in the Operation Manual (Hardware Guide - Installing Options). Install the memory unit » The machine already includes 64 MB memory as standard equipment. You can remove this and add 128 or 256 MB. Install the hard disk SP 7836 shows the size of the memory in the machine.
- Page 26 M080 Training - Sincere-P3 Install IEEE802.11b or Gigabit Ethernet Option Installation procedure: Hardware Guide - Installing Options Print the configuration page to make sure that the machine can find the board. You can install only one of these options. (There is only one interface option slot.) No additional notes.
- Page 27 M080 Training - Sincere-P3 Install the VM Card or Data Storage Unit Try installing one of these options. The procedure is in the Operation Manual (Hardware Guide - Installing Options). No additional notes.
-
Page 28: Updating The Firmware
M080 Training - Sincere-P3 Updating the Firmware No additional notes. - Page 29 M080 Training - Sincere-P3 Firmware The firmware is on an SD card. There are several modules (see below). For more details, see service manual » Service Tables – Firmware Update All of the following firmware modules for this machine can go on one card Engine Network DocBox Printer...
-
Page 30: Firmware Update
M080 Training - Sincere-P3 Firmware Update Make sure that your machine has the most recent firmware. Try the procedures in the service manual. Procedures: » Download: Service Tables – Firmware Update There are two card slots. Use the lower of the two card slots. The bottom line of the display is a progress bar. - Page 31 M080 Training - Sincere-P3 M080 Series Training Model S-P3 3) Machine Component Overview No additional notes.
-
Page 32: Printing Process
M080 Training - Sincere-P3 Printing Process Charge Roller: Quenching: About –1.7 kV -30V Charge: - 900V After exposure (two laser beams): - 140V Development Roller: - 750 V Transfer Roller: +15 μA (+2 kV) These are all standard processes for printers and copiers. Refer to the Core Technology Manual for details. -
Page 33: Mechanical Components
M080 Training - Sincere-P3 Mechanical Components Laser unit Cartridge (AIO-type) Charge roller Development roller By-pass feed tray By-pass feed roller Paper feed roller Friction pad Registration roller 10. Transfer roller 11. Drum 12. Pressure roller 13. Hot roller 14. Paper exit roller 15. -
Page 34: Paper Path
M080 Training - Sincere-P3 Paper Path Output tray Duplex unit By-pass tray Standard paper tray Optional paper tray Study the paper feed paths. Paper feed-in paths: Paper tray, by-pass tray, optional tray Paper feed-out paths: Normal feed, duplex feed The junction gate and solenoid send paper to the duplex tray. These components are in the duplex unit. -
Page 35: Electrical Components
M080 Training - Sincere-P3 Electrical Components Study the electrical component layout diagrams. For the functions of the electrical components, please refer to the component list. Go to your machine. Find the components on the diagrams. Removing covers: Replacement & Adjustment –... - Page 36 M080 Training - Sincere-P3 Boards Engine board: Controls the printer engine If you replace the engine board, remove the NVRAM from the old board and put it on the new one. Controller board: Controls the interfaces between the printer and the computer This is a GW controller NVRAM upload/download Service Manual - Service Tables - NVRAM...
-
Page 37: Block Diagram
M080 Training - Sincere-P3 Block Diagram The engine board controls all the mechanical components. The printer controller board connects to the engine board through a PCI bus. The IEEE 802.11a/g Interface Unit (M344) and Gigabit Ethernet Board (G874) cannot be installed at the same time. - Page 38 M080 Training - Sincere-P3 Controller Board Details are in the notes below The controller controls all applications. Optional features can be added via SD cards. ASIC. Contains the dedicated GW controller chips of the shared resources (the CPU, memory, and HDD hardware) for the copying and printing functions. CPU.
- Page 39 M080 Training - Sincere-P3 M080 Series Training Model S-P3 4) Maintenance No additional notes.
- Page 40 M080 Training - Sincere-P3 Top Cover Screw Removal Fusing Unit Paper Tray Front View Rear View To remove the top cover, remove all four screws - two at the front (left photo) and two at the back (right photo). Be sure to half-open the Exit Guide Plate (see next slide) when either partially or fully removing the top cover.
- Page 41 M080 Training - Sincere-P3 By-pass Tray Unit Removal Following the correct procedures, the By- pass Tray Unit is easily removed. Note that the paper tray must first be removed so that the By-pass Tray can open wide (low enough) to the point where the hinges will disconnect.
-
Page 42: Removing Operation Panel
M080 Training - Sincere-P3 Removing Operation Panel Tabs Connectors Push tabs with fingers after partially View of top of removing Top Cover. machine with Top Cover and After pulling Operation Panel away Operation Panel from Top Cover, disconnect two fully removed. connectors to fully remove Operation panel. -
Page 43: Removing Left Cover
M080 Training - Sincere-P3 Removing Left Cover Front By-pass Feed Clutch Note that (with caution) the left cover can be removed after loosening the top cover (without removing it - right picture above). When removing and replacing By-pass Feed Clutch, carefully pull the corner of the front cover down until enough clearance is made to slide the By-pass Feed Clutch off of, and then back onto, the shaft. -
Page 44: Exterior Covers
M080 Training - Sincere-P3 Exterior Covers - 1/2 Note where the different screws and connectors are in this drawing. No additional notes. - Page 45 M080 Training - Sincere-P3 Exterior Covers - 2/2 Note where the different plastic tabs are in this drawing. Understanding where the plastic tabs are is critical to smooth removal of the various external covers. No additional notes.
- Page 46 M080 Training - Sincere-P3 Left Cover Tab & Hole Alignment Notches Rear Front Front Rear Be sure to line up the notches in the bottom of the left cover (with tabs on bottom edge of machine) and the tab (with the hole on the side of the machine) when reinstalling the left cover.
- Page 47 M080 Training - Sincere-P3 Magnetic Clutch Stopper & Clips Magnetic Clutch Stopper Clip When reinstalling the clutches, always verify that clips and magnetic clutch stoppers are correctly installed. Note: The Magnetic Clutch Stopper pictured in middle image is more easily installed with the Paper Feed Clutch first (before the Registration Clutch), although both the Paper Feed Clutch and the Registration Clutch can be replaced independently of each other.
- Page 48 M080 Training - Sincere-P3 Clutch Removal View with Motor and By-pass Feed Clutch removed. View with only Paper Feed Clutch installed. Note that holder and screw are still attached. Paper Feed Clutch is more easily installed before installing the Registration Clutch. View with all four clutches removed.
- Page 49 M080 Training - Sincere-P3 Clutch Wire Connections Relay Clutch (Behind Motor & Paper Feed Wiring Harness) Clutch Connection Relay Clutch Connection Paper Registration By-pass Feed Registration Feed By-pass Feed Clutch Clutch Clutch Connection Clutch Connection Clutch Before disconnecting clutch wires There are four clutch connectors: from the board, make careful note of Relay Clutch (CN-12)
-
Page 50: Wiring Harness Removal
M080 Training - Sincere-P3 Wiring Harness Removal - 1/2 Plastic Rivet (male section) Plastic Rivet (female section) Remove male section of plastic rivet before female section. To remove the male section [1] of the plastic rivet, pull the edges of the head with your fingernails. »... - Page 51 M080 Training - Sincere-P3 Wiring Harness Removal - 2/2 The most effective and expedient way of Plastic Rivet removing the plastic rivet is usually by using one (index) finger from each hand (as shown in photo). No additional notes.
- Page 52 M080 Training - Sincere-P3 By-pass Feed Clutch Removal When removing the By-pass Feed Clutch with front cover still attached, carefully push corner of cover down (as shown above) while removing (and installing) the clutch. No additional notes.
- Page 53 M080 Training - Sincere-P3 By-pass Feed Clutch Wire Cover Clutch Cover Screw By-pass Feed Clutch By-pass Feed Clutch Wire Bundle Cover Wire Bundle Cover The By-pass Feed Clutch Wire Bundle Cover easily comes off when removing the By-pass Feed Clutch Cover. When reinstalling the Bypass Feed Clutch cover and Wire Bundle Cover, first install the cover with the retaining screw (left above) loosely attached.
-
Page 54: Laser Synchronization Detector
M080 Training - Sincere-P3 Laser Synchronization Detector - 1/2 When installing new Laser Synchronization Detector, verify that board is correctly aligned in holder. For photographic view of this part, see next slide. Laser Synchronization Holder Detector No additional notes. - Page 55 M080 Training - Sincere-P3 Laser Synchronization Detector - 2/2 Laser Synchronization Detector Holder When installing new Laser Synchronization Detector, verify that notch is correctly aligned board is fully installed in holder. No additional notes.
- Page 56 M080 Training - Sincere-P3 Replacing Paper Feed Roller Paper Paper Feed Feed Roller Roller When installing a new Paper Feed Roller, ensure that shaft is correctly oriented in Paper Feed Roller holder. After installing the Paper Feed Roller, if the shaft looks like [1] above, then rotate the roller (carefully, from the side - do not directly touch the rubber of the roller) until it pops into the correct position (as indicated in [2] above).
- Page 57 M080 Training - Sincere-P3 Principles The user does maintenance every 90k. The maintenance kit for the user contains all PM parts. Make sure that engine SP mode 5930 001 (meter charge) is set correctly: If the service contract is for the user to do PM, set meter charge to 'no‘...
- Page 58 M080 Training - Sincere-P3 If PM is Done by the User Set SP 5930 001 (meter-charge) to 'no' (if not already set to 'no' - the default setting). When the PM counter is 90k, the machine tells the user to replace the maintenance kit. Then, the user does the PM.
- Page 59 M080 Training - Sincere-P3 If PM is Done by a Technician - 1/2 Set SP-5930-001 (meter-charge) to 'yes'. This disables the user's "Replace Maintenance Kit" warning at 90k. After you replace the fusing unit components, reset the PM counters with engine SP mode 7804. It is not automatically reset if SP-5930-001 is set to yes.
- Page 60 M080 Training - Sincere-P3 If PM is Done by a Technician - 2/2 How does the technician know when to do PM? The technician must find the current value of the counter. To do this, speak to the user. The user then pushes the Menu key and reads the value on the display over the telephone.
- Page 61 M080 Training - Sincere-P3 Counters Engine service mode has four counters: SP 7993: Shows the engine total counter (also called ‘Total counter’ in the service mode menu) SP 7001: Shows the total number of engine cycles made (called ‘Operation time’ in the menu).
- Page 62 M080 Training - Sincere-P3 The User Says It’s Too Early for PM? The PM interval is 90k prints. However, if the user prints many one-page jobs or two-page jobs, the PM interval can be less than 90k. For the machine, three-page jobs are 'usual' when it calculates the PM counter.
- Page 63 M080 Training - Sincere-P3 User Maintenance Kit Contents User Maintenance Kit Maintenance Kit Type SP 4100 Kit Contents: Fusing unit x 1 Transfer roller x 1 Paper feed roller for the standard tray x 1 Paper feed rollers for the optional PFU x 2 Friction pad - standard tray x 1 Friction pads - optional trays x 2 »...
- Page 64 M080 Training - Sincere-P3 User PM Procedures Do a maintenance procedure on the machine. CAUTION: Let the fusing unit become cool before you start. Do the procedures in the operation manual, to understand what the user must do. Hardware Guide - Replacing Consumables and Maintenance Kit - Replacing the Maintenance Kit Think about problems that users could...
- Page 65 M080 Training - Sincere-P3 Fusing Unit - Replacement Installation When you pull out these rings (during installation of a new Fusing Unit), the hot roller contacts the pressure roller. Before installation, the hot roller and pressure roller are kept separate, to avoid damage to the pressure roller. The pressure roller becomes flattened at the contact point with the hot roller if the two rollers are kept in contact for long periods during storage and transport.
- Page 66 M080 Training - Sincere-P3 Fusing Unit - Overview Different views of the Fusing Unit. Note the correct orientation of the end caps, which are easily removed, but must be correctly oriented before reinstalling. Holder No additional notes.
- Page 67 M080 Training - Sincere-P3 Fusing Unit - Left Side Alignment Pin Attachment Screw When removing the end cap, note the orientation, and then (when reinstalling) make sure the alignment pin goes into the appropriate hole. There is one attachment screw per end cap. Also carefully align the fusing lamp holders when reinstalling.
- Page 68 M080 Training - Sincere-P3 Fusing Unit - Right Side Alignment Pin Attachment Screw When removing the end cap, note the orientation, and then (when reinstalling) make sure the alignment pin goes into the appropriate hole. There is one attachment screw per end cap. Also carefully align the fusing lamp holders when reinstalling.
- Page 69 M080 Training - Sincere-P3 Fusing Unit Lamp Note that the 240V model uses the fusing lamp shown above, with red & black wire connections. The 120V model has blue & black wire connections. No additional notes.
- Page 70 M080 Training - Sincere-P3 PM Done by the Technician PM table: Service Manual - Maintenance - Service Maintenance The service policy of your company controls which procedure you use to change the fusing unit components. The possible procedures are: Replace the fusing unit as one unit Replace each component one at a time, as specified in the PM table.
- Page 71 M080 Training - Sincere-P3 Technician PM Procedures Do the PM procedures. Removal procedures are in the Replacement and Adjustment - Fusing section of the service manual. Hot Roller Bushings - Hot Roller Pressure Roller Bushings - Pressure Roller: Fusing Thermistor Hot Roller Strippers CAUTION: Let the fusing unit become cool before you start.
- Page 72 M080 Training - Sincere-P3 M080 Series Training Model S-P3 5) Laser Exposure No additional notes.
-
Page 73: Laser Optics
M080 Training - Sincere-P3 Laser Optics Two laser beams 16 possible greyscales Automatic power control Mechanical shutter Safety switches Two laser beams The gap between the beams is mechanically adjusted at the factory. There are no motors. Shutter There is a mechanical shutter to stop the laser beam. Safety Switches Safety switches stop power to the laser beam when covers are open. - Page 74 M080 Training - Sincere-P3 LD Safety Circuit Front and rear cover switches When the front or rear cover is open, the cover switches do not let power get to the laser diode. They stop the +24 V supply to the regulator that supplies the +5V power for the laser diodes.
- Page 75 M080 Training - Sincere-P3 Laser Shutter If the front cover is open, the shutter stops the laser beam. This is for safety if the cover switch circuit breaks.. No additional notes.
- Page 76 M080 Training - Sincere-P3 SP Modes 1002: Side to side registration 2112: Main scan magnification No additional notes.
- Page 77 M080 Training - Sincere-P3 Practical Work Cover switches See how the covers push the switches Examine the circuit on the point-to-point diagram Mechanical Shutter Find and examine the mechanical shutter mechanism on the machine. No additional notes.
- Page 78 M080 Training - Sincere-P3 Practical Work Note the location of the laser caution decal. See Service Manual - Replacement and Adjustment - Laser Unit - Caution Decal Locations Do the replacement procedures in the service manual Replacement and Adjustment - Laser Unit Do not adjust the variable resistors on the laser diode drive board.
- Page 79 M080 Training - Sincere-P3 M080 Series Training Model S-P3 6) AIO Cartridge No additional notes.
-
Page 80: Cartridge Components
M080 Training - Sincere-P3 Cartridge Components 1. Charge roller 2. Developer tank 3. Toner tank 4. Reverse roller 5. Development roller 6. Drum 7. Drum shutter 8. Waste toner tank 9. Toner collection roller 10. Cleaning blade This type of cartridge is known as an AIO (all-in-one) cartridge. This is because it contains the drum, the development unit, and many other important engine components. - Page 81 M080 Training - Sincere-P3 Charge Cleaning Pad Charge Roller A charge roller is used The cleaning pad always touches the charge roller. The machine automatically adjusts charge roller voltage for temperature The charge roller gives the drum surface a negative charge of approximately - 900V.
- Page 82 M080 Training - Sincere-P3 Internal Thermistor Internal Thermistor This thermistor measures the temperature inside the machine. The machine uses this temperature to correct the charge voltage and transfer roller current. The thermistor is built into the connector between the ID chip and the engine board.
- Page 83 M080 Training - Sincere-P3 Development Seal Developer tank Toner tank Reverse roller Doctor blade Development roller Agitator Pre-doctor blade Two-component development, one development roller No TD or ID sensor: Toner supply is controlled mechanically by the reverse roller, pre-doctor blade and doctor blade This slide shows the main points about the development unit.
- Page 84 M080 Training - Sincere-P3 Installing a New Cartridge At these times, keep the cartridge level and do not shake it: While you remove the seal to release the developer After you remove the seal to release the developer You can shake the cartridge and hold it at an angle before you remove the seal.
-
Page 85: Toner Near-End And End Detection
M080 Training - Sincere-P3 Toner Near-end and End Detection There are two factors Output from the toner end sensor The time that the main motor has rotated since the current AIO cartridge was first installed No additional notes. - Page 86 M080 Training - Sincere-P3 Toner Near-end & End Detection Toner End Sensor Toner tank Toner near-end: When the output from the toner end sensor falls below a given level. Toner end: Detected 200 pages after near-end If there is a high coverage ratio, the toner may run out before 200 pages.
- Page 87 M080 Training - Sincere-P3 Toner Near-end and End Detection Main Motor Rotation Time The machine monitors the length of time the main motor has been running. When this count exceeds a limit, toner near-end occurs. Warning messages are only displayed if meter charge mode is enabled, if SP 5930 003 is also set to ‘yes’.
- Page 88 M080 Training - Sincere-P3 Toner Near-end and End Detection Messages on the Display - 1 “Replace Print Cartridge Soon”: One of the following Toner near-end (based on the toner end sensor) The print cartridge is near end of its service life (based on main motor rotation).
- Page 89 M080 Training - Sincere-P3 Toner Near-end and End Detection Messages on the Display - 2 When these messages are displayed, printing can continue, but printing quality cannot be guaranteed. This is because the toner can run out suddenly if toner coverage was high after near-end was detected.
- Page 90 M080 Training - Sincere-P3 Toner Near-end and End Detection Messages on the Display - 3 If the alerts do not display, check the settings of SP 5930 001 and 003. These must both be set to ‘yes’. These SPs do not affect the alerts that are triggered by the toner end sensor.
- Page 91 M080 Training - Sincere-P3 Images Getting Pale Suddenly? In most machines, the image gets slowly lighter when the toner cartridge becomes empty. But with this type of cartridge, the image can suddenly get light immediately before the cartridge is empty. What to do if a customer complains about this sudden change in image density? To prevent this symptom, decrease the value of...
- Page 92 M080 Training - Sincere-P3 The AIO Cartridge is not Empty at Toner End When toner end is detected, a small amount of toner still remains in the cartridge. As mentioned in the previous slide, prints become pale very quickly when toner runs out, so there is a safety gap between detected toner end and actual toner end.
-
Page 93: Image Transfer
M080 Training - Sincere-P3 Image Transfer The user replaces the transfer roller. There is a new one in the maintenance kit At given times, the machine applies a negative current to clean the transfer roller The machine automatically adjusts transfer current for temperature Transfer roller Transfer current... - Page 94 M080 Training - Sincere-P3 Are the Rear Side of Prints Dirty? Did the user switch on Auto Continue? This is possibly the cause of the problem. Disable this feature if the user agrees. » User Tools – System Menu – Auto Continue In Auto Continue mode, the machine continues to print, even if there is no paper that agrees with the size and type specified in the driver.
- Page 95 M080 Training - Sincere-P3 Separation from the OPC Separation plate Transfer roller The separation plate helps to remove the paper from the drum after image transfer. No additional notes.
-
Page 96: Drum Cleaning
M080 Training - Sincere-P3 Drum Cleaning Cleaning blade Waste toner tank Toner collection roller The cleaning blade removes remaining toner on the drum. The toner collection roller moves the toner to the used toner tank. The machine does not detect used toner overflow with a sensor. There is no used toner overflow detection. -
Page 97: Toner Overflow Prevention
M080 Training - Sincere-P3 Toner Overflow Prevention The life of the AIO cartridge is 15k prints. The used toner tank will not get full until after that time. So, if the AIO is replaced at 15k, there will be no overflow, and no overflow detection is necessary. - Page 98 M080 Training - Sincere-P3 Possible Symptoms from Drum Cleaning Poor cleaning blade lubrication can cause these problems: Grey banding parallel to the paper feed direction Cleaning blade flipping caused by friction between the blade and the drum Noise caused by friction between the blade and the drum For a solution to this problem, set engine SP 3926 to Yes.
- Page 99 M080 Training - Sincere-P3 Quenching Quenching lamp Find the quenching lamp in the machine. It is not a part of the cartridge. It is above the cartridge. Light from the quenching lamp (LED array) strikes the drum by passing through the slit at the top of the cartridge.
- Page 100 M080 Training - Sincere-P3 Engine SP Modes 2001: Charge roller voltage. Usually, do not adjust 2201: Development bias. Usually, do not adjust 2213: Number of prints after toner near-end 2301: Adjusts the transfer roller current 2910: Enables/disables automatic correction of charge and transfer roller voltages for temperature The temperature is measured at the internal...
- Page 101 M080 Training - Sincere-P3 Engine SP Modes 2980: Displays the waste toner counter 3923: Sets printing to stop (or not to stop) when the main motor rotation counter gets to a set value 3926: Lubricates the cleaning blade with a small amount of toner every 50 prints 3927: Determines whether to allow printing when toner end is detected, to ensure that every last...
- Page 102 M080 Training - Sincere-P3 M080 Series Training Model S-P3 7) Paper Feed No additional notes.
- Page 103 M080 Training - Sincere-P3 Mechanical Components Standard tray and by-pass tray: Both use a friction pad and feed roller mechanism Paper tray capacity: 550 sheets By-pass tray capacity: 100 sheets No additional notes.
-
Page 104: Paper Tray
M080 Training - Sincere-P3 Paper Tray No additional notes. - Page 105 M080 Training - Sincere-P3 Extending the Tray Take out the tray and try this for yourself. Procedure: Operating Instructions (Hardware Guide) - Paper and Other Media – Loading Paper Extend the tray when adding paper longer than A4/LT To use longer paper, release the catches at both sides, then extend the tray and re-lock the catches.
-
Page 106: Paper Lift
M080 Training - Sincere-P3 Paper Lift Guide block Tray arm Spring The guide blocks on the machine lift the tray arms up. The springs attached to the arms lift the bottom plate. The main motor does not drive this mechanism. The springs lift the paper until the top of the stack touches the feed roller. - Page 107 M080 Training - Sincere-P3 Feed and Registration One-way Clutch Friction pad and feed roller, driven by the main motor Paper buckle at registration: Adjustable with engine SP mode 1003 Registration adjustment – can be adjusted with a user tool (Maintenance menu – Registration), in addition to the usual SP modes (1001, 1002).
-
Page 108: Remaining Paper Detection
M080 Training - Sincere-P3 Remaining Paper Detection Two sensors detect how much paper remains in the tray [A] Remaining paper sensor 1 [B] Remaining paper sensor 2 Amount of paper Sensor 1 Sensor 2 1-50 sheets (10%) 51-250 sheets (50%) 251- 450 sheets (90%) 451-550 sheets... -
Page 109: Paper End Detection
M080 Training - Sincere-P3 Paper End Detection Paper end sensor: The actuator drops into the cut-out in the bottom plate when the last sheet of paper has gone No additional notes. -
Page 110: Bypass Tray
M080 Training - Sincere-P3 By-pass Tray No additional notes. -
Page 111: Paper Sensor
M080 Training - Sincere-P3 Paper Sensor By-pass paper sensor: Detects when paper is put on the tray. No width sensor: The user inputs the paper size at the operation panel. No additional notes. - Page 112 M080 Training - Sincere-P3 Feed Feed Roller Clutch Clutch: Transfers drive from the main motor to the feed roller. Cams on the feed roller shaft move the bottom plate up, and this pushes the paper stack against the feed roller. The cams release the bottom plate.
- Page 113 M080 Training - Sincere-P3 Preventing Friction in the By-pass Tray Feed Metal Plate Roller Friction To prevent bad effects from too much friction between the feed roller and friction pad when the feed roller is not turning, the feed roller contains a metal plate. The by-pass feed clutch stops at the correct time so that the plate points down when the roller stops, and paper feeds smoothly.
- Page 114 M080 Training - Sincere-P3 SP Modes Engine SP modes 1001: Leading edge registration 1003: Adjusts the paper buckle at the registration roller 1902: Determines the number of bypass feed roller rotations when ‘Transparencies’ has been selected » Set this to 2 if there are feed problems with OHPs. 2113: Sub scan magnification These engine service modes are related to paper feed.
-
Page 115: Registration Adjustment
M080 Training - Sincere-P3 Registration Adjustment Registration can be adjusted by the user in this model. Maintenance menu - Registration Operating Instructions (Hardware Guide) - Adjusting the Printer - Adjusting Tray Registration No additional notes. - Page 116 M080 Training - Sincere-P3 M080 Series Training Model S-P3 8) Fusing and Paper Exit No additional notes. Date of change Version History Description 28-2-2008 Small change to slide 18, due to wording on screen in SP mode.
- Page 117 M080 Training - Sincere-P3 Components 1. Paper exit roller 2. Hot roller strippers 3. Thermostat 4. Thermistor 5. Fusing lamp 6. Hot roller 7. Fusing pressure roller 8. Pressure spring 9. Fusing exit roller 10. Paper exit sensor No additional notes.
- Page 118 M080 Training - Sincere-P3 Drive Main motor Driven by the main motor No fusing nip adjustment No additional notes.
-
Page 119: Fusing Entrance Guide
M080 Training - Sincere-P3 Fusing Entrance Guide Default position: Outermost holes. Change the position if paper becomes creased while going through the fusing unit. If creasing occurs frequently in the fusing unit, remove all screws and slide the entrance guide to the right. Replace the two end screws only. Do not replace the middle screw. - Page 120 M080 Training - Sincere-P3 User Fusing Pressure Adjustment The user adjusts fusing pressure with the ‘envelope lever’. Normally this lever should be down. Raise the lever (1) to decrease the pressure between the hot roller and pressure roller. This prevents jams and wrinkling when printing on envelopes.
- Page 121 M080 Training - Sincere-P3 Adjusting the Pressure between the Hot Roller and Pressure Roller Spring Factory position: At the top (minimum pressure) Adjust the pressure from the spring if there is insufficient fusing. Envelope Lever The user cannot adjust the springs. The drawing also shows the correct positions of the envelope lever for paper and for envelopes.
-
Page 122: New Fusing Unit Detection
M080 Training - Sincere-P3 New Fusing Unit Detection User maintenance kit: In a new fusing unit, the connector contains a fuse, which blows shortly after the machine is turned on. The technician’s spare part does not have this fuse circuit The CPU has enough time to detect this fuse, and uses this to tell when a new fusing unit has been installed. -
Page 123: Fusing Temperature Control
M080 Training - Sincere-P3 Fusing Temperature Control Thermostat Thermistor Thermistor: Measures the fusing unit temperature Thermostat: Prevents overheating Overheat Protection: If the hot roller temperature becomes greater than 245 °C, the CPU cuts off the power to the fusing lamp. At this time, SC543 will be generated. If the thermistor overheat protection fails, there is a thermostat in series with the common ground line of the fusing lamp. - Page 124 M080 Training - Sincere-P3 Fusing Temperature Control When the main switch turns on, the CPU turns on the fusing lamp using the soft start process. (The soft start process prevents the room lights from flickering.) The lamp stays on until the thermistor detects the ready temperature. Then the CPU maintains this temperature using on-off control.
-
Page 125: Paper Exit
M080 Training - Sincere-P3 Paper Exit Paper Exit Sensor Paper Overflow Sensor Paper exit sensor: Detects paper jams Paper overflow sensor: Printing stops when the paper stack has reached a given thickness No additional notes. - Page 126 M080 Training - Sincere-P3 Are Users Having Trouble with Narrow Paper? There are three hot roller strippers; one in the middle, and one at each end. For some paper sizes, only the one in the middle touches the paper. If this is causing problems, install two extra hot roller strippers at...
- Page 127 M080 Training - Sincere-P3 Jams when Duplex Printing on Thin Paper? User Tools - Maintenance Menu - Curl Prevention Reduces the fusing temperature to prevent thin paper from curling. » This is a common problem with thin paper, when printing on the second side in duplex mode. If curl prevention is enabled, it is done except when OHP or thick paper is selected.
-
Page 128: Energy Saving
M080 Training - Sincere-P3 Energy Saving When the machine is not being used, the energy saver feature reduces power consumption by switching off the fusing lamp. Entering Auto-off Mode Auto-off mode starts after the machine has been idle for a specified time. - Page 129 M080 Training - Sincere-P3 SP Modes Related to Fusing Engine SP mode 1104: On/off or phase control 1106: Shows the fusing temperature 1910: » Roller turn: Idles the hot roller for 20 s after warm up. Use this if the first few prints are not fused enough »...
- Page 130 M080 Training - Sincere-P3 SP 1913 - Fusing Unit Jams Normally, the user will remove fusing unit jams. But, if SP 1913 is changed to ‘yes (on)’, the machine stops if a jam occurs in the fusing unit for three consecutive paper feeds. Then, SC559 appears.
- Page 131 M080 Training - Sincere-P3 M080 Series Training Model S-P3 9) Optional Duplex Unit No additional notes.
-
Page 132: Duplex Unit Components
M080 Training - Sincere-P3 Duplex Unit Components 1. Junction gate 2. Entrance sensor 3. Inverter rollers 4. Transport rollers 5. Transport sensor 6. Exit sensor Note the following points: The junction gate and the solenoid are both included in the duplex unit. Two motors, the inverter motor and the transport motor, drive all the duplex unit mechanisms. - Page 133 M080 Training - Sincere-P3 Duplex Unit Electrical Components 1. Entrance sensor 2. Duplex main board 3. Cover switch 4. Transport motor 5. Exit sensor 6. Inverter sensor 7. Inverter gate clutch 8. Inverter motor No additional notes.
- Page 134 M080 Training - Sincere-P3 Paper Feed and Inversion Junction gate solenoid Study how the duplex unit works. Refer to the G893 Service Manual (Detailed Descriptions Duplexing Feed-in and Exit Mechanism) Junction gate solenoid: Sends the paper to the output tray or to the duplex unit.
- Page 135 M080 Training - Sincere-P3 Paper Feed Timing - Interleaving Longer than A4/LT LEF: Only one page can pass through at a time (that is, no interleaving is done). A4/LT LEF or shorter: Three pages can go through the duplex unit at once (this is known as ‘interleaving’).
- Page 136 M080 Training - Sincere-P3 M080 Series Training Model S-P3 10) Optional Paper Tray Unit and Optional Envelope Feeder No additional notes.
- Page 137 M080 Training - Sincere-P3 Mechanical and Electrical Components Look at the component layout diagrams. G894 service manual Detailed Descriptions Overview Mechanical Components G894 service manual Detailed Descriptions Overview Electrical Components Go to your machine and find the components indicated on the diagrams. The feed mechanism uses a friction pad and feed roller system...
- Page 138 M080 Training - Sincere-P3 Mechanisms The following are exactly the same as for the main body of the printer. Paper Feed and Separation Tray Lift Paper Size Detection Remaining Paper Detection Paper End Detection The optional paper tray unit contains a paper feed sensor. The printer does not have this sensor.
-
Page 139: Paper Feed Sensor
M080 Training - Sincere-P3 Paper Feed Sensor This sensor detects the paper feeding vertically upwards from the paper tray. It detects jams at the exit from the paper tray unit. The sensor is in the frame, not in the tray. No additional notes. -
Page 140: Envelope Feeder
M080 Training - Sincere-P3 Envelope Feeder This optional unit is a tray that slides into the optional paper feed unit. If two optional trays have been installed, the envelope feeder must go into the top tray. In this case, the user has both an envelope feeder and an optional paper tray. - Page 141 M080 Training - Sincere-P3 M080 Series Training Model S-P3 11) Troubleshooting No additional notes.
-
Page 142: Memory All Clear
M080 Training - Sincere-P3 Memory All Clear Engine Settings - Engine SP 5801 Access SP 5801, press Enter, then switch off/on Various sub-menus for various resets Controller Settings - Controller SP 1003 Resets items in the System menu of the user tools No additional notes. -
Page 143: Service Call Conditions
M080 Training - Sincere-P3 Service Call Conditions - 1/2 There are four levels of service call conditions: Level-A Fusing unit SCs shown on operation panel. Machine is disabled. User cannot reset the SC. Level-B These SCs disable only features using defective item. Normally invisible to user, they are indicated on operation panel when defective feature is used. - Page 144 M080 Training - Sincere-P3 Service Call Conditions - 2/2 Reset Procedures Level A reset procedure: 1. Do SP5810 and press [#Enter]. 2. When "execute" is displayed, press [#Enter] again. 3. Press [Escape]. 4. Turn the machine power off/on. Level B reset procedure: Set the main power switch to “off”...
-
Page 145: Self Diagnostics
M080 Training - Sincere-P3 Self Diagnostics This is automatically done just after the power has been switched on. Engine SP 7832: Result of diagnostics Just after the main power is switched on, the machine runs a diagnostic check. This section shows how the machine carries out the self diagnostic tests, and how the machine behaves if a test fails. -
Page 146: Test Patterns
M080 Training - Sincere-P3 Test Patterns Select the test pattern with SP 5902-3. After selecting a pattern, the display automatically shifts to SP 5902. Print the test pattern One page only: SP 5902-1 More than one page: SP 5902-2 Practice printing several of the test patterns. Reset SP 5902-3 to 'not specified' after printing. -
Page 147: Printing Reports
M080 Training - Sincere-P3 Printing Reports Engine: Engine SP 5990 Controller: Controller SP 1004 No additional notes. - Page 148 M080 Training - Sincere-P3 SP Modes - Tests 5802: Free run 5803: Input tests 5804: Output tests Free run Avoid prolonged or unnecessary use of free runs, which can cause machine wear and other problems. Output tests To avoid mechanical or electrical damage, do not leave the electrical components running continuously for a prolonged period of time.
- Page 149 M080 Training - Sincere-P3 SP Modes - Others 5832: Initializes the hard disk 7401: Shows the number of SC codes that were detected 7403: The 10 most recent SC codes 7502: Total number of jams 7504: Jam detection counters (by location) 7506: Jam counters (by paper size) 7507: Jam history 7807: Resets counters for SC code and jams...
-
Page 150: User Tools
M080 Training - Sincere-P3 User Tools Maintenance Menu Image Density Registration Curl Prevention System Menu Prt Error Report Memory Overflow This is a list of user tools that are related to troubleshooting. Image Density: If the user adjusts this setting, the development bias will change. The laser power and charge roller voltage will also change. -
Page 151: Environmental Conservation
M080 Training - Sincere-P3 Environmental Conservation Technology for Environmental Conservation Energy Saving Paper Saving This section explains the technology used in this machine for environmental conservation, and the default settings of related functions. - Page 152 **: New or modified function *: Has this function Blank: Does not have this function Environmental Description New model Old model Technology/Feature S-P3 S-P2 1. QSU - Reduction of warm-up time (Energy 2. Hybrid QSU saving) 3. IH QSU - Reduction of CO emissions 4.
- Page 153 M080 Training - Sincere-P3 Brief Descriptions of the Technologies 1. QSU (Quick Start-up) This technology reduces both the amount of energy consumed while in Standby mode (the Ready condition) is reduced, as well as the time it takes for the machine to warm up to the Ready condition.
- Page 154 M080 Training - Sincere-P3 Brief Descriptions of the Technologies 3. IH QSU This technology incorporates IH (Inductance Heating) technology into conventional QSU technology, which allows the benefits of reduced energy consumption and reduced warm-up time to be extended to color machines. 4.
- Page 155 M080 Training - Sincere-P3 Brief Descriptions of the Technologies 5. High-speed duplex output 1) Enables high-speed duplex printing through the utilization of the Duplex Interleaf and high- speed Inverter Transport features. 2) Enables quick printing of duplex jobs through the use of Duplex Scanning. 6.
- Page 156 M080 Training - Sincere-P3 Brief Descriptions of the Technologies 7. PxP (polymerized) toner "PxP toner" is a fine-particle, polyester resin based toner, manufactured using a Ricoh-original polymerization method instead of the conventional pulverization method. This allows the toner to fuse at a lower...
- Page 157 1) Products sold in the EU conform to the RoHS Directive. 2) Products sold in China conform to China's version of the RoHS Directive. 3) In addition, Ricoh imposes strict internal standards for limiting the presence of harmful substances. No additional notes...
- Page 158 M080 Training - Sincere-P3 Brief Descriptions of the Technologies 10. Environmentally-friendly toner bottle A changeover from PS/PP/HDP to PET plastics allows approximately 40 percent by weight of the toner bottle to be recycled, and also reduces CO emissions that occur during the toner bottle manufacturing process.
-
Page 159: Quick Start-Up
M080 Training - Sincere-P3 Quick Start-up QSU reduces the operating temperature, because of these improvements in fusing unit technology Reduced thickness of the hot roller (5mm=>3mm) Low melting-point toner (165C => 155C) This also means that the warm-up time and recovery time from energy saver modes are also reduced. - Page 160 M080 Training - Sincere-P3 2. Energy Saving 2.1 Overview – 1 Power Consumption Warm-Up Operation Ready Energy Saving! Stand-by Auto-Off Mode /Off Stand-by /Off Auto Off Timer 1 – 60 min. Time Power off Power on Energy Saver Modes Description Auto Off Mode No power is supplied to the printing engine and very little to the controller.
- Page 161 M080 Training - Sincere-P3 2. Energy Saving 2.2 Overview – 2 (System Settings) Power Consumption Warm-up Operation Mode Ready Mode Off Mode Plug In Time Auto Off Timer Timer Starts 1 – 60 min 1) Timer settings and recovery time (System settings => Timer setting) Mode Timer Default...
- Page 162 M080 Training - Sincere-P3 2. Energy Saving 2.2 Energy Saver Mode: Condition of LEDs Condition of LEDs on the operation panel Mode Operation Switch LED Energy Saver LED Main Power LED Auto-Off Mode No additional notes...
- Page 163 M080 Training - Sincere-P3 2. Energy Saving 2.2 Energy Saver Mode: Off Mode – 1 The machine enters auto-off mode when one of the following is done. The auto off timer runs out after the last job. The operation switch is pressed to turn the power off.
- Page 164 M080 Training - Sincere-P3 2. Energy Saving 2.2 Energy Saver Mode: Off Mode – 2 The machine recovers to the ready condition if the operation switch is pressed. Power Consumption Warm-up Operation Mode Warm-up Operation Mode Ready Mode Ready Mode Off Mode Off Mode Plug In...
- Page 165 M080 Training - Sincere-P3 2. Energy Saving 2.3 Energy Save Effectiveness – 1 With the data from SP 8941:Machine Status, and the power consumption values from the specifications, we can estimate the amount of energy that is used by the machine. 8941-005: Auto-Off mode time This should only be used as a reference value,...
- Page 166 (Subtract the earlier measurement from the later measurement and convert the result to hours.) (4) Power consumption figures for each model are acquired from “Publication System of MSDS_&_PEI (PRODUCT ENVIRONMENT INFORMATION)” database. S-P3: Mode/condition Power consumption: Operating mode 560.3W Stand by/Ready...
- Page 167 M080 Training - Sincere-P3 2. Energy Saving 2.3 Energy Save Effectiveness – 3 (5) Multiply this by the power consumption spec for each mode and convert the result to kWh (kilowatt hours) (6) This is a simulated value for power consumed. Example calculations: Mode/condition SP8941:...
- Page 168 M080 Training - Sincere-P3 3. Paper Saving 3.1 Measuring the Paper Consumed – 1 1. Duplex: Reduce paper volume in half! 1 1 2. Combine: Reduce paper volume in half! 1 3. Duplex + Combine: Using both features together can further reduce paper volume by 3/4! 1...
- Page 169 M080 Training - Sincere-P3 3. Paper Saving 3.1 Measuring the Paper Consumed – 2 To check the paper consumption, look at the total counter and the duplex counter. Total counter : SP 8581 001 Single-sided with duplex mode : SP 8421 001 Double-sided with duplex mode : SP 8421 002 Book with with duplex mode : SP 8421 003...
- Page 170 M080 Training - Sincere-P3 3. Paper Saving 3.1 Measuring the Paper Consumed – 3 How to calculate the paper reduction ratio, when compared with Single-sided copying, with no 2-in-1 combine mode Paper reduction ratio (%) = Number of sheets reduced: A/Number of printed original images: B x 100 Number of sheets reduced: A = Output pages in duplex mode/2 + Number of pages in Single-sided...
Need help?
Do you have a question about the S-P3 and is the answer not in the manual?
Questions and answers