Table of Contents
Advertisement
Available languages
Available languages
Quick Links
Advertisement
Chapters
Table of Contents

Related Manuals for Moretti Andea Mobility Taurus


Summary of Contents for Moretti Andea Mobility Taurus
- Page 1 CARROZZINA ELETTRICA REGOLABILE "TAURUS" MANUALE DI ISTRUZIONI...
-
Page 2: Table Of Contents
INDICE 1. CODICE ..........................PAG.3 2. INTRODUZIONE ........................ PAG.3 3. DESTINAZIONE D'USO ....................PAG.3 4. DICHIARAZIONE DI CONFORMITÀ UE ................. pag.3 6. AVVERTENZE GENERALI SULLE INTERFERENZE ELETTROMAGNETICHE ..PAG.4 7. SIMBOLOGIA UTILIZZATA ....................PAG.5 8. SICUREZZA ........................PAG.5 9. AVVERTENZE PER L'UTILIZZO ..................PAG.6 9.1 Avvertenze generali .................... -
Page 3: Codice
4. DICHIARAZIONE DI CONFORMITÀ UE La MORETTI SpA dichiara sotto la sua esclusiva responsabilità che i prodotti fabbricati ed immessi in commercio dalla stessa MORETTI SpA. e facenti parte della famiglia CARROZZINE ELETTRICHE sono conformi alle disposizioni applicabili del regolamento 2017 /745 sui DISPOSITIVI MEDICI del 5 aprile 2017. -
Page 4: Avvertenze Generali Sulle Interferenze Elettromagnetiche
5. AVVERTENZE GENERALI ATTENZIONE! Prestare sempre molta attenzione alla presenza di parti in movimento che po- trebbero causare intrappolamenti agli arti e lesioni personali. • Per un utilizzo corretto del dispositivo fare riferimento attentamente al presente manuale. • Per un utilizzo corretto del dispositivo consultare sempre il vostro medico o terapista. •... -
Page 5: Simbologia Utilizzata
Inoltre questo fa decadere la garanzia del vostro dispositivo. E) In ogni caso segnalare al vostro rivenditore di fiducia od alla MORETTI SPA ogni movimento involontario del veicolo che può essersi verificato, annotatelo su questo manuale ed annotate se vicino a voi vi è... -
Page 6: Avvertenze Per L'utilizzo
• Non fate una curva stretta o una frenata improvvisa, mentre guidate la carrozzina elettrica. • Non guidare la carrozzina elettrica nel traffico. • Non tentare di salire cordoli di altezza superiore a quanto indicato nelle specifiche tecniche. • Non sporgere le mani e le gambe fuori dalla carrozzina elettrica durante la guida. •... -
Page 7: Modifiche
Qualsiasi danno o lesione derivante da un uso improprio non è responsabilità del produttore. 9.2 Modifiche Le carrozzine elettriche della linea ARDEA MOBILITY by Moretti sono state progettate e realizzate per soddisfare tutte le vostre esigenze per un utilizzo pratico, corretto e sicuro. In nessun caso si deve modificare, aggiungere, rimuovere o disabilitare qualsiasi parte o funzio- ne della carrozzina elettrica. -
Page 8: Descrizione Generale
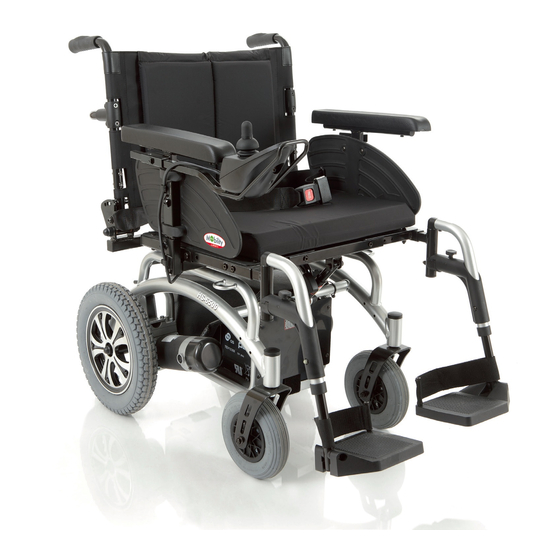
10. DESCRIZIONE GENERALE CS810 Carrozzina elettrica regolabile "Taurus" 10.1 Vista frontale con descrizione delle parti A) Maniglie di impugnatura B) Manopola regolazione staffa del joystick C) Manopola regolazione altezza bracciolo D) Manopola smontaggio bracciolo E) Cintura addominale F) Joystick comando carrozzina G) Dispositivi di bloccaggio/sbloccaggio pedane H) Poggiapiedi in Nylon rinforzati in fibra di vetro I) Regolazione inclinazione seduta... -
Page 9: Vista Principale Controller Illuminazione ( Optional)
E) Pulsante illuminazione anteriore 11. COMPONENTI Il montaggio iniziale della vostra carrozzina elettrica Moretti viene di norma eseguito dal ri- venditore. Nel caso questo non avvenga prima di tutto controllare che il cartone di imballaggio contenga tutte le parti come elencato sotto. (fig.1) (fig.1) -
Page 10: Istruzioni Di Assemblaggio
Successivamente richiudere le batterie con la copertura 12.2 Regolazione del comfort Prima di iniziare ad usare la vostra carrozzina elettrica ARDEA MOBILITY by Moretti, ef- fettuare tutte le regolazioni sotto riportate in modo da ottenere una posizione di guida e di seduta confortevole ed idonea all’utilizzatore. - Page 11 1. Posizione del joystick di comando 1. Svitare la manopola indicata in figura 2. Regolare la posizione del supporto del joystick di comando 3. Stringere nuovamente la manopola N.B. Durante la regolazione prestare attenzione al cavo elettrico del joystick aiutandolo nello scorrimento 2.
- Page 12 5. Larghezza seduta 1. Svitare e togliere i bulloni nella parte frontale e posteriore della seduta 2. Regolare la larghezza della seduta in funzione dei fori presenti sul supporto 3. Avvitare nuovamente le viti e stringere saldamente 6. Inclinazione della seduta 1.
-
Page 13: Uso Dei Comandi
9. Inclinazione dello schienale 1. Svitare le due manopole laterali allo schienale ( rif. B) 2 Regolare l’inclinazione dello schienale in funzione della necessità 3. Inserire nuovamente le due manopole e stringere saldamente N.B. Per motivi di sicurezza non guidare la carrozzina con lo schienale reclinato 10. -
Page 14: Smontaggio Della Carrozzina
12.4 Smontaggio della carrozzina 1. Premere il pulsante sulle pedane indicato in figura , ruotare la pedana verso l’esterno ed estrarla verso l’alto. 2. Svitare la manopola (rif.2) ed estrarre il bracciolo verso l’alto. N.B. Attenzione!! Se il bracciolo ha il joystick montato, da prima scollegare il connettore elet- trico (rif.1) , togliere il cavo elettrico dai supporti ed alla fine estrarre il bracciolo verso l’alto 3. -
Page 15: Uso Della Carrozzina Elettrica
6. Scollegare il velcro di fissaggio delle batterie 7. Sollevareequindiestrarreversol’altoleduebatterie 8. A questo punto la vostra carrozzina disassemblata apparirà come nella figura seguente 13. USO DELLA CARROZZINA ELETTRICA Prima di salire sulla vostra carrozzina elettrica assicuratevi di trovarvi su di una superficie piana e senza ostacoli. -
Page 16: Raccomandazioni Per Un Uso Sicuro
Tale valore è fissato a 6°/10%. La carrozzina elettrica Moretti può superare pendenze fino a 8°/14%. Nel caso in cui ci sia la necessità di guidare sulla pendenza massima è possibile che occorra una velocità più alta, premere il pulsante “speed”... -
Page 17: Precauzioni Generali
SUPERAMENTO DEGLI OSTACOLI Affrontate gli ostacoli lentamente e frontalmente, non prendendoli di lato. Questo vi consenti- rà di superare agevolmente gli ostacoli fino a 3 cm . Non affrontare ostacoli superiori a 3 cm. La carrozzina è dotato di sistema antiribaltamento. Tali dispositivi possono interferire con la salita e con la discesa da marciapiedi. - Page 18 1. Inserire il connettore del caricabatteria nella presa per ricaricare posta sotto il controller 2. Verificare che il selettore della corrente di alimentazione sia impostato su 220V (oppure sul voltaggio che avete a disposizione). Inserire la spina di alimentazione del caricabatteria in una presa di corrente a parete ed accendete il caricabatteria premendo su ON l’interruttore NOTA- Non collocare il caricabatteria vicino ad un luogo dove può...
-
Page 19: Cura E Manutenzione
17. CURA E MANUTENZIONE I dispositivi della linea ARDEA by Moretti al momento dell’immissione in commercio sono con- trollati accuratamente e provvisti di marchio CE. Per la sicurezza del paziente si raccomanda di far controllare dal produttore o da un laboratorio autorizzato, almeno ogni anno, l’idoneità... -
Page 20: Altri Problemi
N° di LED PROBLEMA SOLUZIONE illuminati Connessione delle batterie Controllare lo stato delle batterie e le connessioni. difettosa oppure batterie Ricaricare le batterie per almeno 8 ore. scariche Il motore di sinistra è Controllare il motore di sinistra e le connessioni difettoso elettriche. -
Page 21: Condizioni Di Smaltimento
19. CONDIZIONI DI SMALTIMENTO 19.1 Condizioni di smaltimento generali In caso di smaltimento del dispositivo non usare mai i normali sistemi di conferimento dei rifiuti solidi urbani. Si raccomanda invece di smaltire il dispositivo attraverso le comuni isole ecologiche comunali per le previste operazioni di riciclo dei materiali utilizzati. 19.2 Avvertenze per il corretto smaltimento del prodotto ai sensi della direttiva europea 2012/19/UE: Alla fine della sua vita utile il prodotto non deve essere smaltito insieme ai rifiuti urbani. -
Page 22: Caratteristiche Tecniche
77,5 21. GARANZIA Tutti i prodotti Moretti sono garantiti da difetti di materiale o fabbricazione per un periodo di 2 (due) anni dalla data di vendita del prodotto, salvo eventuali esclusioni e limitazioni specificate di seguito. Questa garanzia non è valida in caso di uso improprio, abuso o modifica del prodotto e per la mancata aderenza alle istruzioni per l’uso. -
Page 23: Riparazioni
è difettoso. Il prodotto sarà restituito al cliente e saranno a suo carico i costi di spedizione dovuti alla restituzione. 23. RICAMBI I ricambi originali Moretti sono garantiti per 6 (sei) mesi a decorrere dal giorno in cui si riceve il ricambio. 24. CLAUSOLE ESONERATIVE Salvo quanto specificato espressamente in questa garanzia ed entro i limiti di legge, Moretti non offre nessun’altra dichiarazione, garanzia o condizione, espressa o implicita, comprese even-... - Page 24 NOTE...
- Page 25 Prodotto ____________________________________________________________________ Acquistato in data ___________________________________________________________ Rivenditore _________________________________________________________________ Via _______________________ Località __________________________________________ Venduto a ___________________________________________________________________ Via ________________________ Località _________________________________________ MORETTI S.P.A. Via Bruxelles, 3 - Meleto 52022 Cavriglia (Arezzo) Tel. +39 055 96 21 11 www.morettispa.com email: info@morettispa.com MADE IN TAIWAN...
- Page 27 “TAURUS” ADJUSTABLE ELECTRIC WHEELCHAIR INSTRUCTION MANUAL...
- Page 28 CONTENTS 1. CODE ........................... PAG.3 2. INTRODUCTION ........................ PAG.3 3. INTENDED USE......................... PAG.3 4. EU DECLARATION OF CONFORMITY ................pag.3 6. GENERAL INFORMATION ON ELECTROMAGNETIC DISTURBANCE ......PAG.4 7. SYMBOLS USED ........................ PAG.5 8. SAFETY ..........................PAG.5 9. WARNINGS ON USE ......................PAG.6 9.1 General warnings ......................
-
Page 29: Code
5. The devices in question should be considered as belonging to class I, in accordance with the rules set out in Annex VIII to said regulation. 6. MORETTI SpA maintains and provides to the competent authorities, for at least ten years from the date of manufacture of the last production lot, the technical documentation proving conformity with Regulation (EU) 2017/745. -
Page 30: General Information On Electromagnetic Disturbance
5. GENERAL PRECAUTIONS WARNING! Take extreme care in the presence of moving parts that could trap limbs and cause injury. • Please consult this manual carefully for correct use of the device. • Always consult your doctor or therapist for correct use of the device. •... -
Page 31: Symbols Used
E) In any case, report any unintentional movement of the vehicle to your retailer or to MORETTI SPA, note it down in this manual and note down the fact that there is a source of electromagnetic radiation in your vicinity, if any. -
Page 32: Warnings On Use
• Do not drive the electric wheelchair in traffic. • Do not attempt to mount curbs higher than those indicated in the technical specifications. • Do not put your hands or legs outside the electric wheelchair while driving. • Do not drive the electric wheelchair on slippery roads or when it is snowing. •... -
Page 33: Changes
9.2 Changes The electric wheelchairs in the ARDEA MOBILITY range by Moretti have been designed and manufactured to satisfy all your needs for practical, correct and safe use. Do not alter, add, remove or disable any part or function of the electric wheelchair under any circumstances. -
Page 34: General Description
10. GENERAL DESCRIPTION CS810 “Taurus” adjustable electric wheelchair 10.1 Front view with description of the parts A) Pushing handles B) Joystick bracket adjustment knob C) Armrest height adjustment knob D) Armrest detachment knob E) Abdominal belt F) Wheelchair control joystick G) Footplate locking/unlocking devices H) Fibreglass-reinforced nylon footrests I) Seat inclination adjustment... -
Page 35: Main View Of The Lighted Controller (Optional)
E) Front lights button 11. COMPONENTS Your Moretti electric wheelchair is usually assembled the first time by the retailer. If this is not the case, start by checking that the cardboard box contains all the parts listed below. (fig.1) (fig.1) 1. -
Page 36: Assembly Instructions
Close the battery cover 12.2 Adjusting comfort Before starting to use your ARDEA MOBILITY electric wheelchair by Moretti, carry out all the adjustments indicated below to obtain a comfortable driving and seating position suited to the user. - Page 37 1. Position of the control joystick 1. Unscrew the knob indicated in the figure 2. Adjust the position of the control joystick support 3. Tighten the knob again N.B. During adjustment, take care with the electric cable of the joystick, assisting it in sliding into place 2.
- Page 38 5. Seat width 1. Unscrew and remove the bolts in the front and rear part of the seat 2. Adjust the width of the seat based on the holes present on the support 3. Firmly tighten the screws again 6. Seat inclination 1.
-
Page 39: Use Of The Controls
9. Backrest inclination 1. Unscrew the two side knobs of the backrest (ref. B) 2 Adjust the backrest inclination according to need 3. Insert the two knobs again and firmly tighten N.B. For safety reasons, do not drive the wheelchair with the backrest reclined 10. -
Page 40: Disassembly Of The Wheelchair
12.4 Disassembly of the wheelchair 1. Press the button on the footplates indicated in the figure, turn the footplate outwards and lift to extract it. 2. Unscrew the knob (ref.2) and extract the armrest upwards. N.B. Warning!! If the armrest has the joystick mounted on it, first disconnect the electrical connector (ref.1), remove the electric cable from the supports and extract the armrest upwards 3. -
Page 41: Using The Electric Wheelchair
6. Detach the battery Velcro attachment strap. 7. Lift the two batteries, then extract them upwards 8. At this point, your disassembled wheelchair will look as shown in the figure below 13. USING THE ELECTRIC WHEELCHAIR Before you get into your electric wheelchair, make sure you are on a flat surface with no obstacles. -
Page 42: Recommendations For Safe Use
International standards set the maximum safe gradient on which an electric wheelchair can be driven without any difficulty. This value is set as 6°/10%. The Moretti electric wheelchair can travel on slopes with a gradient up to 8°/14%. If you need to drive it on the maximum gradient, you may need to travel at a higher speed. -
Page 43: General Precautions
GOING OVER OBSTACLES Go over obstacles slowly and in a forwards direction. Do not go over obstacles from the side. This will allow you to go over obstacles up to 3 cm. Do not go over obstacles higher than 3 cm. The wheelchair has a roll-over protection system. - Page 44 1. Insert the battery charger connector into the charging socket underneath the controller 2. Check that the current selector is on 220V (or the voltage available to you). Insert the battery charger plug into a wall socket and switch on the battery charger by pressing the switch to ON NB - Do not place the battery charger near a potential fire risk 3.
-
Page 45: Care And Maintenance
17. CARE AND MAINTENANCE The devices in the ARDEA range by Moretti are CE marked and carefully checked before being placed on the market. For the safety of the patient, your device should be checked at least once every year by the manufacturer or an authorised laboratory to verify its suitability for use. -
Page 46: Other Problems
N° of LEDs PROBLEM SOLUTION Faulty battery connection Check the battery status and the connections. or flat batteries Charge the batteries for at least 8 hours. Check the left motor and the electrical The left motor is faulty connections. The left motor is short Contact your usual retailer circuiting Check the right motor and the electrical... -
Page 47: Disposal Conditions
19. DISPOSAL CONDITIONS 19.1 General conditions of disposal Never dispose of the product as normal domestic waste. Dispose of the product at a sorted waste collection centre for recycling. 19.2 Instructions for correct disposal in accordance with European directive 2012/19/EU: At the end of its working life, the product must not be disposed of together with normal urban waste. -
Page 48: Technical Specifications
The intended use of the product is given in the user manual. Moretti is not liable for damage, injury or any other consequences resulting from installation or use which are not scrupulously conforming with the instructions given in the installation, assembly and user manual. -
Page 49: Repairs
Moretti will agree with the client whether the defect is covered by the warranty. Moretti, at its sole discretion, may replace or repair the article at a specified Moretti reseller or its own premises. The costs of labour incurred in repairing the product will be borne by Moretti if it determines that the repair is covered by the warranty. - Page 50 NOTES...
- Page 51 Date of purchase _____________________________________________________________ Reseller _____________________________________________________________________ Street _______________________ Town __________________________________________ Sold to ______________________________________________________________________ Street ________________________ Town _________________________________________ MORETTI S.P.A. Via Bruxelles, 3 - Meleto 52022 Cavriglia (Arezzo) - ITALY - Tel. +39 055 96 21 11 www.morettispa.com email: info@morettispa.com MADE IN TAIWAN...
- Page 53 SILLA DE RUEDAS ELÉCTRICA REGULABLE "TAURUS" MANUAL DE INSTRUCCIONES...
- Page 54 ÍNDICE 1. CÓDIGO ..........................PAG.3 2. INTRODUCCIÓN ........................ PAG.3 3. FINALIDAD ........................PAG.3 4. DECLARACIÓN UE DE CONFORMIDAD ................. PAG.3 6. ADVERTENCIAS GENERALES SOBRE LAS INTERFERENCIAS ELECTROMAGNÉTICAS ....................PAG.4 7. SÍMBOLOS ......................... PAG.5 8. SEGURIDAD ........................PAG.5 9. ADVERTENCIAS PARA EL USO ..................PAG.6 9.1 Advertencias generales ...................
-
Page 55: Código
MORETTI SpA declara bajo su exclusiva responsabilidad que los productos fabricados e introducidos en el mercado por la misma MORETTI SpA y que forman parte de la familia de las SILLAS DE RUEDAS ELÉCTRICAS son conformes con las disposiciones del reglamento 2017/745 sobre los PRODUCTOS SANITARIOS del 5 de abril de 2017. -
Page 56: Advertencias Generales Sobre Las Interferencias Electromagnéticas
5. ADVERTENCIAS GENERALES ¡ATENCIÓN! Prestar siempre mucha atención a la presencia de partes móviles que podrían atrapar las manos y causar lesiones personales. • Para el uso correcto del producto, leer atentamente el presente manual. • Para el uso correcto del producto, consultar al médico o terapeuta. •... -
Page 57: Símbolos
Además, la garantía del producto podría perder vigencia. E) En todo caso, señalar al revendedor de confianza o a MORETTI SPA cualquier movimiento involuntario del vehículo; anotarlo en este manual y anotar si en las proximidades hay una fuente de ondas electromagnéticas. -
Page 58: Advertencias Para El Uso
• Evitar las curvas cerradas y las frenadas repentinas durante la conducción de la silla de ruedas eléctrica. • No conducir la silla de ruedas eléctrica en el tráfico. • No intentar subirse a cordones de altura superior a la indicada en las especificaciones técnicas. •... -
Page 59: Modificaciones
9.2 Modificaciones Las sillas de ruedas eléctricas de la línea ARDEA MOBILITY fabricadas por Moretti han sido diseñadas y realizadas para satisfacer todas tus exigencias, con un uso práctico, correcto y seguro. -
Page 60: Descripción General
10. DESCRIPCIÓN GENERAL CS810 Silla de ruedas eléctrica regulable "Taurus" 10.1 Vista frontal con descripción de las partes A) Asideros B) Pomo de regulación del soporte del joystick C) Pomo de regulación de la altura del brazo D) Pomo de desmontaje del brazo E) Cinturón abdominal F) Joystick de mando de la silla de ruedas G) Dispositivos de bloqueo/desbloqueo de los estribos... -
Page 61: Vista Principal Del Controller De Iluminación (Opcional)
E) Tecla de iluminación delantera 11. COMPONENTES El montaje inicial de la silla de ruedas eléctrica Moretti suele ser efectuado por el vendedor. En caso contrario, comprobar que la caja de embalaje contenga todas las partes indicadas a continuación. (fig.1) (fig.1) -
Page 62: Instrucciones De Ensamblaje
12.2 Regulación del confort Antes de comenzar a utilizar la silla de ruedas eléctrica ARDEA MOBILITY fabricada por Moretti, efectuar todas las regulaciones siguientes para lograr una posición de conducción y de asiento confortable y adecuada para el usuario. 1. Posición del joystick de mando 2. - Page 63 1. Posición del joystick de mando 1. Desenroscar el pomo indicado en la figura 2. Regular la posición del soporte del joystick de mando 3. Apretar el pomo Nota Durante la regulación prestar atención al cable eléctrico del joystick, ayudándolo a desplazarse 2.
- Page 64 5. Ancho asiento 1. Desenroscar y quitar los pernos de la parte frontal y posterior del asiento 2. Regular el ancho del asiento en función de los orificios que hay en el soporte 3. Enroscar los tornillos y apretar bien 6.
-
Page 65: Uso De Los Mandos
9. Inclinación del respaldo 1. Desenroscar los dos pomos laterales del respaldo (ref. B) 2 Regular la inclinación del respaldo según las necesidades 3. Colocar los dos pomos y apretar bien Nota Por motivos de seguridad, no hay que conducir la silla de ruedas con el respaldo reclinado 10. -
Page 66: Desmontaje De La Silla De Ruedas
12.4 Desmontaje de la silla de ruedas 1. Pulsar la tecla de los estribos indicada en la figura. Girar el estribo hacia fuera y extraerlo hacia arriba. 2. Desenroscar el pomo (ref.2) y extraer el brazo hacia arriba. Nota ¡Atención! Si el brazo tiene el joystick montado, primero desconectar el conector eléctrico (ref.1) , sacar el cable eléctrico de los soportes y extraer el brazo hacia arriba 3. -
Page 67: Uso De La Silla De Ruedas Eléctrica
6. Desenganchar el velcro de fijación de las baterías 7. Levantar y extraer hacia arriba las dos baterías 8. La silla de ruedas desensamblada se verá como en la figura siguiente 13. USO DE LA SILLA DE RUEDAS ELÉCTRICA Antes de subirse a la silla de ruedas eléctrica, asegurarse de estar sobre una superficie plana y sin obstáculos. -
Page 68: Recomendaciones Para El Uso Seguro
Este valor es de 6° - 10%. La silla de ruedas eléctrica Moretti puede superar pendientes de hasta 8° - 14%. En caso de tener que conducir sobre la pendiente máxima, puede ser necesaria una velocidad más alta: pulsar la tecla “speed”... -
Page 69: Precauciones Generales
SUPERACIÓN DE OBSTÁCULOS Afrontar los obstáculos de manera lenta y frontal, y no de costado. Es posible superar fácilmente obstáculos de hasta 3 cm. No afrontar obstáculos superiores a 3 cm. La silla de ruedas está dotada de sistema antivuelco. Los dispositivos antivuelco pueden dificultar la subida y bajada de las aceras. - Page 70 1. Introducir el conector del cargador en la toma de recarga situada debajo del controller 2. Comprobar que el selector de corriente esté en 220V (o en el valor de tensión a disposición). Introducir la clavija de alimentación del cargador en una toma de alimentación de red y encender el cargador poniendo el interruptor en ON.
-
Page 71: Cuidado Y Mantenimiento
17. CUIDADO Y MANTENIMIENTO Los productos de la línea ARDEA fabricados por Moretti que se introducen en el comercio han sido cuidadosamente controlados y provistos de marca CE. Para la seguridad del paciente se recomienda hacer controlar la idoneidad del producto al fabricante o a un laboratorio autorizado al menos cada año. -
Page 72: Otros Problemas
N° de LEDS PROBLEMA SOLUCIÓN encendidos Conexión de las baterías Controlar el estado de las baterías y las defectuosa, o baterías conexiones. Recargar las baterías al menos descargadas 8 horas. El motor a la izquierda es Controlar el motor a la izquierda y las defectuoso conexiones eléctricas. -
Page 73: Condiciones De Eliminación
19. CONDICIONES DE ELIMINACIÓN 19.1 Condiciones de eliminación generales No eliminar el producto junto con los desechos sólidos urbanos. Para la eliminación del producto, entregarlo en una isla ecológica municipal en vistas del posterior reciclado de los materiales. 19.2 Advertencias para la eliminación correcta del producto según la directiva europea 2012/19/UE: Al final de su vida útil, el producto no se deberá... -
Page 74: Características Técnicas
77,5 21. GARANTÍA Todos los productos Moretti tienen una garantía de 2 años desde la fecha de venta por defectos de fabricación o de material, sin perjuicio de eventuales exclusiones y de las limitaciones especificadas a continuación. La garantía no se aplica en caso de daños causados por uso inadecuado, abusos, alteraciones y en caso de que no se respecten las instrucciones de uso. -
Page 75: Reparaciones
Moretti a su discreción puede sustituir o reparar el artículo en garantía en la dirección de un revendedor Moretti especificado o en su propia sede. Los costes de mano de obra para la reparación del producto pueden estar a cargo de Moretti si se determina que la reparación está... - Page 76 NOTA...
- Page 77 Producto ____________________________________________________________________ Fecha de compra _____________________________________________________________ Distribuidor _________________________________________________________________ Calle _______________________ Localidad _______________________________________ Vendido a ___________________________________________________________________ Calle ________________________ Localidad ______________________________________ MORETTI S.P.A. Via Bruxelles, 3 - Meleto 52022 Cavriglia (Arezzo) Tel. +39 055 96 21 11 www.morettispa.com email: info@morettispa.com MADE IN TAIWAN...
- Page 78 NOTA...
- Page 79 ORETTI Via Bruxelles, 3 - Meleto Tel. +39 055 96 21 11 www.morettispa.com 52022 Cavriglia (Arezzo) Fax. +39 055 96 21 200 info@morettispa.com...
Need help?
Do you have a question about the Andea Mobility Taurus and is the answer not in the manual?
Questions and answers