Table of Contents
Advertisement
Quick Links
Advertisement
Table of Contents

Subscribe to Our Youtube Channel
Related Manuals for Lithium Grim OmniMuff


Summary of Contents for Lithium Grim OmniMuff
- Page 1 OmniMuff Building instructions V1.0...
-
Page 2: Table Of Contents
OmniMuff v1.0 Table of contents PCB layout ............................... 3 Build options ............................4 Components ............................5 Transistors ............................5 Resistors and capacitors ........................5 Build sequence ............................6 Drill template ............................7 Off board wiring ............................8 Modifications ............................9 Troubleshooting ............................ -
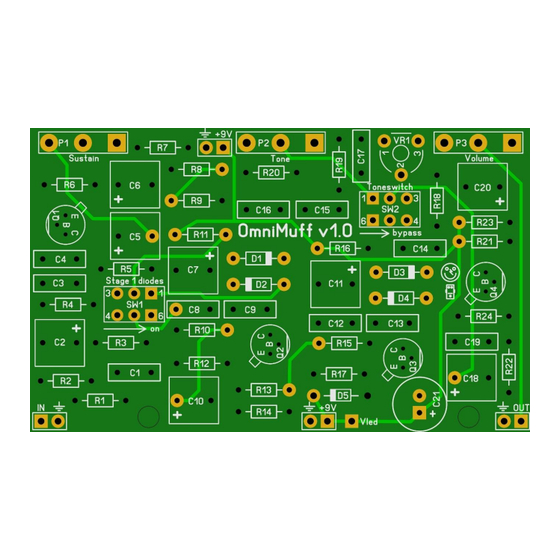
Page 3: Pcb Layout
OmniMuff v1.0 PCB layout Dimensions: 75 mm x 45,5 mm 2.95 inch x 1.79 inch Manufacturers and product names are mentioned solely for circuit identification, and where applicable their trademarks are the property of their respective owners who are in no way associated or affiliated with the author. No cooperation or endorsement... -
Page 4: Build Options
OmniMuff v1.0 Build options This PCB can be used to mimic an extreme wide range of vintage to modern Big Muffs. In total 29 versions of the original Version 1, 2, 3, 6, 7, 8 and 9 as well as some famous clones (EQD, Colorsound etc.) can be built with just this single board. -
Page 5: Components
OmniMuff v1.0 Components Since the OmniMuff can be used to build so many different types of Big Muffs, we split off the components section in to a separate configuration document with all possible configurations. My advice: Capacitors with values < 1nF should be MLCC or Ceramic, values of 1nF – 1µF should be SMF/MKT/Wima and all values >... -
Page 6: Build Sequence
OmniMuff v1.0 Build sequence Soldering this board can be very complicated for some people since the solder pads are very close together. Use a magnifying glass to make the job easier. The trick to soldering a PCB is to work from small to big components. -
Page 7: Drill Template
OmniMuff v1.0 Drill template 15mm 29,6 mm 29,6 mm Volume Tone Sustain Pots drill holes 7mm Switch drill holes 6mm Footswitch drill hole 13 mm Footswitch After you drilled the enclosure you can insert the potentiometers and attach them firmly to the enclosure. -
Page 8: Off Board Wiring
OmniMuff v1.0 Off board wiring R Led Sleeve Ring Sleeve Input Jack Output Jack Note that R led is a 3k3/4k7 resistors. You can change this value depending on the type of LED you use but 3k3 is safe enough for almost all LEDs @ 9V. -
Page 9: Modifications
OmniMuff v1.0 Modifications There are so much tweaks made to the Big Muff, it is almost impossible to write them all down. This PCB by itself is actually one big modification of the Big Muff. But… have a look at the great work Coda Effects did by gathering a lot of tweaks: https://www.coda-effects.com/2015/11/big-muff-mods-and-tweaks.html... -
Page 10: Schematic
OmniMuff v1.0 Schematic Manufacturers and product names are mentioned solely for circuit identification, and where applicable their trademarks are the property of their respective owners who are in no way associated or affiliated with the author. No cooperation or endorsement...
Need help?
Do you have a question about the OmniMuff and is the answer not in the manual?
Questions and answers