Table of Contents
Advertisement
ENGLISH
Tricera System
Instructions Manual
ABOUT THIS MANUAL
This manual provides information on how to set up, operate, and
maintain the Tricera System. It is essential that you read and
understand all of the information in this manual before using or
maintaining the system.
CONTENTS
About this manual ................................................................................................ 1
Contents .............................................................................................................. 1
1.
Symbols Used on the Tricera System Labeling ........................................ 1
2.
Device Description ..................................................................................... 2
3.
Indications for Use ..................................................................................... 2
4.
Contraindications ....................................................................................... 2
5.
Warnings .................................................................................................... 2
6.
Precautions ................................................................................................ 3
7.
Environmental Protection .......................................................................... 5
8.
How Supplied............................................................................................. 5
9.
System Components ................................................................................. 6
10.
System Setup ............................................................................................ 9
11.
System Operation ....................................................................................11
12.
Disassembly ............................................................................................12
13.
Cleaning ...................................................................................................12
14.
Storage ....................................................................................................12
15.
16.
Limited Warranty .....................................................................................14
17.
Customer Service/Technical Support ......................................................14
Controller Product Specifications ........................................15
Optional Data Output ..........................................................15
Abbreviations ......................................................................15
Tones ..................................................................................15
Troubleshooting ..................................................................16
Essential Performance, Power Curve .................................18
EMC Tables ........................................................................19
User Profiles ........................................................................21
DCO-1318
Effective Date: 01-SEP-2021
1.
SYMBOLS USED ON THE TRICERA SYSTEM
LABELING
Catalog Number
Lot Number
Do not reuse
Date of
Manufacture
Store in a cool dry
place
Use by date
Caution, consult
accompanying
documents.
Type BF Applied Part
Non Sterile
Equipotentiality
Coagulation
OK button
Settings Button
Recalibrate Button
Play Button
Footswitch
Do not use if
package is
damaged
MRI unsafe
Consult Instructions for
Use
Serial Number
Do not re-sterilize
(disposable specific)
Manufacturer
Sterilized Using
Irradiation
Federal (US) law
restricts this device to
sale by or on the order
of a physician.
Do not use in the
presence of
flammable
anesthetics
Radiofrequency (RF)
Energy (non-ionizing
radiation)
Risk of Electrical
Shock
Fuses
Ablation
Message Screen Info
Profiles Button
Unlock Cassette
Buttone
Stop Button
Set Pressure Arrow
Waste Electrical and
Electronic
Equipment. Must
follow local law for
equipment disposal.
European Authorized
Representative
LBL 6028 Rev. G
Page 1 of 23
Advertisement
Table of Contents
Troubleshooting

Related Manuals for Zimmer Biomet Tricera


Summary of Contents for Zimmer Biomet Tricera
-
Page 1: Table Of Contents
This manual provides information on how to set up, operate, and Do not reuse (disposable specific) maintain the Tricera System. It is essential that you read and Date of understand all of the information in this manual before using or... -
Page 2: Device Description
WARNING: DO NOT use a Tricera device if it shows any signs of damage. WARNING: When using blades/burrs and RF probes, avoid excessive lateral force as damage or breakage may occur. -
Page 3: Precautions
RF interferes with immediately discontinue use and return equipment for service. pacemaker, defibrillator Overheating can lead to patient injury (burn). Refer to Tricera Handpiece Electrical safety issues – shock, burn – device/controller Instructions for Use LBL 6025/LBL 6043 for additional warnings and overheats, incorrect power source used, fluid enters the precautions for the Tricera Handpieces (All Models). - Page 4 Prior to each use, perform the following: • Inspect all equipment for proper operation. DO NOT operate the Tricera Controller in a moist environment, as • a shock hazard may exist. If liquids have entered the unit, the Ensure all attachments and accessories are correctly and Controller must be returned to the manufacturer for testing prior to completely attached to the Tricera Handpiece.
-
Page 5: Environmental Protection
Any monitoring electrodes are recommended to be placed as far • • One (1) Tricera System Package Insert as possible from the Tricera devices when high frequency surgical 8.3. Shaver Blade/Burr and RF Probe (All Models) equipment and physiological monitoring equipment are used simultaneously on the same patient. -
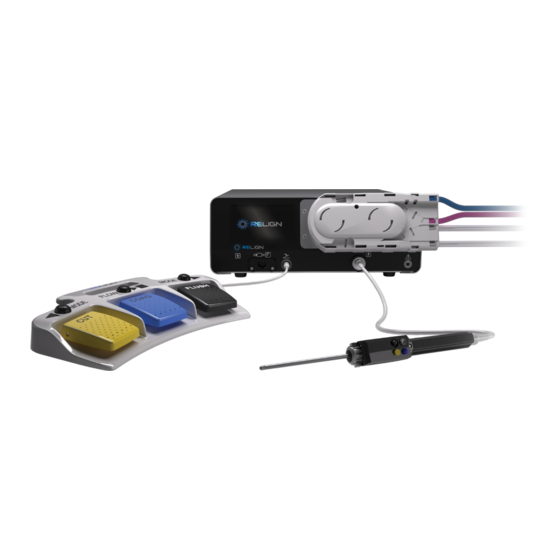
Page 6: System Components
SYSTEM COMPONENTS 9.1. Tricera CONTROLLER WITH VERIFLOW INTEGRATED FLUID MANAGEMENT 1. Footswitch Receptacle 2. Tricera Handpiece Receptacle 3. LCD Touch Screen 4. Inflow Pump 5. Suction Pump 6. Receptacle (reserved for future functionality) 7. Power ON / OFF Switch and Power ON LED 8. - Page 7 Outflow Lumen Barb Connector Cassette Magnet Figure 5: Veriflow (Top) and Exoflow (Bottom) Fluid Management Accessories 9.4. Tricera Handpieces Buttons Cable Suction Connector Figure 6: Tricera Autoclaveable Handpiece DCO-1318 LBL 6028 Rev. G Effective Date: 01-SEP-2021 Page 7 of 23...
- Page 8 Activate Coagulation Joystick Mode Figure 7: Tricera Handpiece LCD and Buttons 9.5. Shaver Blades Coupler Shaft Figure 8: Tricera Device DCO-1318 LBL 6028 Rev. G Effective Date: 01-SEP-2021 Page 8 of 23...
-
Page 9: System Setup
FMA cassette and will provide an audible tone when the cassette is in the correct position. Figure 10 4. Turn on the Tricera Controller using the power switch (Fig. 1, Item 7) on the front of the Controller. Optionally, open the profile screen and select a user profile (See Appendix H for user profile details). - Page 10 11. Connect the inflow tube to the sheath (sheath type may vary) Figure 19 15. To calibrate the Tricera Controller for the back pressure of the endoscope/sheath combination, the controller will run a calibration cycle. This process will purge the air from the inflow tubing and will pump fluid out the tip of the arthroscope for approximately 20 seconds.
-
Page 11: System Operation
19. Connect the Tricera Device to the Tricera Handpiece by inserting the Tricera Device into the open end of the Tricera handpiece 20. Align the Tricera Device/probe tabs with the slots on the Tricera handpiece and ensure that the tabs snap into place in the Tricera Handpiece slots. -
Page 12: Disassembly
2. Clean instruments within 30 minutes after use to minimize the menu: potential of blood and debris drying prior to cleaning. 3. After use, Tricera Devices may be a potential biohazard and should be handled in accordance with acceptable medical practice and applicable local and national requirements. - Page 13 modes will allow RF adjustment, while mechanical modes allow speed adjustment). This setting is selected in the options menu in Figure 29 below. Figure 27 Adjust the volume by pressing the + or – symbol. Figure 30 15.2. Latching Handpiece Button ON and OFF When this feature is on, the activate (yellow) button on the Handpiece 15.4.
-
Page 14: Limited Warranty
+33 (0)1 42 12 83 30 neither assumes nor authorizes any other person to assume for it any other liability in connection with the sale of the Tricera Controller. This warranty shall not apply to the Tricera Controller or any other part ©... -
Page 15: Appendix Acontroller Product Specifications
The ZEOS System can be set up by connecting the ZEOS console to the rear of the Tricera Controller via the USB port (Fig. 2, item 12). The image below shows the ZEOS video system displaying data to the operating monitor. -
Page 16: Appendix Etroubleshooting
APPENDIX E TROUBLESHOOTING IMPORTANT! If you cannot eliminate the issue with the help of this table, please contact the service department or return the device for repair. There are no user serviceable parts inside of the Controller! Opening the unit may cause electrical shock to user and voids warranty! Problem Possible Causes... - Page 17 - Suction tubing kinked or necessary occluded Check Suction tubing for - Tricera Device defective occlusion Replace Shaver blade Handpiece does not - Handpiece is defective Ensure the Handpiece is OLED display on Handpiece ...
-
Page 18: Appendix F Essential Performance, Power Curve
ESSENTIAL PERFORMANCE, POWER CURVE Essential Performance The essential performance of the Tricera System consists of output RF power tolerance of +/-20% while actively delivering RF; no unintentional activation of RF output, no unintentional activation of pump motors and correct pressure indication within +/- one indicator bar. -
Page 19: Appendix Gemc Tables
Table 1: Electromagnetic Emissions Statement Guidance and Manufacturer’s Declaration – Electromagnetic Emissions The Tricera System is intended for use in the electromagnetic environment specified below. The customer or the user of the Tricera System should assure that it is used in such an environment. - Page 20 Table 2: Electromagnetic Immunity Statement Guidance and Manufacturer’s Declaration – Electromagnetic Immunity The Tricera System is intended for use in the electromagnetic environment specified below. The customer or the user of the Tricera System should assure that it is used in such an environment.
-
Page 21: Appendix Huser Profiles
FM radio broadcast and TV broadcast cannot be predicted theoretically with accuracy. To assess the electromagnetic environment due to fixed RF transmitters, an electromagnetic site survey should be considered. If the measured field strength in the location in which the Tricera System is used exceeds the applicable RF compliance level above, the Tricera System should be observed to verify normal operation. - Page 22 Left: User Profile Profile Selection Screen / Right: User Prorfile Insert Name Screen Table 4: Profile Settings Profile Screen Setting Minimum Default Maximum Description Oscillate Default Oscillate Suction Forward/Reverse Default Forward/Reverse Suction Bone Cutting Default Bone Cutting Suction Suction Bone Burring Default Bone Burring Suction Ablation Default Ablation Suction...
- Page 23 Left: User Profile RF Screen / Right: User Prorfile Pressure Screen Table 5: Profile Settings – Lavage When Lavage is set to On: Activating Flush while inflow is active will enable Lavage mode. Lavage will increase the set Lavage pressure by the “pressure increase” amount and maintain it for the “duration.” Duration begins when flush is released.
Need help?
Do you have a question about the Tricera and is the answer not in the manual?
Questions and answers