Table of Contents
Advertisement
Available languages
Available languages
Quick Links
DE Blutdruckmessgerät
Gebrauchsanweisung .....................................................2
EN Blood pressure monitor
Instructions for use .......................................................18
FR Tensiomètre
Mode d'emploi ..............................................................33
ES Tensiómetro
Instrucciones de uso ....................................................48
IT
Misuratore di pressione
Istruzioni per l'uso ........................................................63
TR Tansiyon ölçme cihazı
Kullanım kılavuzu ..........................................................78
RU Прибор для измерения кровяного давления
Инструкция по применению .......................................93
PL Ciśnieniomierz
Instrukcja obsługi ........................................................109
BC 85
Advertisement
Chapters
Table of Contents

Subscribe to Our Youtube Channel
Related Manuals for Beurer BC 85


Summary of Contents for Beurer BC 85
- Page 1 BC 85 DE Blutdruckmessgerät Gebrauchsanweisung .............2 EN Blood pressure monitor Instructions for use ............18 FR Tensiomètre Mode d’emploi ..............33 ES Tensiómetro Instrucciones de uso ............48 Misuratore di pressione Istruzioni per l’uso ............63 TR Tansiyon ölçme cihazı Kullanım kılavuzu ............78 RU Прибор для измерения кровяного давления...
-
Page 2: Table Of Contents
Therapie, Massage, Beauty und Luft. Bitte lesen Sie diese Ge- handenen Herzrhythmusstörungen werden Sie gewarnt. brauchsanweisung aufmerksam durch, bewahren Sie sie für Die ermittelten Werte werden eingestuft und grafisch beurteilt. späteren Gebrauch auf, machen Sie sie anderen Benutzern zugänglich und beachten Sie die Hinweise. Mit freundlicher Empfehlung, Ihr Beurer-Team... -
Page 3: Wichtige Hinweise
2. Wichtige Hinweise Zulässige Betriebstemperatur und -luft- Operating feuchtigkeit Zeichenerklärung In der Gebrauchsanweisung, auf der Verpackung und auf dem Vor Nässe schützen Typschild des Geräts und des Zubehörs werden folgende Symbole verwendet: Seriennummer Vorsicht Die CE-Kennzeichnung bescheinigt die Konformität mit den grundlegenden An- Hinweis Hinweis auf wichtige Informationen forderungen der Richtlinie 93/42/EEC für... - Page 4 • Die von Ihnen selbst ermittelten Messwerte können nur zu • Erkrankungen des Herz-Kreislaufsystems können zu Fehl- Ihrer Information dienen – sie ersetzen keine ärztliche Unter- messungen bzw. zu Beeinträchtigungen der Messgenauig- suchung! keit führen. Ebenso der Fall ist dies bei sehr niedrigem Blut- Besprechen Sie Ihre Messwerte mit dem Arzt, begründen druck, Diabetes, Durchblutungs- und Rhythmusstörungen Sie daraus auf keinen Fall eigene medizinische Entschei-...
- Page 5 • Sie können das Blutdruckmessgerät ausschließlich mit Bat- • Verschluckungsgefahr! Kleinkinder könnten Batteri- terien betreiben. en verschlucken und daran ersticken. Daher Batterien für • Die Abschaltautomatik schaltet das Blutdruckmessgerät zur Kleinkinder unerreichbar aufbewahren! Schonung der Batterien aus, wenn innerhalb 2 Minuten kei- •...
-
Page 6: Gerätebeschreibung
jeder Reklamation zuerst die Batterien und tauschen Sie Gerätes zur Folge haben und zu einer fehlerhaften Betriebs- diese gegebenenfalls aus. weise führen. • Im Interesse des Umweltschutzes darf das Gerät • Eine Nichtbeachtung kann zu einer Minderung der Leis- am Ende seiner Lebensdauer nicht mit dem Haus- tungsmerkmale des Gerätes führen. -
Page 7: Messung Vorbereiten
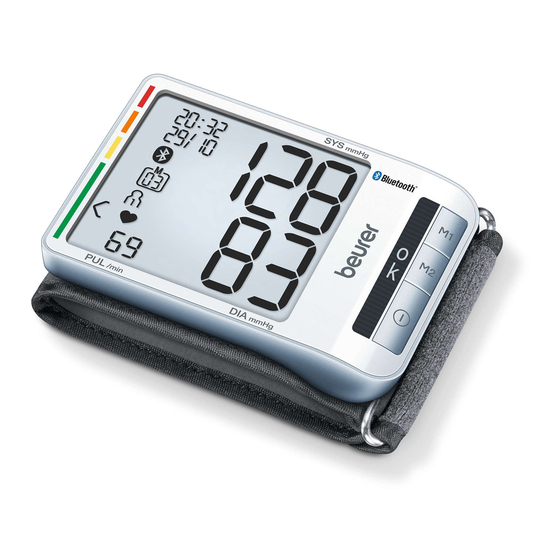
Anzeigen auf dem Display: Systemvoraussetzungen für die PC-Software „ beurer Health Manager“ 1. Risiko-Indikator 2. Uhrzeit und Datum – ab Windows 7 SP1 3. Systolischer Druck – ab USB 2.0 (Type-A) 4. Diastolischer Druck Systemvoraussetzungen für die „beurer HealthManager“- 5. Symbol Herzrhythmusstörung Symbol Puls –... - Page 8 • Wählen Sie mit den Speichertasten M1/M2 Ihr gewünsch- Alle Displayelemente werden kurz angezeigt, blinkt im tes Stundenformat und bestätigen Sie mit der START/ Display. Stellen Sie nun wie im Folgenden beschrieben Datum STOPP- Taste und Uhrzeit ein. Datum Batterie Entsorgung Im Display blinkt die Jahreszahl.
-
Page 9: Blutdruck Messen
Nachdem alle Daten eingestellt wurden, schaltet sich das Ge- • Schließen Sie die Manschette mit dem Klettverschluss, so- rät automatisch aus. dass die Oberkante des Gerätes ca. 1 cm unter dem Hand- ballen sitzt. ® Bluetooth • Die Manschette muss eng um das Handgelenk anliegen, ®... - Page 10 Blutdruckmessung durchführen Mess ergebnis dem zuletzt verwendeten Benutzerspeicher zur Speicherung zugewiesen. Das entsprechende Symbol Legen Sie, wie zuvor beschrieben, die Manschette an und M1 oder M2 erscheint im Display. nehmen Sie die Haltung ein, in der Sie die Messung durch- •...
-
Page 11: Ergebnisse Beurteilen
6. Ergebnisse beurteilen Es ist wichtig, dass Sie Ihren Arzt in regelmäßigen Abständen zu Rate ziehen. Ihr Arzt teilt Ihnen Ihre individuellen Werte für Herzrhythmusstörungen: einen normalen Blutdruck sowie den Wert mit, ab dem die Dieses Gerät kann während der Messung eventuelle Störun- Höhe des Blutdrucks als gefährlich einzustufen ist. -
Page 12: Messwerte Abrufen Und Löschen
7. Messwerte abrufen und löschen Wenn Sie den Benutzerspeicher 2 ausgewählt haben ist die Speichertaste M2 zu benutzen. Benutzerspeicher Durchschnittswerte Die Ergebnisse jeder erfolgreichen Messung werden zusam- Im Display blinkt A. men mit Datum und Uhrzeit abgespeichert. Bei mehr als 60 Messdaten wird jeweils die älteste Messung überschrieben. -
Page 13: Übertragung Der Messwerte
Auf dem Display wird PC angezeigt. Starten Sie • Halten Sie die Speichertasten M1 oder M2 für 5 Sekunden die Datenübertragung in der PC-Software gedrückt. „beurer HealthManager“. Während der Daten- Auf dem Display erscheint CL und 00. übertragung wird im Display eine Animation angezeigt. Eine erfolgreiche Datenübertragung Alle Werte des gegenwärtigen Benutzer-... -
Page 14: Fehlermeldung/Fehlerbehebung
Anschluss an eine einem späteren Zeitpunkt: ® tooth zu übertragen. Messung: • Gehen Dazu benötigen Sie die „beurer Health Manager“-App. Diese ® • Ist Bluetooth Speicherabruf-Modus ist im Apple App Store und bei Google Play kostenlos ver- Daten übertragung (Kap. -
Page 15: Gerät Und Manschette Reinigen Und Aufbewahren
AAA Batterien stehen. Entnehmen Sie die Batterien. Batterie-Lebensdauer Für ca. 300 Messungen, je nach Höhe 11. Technische Angaben des Blutdrucks bzw. Aufpumpdruck Modell BC 85 Klassifikation Interne Versorgung, IPX0, kein AP oder APG, Dauerbetrieb, Anwendungsteil BC 80 Typ BF Messmethode Oszillometrisch, nicht invasive Blut- Datenübertragung... -
Page 16: Garantie / Service
(Medizinische elektrische Geräte Teil 2-30: Besondere Fest- halb eines Zeitraumes von 5 Jahren ab Kaufdatum gegen- legungen für die Sicherheit einschließlich der wesentlichen über der Beurer GmbH, Ulm (Germany) geltend zu machen. Leistungsmerkmale von automatisierten nicht invasiven Blutdruckmessgeräten). Bitte wenden Sie sich im Falle von Reklamationen an •... - Page 17 Fordern wir Sie zur Übersendung des defekten Produktes auf, ist das Produkt an folgende Adresse zu senden: Beurer GmbH Servicecenter Lessingstraße 10 b 89231 Neu-Ulm Germany...
-
Page 18: Getting To Know Your Device
Please read these instructions for use carefully and keep them The recorded values are classified and evaluated graphically. for later use, be sure to make them accessible to other users and observe the information they contain. With kind regards, Your Beurer team... -
Page 19: Important Notes
2. Important notes Permissible operating temperature and Operating humidity Signs and symbols The following symbols are used in these instructions for use, Protect from moisture on the packaging and on the type plate for the device and the accessories: Serial number Attention The CE labelling certifies that the product complies with the essential requirements... - Page 20 Discuss the measurements with your doctor and never base • The blood pressure monitor must not be used in connection any medical decisions on them (e.g. medicines and their with a high-frequency surgical unit. administration). • Only use the unit on people who have the specified wrist •...
- Page 21 • Use identical or equivalent battery types only. Instructions for storage and maintenance • Always replace all batteries at the same time. • The blood pressure monitor is made from precision and • Do not use rechargeable batteries. electronic components. The accuracy of the measurements •...
-
Page 22: Unit Description
3. Unit description • The use of the device may be limited in the presence of electromagnetic disturbances. This could result in issues 1. Risk indicator such as error messages or the failure of the display/device. 2. USB interface • Avoid using this device directly next to other devices or sta- 3. -
Page 23: Preparing For The Measurement
Information on the display: System requirements for the „ beurer Health Manager“ PC software. 1. Risk indicator 2. Time and date – from Windows 7 SP1 3. Systolic pressure – from USB 2.0 (Type-A) 4. Diastolic pressure System requirements for the “beurer HealthManager” app 5. - Page 24 Date Battery disposal The year flashes on the display. • The empty, completely flat batteries must be disposed of • Select the year using the M1/M2 memory through specially designated collection boxes, recycling buttons and confirm with the START/STOP points or electronics retailers. You are legally required to button dispose of the batteries.
-
Page 25: Measuring Blood Pressure
® Bluetooth Adopt the correct posture ® The Bluetooth symbol flashes on the display. • Before every measurement, relax for about five minutes. • Use the M1/M2 memory buttons to choose whether au- Otherwise deviations can occur. ® ® tomatic Bluetooth data transfer is activated (Bluetooth •... -
Page 26: Evaluating Results
The measurement is taken during the inflation phase. transferred to the app. Once the data has been successfully transferred, the device switches off. You can cancel the measurement at any time by pressing • If a connection to the app cannot be established after the START/STOP button ®... -
Page 27: Displaying And Deleting Measurements
ment based on the measurements can be dangerous. Always Blood pressure Systole Diastole Action follow your GP’s instructions. value category (in mmHg) (in mmHg) Setting 1: Risk indicator: regular monito- mild 140 – 159 90 – 99 The measurements can be classified and evaluated in accord- ring by doctor hypertension ance with the following table. - Page 28 transfer will be cancelled and the morning average will be Individual measured values displayed. • When the relevant memory button (M1 or M2) is pressed again, the last If you press the M2 button, the transfer is cancelled and the individual measurement is displayed measurement data of user memory is displayed.
-
Page 29: Transferring Measurements
® the device to your smartphone using Bluetooth You will need the “beurer Health Manager” app for this. This • If you would like to delete other values, repeat the process is available in the Apple App Store and from Google Play. -
Page 30: Error Messages/Troubleshooting
START/STOP button water, as this can cause liquid to enter and damage the device and cuff. The “beurer HealthManager” app must be active to allow • If you store the device and cuff, do not place heavy objects data transfers. - Page 31 European RED Directive 2014/53/EU. The CE Declaration List of supported smartphones/tablets of Conformity for this product can be found under: www. The serial number is located on the device or in the battery beurer.com/web/we-landingpages/de/cedeclarationofcon- compartment. formity.php. Technical information is subject to change without notification to allow for updates.
-
Page 32: Warranty / Service
In case of returning the unit please add a copy of your receipt and a short report of the defect. The following warranty terms shall apply: 1. The warranty period for BEURER products is either 5 years or- if longer- the country specific warranty period from date of Purchase. -
Page 33: Présentation
11. Caractéristiques techniques ...........46 6. Évaluer les résultats ............42 12. Garantie / Maintenance ...........47 Contenu Sincères salutations, Votre équipe Beurer • Tensiomètre avec manchette • 2 piles 1,5 V AAA 1. Présentation • Câble USB Vérifiez si l’emballage extérieur de l’appareil est intact et si •... -
Page 34: Conseils Importants
2. Conseils importants Température et taux d’humidité de stoc- Storage / Transport kage et de transport admissibles Symboles utilisés Les symboles suivants sont utilisés sur le mode d’emploi, sur Température et taux d’humidité d’utilisa- Operating l’emballage et sur la plaque signalétique de l’appareil et des tion admissibles accessoires : Attention... - Page 35 • Effectuez une nouvelle mesure si vous avez un doute sur les dernière des recommandations sur la manière d’utiliser l’ap- valeurs mesurées. pareil. Surveillez les enfants afin de les empêcher de jouer • Les mesures que vous avez établies servent uniquement avec l’appareil.
- Page 36 • Placez la manchette uniquement au niveau du poignet. Ne • Risque d’ingestion ! Les enfants en bas âge pourraient placez pas la manchette sur d’autres parties du corps. avaler des piles et s’étouffer. Veuillez donc conserver les • Vous ne pouvez utiliser le tensiomètre qu’avec des piles. piles hors de portée des enfants en bas âge ! •...
-
Page 37: Description De L'appareil
• Dans l’intérêt de la protection de l’environnement, de l’immunité électromagnétique de l’appareil, et donc cau- l’appareil ne doit pas être jeté avec les ordures mé- ser des dysfonctionnements. nagères à la fin de sa durée de service. L’élimination • Le non-respect de cette consigne peut entraîner une réduc- doit se faire par le biais des points de collecte com- tion des performances de l’appareil. -
Page 38: Préparation De La Mesure
Données affichées à l’écran : Configuration requise pour le logiciel PC « beurer HealthManager » 1. Indicateur de risque 2. Heure et date – à partir d’Windows 7 SP1 3. Pression systolique – à partir d’USB 2.0 (Type-A) 4. Pression diastolique Configuration requise pour l’application « beurer 5. - Page 39 Format de l’heure Lorsque le symbole de remplacement des piles clignote et que E6 apparaît, vous ne pouvez plus effectuer de mesure • Maintenez la touche MARCHE/ARRÊT et vous devez remplacer les piles. enfoncée pendant 5 secondes. Tous les éléments de l’écran s’affichent brièvement et cli- •...
-
Page 40: Mesurer La Tension
Heure Positionnement de la manchette L’heure clignote à l’écran. • À l’aide des touches mémoire M1/M2, sélec- tionnez l’heure que vous souhaitez et confirmez avec la touche MARCHE/ARRÊT Les minutes clignotent à l’écran. • À l’aide des touches mémoire M1/M2, sélec- tionnez l’heure que vous souhaitez et confirmez •... - Page 41 attention, dans tous les cas, à ce que la manchette se • E_ s’affiche lorsque la mesure n’a pas pu être effectuée cor- trouve au niveau du cœur. Sinon, cela pourrait entraîner rectement. Lisez le chapitre Message d’erreur/ des erreurs considérables. Un indicateur de positionne- Résolution des erreurs de ce mode d’emploi et ment a été...
-
Page 42: Évaluer Les Résultats
Si vous oubliez d’éteindre l’appareil, il s’éteindra automatique- Ces valeurs ne doivent être utilisées qu’à titre indicatif car la ment après environ 3 minutes. Dans ce cas, la valeur est attri- tension artérielle varie selon les personnes, les âges, etc. buée à l’utilisateur de la mémoire choisie ou utilisée en dernier. Il est important de consulter votre médecin de manière régu- Attendez au moins 5 minutes avant d’effectuer lière. -
Page 43: Récupérer Et Supprimer Les Valeurs De Mesure
7. Récupérer et supprimer les valeurs de Si vous avez sélectionné la mémoire utilisateur 2, vous devez actionner la touche mémoire M2. mesure Valeurs moyennes Mémoire utilisateur A clignote à l’écran. Le résultat de chaque mesure réussie est enregistré avec la date et l’heure. -
Page 44: Transfert Des Valeurs Mesurées
• Démarrez la consultation de la valeur moyenne des PC s’affiche sur l’écran. Lancez le transfert des mesures. données dans le logiciel PC « beurer • Maintenez les touches mémoire M1 ou M2 enfoncées HealthManager ». Pendant le transfert des pendant 5 secondes. -
Page 45: Message D'erreur/Résolution Des Erreurs
Health Manager » Afin de garantir une transmission sans perturbations, veuillez Ajoutez le BC 85 dans l’application « beurer retirer la housse de votre smartphone. Lancez le transfert de HealthManager » à la section « Réglages/Mes données depuis l’application « beurer HealthManager ». -
Page 46: Nettoyage Et Rangement De L'appareil Et De La Manchette
Retirez les piles. pression de gonflage 11. Caractéristiques techniques Classement Alimentation interne, IPX0, pas d’AP ni d’APG, utilisation continue, appareil Modèle BC 85 de type BF Type BC 80 Transfert de données Bande de fréquence des 2402MHz – Mode de mesure Mesure de la tension artérielle au poi-... -
Page 47: Garantie / Maintenance
Les conditions de garantie suivantes s'appliquent : médicaux ainsi qu’aux normes européennes EN1060-1 1. La période de garantie des produits BEURER est de 5 ans (tensiomètres non invasifs, partie 1 : exigences générales), ou, si elle est plus longue, elle est applicable dans le pays EN1060-3 (tensiomètres non invasifs, partie 3 ... -
Page 48: Índice 1. Introducción
Además, advierte de eventuales alteraciones de uso, consérvelas para su futura utilización, asegúrese de que del ritmo cardiaco. estén accesibles para otros usuarios y respete las indicaciones. Los valores medidos se clasifican y evalúan de forma gráfica. Atentamente, el equipo de Beurer... -
Page 49: Indicaciones Importantes
2. Indicaciones importantes Temperatura y humedad de almacena- Storage / Transport miento y transporte admisibles Símbolos En las presentes instrucciones de uso, en el embalaje y en la Temperatura y humedad de funcionamien- Operating placa de características del aparato y de los accesorios se to admisibles utilizan los siguientes símbolos: Precaución... - Page 50 • Repita la medición si desconfía de la validez de los valores • Las enfermedades cadiovasculares pueden producir errores medidos. de medición o afectar a la precisión de la medición. Esto • Las mediciones realizadas por usted solo tienen carácter también es aplicable en caso de tener la presión sanguínea informativo, en ningún caso pueden sustituir a un examen muy baja, padecer diabetes, problemas circulatorios, altera-...
- Page 51 • El mecanismo de desconexión automática apaga el tensió- • Fíjese en los símbolos más (+) y menos (-) que indican la metro para conservar las pilas si no se pulsa ninguna tecla polaridad. en 2 minutos. • Si se derrama el líquido de una pila, póngase guantes protec- •...
-
Page 52: Descripción Del Aparato
3. Descripción del aparato de recogida adecuados disponibles en su zona. Deseche el aparato según la Directiva europea sobre residuos de apara- 1. Indicador de riesgos tos eléctricos y electrónicos (WEEE). Para más información, 2. Interfaz USB póngase en contacto con la autoridad municipal competente 3. -
Page 53: Preparación De La Medición
Indicaciones en la pantalla: Requisitos del sistema para el software para PC “ beurer Health Manager” 1. Indicador de riesgos 2. Hora y fecha – a partir de Windows 7 SP1 3. Presión sistólica – a partir de USB 2.0 (Type-A) 4. - Page 54 Formato de hora Cuando el símbolo de cambio de pilas parpadea y apa- rece E6, no se pueden seguir realizando mediciones y se de- • Mantenga pulsada la tecla de INICIO/PARA- ben cambiar todas las pilas. durante 5 segundos. Todos los elementos de la pantalla se visualizan brevemente, •...
-
Page 55: Medición De La Presión Arterial
Los minutos parpadean en la pantalla. • Descúbrase la muñeca. Asegúrese de que la circulación • Seleccione con las teclas de memorización M1/ sanguínea en el brazo no está restringida por ropa dema- M2 los minutos deseados y confirme con la tecla siado estrecha o por algo similar. - Page 56 Medición de la presión arterial utilizado. En la pantalla aparece el símbolo correspondiente M1 o M2. Póngase el brazalete como se ha descrito anteriormente y • Apague el tensiómetro con la tecla de INICIO/PARADA colóquese en la postura en la que desea realizar la medición. De esa forma se memorizará...
-
Page 57: Evaluación De Los Resultados
6. Evaluación de los resultados mal, así como del valor a partir del cual puede considerarse peligroso un incremento de la presión arterial. Alteraciones del ritmo cardiaco: La gradación de la pantalla y la escala en el aparato indican en Este aparato es capaz de reconocer eventuales alteraciones qué... -
Page 58: Consultar Y Borrar Los Valores Medidos
7. Consultar y borrar los valores medidos Si ha seleccionado el registro de usuario 2, deberá utilizar la tecla de memorización M2. Registros de usuario Valores medios Los resultados de todas las mediciones correctamente reali- En la pantalla parpadea A. zadas se guardan en la memoria junto con la fecha y la hora. -
Page 59: Transmisión De Los Valores De Medición
Bluetooth • Se borra el valor seleccionado. En el aparato se visualiza Para ello necesitará la app “beurer HealthManager”, disponi- brevemente CL 00. ble gratuitamente en el Apple App Store y en Google Play. -
Page 60: Mensajes De Error/Solución De Problemas
INI- forma automática. CIO/PARADA Paso 2: Aplicación “beurer HealthManager” Añada el dispositivo BC 85 en la opción "Einste- La aplicación “beurer HealthManager” debe estar llungen/Meine Geräte" (Ajustes/Mis dispositivos) activada para realizar la transmisión de datos. de la aplicación “beurer HealthManager”. -
Page 61: Limpiar Y Guardar La Unidad Y El Brazalete
11. Características técnicas Clasificación Alimentación interna, IPX0, sin AP/ Modelo BC 85 APG, funcionamiento continuo, pieza de aplicación tipo BF Tipo BC 80 Transmisión de datos Banda de frecuencia de 2402MHz –... -
Page 62: Garantía / Asistencia
Se aplican las siguientes condiciones de garantía: a los productos sanitarios, las leyes relativas a productos sa- 1. El periodo de garantía para productos de BEURER es de nitarios y las normas europeas EN1060-1 (Esfigmomanóme- 5 años o, si es superior, se aplica el periodo de garantía tros no invasivos, Parte 1: Requisitos generales) y EN1060-3 vigente en el país correspondiente a partir de la fecha de... -
Page 63: Indice 1. Introduzione
Beauty e aria. Leggere attentamente le presenti istruzioni per I valori rilevati vengono classificati e valutati graficamente. l'uso, conservarle per impieghi futuri, renderle accessibili ad altri utenti e attenersi alle indicazioni. Cordiali saluti, team Beurer... -
Page 64: Indicazioni Importanti
2. Indicazioni importanti Temperatura e umidità di trasporto e Storage / Transport stoccaggio consentite Spiegazione dei simboli I seguenti simboli sono utilizzati nelle istruzioni per l’uso, Temperatura e umidità di esercizio Operating sull’imballo e sulla targhetta dell’apparecchio e degli acces- consentite sori: Attenzione... - Page 65 • I valori misurati autonomamente hanno solo scopo informa- della circolazione e del ritmo cardiaco nonché in presenza tivo, non sostituiscono i controlli medici! di brividi di febbre o tremiti. Comunicare al medico i propri valori, non intraprendere in • Non utilizzare il misuratore di pressione insieme ad altri ap- alcun caso terapie mediche definite autonomamente (ad es.
- Page 66 • Se per 2 minuti non vengono utilizzati pulsanti, il dispositivo • In caso di fuoriuscita di liquido dalla batteria, indossare di arresto automatico spegne l’apparecchio per preservare guanti protettivi e pulire il vano batterie con un panno asciut- le batterie. •...
-
Page 67: Descrizione Dell'apparecchio
3. Descrizione dell’apparecchio ture elettriche ed elettroniche - WEEE (Waste Electrical and Electronic Equipment). Per eventuali chiarimenti, rivolgersi 1. Indicatore di rischio alle autorità comunali competenti per lo smaltimento. 2. Interfaccia USB 3. Display Avvertenze sulla compatibilità elettromagnetica 4. Indicatore della posizione (altezza cuore) •... -
Page 68: Preparazione Della Misurazione
Indicatori sul display: Requisiti di sistema per il software per PC “ beurer Health Manager” 1. Indicatore di rischio 2. Ora e data – da Windows 7 SP1 3. Pressione sistolica – da USB 2.0 (Type-A) 4. Pressione diastolica Requisiti di sistema per l’app “beurer HealthManager”... - Page 69 Tutti gli elementi del display vengono brevemente visualizzati, Formato ora sul display lampeggia . A questo punto impostare la data • Tenere premuto il pulsante START/STOP e l’ora come descritto di seguito. per 5 secondi. • Con i pulsanti per la memorizzazione M1/M2 Smaltimento delle batterie selezionare il formato dell’ora desiderato e •...
-
Page 70: Misurazione Della Pressione
Sul display lampeggia l’indicazione dei minuti. • Denudare il polso. Verificare che la circolazione del braccio • Con i pulsanti per la memorizzazione M1/M2 non sia costretta da indumenti o simili. selezionare i minuti desiderati e confermare con Applicare il manicotto all’interno del polso. il pulsante START/STOP •... -
Page 71: Interpretazione Dell'esito
Esecuzione della misurazione della pressione moria utente usata per ultima. Sul display viene visualizzato il relativo simbolo M1 o M2. Applicare il manicotto e sistemarsi nella posizione in cui si de- • Spegnere il misuratore di pressione con il pulsante START/ sidera eseguire la misurazione. -
Page 72: Ricerca E Cancellazione Dei Valori Misurati
termine della misurazione ne segnala la presenza con l’icona diastolico rientrino in due classi diverse (ad es. sistole nella classe „Normale alto“ e diastole nella classe „Normale“), la Può essere un’avvisaglia di aritmia. L’aritmia è una patologia graduazione grafica dell’apparecchio indica sempre la classe in cui il ritmo cardiaco è... - Page 73 • Premere il pulsante per la memorizzazione corrispondente – Se si desidera visualizzare i dati misurati (M1 o M2). per la memoria utente , premere il Sul display lampeggia l’indicazione AM. pulsante per la memorizzazione M1. – Se si desidera visualizzare i dati misu- Viene visualizzato il valore medio degli ultimi 7 giorni di misurazioni mattutine rati per la memoria utente...
-
Page 74: Trasmissione Dei Valori Misurati
® tre essere trasmessi allo smartphone tramite Bluetooth • Per cancellare ulteriori valori, procedere come descritto so- A tale scopo, è necessaria l’app “beurer Health Manager”. È pra. disponibile nell’Apple App Store e in Google Play. L’apparecchio può essere spento in qualsiasi momento pre-... -
Page 75: Messaggi Di Errore/Soluzioni
L’app “beurer HealthManager” deve essere attivata per Fase 1: BC 85 la trasmissione. ® Attivare la funzione Bluetooth sul proprio Per garantire una trasmissione indisturbata, rimuovere even- dispositivo (vedere il capitolo 4. "Preparazione tualmente l’involucro protettivo dello smartphone. Avviare la ®... -
Page 76: Dati Tecnici
11. Dati tecnici Classificazione Alimentazione interna, IPX0, non fa parte della categoria AP/APG, funzio- Modello BC 85 namento continuo, parte applicativa tipo BF Tipo BC 80 Trasmissione dei dati Con banda di frequenza 2402MHz –... -
Page 77: Garanzia / Assistenza
Si applicano le seguenti condizioni di garanzia: 1. La garanzia dei prodotti BEURER dura 5 anni oppure, se più lunga, fa fede la durata di garanzia valida dalla data di acquisto di ciascun paese. -
Page 78: İçindekiler 1. Ürün Özellikleri
Lütfen bu kullanım kılavuzunu dikkatle okuyun, ileride gere- Elde edilen değerler kademelendirilir ve grafik olarak değer- kebileceği için saklayın, diğer kullanıcıların erişebilmesini sağ- lendirilir. layın ve içindeki yönergelere uyun.Yeni cihazınızı iyi günlerde kullanmanızı dileriz Beurer Ekibiniz... -
Page 79: Önemli Yönergeler
2. Önemli yönergeler İzin verilen çalışma sıcaklığı ve hava nemi Operating İşaretlerin açıklaması Cihazın ve aksesuarların kullanım kılavuzunda, ambalajında ve Nemden koruyun model etiketinde aşağıdaki semboller kullanılır: Dikkat Seri numarası Açıklama CE işareti, tıbbi ürünler için 93/42/EEC Önemli bilgilere yönelik açıklama direktifinin temel şartları... - Page 80 Ölçüm değerlerinizi doktorunuza bildirin ve hiçbir zaman • Bu cihazı yalnızca, el bileklerinin kalınlığı cihaz için belirtilen ölçüm sonuçlarından yola çıkarak kendi tıbbi kararlarınızı değerlere uygun olan kişilerde kullanın. vermeyin (örneğin ilaçlar ve dozları)! • Şişirme sırasında ilgili uzuvda işlev kısıtlaması meydana ge- •...
- Page 81 • Her zaman tüm pilleri aynı anda değiştirin. Saklama ve bakım ile ilgili bilgiler • Şarj edilebilir pil kullanmayın! • Tansiyon ölçme cihazı hassas ve elektronik parçalardan • Pilleri parçalarına ayırmayın, açmayın veya parçalamayın. meydana gelir. Ölçüm değerlerinin hassasiyeti ve cihazın Onarım ve bertaraf hakkında bilgiler kullanım ömrü...
-
Page 82: Cihaz Açıklaması
3. Cihaz açıklaması • Bu cihaz başka cihazların hemen yanında veya başka ci- hazlar ile üst üste koyularak kullanılmamalıdır, aksi halde 1. Risk endikatörü cihazın hatalı çalışması söz konusu olabilir. Bahsedilen 2. USB bağlantı noktası şekilde bir kullanım kesinlikle kaçınılmazsa, gerektiği gibi 3. -
Page 83: Ölçüme Hazırlık
Ekrandaki göstergeler: Beurer bilgisayar yazılımı “ beurer Health Manager” için sistem gereksinimleri 1. Risk endikatörü 2. Saat ve tarih – Windows 7 SP1 ve üzeri 3. Sistolik tansiyon – USB 2.0 ve üzeri (Type-A) 4. Diyastolik tansiyon “beurer HealthManager” uygulaması için sistem 5. - Page 84 Tarih Tüm ekran öğeleri kısaca gösterilir, ekranda yanıp söner. Şimdi aşağıda belirtildiği şekilde tarihi ve saati ayarlayın. Ekranda yıl göstergesi yanıp söner. • M1/M2 hafıza tuşu ile istediğiniz yılı seçin Pillerin elden çıkarılması ve START/STOP tuşu ile onaylayın • Kullanılmış, tamamen boşalmış piller özel işaretli toplama Ekranda ay göstergesi yanıp söner.
-
Page 85: Tansiyon Ölçme
® Bluetooth üzerinden aktarımda pil ile çalışma süresi aza- oturun. Sırtınızı ve kollarınızı dayayın. Bacak bacak üstüne lır. atmayın. Ayaklarınızı düz bir şekilde yere koyun. Kolunuzu mutlaka destekleyin ve bükün. Kolunuzu ve el ayalarınızı 5. Tansiyon ölçme gevşetin. Manşetin kalp yüksekliğine gelmesine mutlaka Ölçüm yapmadan önce cihazı... -
Page 86: Sonuçları Değerlendirme
6. Sonuçları değerlendirme • Ölçüm, usulüne uygun şekilde gerçekleştirilemediğinde gö- rüntülenir E_. Bu kullanım kılavuzundaki Hata Kalp ritim bozuklukları: iletisi/Arıza giderme bölümüne bakın ve ölçümü Bu cihaz ölçüm esnasında olası kalp ritim bozukluklarını tespit tekrarlayın. edebilir ve ölçümden sonra gerekirse sembolü... -
Page 87: Ölçüm Değerlerini Görüntüleme Ve Silme
7. Ölçüm değerlerini görüntüleme ve silme Ekrandaki sınıflandırma ve cihazdaki skala, tespit edilen tansi- yonun hangi aralıkta olduğunu gösterir. Sistol ve diyastol de- Kullanıcı hafızası ğerleri iki farklı aralıkta ise (örn. sistol “Yüksek normal” aralığın- Başarılı her ölçümün sonuçları, tarih ve saat ile birlikte kayde- da ve diyastol “Normal”... - Page 88 Ortalama değerler İstediğiniz zaman START/STOP tuşuna basarak Ekranda A sembolü yanıp söner. menüden çıkabilirsiniz. Ölçüm değerlerini sil Bu kullanıcı hafızasında kayıtlı olan tüm ölçüm değerlerinin ortalaması gösterilir. • İlgili kullanıcı hafızasındaki kayıtları silmek için önce bir • İlgili hafıza tuşuna (M1 veya M2) kullanıcı...
-
Page 89: Ölçüm Değerlerinin Aktarılması
“beurer HealthManager” bilgisayar yazılı- “beurer HealthManager” uygulamasında mında veri aktarımını başlatın. Veri aktarımı “Ayarlar / Cihazlarım” altından BC 85’yi ekle- sırasında ekranda bir animasyon gösterilir. yin. Veri aktarımının başarıyla tamamlandığı şekil şekil 1 1’deki gibi gösterilir. Veri aktarımı başarılı ol- madığında şekil 2’deki gibi hata iletisi göste-... -
Page 90: Hata Iletisi/Arıza Giderme
Aktarma işleminin sorunsuzca gerçekleşmesini sağlamak için BC 80 lütfen akıllı telefonunuzun koruyucu kılıfını çıkarın. Veri aktarı- Ölçüm yöntemi El bileğinden, titreşimli, invazif olmayan mını “beurer HealthManager” uygulaması üzerinden başlatın. tansiyon ölçümü 9. Hata iletisi/Arıza giderme Ölçüm aralığı Manşet basıncı 0-300mmHg, Hata olduğunda ekranda E_ hata iletisi görüntülenir. -
Page 91: Garanti / Servis
Aşağıdaki garanti koşulları geçerlidir: uyumluluk bakımından özel koruma tedbirlerine tabidir. Lüt- 1. BEURER ürünlerinin garanti süresi 5 yıldır veya – daha fen taşınabilir veya mobil HF iletişim sistemlerinin bu cihazı uzun ise – ilgili ülkede geçerli olan satın alma tarihinden etkileyebileceğini dikkate alın. - Page 92 d. Normal yıpranmaya uğrayan aksesuarlar (manşet, piller vb.) için garanti geçerli değildir. 4. Cihaz hasar gördüğünde bir garanti talebi kabul edilme- si durumunda da cihazın neden olduğu doğrudan veya dolaylı netice kabilinden doğan hasarlar için sorumluluk üstlenilmez.
-
Page 93: Для Ознакомления
вую измерений. При наличии нарушений сердечного рит- ха. Внимательно прочтите данную инструкцию по приме- ма Вы получите предупреждение. нению, сохраните ее для последующего использования, Полученные результаты измерений классифицируются держите ее в доступном для других пользователей месте и отображаются в графическом виде. и следуйте ее указаниям.С наилучшими пожеланиями, компания Beurer... -
Page 94: Важные Указания
2. Важные указания Допустимая температура и влажность Storage / Transport воздуха при хранении и транспорти- Пояснения к символам ровке В инструкции по применению, на упаковке и на типовой Допустимая рабочая температура Operating табличке прибора и принадлежностей используются сле- и влажность воздуха дующие... - Page 95 • В течение как минимум 30 минут перед измерением • Данный прибор не предназначен для использования следует воздерживаться от приема пищи и жидкости, лицами (включая детей) с ограниченными физическими, курения или физических нагрузок. сенсорными или умственными способностями, или лиц • При наличии сомнений относительно полученных ре- с...
- Page 96 • Убедитесь в том, что к кровеносным сосудам руки, на — Не роняйте прибор. которую накладывается манжета, не подсоединено ме- — Не используйте прибор вблизи сильных электромаг- дицинское оборудование (через внутрисосудистый до- нитных полей, держите его на значительном расстоя- ступ, артериовенозный шунт или при внутрисосудистой нии...
- Page 97 • Не разбирайте, не открывайте и не разбивайте батарей- Указания по электромагнитной совместимости ки. • Прибор предназначен для работы в условиях, Указания по ремонту и утилизации перечисленных в настоящей инструкции по применению, в том числе в домашних условиях. • Не выбрасывайте использованные батарейки в быто- •...
-
Page 98: Описание Прибора
3. Описание прибора Индикация на дисплее: 1. Индикатор риска 1. Индикатор риска 2. Время и дата 2. Интерфейс USB 3. Систолическое давление 3. Дисплей 4. Диастолическое давление 4. Индикация положения (на высоте сердца) 5. Символ нарушения сердечного ритма 5. Кнопка сохранения M1 Символ... -
Page 99: Подготовка К Измерению
Все элементы дисплея отобразятся на короткое время, на – начиная с USB 2.0 (Type-A) дисплее будет мигать индикация . Установите дату и Системные требования для приложения « beurer время, выполнив описанные ниже действия. Health Manager» – iOS ≥ 9.0, Android ≥ 5.0 Утилизация... -
Page 100: Измерение Кровяного Давления
Формат времени На дисплее замигает число минут. • С помощью кнопок сохранения M1/M2 выбе- • Удерживайте кнопку START/STOP нажа- рите нужное число минут и подтвердите вы- той в течение 5 секунд. бор нажатием кнопки START/STOP • С помощью кнопок сохранения M1/M2 вы- После... - Page 101 • Оголите запястье. Следите за тем, чтобы кровоснабже- • Чтобы избежать искажения результатов, во время из- ние руки не было нарушено из-за слишком узкой одеж- мерения следует вести себя спокойно и не разговари- ды и т. п. вать. Наложите манжету на внутреннюю сторону запястья. Измерение...
-
Page 102: Оценка Результатов
стей» в данной инструкции по применению и повторите тат измерения будет сохранен в выбранной или послед- измерение. ней использованной пользовательской памяти. • Теперь при помощи кнопок сохранения M1 или M2 вы- Перед повторным измерением подождите берите пользовательскую память. Если Вы не выбрали не... -
Page 103: Просмотр И Удаление Результатов Измерения
Индикатор риска: Диапазон Систоличе- Диастоличе- Рекомендуе- Оценку результатов измерений можно провести с помо- значений ское ское давление мые меры щью таблицы, представленной ниже. кровяного давление (в мм рт. ст.) Однако эти стандартные значения служат только общим давления (в мм рт. ст.) ориентиром, так как индивидуальные значения кровяного Степень 2: 160–179 100–109... - Page 104 • С помощью кнопок сохранения M1 или M2 выберите Средние значения нужную пользовательскую память ( ), когда прибор На дисплее замигает A. выключен. Отобразится среднее значение всех – Для просмотра сохраненных сохраненных в данной ячейки памяти в пользовательской памяти ре- результатов...
-
Page 105: Передача Результатов Измерения
вайте их нажатыми в течение 5 секунд. подключения к компьютеру ( PC ). Запусти- те передачу данных на компьютер в про- На дисплее появятся символы CL и 00. грамме «beurer HealthManager». Во время Все значения текущей пользователь- передачи данных на дисплее отображает- ской памяти будут удалены. -
Page 106: Сообщение Об Ошибке/Устранение Ошибок
данных в приложении «beurer HealthManager». Шаг 2: Приложение «beurer 9. Сообщение об ошибке/устранение HealthManager» ошибок Добавьте BC 85 в приложении «beurer При возникновении ошибок на дисплее появляется со- HealthManager» в разделе «Настройки/Мои общение об ошибке E_. устройства». Сообщения об ошибках появляются, если... -
Page 107: Очистка И Хранение Прибора И Манжеты
тяжелые предметы. Извлеките батарейки. Допустимые условия От -25 °C до +70 °C, относительная 11. Технические данные хранения влажность воздуха < 93 %, давление окружающей среды 700–1060 гПа Модель BC 85 Электропитание 2 батарейки типа ААА 1,5 В Тип BC 80 Срок службы Примерно 300 измерений, в зависи- Метод... -
Page 108: Гарантия /Сервисное Обслуживание
2014/53/EU. С декларацией о соответствии директивам ту EN60601-1-2 (Соответствие стандартам CISPR 11, ЕС для данного устройства можно ознакомиться, пере- IEC61000-4-2, IEC61000-4-3, IEC61000-4-8, EN 55022, йдя по ссылке: www.beurer.com/web/we-landingpa- EN 55024) и требует особых мер предосторожности в ges/de/cedeclarationofconformity.php. отношении электромагнитной совместимости. Следует... -
Page 109: Spis Treści 1. Informacje O Urządzeniu
że zdecydowali się Państwo na zakup naszego ru i monitorowania ciśnienia tętniczego krwi u osób dorosłych. produktu. Firma Beurer oferuje dokładnie przetestowane, wyso- Umożliwia on łatwy i szybki pomiar ciśnienia krwi, a także kiej jakości produkty przeznaczone do ogrzewania ciała, pomiaru zapisanie zmierzonych wartości i wyświetlenie ich w formie... -
Page 110: Ważne Wskazówki
2. Ważne wskazówki Dopuszczalna temperatura i wilgotność Operating powietrza podczas pracy Objaśnienie symboli W instrukcji obsługi, na opakowaniu i tabliczce znamionowej Chronić przed wilgocią urządzenia oraz akcesoriów znajdują się następujące symbole: Uwaga Numer seryjny Wskazówka Oznakowanie CE potwierdza zgodność Ważne informacje z zasadniczymi wymogami dyrektywy 93/42/EEC w sprawie wyrobów medycz- Należy przestrzegać... - Page 111 dejmować decyzji medycznych na własną rękę (np. doty- • Urządzenie stosować tylko u osób o podanym obwodzie czących stosowania leków i ich dawkowania)! nadgarstka. • Stosowanie ciśnieniomierza poza domem lub w ruchu (np. • Podczas pompowania urządzenia może dojść do zaburze- podczas podróży w samochodzie, karetce lub helikopterze nia sprawności danej kończyny.
- Page 112 Wskazówki dotyczące przechowywania i • Nie wolno ładować ani zwierać baterii. użytkowania • W przypadku niekorzystania z urządzenia przez dłuższy czas wyjąć baterie z przegrody. • Ciśnieniomierz jest wykonany z precyzyjnych podzespo- • Należy używać tylko tego samego lub równoważnego typu łów elektronicznych.
-
Page 113: Opis Urządzenia
3. Opis urządzenia leży zwrócić się do odpowiedniej instytucji odpowiedzialnej za utylizację. 1. Wskaźnik ryzyka 2. Złącze USB Wskazówki dot. kompatybilności 3. Wyświetlacz elektromagnetycznej 4. Wskaźnik ustawienia (wysokość serca) • Urządzenie jest przeznaczone do użytkowania w każdym 5. Przycisk pamięci M1 otoczeniu wymienionym w niniejszej instrukcji obsługi, 6. -
Page 114: Przygotowanie Do Pomiaru
Informacje na wyświetlaczu: Program „ beurer Health Manager” — wymagania systemowe 1. Wskaźnik ryzyka 2. Godzina i data – od Windows 7 SP1 3. Ciśnienie skurczowe – od USB 2.0 (Type-A) 4. Ciśnienie rozkurczowe Wymagania systemowe dla aplikacji „beurer 5. Symbol zaburzeń rytmu serca Health Manager”... - Page 115 Na krótko wyświetlą się wszystkie elementy wyświetlacza, na • Za pomocą przycisków pamięci M1/M2 ustaw odpowiedni wyświetlaczu miga wskazanie . Ustaw zgodnie z poniż- format godziny, a następnie potwierdź przyciskiem START/ szym opisem datę i godzinę. STOP Data Utylizacja baterii Na wyświetlaczu zacznie migać...
-
Page 116: Pomiar Ciśnienia Tętniczego
• Za pomocą przycisków pamięci M1/M2 ustaw odpo- • Odkryć nadgarstek. Zwróć uwagę, czy przepływ krwi w ręce wiednią liczbę minut, a następnie potwierdź przyciskiem nie jest ograniczony przez zbyt ciasną odzież itp. Połóż mankiet na wewnętrznej stronie nadgarstka. START/STOP Po ustawieniu wszystkich danych urządzenie wyłączy się... -
Page 117: Interpretacja Wyników
Pomiar ciśnienia tętniczego krwi • Wyłącz urządzenie za pomocą przycisku START/STOP Załóż mankiet zgodnie z powyższym opisem i przyjmij pozy- Spowoduje to zapisanie wyniku pomiaru w wybranej pamięci. cję, w której ma być dokonany pomiar. ® Jeśli aktywowana jest transmisja danych Bluetooth , po po- •... -
Page 118: Odczyt I Usuwanie Wyników Pomiaru
zbyt wolne lub zbyt szybkie tętno. Przyczyny to m.in. choroby Zakres Ciśnienie Ciśnienie Rozwiązanie serca, podeszły wiek, predyspozycje wynikające z budowy wartości skurczowe rozkurczowe ciała, nadmierne spożycie używek, stres lub zbyt mała ilość ciśnienia (w mmHg) (w mmHg) snu. Arytmię może stwierdzić tylko lekarz po przeprowadzeniu Poziom 3: ≥180 ≥110... - Page 119 – Jeśli chcesz wyświetlić dane pomiarów Na wyświetlaczu będzie migać symbol AM. z danej pamięci użytkownika naci- Zostanie wyświetlona średnia wartość śnij przycisk pamięci M1. z ostatnich 7 dni pomiarów porannych – Jeśli chcesz wyświetlić dane pomia- (rano: godz. 5.00–9.00). rów z danej pamięci użytkownika •...
-
Page 120: Przenoszenie Danych Pomiarowych
CL 00. ® czenie Bluetooth • Jeśli skasowane mają zostać inne wartości, należy powtó- W tym celu należy skorzystać z aplikacji „beurer rzyć wyżej opisane czynności. Health Manager” dostępnej bezpłatnie w sklepie Apple App Naciskając przycisk START/STOP można w każdej chwili Store i w Google Play. -
Page 121: Komunikaty Błędów/Usuwanie Błędów
Aplikacja „beurer HealthManager” musi być aktywna Krok 1: BC 85 w celu wykonania transmisji. ® Aktywuj funkcję Bluetooth w swoim urzą- W celu zapewnienia sprawnego przenoszenia danych zdejmij dzeniu (patrz rozdział 4. „Przygotowanie do etui ze smartfonu. Rozpocznij transmisję danych w aplikacji ®... -
Page 122: Dane Techniczne
Trwałość baterii Ok. 300 pomiarów, w zależności od 11. Dane techniczne wysokości ciśnienia tętniczego lub ci- śnienia pompowania Model BC 85 Klasyfikacja Zasilanie wewnętrzne, IPX0, nie jest to BC 80 urządzenie kategorii AP lub APG, praca ciągła, część aplikacyjna typu BF... -
Page 123: Gwarancja / Serwis
— Część 1: Wymagania ogólne), EN1060-3 (Nieinwazyjne Obowiązują następujące warunki gwarancji: sfigmomanometry – Część 3: Wymagania dodatkowe do- 1. Okres gwarancji na produkty firmy BEURER wynosi 5 lat tyczące elektromechanicznych systemów do pomiaru ci- lub, jeśli jest dłuższy, obowiązuje w danym kraju od daty śnienia krwi) oraz IEC80601-2-30 (Medyczne urządzenia... - Page 124 ® The Bluetooth word mark and logos are registered trademarks owned by Bluetooth SIG, Inc. and any use of such marks by Beurer GmbH is under license. Other trademarks and trade names are those of their respective owners. Apple and the Apple logo are trademarks of Apple Inc., registered in the U.S. and other countries. App Store is a service mark of Apple Inc., registered in the U.S.
Need help?
Do you have a question about the BC 85 and is the answer not in the manual?
Questions and answers