Advertisement
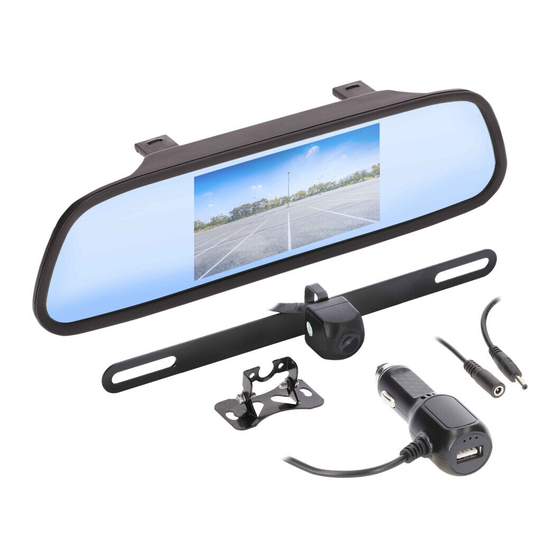
Part Components
A) Mirror/Monitor
B) Camera w/ dual mounting options C) Accessories
A
iBEAM Vehicle Safety Sytems
®
Universal
Wireless 4.3" Mirror/Monitor
and Camera
Visit
iBEAMUSA.com
for more detailed informatuon about the product and up-to-date vehicle specific
applications.
Product Features
• Wireless camera and mirror/monitor kit
• 4.3" LCD Monitor
• 20 M / 65 FT range
• DC socket for monitor power with USB for smart device charging
• Video triggered by the camera's signal
B
iBEAMUSA.com
©COPYRIGHT 2020 METRA ELECTRONICS CORPORATION
C
TE-WKMR43
INSTALLATION INSTRUCTIONS
#IBEAMSAFETY
TABLE OF CONTENTS
Installation............................................................2-3
Wireless Pairing .....................................................4
Display Settings .....................................................5
Wire Lenths ............................................................6
Specifications .........................................................7
TOOLS REQUIRED
• Wire stripper
• Tape
• Digital Multi-meter
• Cutter
Attention!
When testing the aftermarket
equipment, ensure that all factory equip-
ment is connected before cycling the key to
ignition.
REV. 07/20/2020 INSTTE-WKMR43
Advertisement
Table of Contents

Related Manuals for iBeam TE-WKMR43


Summary of Contents for iBeam TE-WKMR43
- Page 1 B) Camera w/ dual mounting options C) Accessories Attention! When testing the aftermarket equipment, ensure that all factory equip- ment is connected before cycling the key to ignition. iBEAM Vehicle Safety Sytems ® iBEAMUSA.com ©COPYRIGHT 2020 METRA ELECTRONICS CORPORATION REV. 07/20/2020 INSTTE-WKMR43...
- Page 2 MONITOR INSTALLATION Mirror/Monitor install and wiring 1. Carefully extend the clips on the back of the clip-on mirror and attach to the current rearview mirror in the vehicle. 2. Plug the DC socket into the mirror and run the wire in the path shown in Figure A and safely hide the wire from being pulled or caught on while operating the vehicle.
- Page 3 CAMERA INSTALLATION Camera Installation Mount the camera with either the surface mount or the license plate mount. If wanting the surface mount, the two small screws will need to be removed to remove the license plate mount and replace with surface mount. Remove the tail light from the vehicle to allow access to the light bulbs wiring.
- Page 4 WIRELESS PAIRING Mirror/Monitor to Camera pairing Before operation, the camera and mirror need to be paired to each other. Start by connecting power to both devices. If camera is connected to reverse, the vehicle must be put into the reverse gear. NOTE: Please acti- vate parking brake while pairing for safety.
- Page 5 DISPLAY SETTINGS Display Settings Brightness Press the MENU button (middle button) to enter into the settings menu, use the + and - buttons (+ = top button, - = bottom button) to navigate to the PICTURE menu. Press and hold the MENU button for 2 seconds to enter the PICTURE menu.
- Page 6 WIRE LENGTHS 1.5 FT 11 FT 4.5 FT 386-257-1187 iBEAMUSA.com...
- Page 7 SPECIFICATIONS TV SYSTEM NTSC EFFECTIVE PIXEL 976 X 592 pixels IP RATING IP67 VISUAL ANGLE 120 horizantal 170 diagonal MIN. ILLUMINATION 0.1 Lux WORKING VOLTAGE 9 - 16V WORKING TEMP. -30 C ~ 70 C STORAGE TEMP. - 40 C ~ 120 C SCREEN SIZE 4.3 inch LCD DISPLAY RESOLUTION...
- Page 8 Log onto www.installerinstitute.com or call 800-354-6782 for more information and take steps toward a better tomorrow. Metra Recommends MECP certified technicians iBEAM Vehicle Safety Sytems ® iBEAMUSA.com ©COPYRIGHT 2020 METRA ELECTRONICS CORPORATION REV. 07/20/2020 INSTTE-WKMR43...
Need help?
Do you have a question about the TE-WKMR43 and is the answer not in the manual?
Questions and answers