Stahl 8485 Series Operating Instructions Manual
Grounding monitoring device
Hide thumbs
Also See for 8485 Series:
- Operating manual (80 pages) ,
- Operating instructions manual (69 pages)

Subscribe to Our Youtube Channel
Related Manuals for Stahl 8485 Series


Summary of Contents for Stahl 8485 Series
- Page 1 Betriebsanleitung Additional languages r-stahl.com Erdungsüberwachungsgerät Reihe 8485...
-
Page 2: Table Of Contents
Inhaltsverzeichnis Inhaltsverzeichnis Allgemeine Angaben....................3 Hersteller......................3 Zu dieser Betriebsanleitung .................3 Weitere Dokumente .....................3 Konformität zu Normen und Bestimmungen ............3 Erläuterung der Symbole ..................4 Symbole in der Betriebsanleitung ................4 Symbole am Gerät ....................4 Sicherheit ......................5 Bestimmungsgemäße Verwendung..............5 Qualifikation des Personals .................5 Restrisiken ......................6 Transport und Lagerung ..................7 Produktauswahl und Projektierung ..............8 Varianten......................8... -
Page 3: Allgemeine Angaben
Betriebsanleitung während der Lebensdauer des Geräts aufbewahren. ▶ Betriebsanleitung dem Bedien- und Wartungspersonal jederzeit zugänglich machen. ▶ Betriebsanleitung an jeden folgenden Besitzer oder Benutzer des Geräts weitergeben. ▶ Betriebsanleitung bei jeder von R. STAHL erhaltenen Ergänzung aktualisieren. ID-Nr.: 204166 / 848560300010 Publikationsnummer: 2021-08-06·BA00·III·de·12 Hardwareversion: Die Originalbetriebsanleitung ist die deutsche Ausgabe. -
Page 4: Erläuterung Der Symbole
Erläuterung der Symbole Erläuterung der Symbole Symbole in der Betriebsanleitung Symbol Bedeutung Hinweis zum leichteren Arbeiten Gefahrensituation, die bei Nichtbeachtung der GEFAHR! Sicherheitsmaßnahmen zum Tod oder zu schweren Verletzungen mit bleibenden Schäden führen kann. Gefahrensituation, die bei Nichtbeachtung der WARNUNG! Sicherheitsmaßnahmen zu schweren Verletzungen führen kann. -
Page 5: Se Fi
Bereich. Zur bestimmungsgemäßen Verwendung gehört die Beachtung dieser Betriebsanleitung und der mitgeltenden Dokumente, z.B. der Datenblätter. Alle anderen Anwendungen sind nur nach Freigabe der Firma R. STAHL bestimmungsgemäß. Qualifikation des Personals Für die in dieser Betriebsanleitung beschriebenen Tätigkeiten ist eine entsprechend qualifizierte Fachkraft erforderlich. -
Page 6: Restrisiken
▶ Gerät nur in Originalverpackung oder gleichwertiger, stabiler Verpackung transportieren. ▶ Verpackung und Gerät auf Beschädigung prüfen. Beschädigungen umgehend an R. STAHL melden. Beschädigtes Gerät nicht in Betrieb nehmen. ▶ Gerät nicht belasten. ▶ Gerät in Originalverpackung, trocken (keine Betauung), in stabiler Lage und sicher vor Erschütterungen lagern. -
Page 7: Gr 4 Transport Und Lagerung
Abstand von mindestens 50 mm (Fadenmaß) einhalten. ▶ Gerät nicht ändern oder umbauen. ▶ Reparaturen am Gerät nur durch R. STAHL durchführen lassen. ▶ Gerät nur mit feuchtem Tuch und ohne kratzende, scheuernde oder aggressive Reinigungsmittel oder Lösungen schonend reinigen. -
Page 8: Produktauswahl Und Projektierung
Produktauswahl und Projektierung Produktauswahl und Projektierung Die Erdungskabel, Zangen und Aufrollautomatiken (siehe Datenblatt) müssen zusätzlich bestellt werden (nicht im Lieferumfang enthalten). GEFAHR! Explosionsgefahr durch nachträgliche, komplette Lackierung des Geräts! Nichtbeachten führt zu tödlichen oder schweren Verletzungen. ▶ Gerät nicht lackieren. ▶... -
Page 9: Installation
Montage und Installation ▶ Das Gerät vertikal montieren (Kabelverschraubungen unten). ▶ Das Gerät mit 4 Schrauben befestigen (M10 mit Anzugsmoment: 35 ... 40 Nm). ▶ Sicherstellen, dass die angeschlossene Zange mit Kabel, Spiralkabel oder Aufrollautomatik sicher und gegen Zugkräfte geschützt abgelegt werden kann. Installation Bei Betrieb unter erschwerten Bedingungen wie insbesondere auf Schiffen sind zusätzliche Maßnahmen zur korrekten Installation je nach Einsatzort zu treffen. - Page 10 Montage und Installation 6.2.3 Elektrische Anschlüsse / Prinzipschaltbild Anschlussklemmen auf der Leiterplatte PE PE RE 1 RE 2 RE 3 RE 4 K1 GND K2 20477E00 Klemme Beschreibung PIN-Nr. Hilfsenergieanschluss 1 = L Hinweis: Bei DC Anschluss an die Klemmen L und N spielt die 2 = N Polarität keine Rolle.
- Page 11 Montage und Installation 6.2.4 Anschlussbilder Die Verdrahtung muss entsprechend der folgenden Anschlussbilder durchgeführt werden. Im Falle von unzureichender Erdung ist es möglich, Klemme Nr. 4 der Klemmleiste XC1 "Speisung" mit dem PE-Anschlusspunkt vom Gehäuse des 8485 zu verbinden, um eine korrekte Funktion sicherzustellen. 6.2.4.1 Elektrischer Anschlussplan für Tanklastwagen und Schienenfahrzeuge Hilfsenergie Relaisausgang R1 für K1...
- Page 12 Montage und Installation 6.2.4.2 Elektrischer Anschlussplan für FIBC (Big Bag) Hilfsenergie Relaisausgang R1 für K1 Relaisausgang R2 für 10 Ω Power supply Relay Output R1 for K1 Relay Output R2 for 10Ω Anschluss der Zange Connection of the clamp Zange K1 Kabel oder Aufrollautomatik Clamp K1 Cable or automatic retractor (reel)
- Page 13 Montage und Installation 6.2.6 Anschluss der Stromversorgung ▶ 20481E00 Das Stromversorgungskabel durch die Kabelverschraubung (siehe Abbildung, Anschluss 1) und durch den EMV-Ferrit in das Gehäuse einführen. ▶ Die Adern des Stromversorgungskabels an der Klemme XC1 anschließen. Beim Anschluss von DC an die Klemmen L und N spielt die Polarität keine Rolle (Verpolschutz).
- Page 14 Montage und Installation 6.2.8 Anschluss des Erdungskabels Anschluss des Erdungskabels für Tanklastwagen und Schienenfahrzeug entsprechend Kapitel 6.2.4.1 ▶ Den Kabelschuh / die Kabelschuhe auf dem rechten Anschlussbolzen befestigen (Anzugsdrehmomente 10 Nm). Dabei die Anordnung der Unterlegscheiben und des Sprengrings beachten (siehe Bild unten). ▶...
- Page 15 Montage und Installation 6.2.9 Anschluss der Aufrollautomatik Anschluss der Aufrollautomatik für Tanklastwagen und Schienenfahrzeug entsprechend Kapitel 6.2.4.1 ▶ Zusätzliche Kabelverschraubung in das Gehäuse einschrauben (siehe Abbildung Kapitel 6.2.6, Pos. 1, Anzugsdrehmoment 25 Nm). Sicherstellen, dass eine Dichtung zwischen Gehäuse und Kabelverschraubung montiert wird.
- Page 16 Montage und Installation 6.2.10 Anschluss des Erdungspunkts an den Potentialausgleich PA ▶ 20467E00 Den äußeren PA‐Punkt (Erdungsbolzen) des Gehäuses über eine gelb‐grüne PE‐Leitung (min. 4 mm ) mit der Potentialausgleichsschiene der Verladeplattform verbinden und verschrauben (Anzugsdrehmoment für den äußeren PA-Punkt (Erdungsbolzen): 8 Nm). 6.2.11 Verschließen des Gehäuses ▶...
-
Page 17: Parametrierung Und Inbetriebnahme
Parametrierung und Inbetriebnahme Parametrierung und Inbetriebnahme Vor Inbetriebnahme folgende Prüfschritte durchführen: ▶ Gehäuse auf Schäden prüfen. ▶ Montage und Installation auf korrekte Durchführung prüfen. Dabei prüfen, ob alle Abdeckungen und Trennwände an spannungsführenden Teilen vorhanden und befestigt sind. ▶ Sicherstellen, dass alle Öffnungen/Bohrungen im Gehäuse mit dafür zulässigen Komponenten verschlossen sind. - Page 18 Parametrierung und Inbetriebnahme 7.1.2 Kommunikation mittels Bluetooth 22945E00 Die Bluetooth-Schnittstelle des Erdungsüberwachungsgeräts kann mit einem DIP-Schalter (1) eingeschaltet werden (Werkeinstellung: deaktiviert). Im aktivierten Zustand leuchtet die blaue LED (2). 7.1.3 Konfiguration mittels Software Die Konfigurationssoftware wird verwendet, um das Erdungsüberwachungsgerät einzustellen sowie den aktuellen Status und die Werte des A/D-Wandlers vom Erdungsüberwachungsgerät auszulesen.
- Page 19 Parametrierung und Inbetriebnahme 7.1.4 Installation der Konfigurationssoftware Software R. STAHL 8485 ▶ USB-Stick in einen Port Ihres PCs stecken und die Installationsdatei setup.exe ausführen. ▶ Den Anweisungen am Bildschirm folgen. Nach der Software-Installation werden die USB-Treiber "FT232R USB UART" und den USB Serial Port installiert.
- Page 20 Parametrierung und Inbetriebnahme 7.1.6 Aufbau der Kommunikation Kommunikation mittels Infrarot-Adapter ▶ Infrarot-Adapter des Konfigurationssets mit einem USB-Port des PCs verbinden. ▶ Anwendung "Systemsteuerung > Gerätemanager > Anschlüsse (COM & LPT)" öffnen. ▶ Eintrag "USB Serial Port" suchen und die angegebene COM-Port-Nummer (z.B. COM 20) merken.
- Page 21 Parametrierung und Inbetriebnahme 7.1.7 Einstellung der Grenzwerte 22947E00 Legende = Seriennummer = Ausgewählter Kommunikationsport = Firmware-Version = Auswahl Kommunikationsschnittstelle = Statuszeile = Status roter Leuchtmelder = Messwert = Status grüner Leuchtmelder = Grenzwerte = Verbinden / Trennen der Kommunikation = Übertragung der Werte = Statusanzeige Kommunikation = Sprachversion Die Grenzwerte können durch Eingabe der Werte in die entsprechenden Felder und...
- Page 22 Parametrierung und Inbetriebnahme Gerätedaten auslesen ▶ Schaltfläche "Nachladen" klicken, um Anzeige der Parameter zu aktualisieren. Tanklastwagen Der Wert 10 ... 160 (Standardeinstellung) entspricht in der Einstellung "Tanklastwagen" einer realen Impedanz von ca. 50 ... 3000 Ω. Der typische Wert eines Tanklastwagens beträgt 50 ...
- Page 23 Parametrierung und Inbetriebnahme 7.1.10 Einstellung zusätzlicher Parameter Diese Betriebsart erlaubt die Veränderung von zusätzlichen Einstellungen. ▶ Auf das Feld "Servicemodus" klicken. ▶ PIN für das Gerät eingeben. Standardeinstellung: 123456. 22948E00 Legende = Bereich für Einstellung zusätzlicher Parameter Aktiv / Inaktiv Durch die Aktivierung des Feldes "Aktiv/Inaktiv"...
-
Page 24: Betrieb
Betrieb Simulation von Relais Das Relais kann unabhängig vom angezeigten Status der Zange ein- oder ausgeschaltet werden. Das Relais wird eingeschaltet, wenn das Feld "Simulation von Relais" aktiviert wird. Die Aktivierung der manuellen Relaissteuerung wird am Gerät angezeigt, indem der grüne und der rote Leuchtmelder im Abstand von 1 Sekunde ein- und ausgeschaltet werden. - Page 25 Betrieb Wenn die Zange am Objekt angeschlossen ist, ist das Objekt unabhängig von der Anzeige am Erdungsüberwachungsgerät elektrostatisch geerdet. Vor dem Einsatz sind die Geräte über einen DIP-Schalter passend zum entsprechenden Erdungsobjekt zu konfigurieren. 8.2.1 Verwendung des Erdungsüberwachungsgeräts für Tanklastwagen Elektrischer Anschlussplan, siehe Kapitel 6.2.4.1.
- Page 26 Betrieb Grüner Leuchtmelder leuchtet oder blinkt (Werkseinstellung: Dauerlicht) = Korrekte Erdung vorhanden. • Tank (über Zange) angeschlossen und die Impedanz des Systems liegt zwischen 50 ... 3000 Ω. Die elektrostatische Aufladung wird abgeleitet. Das Relais R1 (RE1 & RE2) zieht nach 5 Sekunden an. Verladearm Filling Arm Tanklastzug...
- Page 27 Betrieb 8.2.2 Verwendung des Erdungsüberwachungsgeräts für Schienenfahrzeuge Elektrischer Anschlussplan, siehe Kapitel 6.2.4.1. Einstellung der Grenzwerte, siehe Kapitel 7.1.7. Anzeige Erdungsüberwachungsgerät Der rote bzw. der grüne Leuchtmelder auf der Frontseite des Geräts zeigen an, ob das Gerät eine korrekte Erdung erkennt. Es leuchtet nur einer der beiden Leuchtmelder. Roter Leuchtmelder leuchtet = keine korrekte Erdung vorhanden.
-
Page 28: Anzeigen
Verladearm mit dem Objekt verbinden. Wenn sich der Fehler mit den genannten Vorgehensweisen nicht beheben lässt: ▶ An R. STAHL Schaltgeräte GmbH wenden. Zur schnellen Bearbeitung folgende Angaben bereithalten: • Typ und Seriennummer des Geräts • Revision-Nr./Firmware-Version • Kaufdaten •... -
Page 29: Instandhaltung, Wartung, Reparatur
▶ Rücksendung bzw. Verpackung der Geräte nur in Absprache mit R. STAHL durchführen! Dazu mit der zuständigen Vertretung von R. STAHL Kontakt aufnehmen. Für die Rücksendung im Reparatur- bzw. Servicefall steht der Kundenservice von R. STAHL zur Verfügung. ▶ Kundenservice persönlich kontaktieren. -
Page 30: Reinigung
Umweltgerechte Entsorgung aller Bauteile gemäß den gesetzlichen Bestimmungen sicherstellen. Zubehör und Ersatzteile HINWEIS! Fehlfunktion oder Geräteschaden durch den Einsatz nicht originaler Bauteile. Nichtbeachten kann zu Sachschäden führen. ▶ Nur Original-Zubehör und Original-Ersatzteile der R. STAHL Schaltgeräte GmbH (siehe Datenblatt) verwenden. Erdungsüberwachungsgerät 204166 / 848560300010 Reihe 8485 2021-08-06·BA00·III·de·12... -
Page 31: Anhang A
Anhang A Anhang A 14.1 Technische Daten Explosionsschutz Global (IECEx) Gas und Staub IECEx FTZU 15.0031X Ex db ib [ib] IIB T4 Gb Ex ib [ib] tb IIIC T130 °C Db Europa (ATEX) Gas und Staub FTZU 09 ATEX 0059X E II 2 G Ex db ib [ib] IIB T4 Gb E II 2 D Ex ib [ib] tb IIIC T130 °C Db Bescheinigungen und Zertifikate... - Page 32 Anhang A Technische Daten Funktionsweise LED Anzeige Zustand der Erdung Reaktion des Erdungs- überwachungsgerätes Zange nicht Erdung fehlerhaft angeschlossen, • roter Leuchtmelder Gerät im R1 R2 Ruhezustand • grüner Leucht- melder AUS • Relais R1 und R2 20331E00 sind abgefallen Zange direkt mit Erdung fehlerhaft Erde verbunden,...
- Page 33 - CMP-20ST3CDS (10 ... 15 mm Art. Nr. 246560 - Dichtung M20 Art. Nr. 111778 - Schutzdach aus Edelstahl 8298/05-111 Art. Nr. 226972 - Montageset für Schutzdach Art. Nr. 230051 Weitere technische Daten, siehe r-stahl.com. 204166 / 848560300010 Erdungsüberwachungsgerät 2021-08-06·BA00·III·de·12 Reihe 8485...
-
Page 34: Anhang B
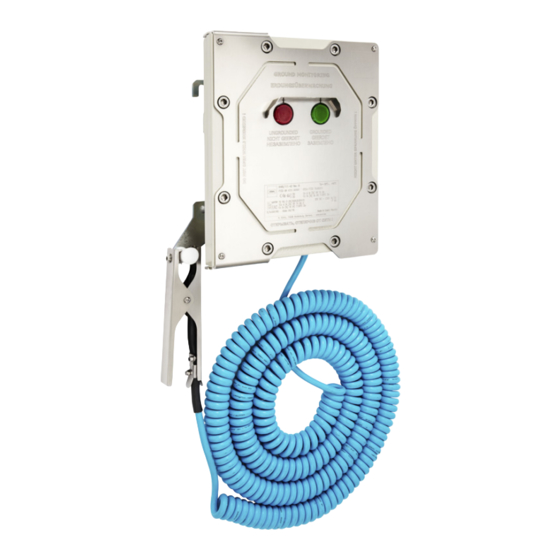
Anhang B Anhang B 15.1 Geräteaufbau 20465E00 Gerätelement Beschreibung Kabelverschraubung M20 Anschluss der Hilfsenergie Kabelverschraubung M20 Anschluss der potentialfreien Kontakte Kabelverschraubung M20 Anschluss der Erdungszange mit Kabel oder Aufrollautomatik Isolierter Aufhängepunkt Für sichere Verstauung der Zange Roter Leuchtmelder Signalisierung "Erdung nicht vorhanden" Grüner Leuchtmelder Signalisierung "Erdung vorhanden"... -
Page 35: 15.2 Maßangaben / Befestigungsmaße
Anhang B 15.2 Maßangaben / Befestigungsmaße Maßzeichnungen (alle Maße in mm [Zoll]) – Änderungen vorbehalten 55 10,04 291 11,46 20488E00 270,50 [10,65] 520 [20,47] 158 [6,22] 112,50 [4,43] 40 [1,57] 110 [4,33] 80 [3,15] ø 7 ø 7 [ 0,28] ø... - Page 36 Anhang B Maßzeichnungen (alle Maße in mm [Zoll]) – Änderungen vorbehalten 20366E00 Erdungszange mit Kabel-Aufrollautomatik (Art. Nr. 269915) 19141E Erdungszange (Art. Nr. 247675) Erdungsüberwachungsgerät 204166 / 848560300010 Reihe 8485 2021-08-06·BA00·III·de·12...
- Page 37 Operating instructions Additional languages r-stahl.com Grounding monitoring device Series 8485...
- Page 38 Contents Contents General Information .....................3 Manufacturer......................3 About these Operating Instructions..............3 Further Documents ....................3 Conformity with Standards and Regulations............3 Explanation of Symbols ..................4 Symbols used in these Operating Instructions.............4 Symbols on the Device ..................4 Safety........................5 Intended Use......................5 Personnel Qualification ..................5 Residual Risks .....................6 Transport and Storage ..................7 Product Selection and Project Engineering ............8 Variants........................8...
-
Page 39: General Information
Make the operating instructions accessible to operating and maintenance staff at all times. ▶ Pass the operating instructions on to each subsequent owner or user of the device. ▶ Update the operating instructions every time R. STAHL issues an amendment. ID no.: 204166 / 848560300010 Publication code: 2021-08-06·BA00·III·en·12... -
Page 40: Explanation Of Symbols
Explanation of Symbols Explanation of Symbols Symbols used in these Operating Instructions Symbol Meaning Handy hint for making work easier Dangerous situation which can result in fatal or severe injuries DANGER! causing permanent damage if the safety measures are not complied with. -
Page 41: Se Fi
Specialists who perform these activities must have a level of knowledge that meets applicable national standards and regulations. Additional knowledge is required for any activity in hazardous areas! R. STAHL recommends having a level of knowledge equal to that described in the following standards: •... -
Page 42: Residual Risks
▶ Transport the device only in its original packaging or in equivalent, stable packaging. ▶ Check the packaging and the device for damage. Report any damage to R. STAHL immediately. Do not commission a damaged device. ▶ Do not place any loads on the device. -
Page 43: Gr 4 Transport And Storage
▶ Do not change or modify the device. ▶ Repair work on the device must be performed only by R. STAHL. ▶ Gently clean the device with a damp cloth only – do not use scratching, abrasive or aggressive cleaning agents or solutions. -
Page 44: Product Selection And Project Engineering
Product Selection and Project Engineering Product Selection and Project Engineering The grounding cable, clamps and automatic winder (see data sheet) must be ordered additionally (not included in delivery). DANGER! Explosion hazard if the entire device is painted after receipt from the manufacturer. -
Page 45: Installation
Mounting and Installation ▶ Mount the device vertically (cable glands at the bottom). ▶ Secure the device using 4 screws (M10 with tightening torque: 35 to 40 Nm). ▶ Ensure that the connected clamp with cable, spiral cable or automatic winder can be put down safely and such that it is protected against tensile forces. - Page 46 Mounting and Installation 6.2.3 Electrical Connections/Schematic Diagram Connection terminals on the PCB PE PE RE 1 RE 2 RE 3 RE 4 K1 GND K2 20477E00 Terminal Description Pin no. Auxiliary power connection 1 = L Note: When connecting DC to terminals L and N, the polarity is 2 = N irrelevant.
- Page 47 Mounting and Installation 6.2.4 Connection Diagrams The wiring must be performed corresponding to the following connection pictures. In the case of insufficient grounding, it is possible to connect terminal no. 4 of the terminal strip XC1 "Supply" to the PE connecting point of the enclosure of the 8485 in order to ensure a correct function.
- Page 48 Mounting and Installation 6.2.4.2 Electric Connection Diagram for FIBC (big bag) Hilfsenergie Relaisausgang R1 für K1 Relaisausgang R2 für 10 Ω Power supply Relay Output R1 for K1 Relay Output R2 for 10Ω Anschluss der Zange Connection of the clamp Zange K1 Kabel oder Aufrollautomatik Clamp K1...
- Page 49 Mounting and Installation 6.2.6 Connection of the Power Supply ▶ 20481E00 Insert the power supply cable through the cable gland (see figure, connection 1) and through the EMC ferrite into the enclosure. ▶ Connect the cores of the power supply cable to the terminal XC1. When connecting DC to terminals L and N, the polarity is irrelevant (polarity reversal protection).
- Page 50 Mounting and Installation 6.2.8 Connecting the Grounding Cable Connecting the grounding cable for road tankers and rail vehicles in accordance with chapter 6.2.4.1 ▶ Fit the cable lug/cable lugs to the right connecting bolt (tightening torques 10 Nm). When doing so, observe the arrangement of the washers and snap ring (see image below).
- Page 51 Mounting and Installation 6.2.9 Connecting the Automatic Winder Connecting the automatic winder for road tankers and rail vehicles in accordance with chapter 6.2.4.1 ▶ Screw an additional cable gland into the enclosure (see figure in chapter 6.2.6, item 1, tightening torque 25 Nm). Ensure that a seal is fitted between the enclosure and cable gland.
- Page 52 Mounting and Installation 6.2.10 Connecting the Grounding Point to the Equipotential Bonding Bar ▶ 20467E00 Connect the external grounding point (ground bolt) on the enclosure via a yellow-green PE electrical line (min. 4 mm ) to the equipotential bonding bar on the loading platform and screw it down (tightening torque for the external grounding point (ground bolt): 8 Nm).
-
Page 53: Parameterisation And Commissioning
Parameterisation and Commissioning Parameterisation and Commissioning Before commissioning, carry out the following checks: ▶ Check the enclosure for damage. ▶ Check that mounting and installation have been performed correctly. When doing so, check whether all coverings and partitions for live components have been installed and fastened. - Page 54 Parameterisation and Commissioning 7.1.2 Communication using Bluetooth 22945E00 The Bluetooth interface of the grounding monitoring device can be switched on using a DIP switch (1) (factory setting: Deactivated). The blue LED (2) lights up when activated. 7.1.3 Configuration using Software The configuration software is used to adjust the grounding monitoring device as well as to read out the current status and values of the A/D converter from the grounding monitoring device.
- Page 55 Parameterisation and Commissioning 7.1.4 Installing the Configuration Software R. STAHL 8485 software ▶ Insert the USB stick into a port of your PC and run the installation file setup.exe. ▶ Follow the instructions on the screen. After the software installation, the USB driver "FT232R USB UART" and the USB serial port will be installed.
- Page 56 Parameterisation and Commissioning 7.1.6 Communication Structure Communication using infrared adapter ▶ Connect the infrared adapter from the configuration kit to a USB port on the PC. ▶ Open the "Control panel > Device Manager > Ports (COM & LPT)" application. ▶...
- Page 57 Parameterisation and Commissioning 7.1.7 Adjusting the Limiting Values 22947E00 Legend = Serial number = Selected communication port = Firmware version = Communication interface selection = Status bar = Red indicator lamp status = Measured value = Green indicator lamp status = Limiting values = Connect/disconnect communication...
- Page 58 Parameterisation and Commissioning Reading out device data ▶ Click on the "Reload" button to update the parameter display. Road tanker The value of 10 to 160 (standard setting) corresponds to a real impedance of approx. 50 to 3000 Ω in the "Road tanker" setting. The typical value for a road tanker is between 50 and 60.
- Page 59 Parameterisation and Commissioning 7.1.10 Adjusting additional Parameters This operating mode enables additional settings to be changed. ▶ Click on "Service mode". ▶ Enter the PIN for the device. Standard setting: 123456. 22948E00 Legend = Range for adjusting additional parameters Active/inactive By activating the "Active/Inactive"...
-
Page 60: Operation
Operation Simulation of Relay The relay can be switched on and off independently of the displayed status of the clamp. The relay is switched on when the "Simulation of Relay" field is activated. Activation of the manual relay control is indicated on the device in the form of the green and red indicator lamps switching on and off at intervals of 1 second. - Page 61 Operation When the clamp is connected to the object, the object is electrostatically grounded independently from the display on the grounding monitoring device. Before use, the devices must be configured using a DIP switch suitable for the corresponding grounding object. 8.2.1 Use of the Grounding Monitoring Device for Road Tankers For the electric connection diagram, see chapter 6.2.4.1.
- Page 62 Operation Green Indicator lamp lights up or flashes (factory setting is continuous light) = correct grounding is present. • Tank is connected (via clamp) and the impedance of the system is between 50 and 3000 Ω. The electrostatic charge is dissipated. The relay R1 (RE1 & RE2) is energised after 5 seconds.
- Page 63 Operation 8.2.2 Use of the Grounding Monitoring Device for Rail Vehicles For the electric connection diagram, see chapter 6.2.4.1. To adjust the limiting values, see chapter 7.1.7. Grounding monitoring device display The red or green indicator lamps on the front side of the device indicate whether the device detects correct grounding.
-
Page 64: Displays
If the error cannot be eliminated using the specified procedures: ▶ Contact R. STAHL Schaltgeräte GmbH. For rapid processing, have the following information ready: • Type and serial number of the device • Revision no./firmware version •... -
Page 65: Maintenance, Overhaul, Repair
Returning the Device ▶ Only return or package the devices after consulting R. STAHL! Contact the responsible representative from R. STAHL. R. STAHL's customer service is available to handle returns if repair or service is required. ▶ Contact customer service personally ▶... -
Page 66: Cleaning
NOTICE! Malfunction or damage to the device due to the use of non-original components. Non-compliance can result in material damage. ▶ Use only original accessories and spare parts from R. STAHL Schaltgeräte GmbH (see data sheet). Grounding monitoring device 204166 / 848560300010 Series 8485 2021-08-06·BA00·III·en·12... -
Page 67: 14.1 Technical Data
Appendix A Appendix A 14.1 Technical Data Explosion protection Global (IECEx) Gas and dust IECEx FTZU 15.0031X Ex db ib [ib] IIB T4 Gb Ex ib [ib] tb IIIC T130 °C Db Europe (ATEX) Gas and dust FTZU 09 ATEX 0059X E II 2 G Ex db ib [ib] IIB T4 Gb E II 2 D Ex ib [ib] tb IIIC T130 °C Db Certifications and certificates... - Page 68 Appendix A Technical data Function LED display Grounding status Reaction of grounding monitoring device Clamp not connected, Grounding defective device not used • Red indicator lamp R1 R2 • Green indicator lamp OFF • Relays R1 and R2 20331E00 are de-energised Clamp is directly Grounding defective connected to ground,...
- Page 69 - M20 seal Art. No. 111778 - protective roof made of stainless steel 8298/05-111 Art. No. 226972 - assembly kit for protective roof Art. No. 230051 For further technical data, see r-stahl.com. 204166 / 848560300010 Grounding monitoring device 2021-08-06·BA00·III·en·12 Series 8485...
-
Page 70: 15.1 Device Design
Appendix B Appendix B 15.1 Device Design 20465E00 Device element Description M20 cable gland Auxiliary power connection M20 cable gland Potential-free contacts connection M20 cable gland Connection for grounding clamp with cable or automatic winder Insulated suspension point For safe stowage of the clamp Red indicator lamp Signalling "Grounding not present"... -
Page 71: 15.2 Dimensions/Fastening Dimensions
Appendix B 15.2 Dimensions/Fastening Dimensions Dimensional drawings (all dimensions in mm [inches]) – Subject to change 55 10,04 291 11,46 20488E00 270,50 [10,65] 520 [20,47] 158 [6,22] 112,50 [4,43] 40 [1,57] 110 [4,33] 80 [3,15] ø 7 ø 7 [ 0,28] ø... - Page 72 Appendix B Dimensional drawings (all dimensions in mm [inches]) – Subject to change 20366E00 Grounding clamp with automatic winder for cable (Art. No. 269915) 19141E Grounding clamp (Art. No. 247675) Grounding monitoring device 204166 / 848560300010 Series 8485 2021-08-06·BA00·III·en·12...
Need help?
Do you have a question about the 8485 Series and is the answer not in the manual?
Questions and answers