Table of Contents
Advertisement
Advertisement
Table of Contents

Related Manuals for KaVo RONDOflex plus 360


Summary of Contents for KaVo RONDOflex plus 360
- Page 1 Instructions for use RONDOflex plus 360...
- Page 2 Sales: Manufacturer: KaVo Dental GmbH Kaltenbach & Voigt GmbH Bismarckring 39 Bismarckring 39 D-88400 Biberach D-88400 Biberach Tel. +49 7351 56-0 www.kavo.com Fax +49 7351 56-1488...
-
Page 3: Table Of Contents
Contents Contents Contents ................................. 1 User instructions ..............................4 Purpose – Proper use ............................6 Instructions ................................8 Warranty terms and conditions .......................... 10 Safety ................................... 12 Description of safety instructions ........................12 Description of safety instructions: Warning symbol ..................12 Description of safety instructions: Structure .................... - Page 4 Contents Transportation and storage conditions ......................23 First use ................................24 Checking the MULTIflex Coupling ........................25 Changing the RONDOflex plus ......................... 26 Changing the RONDOflex plus: Mounting ....................26 Changing the RONDOflex plus: Disconnection ................... 27 Filling the powder container ..........................28 Changing the cannula ............................
- Page 5 Contents Disinfection ................................ 39 Drying ................................42 Care products and systems ..........................43 Packaging ................................44 Sterilisation ................................ 45 Storage ................................47 Accessories ................................48...
-
Page 6: User Instructions
User instructions User instructions Dear user, KaVo hopes that you enjoy your new high-quality product. Following the instructions below will allow you to work smoothly, economically and safely. Symbols See the section Safety/Warning Symbol Important information for users and technicians... - Page 7 User instructions Sterilisable up to 138°C CE mark (Communauté Européenne). A product with this mark meets the requirements of the relevant EC directives, i.e. the ap‐ plicable standards in Europe. Action request Target group This document is intended for dentists and their assistants. The section on starting up is also intended for service technicians.
-
Page 8: Purpose - Proper Use
User instructions Purpose – Proper use The RONDOflex plus is an air abrasion system that accelerates aluminium oxide particles in an air jet to a high speed to abrade material from the surface of teeth. The RONDOflex plus is suitable for the following indications: ▪... - Page 9 User instructions ▪ only for dental treatment by a dental professional. The product may not be changed or used for any other purpose since this may be hazar‐ dous. ▪ A medical device according to relevant national statutory regulations. According to these provisions, this medical device may only be used for the described application by a knowledgeable user.
-
Page 10: Instructions
User instructions Instructions Practice creating a cavity in a disposable mirror with the RONDOflex plus to familiarize yourself with the device. Use surgical loupes or a microscope to check the minimally invasive work. Note It is recommendable to use a disposable mirror during treatment. To create cavities ▶... - Page 11 User instructions To roughen surfaces, for example adhesive surfaces of brackets ▶ Use a brushing motion ▶ Distance: 1 mm ▶ Hold the powder jet perpendicular to the surface of the tooth Extraoral use You can of course also use the RONDOflex plus outside of the oral cavity. When for example adhesive residue needs to be removed from crowns.
-
Page 12: Warranty Terms And Conditions
12 months from date of invoice, subject to the following conditions: In case of justified complaints, KaVo will honour its warranty with a repair or free replacement. Other claims of any nature whatsoever, in particular with respect to compensation, are excluded. - Page 13 Defects or their consequences that can be attributed to interventions on or changes made to the product by the customer or a third party not authorised by KaVo are excluded from the warranty. Service warranty claims will only be accepted if the product is submitted along with proof of purchase in the form of a copy of the invoice/delivery note.
-
Page 14: Safety
Safety Description of safety instructions: Warning symbol Warning symbol... -
Page 15: Description Of Safety Instructions: Structure
Safety Description of safety instructions: Structure The introduction describes the type and source of the hazard. This section describes the potential consequences of non-observance. ▶ The optional step contains necessary measures for avoiding hazards. DANGER... -
Page 16: Description Of Safety Instructions: Description Of Hazardous Steps
Safety Description of safety instructions: Description of hazardous steps The herein cited safety instructions with the three levels of danger will help avert property damage and injury. CAUTION indicates a hazardous situation that can lead to property damage or minor to moderate injury. - Page 17 Safety DANGER indicates a maximum hazardous situation that can directly cause serious injury or death. DANGER...
-
Page 18: Safety Instructions
Safety Safety instructions Premature wear and malfunction due to improper storage or longer peri‐ ods of nonuse. Reduced product life. CAUTION ▶ The medical device should be cleaned, serviced and placed in a dry stored location according to instructions before long periods of non‐ use. - Page 19 Safety Hazard from aerosols. Infection from aerosols. ▶ Never work without safety goggles, a dust mask (P 2), protective glo‐ CAUTION ves, particle-impervious clothes and a hood. ▶ We recommend using a dental dam and a dust extraction system. Damage from soiled and moist compressed air. Contaminated and moist compressed air can cause malfunctions and lead to premature bearing wear.
- Page 20 Safety Hazard from the jet directly contacting the gingiva and the insufflation of blown air into open wounds. This can cause injury, air embolisms as well as skin emphysema. CAUTION ▶ Keep the jet from directly contacting the gingiva and avoid the insuf‐ flation of blown air into open wounds.
- Page 21 Rinse parts insensitive to moisture under flowing water to remove residual powder. The following individuals are authorised to repair and service KaVo pro‐ ducts: ▪ The technicians of KaVo branches throughout the world ▪...
-
Page 22: Product Description
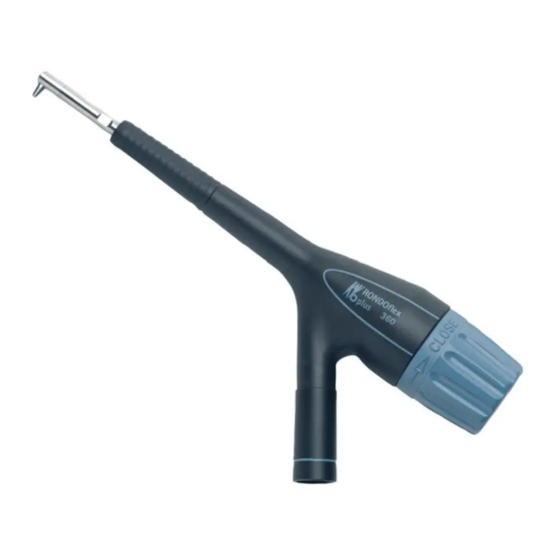
Product description Product description RONDOflex plus 360, Mat. no. 1.002.2179... -
Page 23: Technical Data
Product description Technical data Drive pressure 3.2 - 6.0 bar Water pressure 1,5 ± 0,1 bar Air consumption 5 - 11 Nl/min depending on the type of cannula Water quantity 35-45 ml/min. Connection: Attachable to all MULTIflex coup‐ lings. Note The pressure set for the turbine drive is automatically increased 20%, from 2.8 to 3.2 bar. - Page 24 Product description Have a service technician regularly check the manufacturer's recommen‐ ded pressure for your unit to ensure that the instruments function properly.
-
Page 25: Transportation And Storage Conditions
Product description Transportation and storage conditions Hazard from starting the medical device after very cold storage. The medical device can malfunction. ▶ Products that are very cold must be warmed to 20°C to 25°C before CAUTION use. Temperature: -50 °C to 80°C Relative humidity: Non-condensing Air pressure: 700 hPa to 1060 hPa Protect from moisture. -
Page 26: First Use
First use First use Hazard from nonsterile products. Infection danger to the care provider and patient. ▶ Before first use and after each treatment, sterilize the medical device. WARNING... -
Page 27: Checking The Multiflex Coupling
First use Checking the MULTIflex Coupling All O-rings must be present and undamaged. Missing or damaged O-rings If the O-rings are missing or damaged, malfunctions and premature failure can occur. CAUTION ▶ Check that all O-rings are present and undamaged on the coupling. -
Page 28: Changing The Rondoflex Plus
First use Changing the RONDOflex plus: Mounting ▶ Place the RONDOflex plus precisely on the MULTIflex coupling and push it to the back until it audibly locks into place. Note Pull on the RONDOflex plus to check its seat on the MULTlflex coupling. -
Page 29: Changing The Rondoflex Plus: Disconnection
First use Changing the RONDOflex plus: Disconnection ▶ Grasp the MULTIflex coupling, and pull the RONDOflex plus forward twisting slightly. -
Page 30: Filling The Powder Container
First use Filling the powder container ▶ Unscrew the powder container to the left against the direction of the arrow. ▶ Fill the powder container half way with RONDOflex powder (20 g). ▶ Screw on the powder container straight on to the right in the direction of the arrow. - Page 31 If you do not need the powder container, close it with the rubber cover. ▶ Only use original KaVo RONDOflex powder. CAUTION Note Observe the safety datasheet for the RONDOflex 2013 powder 50 µm and 27 µm! This can be found at www.kavo.comby searching for "Safety data sheets".
-
Page 32: Changing The Cannula
First use Changing the cannula: Insertion ▶ Before inserting the cannula, blow out the receiving hole with com‐ pressed air. ▶ Insert the cannula into the handpiece, and turn it all the way to the right with the key opposite the direction of the arrow. - Page 33 First use The marks must be adjacent; otherwise the cannula can come loose. If the cannula comes off during treatment, it could substantially endanger the patient and user. CAUTION ▶ Pull on the cannula each time before treatment and check its seat. ▶...
-
Page 34: Changing The Cannula: Removal
First use Changing the cannula: Removal ▶ Turn the cannula with the key all the way to the left in the direction of the arrow, and remove it. -
Page 35: Check For Malfunctions
Check for malfunctions Check for malfunctions ▶ The distance to the tooth surface is too far ▶ When preparing cavities, "paint" with the tip ▶ The caries lesions are too large since the kinetic energy of the powder particles is lost due to the soft caries material ▶... -
Page 36: Setup Methods According To Din En Iso 17664
Setup methods according to DIN EN ISO 17664 Preparation at the site of use Hazard from nonsterile products. An infection hazard exists from contaminated medical devices. ▶ Observe suitable personal protective measures. CAUTION ▶ Remove residual cement, composite or blood at the Site of use . ▶... -
Page 37: Cleaning
Setup methods according to DIN EN ISO 17664 Cleaning Malfunctions from cleaning in the ultrasonic unit. Defects in the product. ▶ Only clean manually! CAUTION Malfunction from cleaning with oils or maintenance spray. Defective product. ▶ Do not clean the medical device with oils or maintenance of spray. CAUTION Manually cleaning the outside Necessary accessories:... - Page 38 ISO 15883-1. (The interior of this product is not to be cleaned manually). Mechanically cleaning the exterior and interior KaVo recommends thermodesinfectors in accordance with DIN EN ISO 15883 such as the Miele G 7781/ G 7881.
- Page 39 Setup methods according to DIN EN ISO 17664 (Validation was performed with the program "VARIO-TD", the cleaner "ne‐ odisher mediclean", the neutraliser "neodisher Z" and rinse "neodisher ® ® ® mielclear"). ▶ The program settings and cleansers and disinfectants that must be used can be found in the instructions for use of the thermodisinfector.
-
Page 40: Cleaning: Cleaning The Cannulas
Setup methods according to DIN EN ISO 17664 Cleaning: Cleaning the cannulas ▶ Remove the cannulas. ▶ Twist the nozzle needle from the front and then from the back into the cannula. ▶ Remove the nozzle needle, and blow out the cannula with compressed air. -
Page 41: Disinfection
CAUTION ▶ Only clean manually or in the thermodesinfector! Manually disinfecting the exterior KaVo recommends the following products based on material compatibility. The microbiological efficacy must be ensured by the disinfectant manufac‐ turer. ▶ Microcide AF by Schülke&Mayr (liquid or cloths) ▶... - Page 42 Setup methods according to DIN EN ISO 17664 Cloths for wiping off the medical device. Spray the disinfectant on a cloth then wipe the medical device and let it work according to the disinfectant manufacturer. Note Observe the instruction for use for the disinfectant. Manual disinfection of the interior To effectively set up, the inside of the machine must be cleaned automati‐...
- Page 43 Setup methods according to DIN EN ISO 17664 Mechanically disinfecting the exterior and interior KaVo recommends thermodesinfectors in accordance with DIN EN ISO 15883 such as the Miele G 7781/ G 7881. (Validation was performed with the program "VARIO-TD", the cleaner "ne‐...
-
Page 44: Drying
Setup methods according to DIN EN ISO 17664 Drying Manual drying ▶ Blow off the outside and inside the compressed air until no water drops are visible. Machine drying The drying procedure is normally part of the disinfection program of the thermodisinfector. -
Page 45: Care Products And Systems
Setup methods according to DIN EN ISO 17664 Care products and systems Insufficient product care. This can cause damage and malfunction. ▶ Before each thermodisinfection or sterilisation, unscrew the powder CAUTION container, empty it and thermodisinfect or sterilise it with the hand‐ piece. -
Page 46: Packaging
Setup methods according to DIN EN ISO 17664 Packaging Note The sterilisation bag must be large enough for the instrument so that the bag is not stretched. The quality and use of the packaging of the items to be sterilised must satisfy the applicable standards and be appropriate for sterilising. -
Page 47: Sterilisation
The medical device has a max. temperature resistance of 138℃. KaVo recommends for example - STERIclave B 2200/ 2200P by KaVo - Citomat/ K-series by Getinge Autoclave three times with an initial vacuum for at least 4 minutes at 134°C... - Page 48 Setup methods according to DIN EN ISO 17664 Autoclave using the gravitation method for at least 10 minutes at 134°C ± Autoclave using the gravitation method for at least 60 minutes at 121°C ± Follow the manufacturer's instructions for use.
-
Page 49: Storage
Setup methods according to DIN EN ISO 17664 Storage Prepared products should be stored protected germ-free from dust in a dry, dark and cool room. Note Observe the expiration date of the sterilised item. -
Page 50: Accessories
Accessories Accessories 1 set consists of Accessories obtainable from dental and medical suppliers. - Page 51 Accessories Designation Mat. no. cannula 110° - 0.64 mm 1.002.6251 cannula 90° - 0.64 mm 1.002.9179 cannula 110° - 0.46 mm 1.002.9176...
- Page 52 Accessories Designation Mat. no. cannula 90° - 0.46 mm 1.002.9182 Wrench 1.002.6250 Powder container 27 μm 1.003.1235 Rubber cover 1.000.2678 Powder 27 μm 1000 g 1.000.5957 Powder 50 μm 1000 g 1.000.5956 Cleaning drill 1.001.3602 Nozzle tube 1.002.9920 Additional accessories Designation Mat.
Need help?
Do you have a question about the RONDOflex plus 360 and is the answer not in the manual?
Questions and answers