Advertisement
Quick Links
INSTALLATION MANUAL
Level of Difficulty
Easy
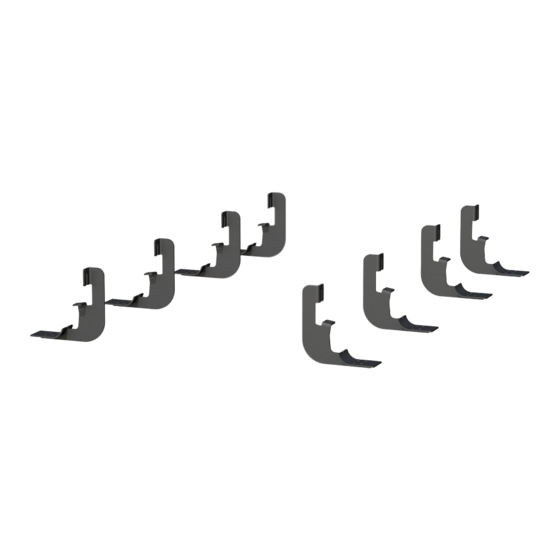
Parts List
2
6" oval side bar
8
Universal bracket
8
Stainless steel bolt plate
32 Flat washer, M6
32 Nylock nut, M6
16
Flat washer, M8
16
Lock washer, M8
16
Hex head cap screw, M8
* Not all hardware may be used.
Some hardware is used for stainless
steel running boards only.
Additional Hardware*
24 T-bolt, M8
24 Flat washer, M8
24 Lock washer, M8
24 Hex nut, M8
* Aluminum side bars are supplied with
additional hardware. Quantities listed are in
addition to the standard supplied hardware.
Tools Required
Socket set
Level
Socket extension
--
Torque Specifications
M6 bolt
3 ft-lbs.
M8 bolt
7 ft-lbs.
Use above torque setting unless otherwise noted
ARIESAUTOMOTIVE.COM
Product Photo
NOTICE
Before you begin installation, read all instructions thoroughly.
Proper tools will improve the quality of installation and reduce the time required.
To help prevent damage to the product or vehicle, refer to the specified
torque specifications when securing hardware during the installation process.
Maintenance
To protect the product, wax after installing. Regular waxing is recommended
to add a protective layer over the finish. Do not use any type of polish or wax
that may contain abrasives that could damage the finish.
For polished, gloss and other smooth finishes,
polish may be used to clear small scratches and scuffs on the finish.
Mild automotive detergent may be used to clean the product. Do not use dish detergent, abrasive
cleaners, abrasive pads, wire brushes or other similar products that may damage the finish.
Product Registration and Warranty
CURT Group stands behind our products with industry-leading warranties.
Provide feedback and help us to improve our products by registering your purchase at:
warranty.curtgroup.com/surveys
•
NEED ASSISTANCE?
•
877.287.8634
Front
•
4499-INS-RA
•
PAGE 1
Rear
4499
Advertisement

Related Manuals for Aries 4499


Summary of Contents for Aries 4499
- Page 1 INSTALLATION MANUAL 4499 Level of Difficulty Product Photo Easy Rear Parts List 6" oval side bar Universal bracket Stainless steel bolt plate 32 Flat washer, M6 32 Nylock nut, M6 Flat washer, M8 Front Lock washer, M8 Hex head cap screw, M8 * Not all hardware may be used.
- Page 2 Step 3 Repeat step 2 for the remaining three locations on the passenger side. Repeat this process for the four mounting locations on the driver side of the vehicle. ARIESAUTOMOTIVE.COM • NEED ASSISTANCE? • 877.287.8634 • 4499-INS-RA • PAGE 2...
- Page 3 Repeat this for the rear brackets. Secure the side bar to the brackets using M8 flat washers, lock washers and nuts. Snug the hardware, but do not fully tighten. ARIESAUTOMOTIVE.COM • NEED ASSISTANCE? • 877.287.8634 • 4499-INS-RA • PAGE 3...
- Page 4 Repeat this process on the passenger side of the vehicle. Step 8 Congratulations on the installation of your new ARIES 6" oval side bars. With the side bars installed, periodic inspections should be performed to ensure all mounting hardware remains tight.
Need help?
Do you have a question about the 4499 and is the answer not in the manual?
Questions and answers