Table of Contents
Advertisement
Quick Links
INSTALLATION MANUAL
Level of Difficulty
Moderate
Installation difficulty levels are based on time
and effort involved and may vary depending on
the installer level of expertise, condition of the
vehicle and proper tools and equipment.
Wiring Location(s)
S1 and S2
Wiring Location Guide*
for SUVs and Vans (S)
S1
Behind driver side taillight housing
S2
Behind passenger side taillight housing
S3
Behind driver side rear access panel
S4
Behind passenger side rear access panel
S5
Behind driver side rear bumper
S6
Behind center of rear bumper
S7
Behind passenger side rear bumper
S8
Under rear floor panel
S9
Behind driver side rear access panel
S10 Behind passenger side rear access panel
S10
S9
S1
S2
S3
S4
S8
S5
S6
S7
* Representative vehicle shown
Tools Required
Ratchet
Drill
Socket, 12mm
Drill bit, 3/32"
Socket, 15mm
Fishwire
Flathead screwdriver Socket extension
Utility knife
Electrical tape
Panel trim
--
removal tool
58957-INS-RA
•
05/29/2020
•
WARNING
Do not exceed product rating or tow vehicle lamp load rating, whichever is lower.
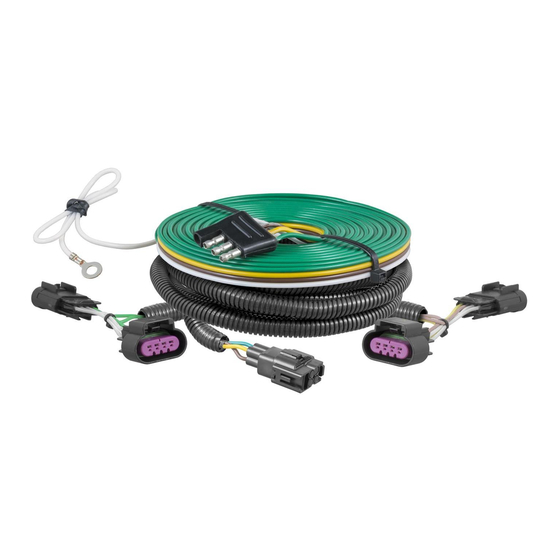
Product Photo
Included Parts
NOTICE
Before you begin installation, read all instructions thoroughly.
Proper tools will improve the quality of installation and reduce the time required.
All steps must be followed to ensure the product will function properly. Once installed,
test for proper function by using a test light or connecting a properly wired trailer.
Maintenance
Periodic inspection of all wires and connections should be performed
to ensure there is no visible damage or loose connections.
PAGE 1
Advertisement
Table of Contents

Related Manuals for Curt Manufacturing 58957


Summary of Contents for Curt Manufacturing 58957
- Page 1 Periodic inspection of all wires and connections should be performed Socket, 12mm Drill bit, 3/32" to ensure there is no visible damage or loose connections. Socket, 15mm Fishwire Flathead screwdriver Socket extension Utility knife Electrical tape Panel trim removal tool 58957-INS-RA • 05/29/2020 • PAGE 1...
- Page 2 Separate the connectors from the taillight housing taking care not to damage the locking tabs. Set the taillight aside. Step 4 Repeat Steps 2 and 3 on the passenger side. 58957-INS-RA • 05/29/2020 • PAGE 2...
- Page 3 Once the RV harness is installed, verify that the harness is functioning by attaching the 4-way flat to any vehicle with functioning taillights. The taillights on the vehicle to be towed should function along with the taillights on the vehicle that is powering them. Step 9 If all functions test out, reinstall all removed items. 58957-INS-RA • 05/29/2020 •...
- Page 4 Use a cable tie to fasten any excess wire to a solid spot along the driver's side inner fender. Reinstall all items removed during install. If it was disconnected at the beginning of the installation, reconnect the negative battery terminal. Install the provided 4-flat dust cover to help prevent corrosion. 58957-INS-RA • 05/29/2020 •...
Need help?
Do you have a question about the 58957 and is the answer not in the manual?
Questions and answers