
Subscribe to Our Youtube Channel
Related Manuals for CHESTER Crusader VS


Summary of Contents for CHESTER Crusader VS
- Page 1 Crusader VS Lathe Operation Manual Chester UK Ltd Clwyd Close Hawarden Industrial Park Hawarden Chester CH5 3PZ Tel: 01244 531631 sales@chestermachinetools.com www.chestermachinetools.com...
-
Page 2: Table Of Contents
Contents Safety Rules for Lathes Machine Specification Constructional Indication Unpacking and Installation 4.1. Unpacking 4.2. Cleaning 4.3. Installation Lubrication 5.1. Headstock 5.2. Gearbox 5.3. Apron 5.4. Change Gears 5.5. Other Parts Test Running 6.1. Spindle Speed Control 6.2. Operation Symbols Thread and Feed Selection 7.1. -
Page 3: Safety Rules For Lathes
1. Safety Rules for Lathes Safety is a combination of operator common sense and alertness at all times when the lathe is being used. Study these safety rules and general safety rules before operating and retain this manual for future use. 1. -
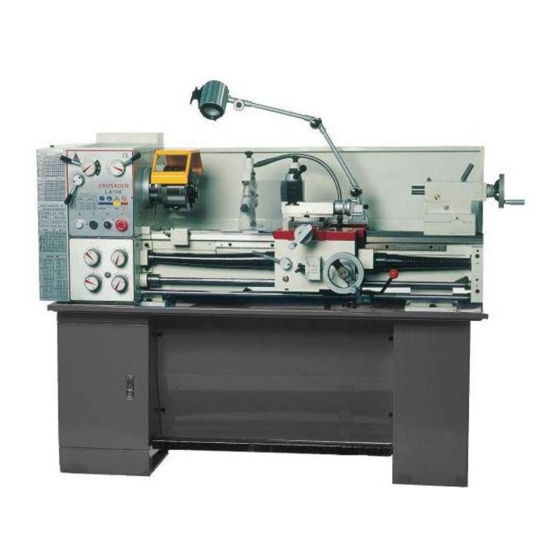
Page 4: Constructional Indication
3. Constructional Indication No Name No Name Speed selector 22 Apron Headstock 23 Threading cutting engagement lever DRO for spindle speeds 24 Control lever Feed direction selector 25 Cross travel control handwheel Change gear box 26 Saddle Feed box selectors 27 Cross slide Feed gear box 28 Support casting... -
Page 5: Unpacking And Installation
4. Unpacking and Installation Unpacking Unload the machine with a tackle, using clamping plates and eyebolts. Keep the machine in balance by moving the tailstock and the bed slide to the right. Avoid using sling chains as they could cause damage to the feed rod and the leadscrew. Lift the lathe carefully and place it softly onto the floor or the workbench. -
Page 6: Change Gears
Change Gears Lubricate the change gears with thick machine oil or grease once a month. Other parts There are other lubricating points on the input shaft bracket of the gearbox, the handwheel on the apron, the longitudinal and cross slide, the thread dial indicator, the tailstock and the bracket. -
Page 7: Operation Symbols
6.2 Operation Symbols... -
Page 8: Thread And Feed Selection
7. Thread and Feed Selection Thread and Feed Selection All threads and feeds are indicated on the tables fitted on the front of the change gearbox. They are selected with the feed selector handles (6) on the feed gearbox. A. Manual Operation The carriage is moved by the handwheel (21), the cross slide handwheel (25) and the compound rest handwheel (36). - Page 9 B. Thread Tables Thread table for a metric leadscrew Thread table for an imperial leadscrew 7.3 Thread Cutting Operation In order to obtain the desired thread, all the correct change gears must be installed in strict accordance with the chart. Failure to do so will give incorrect threads. Rotate the leadscrew by operating the feed/selector to any position and be sure the feed selector handle is engaged.
-
Page 10: Threading Dial Indicator
selector at the headstock. There are 31 thread pitches in imperial and 26 metric pitches which can be obtained by turning the feed selector handles. A. Thread Dial Indicator The thread dial indicator is installed on the right hand side of the apron. The indicator is used for thread cutting to engage with the leadscrew. -
Page 11: Chuck And Faceplate Removal/Installation
8. Chuck and Faceplate Removal/Installation When fitting chucks or faceplates, ensure that the spindle and the chuck taper are correct when mounting a new chuck to re-set the cam lock studs (A). Remove the cap head locking screws (B) and set each stud so that the scribed ring (C) is flush with the rear face of the chuck with the slot lining up with the locking screw hole. -
Page 12: Maintenance And Servicing
9. Maintenance and Servicing Lathe Alignment When the lathe is installed and ready for use, it is recommended to check the machines alignment before commencing work. Alignment and levelling should be checked regularly to insure continued accuracy. Adopt the following procedure: Take a steel bar with a diameter of approx. -
Page 13: Compound Rest
Compound Rest It is the same procedure as the cross slide. To take up for the wear on the compound rest taper gib strip can adjust the slotted head screw on the tool post side of the compound rest by a clockwise direction. The procedure is to slacken the similar screw at the rear then retighten this after adjustment to clamp the gib into its new position. -
Page 14: Parts List
10. Parts List and Diagrams Bed Assembly (1/2) - Page 15 Part No. Name Specification V-Belt A838/A850/A864 D330A-11106 Pulley GB1096 8x35 GB5781 Hexagonal Head Tap Bolt M8x25 GB97.1 Washer 8x55 Motor 415V 50Hz 1.5kW GB78 Screw M6x8 GB70 Socket Head Screw M8x30 GB5781 Hexagonal Head Tap Bolt M8x40 GB6170 GB70 Socket Head Screw M12x35 GB97.1 Washer...
- Page 16 GB78 Screw M6x16 GB6170 GB118 Taper Pin 6x45 GB7940.4 Oil Cup GB70 Socket Head Screw M8x60 GB78 Screw M8x12 D330C-3012C Plectrum GB70 Socket Head Screw M8x16 GB818 Screw M4x42 Switch D330C-11301C D330C-11302C Cover GB818 Screw M4x10 D330B-11210G-1 Cover D330B-11210G-2 Cover GB5781 Hexagonal Head Tap Bolt M12x45...
- Page 17 Bed Assembly (2/2)
- Page 18 Part No. Name Specification GB70 Socket Head Screw M6x12 GB97.1 Tailor-Made Washer D330B-14205 Splash Guard GB818 Screw M5x8 GB91 3x16 D330A-21105 Pulley GB97.1 Washer GB70 Socket Head Screw M8x16 GB1096 8x20 D330B-14203 Oil Tray D330B-14204 Oil Tray D330B-14401 Water Tank GB70 Socket Head Screw M10x30...
-
Page 19: Headstock Assembly
Headstock Assembly (1/3)
Need help?
Do you have a question about the Crusader VS and is the answer not in the manual?
Questions and answers