
Related Manuals for CHESTER Cobra Mill


Summary of Contents for CHESTER Cobra Mill
- Page 1 Cobra Mill Instruction Manual Chester UK Ltd Clwyd Close, Hawarden Industrial Pk Hawarden, Nr Chester Flintshire. CH5 3PZ Tel: 01244 531631 Email: sales@chesteruk.net www.chesteruk.net...
-
Page 2: Table Of Contents
Contents 1. Introduction 2 2. Health & Safety 3 5 3. Machine Specification 6 7 4. Operation 8 9 5. Controls 10 6. Part Diagrams & Lists 11 13 14 15 7. Circuit Diagram 8. Guide To Milling 16 Chester UK Cobra Mill ... -
Page 3: Introduction
There are several divisions within the company; Export, Education, Model Engineering & UK Sales, all with dedicated sales personnel who are trained to answer your questions. When buying from Chester you can be assured of a complete backup service with mechanical and electrical engineers that are available to give advice if required. Stock is a large part of any business and Chester have always invested substantially in building a large quantity of machines and spares, ready to satisfy customer requirements. Chester UK has one of the ... -
Page 4: Health & Safety
However, if normal safety precautions are overlooked or ignored, personal injury to the operator may result. This machine was designed for certain applications only. We strongly recommend that the machine is not modified, and / or used for any application other than which it was designed. If you have any questions relative to its application do not use the machine, until you have first been in contact with Chester UK. The lathe may not arrive with a power socket or plug. In the event of this happening, please inform Chester UK on Tel: (01244) 531 631. ... - Page 5 5. Maintain tools in top condition Keep tools sharp and clean for the best and safest performance. Follow instructions for lubricating and changing accessories. 6. Use recommended accessories Consult Chester UK for recommended accessories. The use of improper accessories may cause hazards. 7. Avoid accidental starting Make sure the switch is in the ‘OFF’ position before plugging in power cord. 8. Stop The machine before putting material in the vice. 9. Always Have stock firmly clamped in the vice before starting the cut. 10. Ground all tools If the tool is equipped with a threeprong plug, it should be plugged into a threehole electrical receptacle. If an adapter is used to accommodate a twoprong receptacle, the adapter plug must be attached to a known ground. Never remove the third prong. Adjustment Make all adjustments with the power off. When assembling follow the manuals instructions, this ...
- Page 6 Do not remove this switch from the machine for any reason, and check it’s function frequently. 2. Interlock switch on cutting area. As soon as the pulley cover is open, the machine will come to a stop with the function of this switch. Do not remove this switch from the machine for any reason, and check it’s function frequently. Chester UK Cobra Mill ...
-
Page 7: Machine Specification
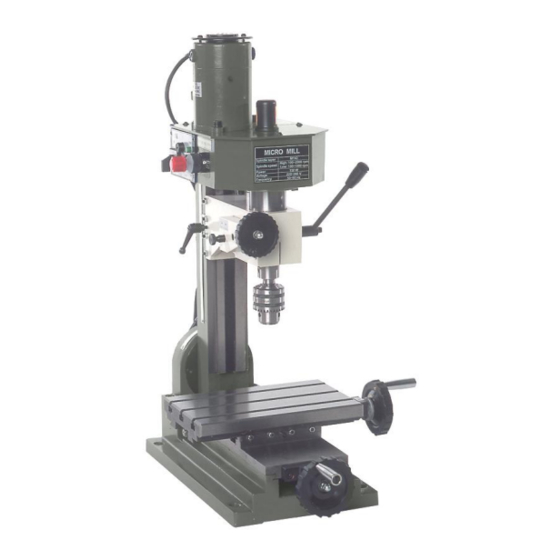
Machine Specification Drilling Capacity 10mm End Milling Capacity 10mm Face Milling Capacity 20mm Spindle Stroke 30mm Throat 140mm Table Working Surface 145x240mm Longitudinal Travel 180mm Cross Travel 90mm Max. Distance Spindle To Table 220mm No. Of Spindle Speeds Variable Range Of Speeds 1002000rpm Spindle Taper MT2 Motor 150W Supply 240V Weight (nw/gw) 25/38kg Dimensions (LxWxH) 480x380x680mm Chester UK Cobra Mill ... - Page 8 Features 1. Forward/Off/Reverse Switch 2. Variable Speed Control Knob 3. Fuse Box 4. Power Light (Green) 5. Yellow Light (only 110V) 6. High Low Change Knob 7. 8. Fine Feeding Handwheel 9. 10. Work Table 11. Cross Feed Handwheel 12. Longitudinal Feed Handwheel 13. Handle 14. Lifting Handwheel 15. DC Motor Chester UK Cobra Mill ...
-
Page 9: Operation 8
Operation Installation Of The Tapered Shank 1. Disconnect from the main power supply, before you replace the cutter. 2. Remove the protective cover (a). 3. Wipe the spindle sleeve and taper shank. 4. Put the taper shank (i) into the spindle sleeve. Matt the cutter with an oilcloth. 5. Use a #14 openend wrench (c), turning the spindle draw bar (clockwise) (b), in order to secure the tapered shank. 6. Pull out the fixing pin 7. Install the protective cover (a). Removal Of The Tapered Shank 1. Disconnect from the main power supply, before you replace the cutter. 2. Remove the protective cover (a). 3. Use a#14 openend wrench (c), to loosen the spindle draw bar (counterclockwise) (i), in order to remove the tapered shank. 4. Knock the taper shank (i) (gently with a plastic hammer) to loosen it in the spindle sleeve. 5. Matt the cutter with an oilcloth. 6. Install the protective cover (a). Chester UK Cobra Mill ... - Page 10 3. Tighten and loosen the adjusting screws, also keeping the pressure of each adjusting screw the same. 4. Tighten the locked nut uniformly. 5. When the nut is locked, please use the #3 interior hexagonal wrench to fix the adjusting screw from rotating (this will cause an unbalance in the pressure). 6. Please adjust the middle portion first and then go to toward the interior from two sides uniformly while you are adjusting the screw in order to ensure uniform pressure. Chester UK Cobra Mill ...
-
Page 11: Controls
Run for a total of 5 minutes; gradually increase the spindle speed to its maximum. Run at top speed for at least 2 minutes at top speed before stopping. Check that all components are secure, working freely and correctly. Check that the Cobra Mill is mounted securely. Repeat the procedure at a HIGHspeed setting. Caution Never attempt to change from a HIGH to a LOW speed whilst the machine is running. Starting Under Normal Conditions 1. Take all the necessary precautions previously stated, and ensure the workpiece is fixed firmly. 2. Select an appropriate speed level. 3. Select the FORWARD / off / REVERSE to a FORWARD or REVERSE position. 4. Proceed to start the machine as described above. 5. Whilst not in use, switch off and disconnect from the power supply. Notice When using 100~120v power, the socket will have to have a auto overload protective function. If the feed is to fast, or the drilling is too deep, the Cobra Mill will stop working and a yellow light (behind the fuselage) will light up. By turning the Variable Speed control knob (D) and then turn on again, the Cobra will now work again and the yellow lamp will off automatically. Chester UK Cobra Mill ... -
Page 12: Part Diagrams & Lists
Part Diagrams & Lists Chester UK Cobra Mill ... - Page 13 31 Spacer 1 68 Top nut M6 4 32 Spindle gear 1 69 Screw M6 x 20 1 33 Check ring for shaft 20 1 34 Powder metallurgy bearing 2 71 Screw M4 x 20 2 35 Gear 1 72 Screw M4 X 18 8 36 Check ring for shaft 10 1 73 Nut M4 8 37 Change gear 1 74A Base 1 Chester UK Cobra Mill ...
- Page 14 111 Lengthways screw 2 148 Screw M6*6 1 112 Screw M4 x 8 4 149 Screw M8*25 4 113 Screw nut 2 150 Screw M6*25 2 114A Saddle 1 151 Label rivet 2*3 2 115 Wedge 2 152 Pin 6*35 2 116 Change speed label 1 117 Joint label 1 118 0 position label 2 Chester UK Cobra Mill ...
-
Page 15: Circuit Diagram
Circuit Diagram 220~240V / 5060Hz Chester UK Cobra Mill ... - Page 16 100~120V / 5060Hz Chester UK Cobra Mill ...
-
Page 17: Guide To Milling
Guide To Milling Contents 1. Introduction 6. Typical Milling Operations 2. Types of Milling Machine 6.1 Plain Milling 2.1 Horizontal Milling Machine 6.2 End Milling 2.2 Vertical Milling Machine 6.3 Gang Milling 3. Cutting Tools 6.4 Straddle Milling 3.1 Cutting Tools for Horizontal 7. Milling Set Up Milling Machine 7.1 Vice Alignment 3.2 Cutting Tools for Vertical 7.2 Work Holding Method Milling Machine 8. Safety 4. Industrial Applications 5. Milling Processes 5.1 Spindle Speed 5.2 Feed Rate 5.3 Depth of Cut 5.4 Direction of Cutter Rotation 1. Introduction Milling machine is one of the most versatile conventional machine tools with a wide range of metal cutting capability. Many complicated operations such as indexing, gang milling, and straddle milling etc. can be carried out on a milling machine. This training module is intended to give you a good appreciation on the type of milling machines and the various types of milling processes. Emphasis is placed on its industrial applications, operations, and the selection of appropriate cutting tools. ... -
Page 18: Types Of Milling Machine
2. Types of Milling Machine Most of the milling machine are constructed of ¡¥column and knee¡¦ structure and they are classified into two main types namely Horizontal Milling Machine and Vertical Milling Machine. The name Horizontal or Vertical is given to the machine by virtue of its spindle axis. Horizontal machines can be further classified into Plain Horizontal and Universal Milling Machine. The main difference between the two is that the table of an Universal Milling Machine can be set at an angle for helical milling while the table of a Plain Horizontal Milling Machine is not. 2.1. Horizontal Milling Machine Figure 2 shows the main features of a Plain Horizontal Milling Machine. Their functions are : a. Column The column houses the spindle, the bearings, the gear box, the clutches, the shafts, the pumps, and the shifting mechanisms for transmitting power from the electric motor to the spindle at a selected speed. b. Knee The knee mounted in front of the column is for supporting the table and to provide an up or down motion along the Z axis. c. Saddle The saddle consists of two slideways, one on the top and one at the bottom located at 90º to each other, for providing motions in the X or Y axes by means of lead screws. d. Table The table is mounted on top of the saddle and can be moved along the X axis. On top of the table are some Tslots for the mounting of workpiece or clamping fixtures. Figure 2. Horizontal Milling Machine e. Arbor The arbor is an extension of the spindle for mounting cutters. Usually, the thread end of an arbor is of left hand helix. ... -
Page 19: Vertical Milling Machine
2.2. Vertical Milling Machine... -
Page 20: Cutting Tools For Vertical
Figure 6. Slitting Saw Note: Horizontal milling cutters are specified by the name, the material, the width, the diameter, and the hub size of the cutter. Example Side and face cutter, High Speed Steel, Cutter size : 10 X ø 100 Hub size: ø 25 3.2. Cutting tools for Vertical Milling a. End Mills Commonly used for facing, slotting and profile milling. Figure 7. End Mill b. Rough Cut End Mills For rapid metal removal. Figure 8. Rough Cut End Mill c. Slot Drills For producing pockets without drilling a hole before hand. Figure 9. Slot Drill d. Face Milling Cutters For heavy cutting. Figure 10. Face Milling Cutter Note: Most vertical milling cutters are of end mill types and are specified by the material, the diameter, the length, the helical angle, the types of shank and the shank diameter. For face milling cutter, only the diameter of the cutter and the types of carbide inserts are required. -
Page 21: Industrial Applications
4. Industrial Applications Milling machines are widely used in the tool and die making industry and are commonly used in the manufacturing industry for the production of a wide range of components as shown in figure 11. Typical examples are the milling of flat surface, indexing, gear cutting, as well as the cutting of Figure 11. Components Made by Milling slots and keyways. When equipped with digital readout, the machine is capable of producing more precise work for the manufacturing of plastic moulds, tool & dies, and jigs & fixtures. Figure 12 shows a typical plastic mould produced by milling. Figure 12. Plastic Mould 5. Milling Processes Milling is a metal removal process by means of using a rotating cutter having one or more cutting teeth as illustrated in figure 13. Cutting action is carried out by feeding the workpiece against the rotating cutter. Thus, the spindle speed, the table feed, the depth of cut, and the rotating direction of the cutter become the main parameters of the process. Good results can only be achieved with a well balanced settings of these parameters. Figure 13. Milling Process... -
Page 22: Spindle Speed
5.1. Spindle Speed Spindle speed in revolution per minute (R.P.M.) for the cutter can be calculated from the equation : N = R.P.M. of the cutter where CS = Linear Cutting Speed of the material in m/min. ( see table 1 ) d = Diameter of cutter in mm 5.2. Feed Rate Feed rate (F) is defined as the rate of travel of the workpiece in mm/min. But most tool suppliers recommend it as the movement per tooth of the cutter (f). Thus, F = f . u . N where F = table feed in mm/min f = movement per tooth of cutter in mm ( see table 1 ) u = number of teeth of cutter N = R.P.M. of the cutter where C.S. and feed rate for some common material : Tool Material High Speed Steel Carbide Cutting Cutting Material Feed (f) Feed (f) Speed Speed Mild Steel 25 0.08 100 0.15 Aluminium 100 0.15 500 0.3 Hardened Steel 50 ... -
Page 23: Depth Of Cut
5.3. Depth of Cut Depth of cut is directly related to the efficiency of the cutting process. The deeper the cut the faster will be the production rate. Yet, it still depends on the strength of the cutter and the material to be cut. For a certain type of cutter, a typical range of cut will be recommended by the supplier. Nevertheless, it should be noted that a finer cut is usually associated with a better surface finish as well as a long tool life. 5.4. Direction of Cutter Rotation a. Up Cut Milling In up cut milling, the cutter rotates in a direction opposite to the table feed as illustrated in figure 14. It is conventionally used in most milling operations because the backlash between the leadscrew and the nut of the machine table can be eliminated. Figure 14. Up Cut Milling b. Down Cut Milling In down cut milling, the cutter rotates in the same direction as the table feed as illustrated in figure 15. This method is also known as Climb Milling and can only be used on machines equipped with a backlash eliminator or on a CNC milling machine. This method, when properly treated, will require less power in feeding the table and give a better surface finish on the workpiece. Figure 15. Down Cut Milling... -
Page 24: Typical Milling Operations
6. Typical Milling Operations 6.1. Plain Milling Plain milling is the milling of a flat surface with the axis of the cutter parallel to the machining surface. It can be carried out either on a horizontal machine or a vertical machine as shown in figure 16. 6.2. End Milling End Milling is the milling of a flat surface with the axis of the cutter perpendicular to the machining surface as shown in figure 17. Figure 17. End Milling... -
Page 25: Gang Milling
6.3. Gang Milling Gang milling is a horizontal milling operation that utilises three or more milling cutters grouped together for the milling of a complex surface in one pass. As illustrated in figure 18, different type and size of cutters should be selected for achieving the desire profile on the workpiece. Figure 18. Gang Milling 6.4. Straddle Milling In straddle milling, a group of spacers is mounted in between two side and face milling cutters on the spindle arbor as shown in figure 19. for the milling of two surfaces parallel to each other at a given distance. Figure 19. Straddle Milling 7. Milling Set Up Correct use of holding device and a good set up are of crucial importance in achieving a safe, accurate, and efficient operation of the machine. Large workpiece can be mounted directly onto the machine table by means of tenons and screws while small workpieces are usually held by machine vice as shown in figure 20. In either case, a dial indicator is used for alignment checking. Figure 20. Machine Vice... -
Page 26: Vice Alignment
7.1. Vice Alignment In the setting up of the vice onto the machine table, the fix jaw of the vice must be set parallel to the machine table using a Parallel Bar and a Dial Indicator as illustrated in figure 21. Adjustments can only be made by using a hide face hammer to correct its position such that a near zero indicator movement is achieved at all positions along the parallel bar. Figure 21. Machine Vice Setup 7.2. Work Holding Method In the machining of a complex component, it is usually started off with the milling of a rectangular block. To ensure that each surface of the rectangular block is perpendicular to its neighbouring surfaces, the following points should be noted: The vice jaws and the workpiece must be free from burrs, chips, and cutting fluid. · Smaller workpiece should be supported by parallel bars to provide the supporting datum. · · Round bar must be placed between the workpiece and the movable jaw to ensure that the workpiece is in perfect contact with the fix jaw. · The vice handle should be tightened by hand to avoid over clamping of the workpiece as well as the vice. Hide face hammer should be used to assure that the workpiece is in perfect contact with the supporting base. · On completion of the milling of the first face, the workpiece should be unloaded, deburred, and cleaned before the next operation. · To machine the second and the third faces, the workpiece should be clamped with its preceding machined surface facing against the fix jaw of the vice. Similar clamping method can be applied in the machining of the fourth face. · · Yet it can also be clamped on the vice without the round bar. Both ends of the workpiece can be machined with the periphery flutes of the cutter using up cut · milling as shown in figure 23. Figure 22. Holding Method by Using a Machine Vice... -
Page 27: Safety
Figure 23. End Surface Milling 8. Safety Safety practices of a machine shop should be followed. A complete understanding of the Safety Rules would enable the students to identify potential hazards that may occur under different working conditions such that appropriate preventive actions can be taken to avoid the happening of accidents. Emphasis should be given that the eyes of the machine operator must be protected by wearing a face shield (figure 24) to prevent accident that may be caused by chips, cutting fluid, and tool breakage. Machine operators must also take care of their body Figure 24. Face Shield such as fingers which keep out of any moving parts, especially the rotating cutter of the machine, to prevent any unnecessary accident hurt. The milling machine must be stopped immediately when any accidence occurred, so the operator must stand near by the control panel of the machine and pays more attention on the operation. Remember the Chinese phrase 'carefully can be driven the boat in thousand year' that you will enjoy the benefits provided by milling. ...
Need help?
Do you have a question about the Cobra Mill and is the answer not in the manual?
Questions and answers