
Related Manuals for Apera Instruments DO8500


Summary of Contents for Apera Instruments DO8500
- Page 1 DO8500 Portable Optical Dissolved Oxygen Meter Instruction Manual APERA INSTRUMENTS, LLC aperainst.com v1.2 - 1 -...
-
Page 2: Table Of Contents
Table of Contents Overview ......................... - 3 - Luminescent optical sensor....................- 3 - Advanced Intelligent Instrument ................... - 3 - Technical Specifications ....................- 4 - Instructions ........................- 5 - LCD Screen ........................... - 5 - Key Operation ........................- 6 - Batteries .......................... -
Page 3: Overview
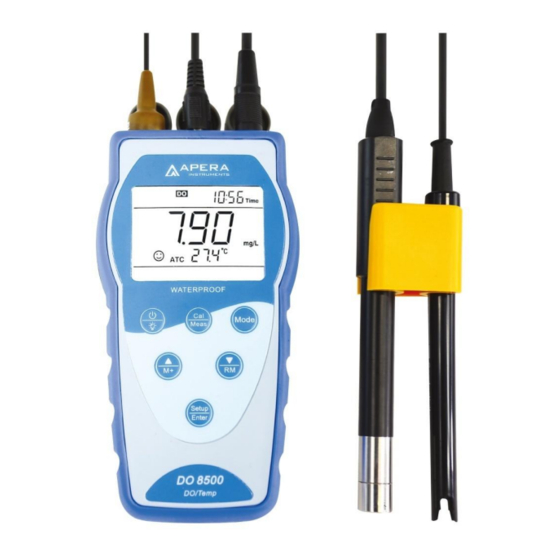
1 Overview Thank you for purchasing Apera Instruments DO8500 Portable Optical Dissolved Oxygen Meter. The DO8500 measures dissolved oxygen in water using luminescence technology through an optical sensor and displays data with intelligent instrumentation. Compared to conventional electrochemical dissolved oxygen meter, the DO8500 is more accurate, stable and easier to use. -
Page 4: Technical Specifications
2 Technical Specifications Dynamic Range (0-20.00) mg/L (ppm), (0-200.0)% Resolution 0.01/0.1mg/L (ppm), 0.1/1% ±2% reading or ±0.2 mg/L, whichever is greater Accuracy ±2% reading or ±2% saturation, whichever is greater Dissolved Oxygen Response Time ≤30 s (25℃, 90% response) Calibration Points Saturation Point &... -
Page 5: Instructions
Instructions 3.1 LCD Screen Fig.-1 Serial number of storage and Measurement mode ① ⑨ prompts of special display mode M+ — Measurement to be stored Reading/Measured Value ② ⑩ RM — Reading to be recalled Temperature value and Timing storage ③... -
Page 6: Key Operation
3.2 Key Operation Fig.-2 Short press: key press time < 2 s; Long press: key press time> 2 s. Power on: Press to turn on. Shutdown: long press 2 seconds off. First time use: see parameter setting P4.7 & P4.8 to set correct date and time (as Clause 8.3) Special notes: Before getting readings or performing other operations, wait about 30 seconds after meter is powered on. -
Page 7: Batteries
3.3 Batteries The instrument uses three AA alkaline batteries. Battery life > 200 hours (without backlight). When the display shows symbol as shown in Figure-3, replace the battery. 3.4 Instrument Socket Fig.-3 The instrument sockets are protected by grey rubber sealing cap, as shown in Figure-4. -
Page 8: Data Storage.recall And Clear
3.6 Data storage, recall, and clear. 3.6.1 Manual storage When the measurement is stable, press , the meter will store the measurement at the moment, M+ icon and storage serial number Fig.-9 will be displayed on the botton right of sreen, as shown in Figure-9, First group of data was stored. -
Page 9: Optical Dissolved Oxygen Probe
to turn on auto power off function, the instrument will shut down automatically if no operation within 20 minutes, select Off to disable this function, meaning the meter won’t power off until the user manually turn it off. 4 Optical Dissolved Oxygen Probe 4.1 Probe Structure The DO803 optical dissolved oxygen probe has a cable length of 3m and a built-in temperature sensor for automatic temperature compensation. -
Page 10: Sensor Cap
(C) Before the first use, unscrew the calibration sleeve to check if the sponge is damp. If the sponge is dry or if the electrode is exposed to dry air for more than 8 hours, the surface coating of the sensor cap may be dried out. So the electrode should be soaked in clean water at room temperature for 24 hours. -
Page 11: Resolution Selection
switch between mg / L and %, or ppm → %. Users can choose mg / L or ppm in parameter setting P3.1, but only percentage (DO%) is displayed in calibration mode. Resolution Selection The resolution unit can be selected in parameter setting P3.2: 0.01 or 0.1mg/L (ppm), After setting, the meter will display resolution of 0.1 or 1 in according to %. -
Page 12: Calibration
5.5.1 Manual salinity compensation (Hnd) (A) In parameter setting P3.3, select manual salinity compensation (Hnd). Operation refers to P3.3. (B) In parameter setting P3.4, input salinity value (0~45ppt), Operation refers to P3.4. (C) Connect DO probe to take DO measurement. 5.5.2 Automatic salinity compensation (Aut) (A) Connect salinity probe to meter;... -
Page 13: Zero-Oxygen Calibration
the probe. Tighten the locking cap. Be careful not to have water droplets on the head of the sensor cap. Wait for 5 to 10 minutes after turning on the instrument in order to saturate the air in the calibration sleeve with water vapor. In addition, wait for the temperature to completely stablize. -
Page 14: Parameter Settings
Note: the brief stirring of the probe in solution is only to eliminate bubbles. Unlike conventional galvanic/polarographic electrodes, the measuring via optical dissolved oxygen probes does not require constant stirring of the solution or flowing fluid. 7.2 Users can read the measurements when appears and stays on. - Page 15 P4.7 Adjust Date P4.8 Adjust Time DO Parameter setting (press to switch) P3.1—Dissolved Oxygen Unit (mg/L—ppm) 1. In P3.0 mode, press to enter P3.1 mode. 2. Press , mg / L flashes, press to select mg/L → ppm, press to confirm. 3.
- Page 16 P3.6—Back to Factory Default (No—Yes) Press , No flashes, Press to select No →Yes, Press to confirm. Meter returns to measurement mode. No—cancel restore. Yes—restore Basic Parameter setting (press to switch) P4.1—Adjust timing storage time 1. In P4.0 mode, Press to enter P4.1 mode.
-
Page 17: Usb Communication
P4.5—Auto Backlight (On—Off) 1. Press , On flashes, Press to select On→Off, Press to confirm. On – turn on auto backlight off function, Off – turn off auto backlight off function. 2. Press to enter P4.6 mode, or press to return to measurement. - Page 18 stored in the meter as shown in Figure – 15. ② — Mode and Serial Number ③ — Parameter setting information ④ — Port type and press key The port number shows where the software is connected to the computer, each computer recognizes a different port number, as shown in Figure –...
-
Page 19: Complete Kit
Press “Export” key to export the stored value to Microsoft Excel file for further analysis or printing. 10 Complete Kit 10.1 What’s in the box Content Quantity DO8500 Portable Optical Dissolved Oxygen Meter DO803 Optical Dissolved Oxygen Probe Probe Calibration/storge sleeve Conductivity Electrode 2301-3M PC-Link Communication Software Flashdrive USB Communication Cable... -
Page 20: Accessories For Separate Purchase
Calibration/Storage sleeve 11 Warranty 11.1 The warranty period of the DO8500 instrument (only the instrument) is 3 years from the date of purchase. That of DO803 optical DO probe (excluding sensor cap) is 2 years from the date of purchase. That of DO8032 sensor cap is 1 year from the date of delivery. If the above products or parts within the warranty period is not functional due to raw material defects or poor manufacturing, they are free for repair or replace. -
Page 21: Trouble Shooting
12 Trouble Shooting Error Solutions 1. The battery is not installed correctly. Check the direction. The instrument does 2. Battery low voltage, replace the battery. not turn on 3. Instrument freezes. Take out the batteries and re-install. 1. Check calibration procedure: correct atmospheric pressure, salinity input and temperature. -
Page 22: Appendix A: Oxygen Solubility Table (760Mm Hg)
11 Appendix A: Ox ygen Solubility Table (760mm Hg) Chlority: 0 5.0 ppt 10.0 ppt 15.0 ppt 20.0 ppt 25.0 ppt Temp °C Salinity: 0 9.0 ppt 18.1 ppt 27.1 ppt 36.1 ppt 45.2 ppt 14.62 13.73 12.89 12.10 11.36 10.66 14.22 13.36... -
Page 23: Appendix B: Do % Calibration Values
Salinity = Dissolved salts in water. Chlorinity = Measure of chloride content, by mass, of water. S (‰) = 1.80655 x Chlorinity (‰) 12 Appendix B: DO % Calibration Values Cal. Cal. Pressure Pressure value value D.O. in Hg mmHg mbar D.O. - Page 24 APERA INSTRUMENTS, LLC Address: 6656 Busch Blvd, Columbus Ohio 43229 Tel: 1-614-285-3080 Email: info@aperainst.com Website: https://aperainst.com - 24 -...
Need help?
Do you have a question about the DO8500 and is the answer not in the manual?
Questions and answers