Table of Contents
Advertisement
Available languages
Available languages
Quick Links
BEDIENUNGSANLEITUNG
USER MANUAL
MODE D'EMPLOI
MANUAL DEL USUARIO
TMH-250 EHJ
Moving-Head
©
Für weiteren Gebrauch aufbewahren!
Copyright
Keep this manual for future needs!
Nachdruck verboten!
Gardez ce mode d'emploi pour des
Reproduction prohibited!
utilisations ultérieures!
Réproduction interdit!
Guarde este manual para posteriores usos.
Prohibida toda reproducción.
Advertisement
Table of Contents

Related Manuals for EuroLite TMH-250 EHJ


Summary of Contents for EuroLite TMH-250 EHJ
- Page 1 BEDIENUNGSANLEITUNG USER MANUAL MODE D'EMPLOI MANUAL DEL USUARIO TMH-250 EHJ Moving-Head © Für weiteren Gebrauch aufbewahren! Copyright Keep this manual for future needs! Nachdruck verboten! Gardez ce mode d’emploi pour des Reproduction prohibited! utilisations ultérieures! Réproduction interdit! Guarde este manual para posteriores usos.
-
Page 2: Table Of Contents
MULTI-LANGUAGE-INSTRUCTIONS Inhaltsverzeichnis Table of contents Sommaire/Contenido EINFÜHRUNG..............................4 SICHERHEITSHINWEISE..........................4 BESTIMMUNGSGEMÄßE VERWENDUNG..................... 6 GERÄTEBESCHREIBUNG ..........................7 Features ................................. 7 Geräteübersicht.............................. 8 INSTALLATION ..............................9 Lampeninstallation/Lampenwechsel ......................9 Lampenjustierung............................10 Einsetzen/Austauschen von Gobos ......................10 Projektormontage............................10 Anschluss an den DMX-512 Controller / Verbindung Projektor - Projektor ..........13 Anschluss ans Netz............................ - Page 3 You can find the latest update of this user manual in the Internet under: Vous pouvez trouvez la dernière version de ce mode d'emploi dans l'Internet sous: Vd. puede encontrar la versión más reciente de este manual en el Internet bajo: www.eurolite.de 3/63 51786500_V_1_1.DOC...
-
Page 4: Einführung
- sich die letzte Version der Anleitung im Internet herunter laden EINFÜHRUNG Wir freuen uns, dass Sie sich für einen EUROLITE TMH-250 EHJ entschieden haben. Sie haben hiermit ein leistungsstarkes und vielseitiges Gerät erworben. Nehmen Sie den TMH-250 EHJ aus der Verpackung. - Page 5 Das Gerät darf nicht in Betrieb genommen werden, nachdem es von einem kalten in einen warmen Raum gebracht wurde. Das dabei entstehende Kondenswasser kann unter Umständen Ihr Gerät zerstören. Lassen Sie das Gerät solange uneingeschaltet, bis es Zimmertemperatur erreicht hat! Bitte überprüfen Sie vor der ersten Inbetriebnahme, ob kein offensichtlicher Transportschaden vorliegt.
-
Page 6: Bestimmungsgemäße Verwendung
Achtung: Gerät niemals während des Betriebes berühren. Gehäuse erhitzt sich! Vermeiden Sie es, das Gerät in kurzen Intervallen an- und auszuschalten (z. B. Sekundentakt), da anson- sten die Lebensdauer der Lampe erheblich reduziert werden würde. GESUNDHEITSRISIKO! Blicken Sie niemals direkt in die Lichtquelle, da bei empfindlichen Menschen u. U. epileptische Anfälle ausgelöst werden können (gilt besonders für Epileptiker)! Kinder und Laien vom Gerät fern halten! Das Gerät darf niemals unbeaufsichtigt betrieben werden! -
Page 7: Gerätebeschreibung
Sie, dass wärmeempfindliche Gegenstände durch die emittierte Wärme verformt oder beschädigt werden können. Achten Sie bei der Projektormontage, beim Projektorabbau und bei der Durchführung von Servicearbeiten darauf, dass der Bereich unterhalb des Montageortes abgesperrt ist. Bei Überkopfmontage (Montagehöhe >100 cm) ist das Gerät immer mit einem geeigneten Sicherheitsfang- seil zu sichern. -
Page 8: Geräteübersicht
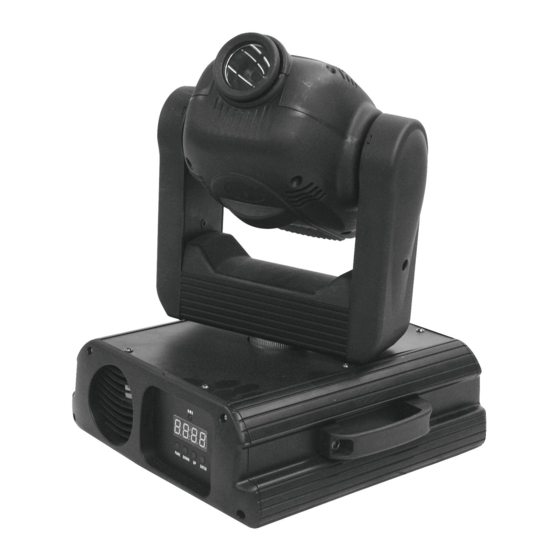
Geräteübersicht (1) Projektorkopf (2) Objektivlinse (3) Projektorarm (4) Base (5) Tragegriff (6) Netzschalter (7) Netzanschluss (8) Sicherungshalter (9) Lüfter (10) DMX-Eingangsbuchse (11) DMX-Ausgangsbuchse (12) Display (13) Funktiostasten 8/63 51786500_V_1_1.DOC... -
Page 9: Installation
INSTALLATION Lampeninstallation/Lampenwechsel LEBENSGEFAHR! Lampe nur bei ausgeschaltetem Gerät einsetzen! Netzstecker ziehen! Zur Installation benötigen Sie eine EHJ 24 V/250 W G-6,35 Lampe. ACHTUNG! Die Lampe muss gewechselt werden, wenn diese beschädigt ist oder sich durch Wärme verformt hat! Die verwendete Lampe erreicht Temperaturen von bis zu 600° C. Vor dem Wechseln der Lampe diese unbedingt erst abkühlen lassen (ca. -
Page 10: Lampenjustierung
Lampenjustierung Der Lampenhalter des Gerätes wird ab Werk justiert. Da sich die zu verwendenden Lampen von Hersteller zu Hersteller unterscheiden, kann es u. U. notwendig sein, die Position des Lampenhalters nachzujustieren. Zünden Sie die Lampe, öffnen Sie den Shutter und die Iris, stellen Sie die Dimmerintensität auf 100 % und fokussieren Sie den Lichtstrahl auf einer ebenen Oberfläche (Wand). - Page 11 Der Unternehmer hat dafür zu sorgen, dass sicherheitstechnische und maschinentechnische Einrichtungen vor der ersten Inbetriebnahme und nach wesentlichen Änderungen vor der Wiederinbetriebnahme durch Sachverständige geprüft werden. Der Unternehmer hat dafür zu sorgen, dass sicherheitstechnische und maschinentechnische Einrichtungen mindestens alle vier Jahre durch einen Sachverständigen im Umfang der Abnahmeprüfung geprüft werden. Der Unternehmer hat dafür zu sorgen, dass sicherheitstechnische und maschinentechnische Einrichtungen mindestens einmal jährlich durch einen Sachkundigen geprüft werden.
- Page 12 (1) Omega-Halter (2) Haken (3) Schnellverschluss Verschrauben Sie je einen Haken über eine M12 Schraube und Mutter mit den Omega-Haltern. Führen Sie die beiden Schnellverschlüsse des ersten Omega-Halters in die dafür vorgesehenen Öffnungen an der Geräteunterseite ein. Drehen Sie die Schnellverschlüsse im Uhrzeigersinn bis zum Anschlag fest. Installieren Sie den zweiten Omega-Halter.
-
Page 13: Anschluss An Den Dmx-512 Controller / Verbindung Projektor - Projektor
Anschluss an den DMX-512 Controller / Verbindung Projektor - Projektor Achten Sie darauf, dass die Adern der Datenleitung an keiner Stelle miteinander in Kontakt treten. Die Geräte werden ansonsten nicht bzw. nicht korrekt funktionieren. Die Verbindung zwischen Controller und Projektor sowie zwischen den einzelnen Geräten muss mit einem zweipoligen geschirmten Kabel erfolgen. -
Page 14: Anschluss Ans Netz
Lichteffekte dürfen nicht über Dimmerpacks geschaltet werden. BEDIENUNG Wenn Sie das Gerät an die Spannungsversorgung angeschlossen haben, nimmt der TMH-250 EHJ den Betrieb auf. Während des Reset justieren sich die Motoren aus und das Gerät danach betriebsbereit. Stellen Sie den Fokus durch Drehen der der Fokus-Schraube neben der Objektivlinse ein, um die Projektion scharf zu stellen. -
Page 15: Dmx-Gesteuerter Betrieb
Nachdem Sie die Startadresse definiert haben, können Sie den TMH-250 EHJ über Ihren Controller ansteuern. Bitte beachten Sie: Schalten Sie den TMH-250 EHJ ein. Das Gerät prüft, ob DMX-512 Daten empfangen werden oder nicht. Wenn Daten empfangen werden, blinkt die Kontroll-LED. Werden keine Daten empfangen, leuchtet die Kontroll-LED permanent. -
Page 16: Dmx-Protokoll
DMX-Protokoll Steuerkanal 1 - Horizontale Bewegung (Pan) (innerhalb 360°) Wenn Sie den Regler verschieben, bewegen Sie den Kopf horizontal (PAN). Allmähliches Einstellen des Kopfes bei langsamen Schieben des Reglers (0-255, 128-Mitte). Der Kopf kann an jeder gewünschten Einstellung angehalten werden. Steuerkanal 2 - Vertikale Bewegung (Tilt) (innerhalb 250°) Wenn Sie den Regler verschieben, bewegen Sie den Kopf vertikal (TILT). -
Page 17: Reinigung Und Wartung
REINIGUNG UND WARTUNG Der Unternehmer hat dafür zu sorgen, dass sicherheitstechnische und maschinentechnische Einrichtungen mindestens alle vier Jahre durch einen Sachverständigen im Umfang der Abnahmeprüfung geprüft werden. Der Unternehmer hat dafür zu sorgen, dass sicherheitstechnische und maschinentechnische Einrichtungen mindestens einmal jährlich durch einen Sachkundigen geprüft werden. Dabei muss unter anderem auf folgende Punkte besonders geachtet werden: 1) Alle Schrauben, mit denen das Gerät oder Geräteteile montiert sind, müssen fest sitzen und dürfen nicht korrodiert sein. -
Page 18: Sicherungswechsel
GE EHJ A1/223 24V/250W G-6,35 50h Best.-Nr. 88289000 OSRAM EHJ 64655HLX A1/223 24V/250W G-6,35 Best.-Nr. 88289010 EUROLITE DMX Operator 192 Kanal Best.-Nr. 70064520 EUROLITE DMX Scan Control 192 Kanal Best.-Nr. 70064525 Wizard-512 USB DMX-Software + Interface Best.-Nr. 51860102 Wizard-1024 USB DMX-Software + Interface Best.-Nr. 51860110 FUTURELIGHT DES-3 Abschlusstecker 3-pol Best.-Nr. -
Page 19: Introduction
- pass this manual on to every further owner or user of the product - download the latest version of the user manual from the Internet INTRODUCTION Thank you for having chosen a EUROLITE TMH-250 EHJ. You will see you have acquired a powerful and versatile device. Unpack your TMH-250 EHJ. - Page 20 If the device has been exposed to drastic temperature fluctuation (e.g. after transportation), do not switch it on immediately. The arising condensation water might damage your device. Leave the device switched off until it has reached room temperature. Please make sure that there are no obvious transport damages. Should you notice any damages on the A/C connection cable or on the casing, do not take the device into operation and immediately consult your local dealer.
-
Page 21: Operating Determinations
HEALTH HAZARD! Never look directly into the light source, as sensitive persons may suffer an epileptic shock (especially meant for epileptics)! Keep away children and amateurs! Never leave this device running unattended. OPERATING DETERMINATIONS This device is a moving-head spot for creating decorative effects. This product is only allowed to be operated with an alternating current of 230 V, 50 Hz and was designed for indoor use only. -
Page 22: Description Of The Device
The lamp must never be ignited if the objective-lens or any housing-cover is open, as discharge lamps may explose and emit a high ultraviolet radiation, which may cause burns. The maximum ambient temperature T = 45° C must never be exceeded. Operate the device only after having familiarized with its functions. -
Page 23: Overview
Overview (1) Projector head (2) Objective-lens (3) Yoke (4) Base (5) Carrying handle (6) Power switch (7) Power supply (8) Fuseholder (9) Ventilation fan (10) DMX-In socket (11) DMX-Out socket (12) Display (13) Function keys 23/63 51786500_V_1_1.DOC... -
Page 24: Installation
INSTALLATION Installing/Replacing the lamp DANGER TO LIFE! Only install the lamp with the device switched off! Unplug from mains before! For the installation, you need one EHJ 24 V/250 W G-6.35 lamp. CAUTION! The lamp has to be replaced when it is damaged or deformed due to the heat! During the operation, the lamp reaches temperatures of up to 600°... -
Page 25: Lamp Adjustment
Lamp adjustment The lampholder is aligned at the factory. Due to differences between lamps, fine adjustment may improve light performance. Strike the lamp, open the shutter and the iris, set the dimmer intensity onto 100 % and focus the light on a flat surface (wall). Center the hot-spot (the brightest part of the beam) using the 3 adjustment screws "A, B, C”. - Page 26 The operator has to make sure that safety-relating and machine-technical installations are approved by an expert after every four year in the course of an acceptance test. The operator has to make sure that safety-relating and machine-technical installations are approved by a skilled person once a year.
- Page 27 (1) Omega-holders (2) Clamp (3) Quick-lock fastener Screw one clamp each via a M12 screw and nut onto the Omega-holders. Insert the quick-lock fasteners of the first Omega-holder into the respective holes on the bottom of the device. Tighten the quick-lock fasteners fully clockwise. Install the second Omega-holder. 27/63 51786500_V_1_1.DOC...
-
Page 28: Dmx-512 Connection / Connection Between Fixtures
DMX-512 connection / connection between fixtures The wires must not come into contact with each other, otherwise the fixtures will not work at all, or will not work properly. Only use a stereo shielded cable and 3-pin XLR-plugs and connectors in order to connect the controller with the fixture or one fixture with another. -
Page 29: Operation
Lighting effects must not be connected to dimming-packs. OPERATION After you connected the effect to the mains, the TMH-250 EHJ starts running. During the Reset, the motors are trimmed and the device is ready for use afterwards. Turn the focus-screw next to the objective-lens for adjusting the focus in order to obtain a sharp projection. -
Page 30: Dmx-Controlled Operation
After having addressed all TMH-250 EHJ, you may now start operating these via your lighting controller. Note: After switching on, the TMH-250 EHJ will automatically detect whether DMX 512 data is received or not. If the data is received, the control LED flashes. If there is no data received at the DMX-input, the control LED lights up permanently. - Page 31 Control-channel 4 - Rotating gobo index, gobo rotation Decimal Hexad. Percentage S/F Feature 00 04 0% 2% S No rotation 5 120 05 78 2% 47% F Forwards gobo rotation with increasing speed 121 139 79 8B 47% 55% S No rotation 140 255 8C FF 55% 100% F Backwards gobo rotation with increasing speed...
-
Page 32: Cleaning And Maintenance
CLEANING AND MAINTENANCE The operator has to make sure that safety-relating and machine-technical installations are inspected by an expert after every four years in the course of an acceptance test. The operator has to make sure that safety-relating and machine-technical installations are inspected by a skilled person once a year. -
Page 33: Replacing The Fuse
GE EHJ A1/223 24V/250W G-6.35 50h No. 88289000 OSRAM EHJ 64655HLX A1/223 24V/250W G-6.35 No. 88289010 EUROLITE DMX Operator 192 Kanal No. 70064520 EUROLITE DMX Scan Control 192 Kanal No. 70064525 Wizard-512 USB DMX-Software + Interface No. 51860102 Wizard-1024 USB DMX-Software + Interface No. 51860110 FUTURELIGHT DES-3 DMX-terminator 3-pin No. -
Page 34: Introduction
- transmettre le mode d'emploi à un éventuel acheteur ou utilisateur de l'appareil - télécharger la version ultérieure du mode d'emploi d'Internet INTRODUCTION Nous vous remercions d'avoir choisi un EUROLITE TMH-250 EHJ. Vous êtes en possession d'un effet lumineux puissant aux possibilités multiples. Sortez le TMH-250 EHJ de son emballage. - Page 35 L'appareil ne doit pas être mis en service lorsqu'il à été transporté d'un endroit froid à un endroit chaud. Il se forme de la condensation qui pourrait endommager l'appareil. Laissez celui-ci atteindre la température ambiante avant de le mettre en service. Avant tout, assurez-vous que l'appareil n'a pas subi de dommages lors de son transport.
-
Page 36: Emploi Selon Les Prescriptions
Lors de la première mise en service, il peut y avoir une émission de fumée et d'odeurs. Ceci n'est pas dû à un défaut de l'appareil. Danger d'incendie! Ne jamais installer l'appareil sur des surfaces facilement inflammables (p.ex. tapis de foire)! Attention: L’appareil produit des témperatures excessives! Evitez de faire des effets "flash"... -
Page 37: Description De L'appareil
- - -m Le symbole indique la distance minimale des objets illuminés. Ne jamais prendre une distance en- dessous de la valeur entre la sortie de lumière et la surface à illuminer! Seulement installer l'appareil sur des surfaces non enflammables. Afin d'assurer une ventilation optimale, il est nécéssaire de laisser un espace d'au moins 50 cm autour de l'appareil. -
Page 38: Aperçue Des Parties
Aperçue des parties (1) Tête rotatif (2) Objectif (3) Bras rotatifs (4) Base (5) Poignée de transport (6) Interrupteur secteur (7) Alimentation (8) Porte-fusible (9) Ventilateur (10) Entrée DMX (11) Sortie DMX (12) Affichage (13) touches de fonction 38/63 51786500_V_1_1.DOC... -
Page 39: Installation
INSTALLATION Installer/Remplacer la lampe DANGER DE MORT! Toujours mettre hors tension avant de mettre en place l'ampoule! Débrancher avant toute manipulation! Pour l'installation, vous avez besoin d'une lampe EHJ 24 V/250 W G-6,35. ATTENTION! La lampe doit être remplacée lorsqu'elle a été endommagée ou déformée par la chaleur! La lampe utilisée a une température moyenne de 600°... -
Page 40: Ajustage De La Lampe
Ajustage de la lampe Le porte-lampe de l’appareil est ajusté à l‘usine. Comme les lampes à utiliser diffèrent d’un fabricant à l’autre, il pourrait devenir nécessaire de procéder à un nouveau ajustage de la position du porte-lampe. Allumez la lampe, ouvriez le shutter et l'iris, ajustez l'intensité du dimmeur à... - Page 41 L’entrepreneur doit s'assurer que les installations concernant la sécurité technique et la sécurité des machines soient examinées par des experts. L’entrepreneur doit s'assurer que les installations concernant la sécurité technique et la sécurité des machines soient examinées au moins tous les quatre ans par un expert au cadre de l’épreuve de réception. L’entrepreneur doit s'assurer que les installations concernant la sécurité...
- Page 42 (1) Fixations Omega (2) Crochet (3) Cerrage Quick-Lock Visser les crochets avec un vis M12 à la fixation Omega. Insérez les deux cerrages Quick-Lock de la première fixation dans les trous dans la base. Fixez les cerrage Quick-Lock. Installez la deuxième fixation Omega. 42/63 51786500_V_1_1.DOC...
-
Page 43: Connexions Au Contrôleur Dmx-512 / Raccord Projecteur - Projecteur
Connexions au contrôleur DMX-512 / raccord projecteur - projecteur Faites attention que les câbles n'ont pas de contact entre eux. Il se peut autrement que les appareil ne fonctionneront pas correctement. Le raccord entre le contrôleur et le projecteur ainsi qu’entre les projecteurs doit être effectué avec un câble gainé... -
Page 44: Alimentation
Ne jamais connecter des effets lumineux à un "dimmer pack". MANIEMENT Le TMH-250 EHJ commençera à fonctionner dès que vous le brancherez au secteur. Durant le Reset (réinitialisation), les moteurs s’ajusteront automatiquement et l’appareil sera prêt à fonctionner après. Ajuster le foyer en tourner le vis du foyer prêt à l'objective pour obtenir une projection claire. -
Page 45: Contrôle Par Dmx
Attention: Après avoir mis le TMH-250 EHJ sous tension, le projecteur reconaîtra s'il recoit des signaux DMX-512 ou non. S' il y a de signaux DMX à la douille entrée DMX, la DEL de contrôle clignote. S' il n'y a pas de signaux DMX à... - Page 46 Canal de contrôle 3 - Roue de couleurs Changement linéaire des couleurs selon le mouvement du régulateur. Decimal Hexad. Percentage S/F Caractéristique 0 16 00 10 0% 6% S Ouvert/blanc 17 33 11 21 7% 13% S Pink 34 50 22 32 13% 20% S Bleu...
-
Page 47: Nettoyage Et Maintenance
NETTOYAGE ET MAINTENANCE L’entrepreneur doit assurer à ce que les installations concernant la sécurité technique et la sécurité des machines soient examinés au moins tous les quatre ans par un expert au cadre de l’épreuve de réception. L’entrepreneur doit assurer à ce que les installations concernant la sécurité technique et la sécurité des machines soient examinés au moins une fois par an par une personne compétente. -
Page 48: Remplacer Le Fusible
N° d'art. 88289000 OSRAM EHJ 64655HLX A1/223 24V/250W G-6,35 N° d'art. 88289010 EUROLITE DMX Operator 192 canaux N° d'art. 70064520 EUROLITE DMX Scan Control 192 canaux N° d'art. 70064525 Wizard-512 USB DMX-Software + Interface N° d'art. 51860102 Wizard-1024 USB DMX-Software + Interface N°... -
Page 49: Introducción
-pasar el manual a cada sucesivo poseedor o usuario del producto -descargar la última versión del manual del Internet INTRODUCCIÓN Gracias por haber elegido un EUROLITE TMH-250 EHJ. Verá que ha adquirido un aparato potente y versátil. Desembale su TMH-250 EHJ. - Page 50 Si el aparato ha estado expuesto a grandes cambios de temperatura (p.e. tras el transporte), no lo enchufe inmediatamente. La condensación de agua producida podría dañar su aparato. Deje el aparato desconec- tado hasta que llegue a la temperatura ambiente. Antes de la puesta en marcha inicial, por favor asegúrese de que no hay daños causados durante el transporte.
-
Page 51: Instrucciones De Manejo
INSTRUCCIONES DE MANEJO Este aparato es un efecto luminoso para crear efectos de decoración. El aparato sólo es permitido para una conexión con una tensión alternativa de 230 V, 50 Hz y ha sido diseñado para ser usado en interiores. Este aparato ha sido diseñado para usos profesionales, por ejemplo en escenas, discotecas, teatros etc. -
Page 52: Descripción Del Aparato
¡Por favor tenga en cuenta que por razones de seguridad las modificaciones no autorizadas del aparato están prohibidas! El código de barras de serie no debe ser quitado del aparato, en caso de que esto ocurra la garantía ya no es válida. -
Page 53: Descripción De Las Partes
Descripción de las partes (1) Cabeza del proyector (2) Objetivo (3) Suspensión (4) Base (5) Asas de transporte (6) Interruptor On/Off (7) Alimentación (8) Portafusible (9) Ventilador (10) Entrada DMX (11) Salida DMX (12) Pantalla (13) Tecla de función 53/63 51786500_V_1_1.DOC... -
Page 54: Instalación
INSTALACIÓN Instalar/Reemplazar la lámpara ¡PELIGRO DE MUERTE! ¡Instale la lámpara únicamente con el aparato desenchufado! ¡Desenchufe-lo de la corriente! Para la instalación, Vd. necesita una lámpara EHJ 24 V/250 W G-6,35. ¡PRECAUCION! ¡La lámpara debe ser reemplazada cuando esté deteriorada o deformada debido al calor! Al operar las lámparas de este tipo llegan a temperaturas de hasta 600°... -
Page 55: Ajuste De La Lámpara
Ajuste de la lámpara El sistema de portalámparas está ajustado en la fábrica. Como las lámparas de los fabricantes diferentes son diferentes, puede ser necesario de reajustar la posición del sistema de portalámparas. Enciende la lámpara, abre el shutter y la iris, coloque la intensidad del dimmer a 100 % y foca el rayo en una superficie plana (pared). - Page 56 Durante el montaje del projector, el desmontaje y operaciones de mantenimiento la presencia en áreas de movimiento, en puentes de iluminación, debajo de puestos de trabajo altos y otros áreas de peligro es permitida. El empresario debe asegurar que instalaciones de seguridad y de máquinas son inspeccionados por un perito antes de la primera puesta en marcha y antes de otra puesta en marcha después de cambios graves.
- Page 57 (1) Soportes Omega (2) Ágrafe (3) Sujetador Quick-Lock Atornille el agrafe con un tornillo M12 con los soportes Omega. Insere los sujetadores Quick-Lock del soporte Omega en los orificios de la parte inferior del aparato. Fijar los sujetadores Quick-Lock. Instale el segundo soporte Omega. Insere el cable de anclaje en el orificio en la base y en el trussing u un lugar de fijación seguro.
-
Page 58: Conexión Al Controlador Dmx / Conexión Proyector - Proyector
Conexión al controlador DMX / conexión proyector - proyector Asegúrese de que los conductores del cable de datos no hagan contacto entre si. Los aparatos no van a funcionar o no van a funcionar correctamente. La conexión entre controlador y proyector y entre proyector y proyector se tiene que efectuar con un cable de dos polos con blindaje. -
Page 59: Alimentación
Efectos de luz no deben ser conectados a dimming-packs. OPERACIÓN Tras la conexión del aparato a la red, el TMH-250 EHJ comienza a funcionar. Durante el Reset, los motores se ajustan y el aparato está listo para ser usado después. -
Page 60: Control Por Dmx
Después de ajustar la dirección de comienzo, Vd. puede controlar el TMH-250 EHJ mediante su controlador DMX. Note: Conecte el TMH-250 EHJ. El aparato controla si recibe datos DMX-512 o no. Si recibe datos, la LED de control parpadea. Si no recibe datos, la LED de control brilla permanentemente. El aviso aparece -si no cable XLR (cable de señal del controlador) habia sido puesto en la entrada DMX del TMH-250 EHJ. -
Page 61: Protócolo Dmx
Protócolo DMX Canal de control 1 - Movimiento horizontal (Pan) (dentro de un ángulo de 360°) Establezca los ajustes para mover la cabeza horizontalmente. Los movimientos graduales de la cabeza mediante el ajuste lento de los valores DMX (0-255; 128 = centro). Canal de control 2 - Movimiento vertical (Tilt) (dentro de un ángulo de 250°) Establezca los ajustes para mover la cabeza verticalmente (TILT). -
Page 62: Limpieza Y Mantenimiento
LIMPIEZA Y MANTENIMIENTO El empresario debe asegurar que instalaciones de seguridad y de máquinas son inspeccionados por un perito en la extension de una inspección inicial cada cuatro años por lo menos. El empresario debe asegurar que instalaciones de seguridad y de máquinas son inspeccionados por un baquiano una vez por año. -
Page 63: Reemplazar El Fusible
GE EHJ A1/223 24V/250W G-6,35 50h Referencia 88289000 OSRAM EHJ 64655HLX A1/223 24V/250W G-6,35 Referencia 88289010 EUROLITE DMX Operator 192 Kanal Referencia 70064520 EUROLITE DMX Scan Control 192 Kanal Referencia 70064525 Wizard-512 USB DMX-Software + Interface Referencia 51860102 Wizard-1024 USB DMX-Software + Interface Referencia 51860110 FUTURELIGHT DES-3 Clavija terminación 3-p...
Need help?
Do you have a question about the TMH-250 EHJ and is the answer not in the manual?
Questions and answers