Table of Contents
Advertisement
Advertisement
Table of Contents
Troubleshooting

Related Manuals for BossWeld Buddy MIG 150


Summary of Contents for BossWeld Buddy MIG 150
- Page 1 MIG 150 STICK INSTRUCTION MANUAL bossweld.com.au...
-
Page 2: Table Of Contents
CONTENTS Specifications ......................... Page 02 Machine Overview ........................Page 03 Control Panel Overview ......................Page 03 Wire Feeder Overview ......................Page 04 Safety Information ........................Page 04 Machine Safety ........................Page 05 Work Area Safety ........................Page 05 Personal Protective Equipment (PPE) ..................Page 06 Maintenance ...........................Page 06 Wire Feeder Machine Set Up ....................Page 07 MIG Gasless Machine Set Up ....................Page 08... -
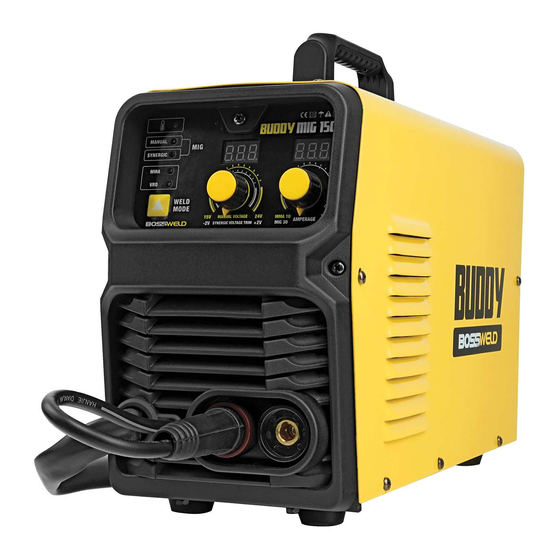
Page 3: Machine Overview
4. Manual MIG Mode Indicator Light Knob (R) 5. Synergic MIG Mode Indicator Light 6. Stick Mode Indicator Light 7. VRD Indicator Light Indicates that the Voltage Reduction Device is operating. VRD reduces the Open Circuit Voltage before welding for added safety bossweld.com.au... -
Page 4: Wire Feeder Overview
WIRE FEEDER OVERVIEW 1. Spool Holder 2. Wire Inlet 3. Wire Feed Tension Adjustment Knob 4. Wire Feed Tension Arm 5. Wire Drive Roller SAFETY INFORMATION WARNING! The device and packaging material are not toys! Children must not be allowed to play with the machine and its accessories. -
Page 5: Machine Safety
Working with more than one welding machine on a single work piece, or on work pieces that are connected, may generate a dangerous accumulation of no-load voltage between two different electrode holders or torches, the value of which may reach double the allowed limit. bossweld.com.au... -
Page 6: Personal Protective Equipment (Ppe)
PERSONAL PROTECTIVE EQUIPMENT (PPE) PERSONAL PROTECTIVE EQUIPMENT MUST BE USED WHEN MACHINE IS IN USE! GLOVES AND PROTECTIVE CLOTHING Use protective gloves and fire resistant protective clothing when welding. Avoid exposing skin to ultraviolet rays produced by the arc. WELDING HELMET Under no circumstances should the welder be operated unless the operator is wearing a welding helmet to protect the eyes and face. -
Page 7: Wire Feeder Machine Set Up
11. Switch machine power OFF. 12. Reinstall the welding tip over wire. Ensure contact tip size matches the size of the wire being used. Do not overtighten. Reinstall nozzle. 13. Trim wire to the end of the nozzle. bossweld.com.au... -
Page 8: Mig Gasless Machine Set Up
MIG WELDING MACHINE SET UP - GASLESS WARNING! Ensure the machine is turned off and disconnected from the power supply before performing any of the following operations. Connecting Work Clamp & Setting Polarity 1. Plug Work clamp connector into the Positive terminal. Twist to ensure a good connection. -
Page 9: Mig Gas Machine Set Up
Use the table below as a guide: MANUAL Metal Type Recommended Gas SYNERGIC Mild Steel Ar-CO Stainless Steel Ar-CO Low Alloy Steel Ar-CO WELD MODE Galvanised Steel Ar-CO MANUAL VOLTAGE MMA 101 AMPERAGE Aluminium MIG 30 SYNERGIC VOLTAGE TRIM bossweld.com.au... -
Page 10: Mig Operation
OPERATION - MIG WELDING WARNING! Ensure appropriate PPE is worn, and work area is clear of hazards prior to operation. Starting The Arc 1. Feed approximately 8-10mm of wire from the end of the torch (also called ‘stickout’) by pulling the trigger on the torch. -
Page 11: Mma (Stick) Machine Set Up
8. Rotate the Current Adjustment Knob (R) to set welding current. Use the Welding Current Guide on next page. MANUAL SYNERGIC WELD MODE MANUAL VOLTAGE MIG 150 SYNERGIC VOLTAGE TRIM MANUAL SYNERGIC WELD MODE MANUAL VOLTAGE MMA 101 AMPERAGE MIG 30 SYNERGIC VOLTAGE TRIM bossweld.com.au... -
Page 12: Mma (Stick) Operation
MMA (STICK) WELDING OPERATION WARNING! Ensure appropriate PPE is worn, and work area is clear of hazards prior to operation. Starting The Arc 1. Hold the Electrode above the work piece. In a smooth, quick motion, scratch the electrode across the work piece to create the arc. Welding Work Piece 2. -
Page 13: Trouble Shooting
5. Select a lower voltage range and /or adjust the wire speed to suit Increase travel speed Lack of Penetration 1. Select a higher voltage range and /or adjust the wire speed to suit Reduce travel speed 2. Remove materials like paint, grease, oil, and dirt, including mill scale from base metal bossweld.com.au... -
Page 14: Trouble Shooting - Wire Feeder
TROUBLE SHOOTING - WIRE FEEDER Problem Suggested Remedy No wire feed 1. Check that the MMA/MIG selector switch set to MIG position Inconsistent / interrupted 1. Be sure to adjust the wire feed and voltage dials for MIG welding. wire feed The current dial is for MMA welding mode. -
Page 15: Box Contents
OPTIONAL ACCESSORIES 1. Bossweld Wideview Welding Helmet - Blaze (700199) 2. Bossweld Mild Steel MIG Wire - 0.8mm x 0.7kg (200003) 3. Bossweld Mild Steel MIG Wire - 0.8mm x 5kg (200004) 4. Bossweld Gasless GS MIG - 0.8mm x 0.9kg (200342) 5. -
Page 16: Warranty Information
WARRANTY PRIOR TO RETURNING YOUR PRODUCT FOR WARRANTY PLEASE CHECK THE TROUBLESHOOTING GUIDE IN THE PRODUCT INSTRUCTION MANUAL FOR SERVICE SUPPORT PLEASE CALL (02) 8761 6500 IN ORDER TO MAKE A CLAIM UNDER WARRANTY YOU MUST RETURN THE PRODUCT TO THE ORIGINAL PLACE OF PURCHASE ALONG WITH YOUR PURCHASE RECEIPT.
Need help?
Do you have a question about the Buddy MIG 150 and is the answer not in the manual?
Questions and answers