
Related Manuals for Deltec CADD-Prizm VIP CONTIN 6100


Summary of Contents for Deltec CADD-Prizm VIP CONTIN 6100
- Page 1 P A T I E N T I N F O R M A T I O N CONTIN Continuous Delivery Mode Model 6100 and 6101 Ambulatory Infusion Pumps...
-
Page 2: Table Of Contents
Table of Contents Introduction ..............Warnings ..............Cautions ................. ® CADD-Prizm Pump (Diagram) ........Description of the Keys ..........Installing a New Battery ..........The Main Screen ............10 Å The HELP Key ............11 Starting the Pump ............12 Stopping the Pump ............ -
Page 3: Introduction
Introduction ® Your doctor has recommended that you use the CADD-Prizm pump as part of your treatment. ® The CADD-Prizm pump can be carried with you and is designed to deliver medication into your body. Your physi- cian will prescribe your medication specifically for you. Your prescription is programmed into your pump by your clinician according to your physician’s specific orders. -
Page 4: Warnings
Failure to properly follow warnings, cautions, and instruc- tions could result in damage to the pump or death or serious injury. W a r n i n g s • If the pump is used to deliver life-sustaining medication, an additional pump must be available. - Page 5 • If the pump is dropped or hit, the battery door may be- come broken or damaged. Do not use the pump if the battery door is damaged because the battery will not be properly secured; this may result in loss of power or non- delivery of drug.
-
Page 6: Cautions
• Do not prime the fluid path with the tubing connected to your catheter. This could result in over-delivery of medica- tion or air embolism. • Ensure that the entire fluid path is free of all air bubbles before connecting to your catheter to prevent air embo- lism. - Page 7 • Do not use the pump in the presence of flammable anes- thetics or explosive gasses. • Use only Deltec accessories as using other brands may adversely affect the operation of the pump.
-
Page 8: Cadd-Prizm ® Pump (Diagram)
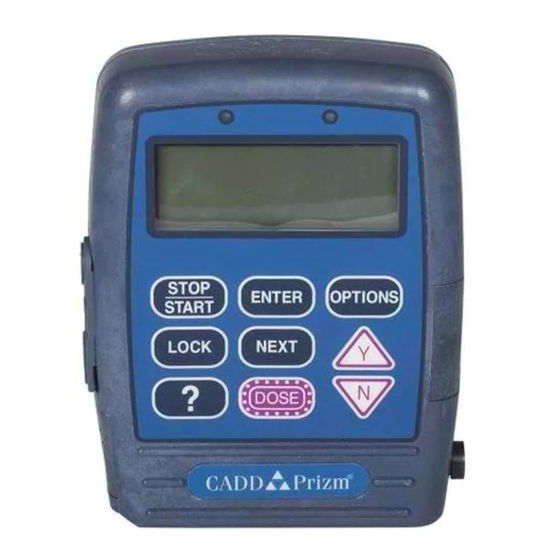
® CADD-Prizm Pump (Diagram) Green Amber Light Light Display Keypad Power Jack Battery Compartment Data In/Out Jack Air Detector Cassette (Optional) (The part of the Medication ™ Cassette Reservoir ® or the CADD Administration Set that attaches to the pump) Green Light Blinks every 3 seconds when the pump is running and deliver- ing medication. -
Page 9: Description Of The Keys
D e s c r i p t i o n o f t h e K e y s ⁄ Starts and stops the pump and silences alarms. Œ Used by the clinician. Å The “Help” Key — explains what you see on the display. -
Page 10: Installing A New Battery
Installing a New Battery If 9-volt Battery Low or 9-volt Battery Depleted appears in the display, or if Battery Low appears on the main screen, you should change the battery. Use a new 9 volt alkaline or lithium battery such as the ®... - Page 11 To install a new battery: ⁄ 1. Stop the pump by pressing 2. When you see Stop the pump?, Stop the Pump? ´ press 3. Press the button on the Press Y or N battery door and slide the battery door forward. Remove on»...
-
Page 12: The Main Screen
an electronic self-test, and the pump will beep at the end of the power up sequence. All of the display indicators, the software revision level, and each parameter will appear briefly. CAUTION: Do not store the pump for prolonged periods of time with the battery installed. -
Page 13: The Help Key
Å The HELP Key Å If you have a question about a screen, press for more information. A description of the screen will appear. For example, if you want information about the Reservoir Å Volume screen, you can press and the following will appear: The symbol (?≥) in the lower This is the... -
Page 14: Starting The Pump
Starting the Pump When you start the pump, it will review the program, and then begin delivering medication. If the pump will not start, a message should appear on the display. Refer to the Messages and Alarms section on page 23. WARNING: Prior to starting infusion, inspect the fluid path for kinks, a closed clamp, or other upstream obstructions, and remove all air bubbles to prevent air embolism. -
Page 15: Stopping The Pump
Stopping the Pump Stopping the pump stops delivery of medication. Whenever the pump is stopped, the amber light will blink. ⁄ Stop the Pump? 1. Press 2. When Stop the Pump? ap- ´ Press Y or N pears, press STOPPED will appear on the CONTIN 6220X *** main screen, and the amber STOPPED... -
Page 16: Removing A Cassette
R e m o v i n g a Cassette WARNING: Close the tubing clamp before removing the cassette from the pump to prevent unregulated infusion, which could result in death or serious injury. To remove a cassette: Stop the Pump? ⁄... -
Page 17: Attaching A Cassette
A t t a c h i n g a Cassette WARNING: ® • You must use a CADD Extension Set with Anti-Siphon ® Valve or a CADD Administration Set with either an integral or add on Anti-Siphon Valve to protect against unregulated gravity infusion that can result from an improperly attached cassette. - Page 18 3. Place the pump upright on a firm, flat surface. Press down so the cassette fits tightly against the pump. ® 2000-03-08 D. Zurn T bl 4. Insert a coin into the latching button, push in, and turn counterclockwise until the mark on the latch lines up with the solid dot.
- Page 19 6. A message will appear on the Admin set latched display showing the type of cassette you have latched. „ Next to continue Press 7. Reset Reservoir Volume to — ? Reset Reservoir ´ Volume to 100.0 ml? may appear. Press to reset the Reservoir Volume to the Press Y or N...
-
Page 20: Resetting The Reservoir Volume
R e s e t t i n g t h e R e s e r v o i r V o l u m e Normally, when you lock a new cassette on the pump, you will be prompted to reset the Reservoir Volume. You can, however, reset the Reservoir Volume without changing the cassette. -
Page 21: Priming The Tubing And Starting The Pump
Priming the Tubing and Starting the Pump When the new cassette is attached, the pump may automati- cally prompt you to prime the tubing. Prime Tubing? 1. If Prime Tubing? appears, ´ press Press Y or N 2. This screen will appear. Make sure you are not connected Disconnect tubing to the pump’s tubing. - Page 22 When the new cassette is attached, the pump will automati- cally prompt you to start the pump. 5. When Start the Pump? Start the Pump? appears, check to see if the fluid path is free of air. If Press Y or N your clinician has instructed you to use the Air Detector, go to the next section.
-
Page 23: Inserting The Tubing Into The Air Detector
I n s e r t i n g t h e Tu b i n g i n t o t h e A i r D e t e c t o r The Air Detector is designed to detect air bubbles in the fluid path. -
Page 24: What If I Drop Or Hit The Pump
W h a t i f I d r o p o r h i t t h e p u m p ? What should I do if I drop the pump in water? If you accidentally drop the pump in water, retrieve it quickly, dry it off with a towel, and call your clinician. -
Page 25: Alarms And Messages
Alarms and Messages If there are alarms or special messages you need to be aware of, the pump will beep or sound an alarm. Look at the screen Å and follow the steps in this table, or press for help. When you see: Take this action: The 9 volt battery is low but the... - Page 26 Alarms and Messages When you see: Take this action: There may be a kink in the High Pressure tubing or a clamp may be closed. Unkink the tubing or Pump Stopped open the clamp and the pump will resume delivery. You may ⁄...
- Page 27 A l a r m s a n d M e s s a g e s When you see: Take this action: Fluid is not flowing from the Upstream Occlusion fluid container to the pump. Check for a kink, a closed clamp, Press STOP to silence or an air bubble in the tubing between the fluid container and...
- Page 28 A l a r m s a n d M e s s a g e s When you see: Take this action: The Reservoir Volume value is Reservoir Volume low, indicating that the level of fluid in the fluid container is NEXT to continue low.
- Page 30 Yo u r C l i n i c i a n ’s Name: ________________________________________________ Phone Number: _______________________________________ I n s t r u c t i o n s : Pump placement during bathing/showering: _____________ _______________________________________________________ Pump placement during sleep: __________________________ _______________________________________________________ Storage of medication: _________________________________ _______________________________________________________...
- Page 31 N o t e s...
- Page 32 4,559,038; 4,565,542; 4,650,469; 5,181,910; 5,338,157; 5,364,242; 5,485,408; 5,531,697; 5,531,698; 5,538,399; 5,540,561; 5,564,915; 5,567,136; 5,567,119; 5,695,473 (Model 6101 only); other patents pending. 19815 © 2000 SIMS Deltec, Inc. All rights reserved. Printed in U.S.A. 2000-04 SIMS Deltec, Inc., St. Paul, MN 55112 U.S.A.
Need help?
Do you have a question about the CADD-Prizm VIP CONTIN 6100 and is the answer not in the manual?
Questions and answers