Advertisement
Quick Links
Advertisement

Subscribe to Our Youtube Channel
Related Manuals for True MP 2.0


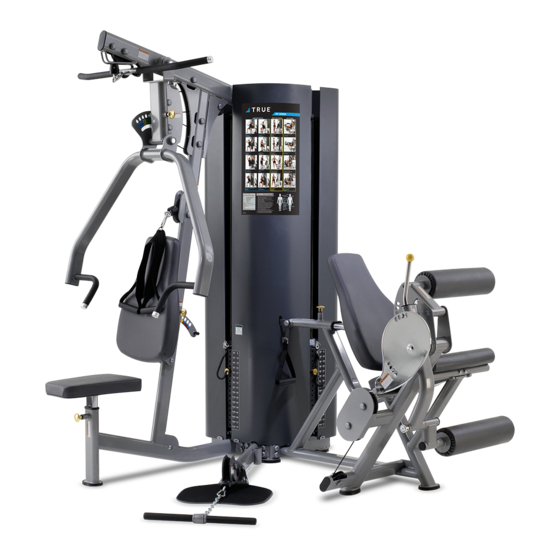
Summary of Contents for True MP 2.0
- Page 1 MP 2.0 MP 2.5 SSEMBLY ANUAL AM-MP-2-0 022520...
- Page 2 Технические характеристики, особенности и программного обеспечения могут быть изменены без предварительного уведомления. Для получения самой последней на сегодняшний день руководство по эксплуатации пожалуйста, посетите www.truefitness.com .Для документов на другие языки, пожалуйста, посетите www.truefitness.com/resources/document-library/ Page # 2 of 47 True Fitness Technology • O’Fallon, MO • Phone: 800-426-6570/636-272-7100 • Truefitness.com...
- Page 3 The proud manufacturing tradition of quality and the culture of innovation at TRUE have given rise to a full line of extraordinary cardio and strength equipment. As a result, people all over the world are benefiting from the TRUE experience.
- Page 4 TACK ABELS 18: I ..............40 NSTALL THE ..................... 42 ROCEDURE ABEL ....................... 43 ARNING ABELS ........................44 ERVICE ................. 45 ARAMOUNT IMITED ARRANTY Page # 4 of 47 True Fitness Technology • O’Fallon, MO • Phone: 800-426-6570/636-272-7100 • Truefitness.com...
- Page 5 Be certain members are instructed on how to operate and adjust all safety mechanisms. Page # 5 of 47 True Fitness Technology • O’Fallon, MO • Phone: 800-426-6570/636-272-7100 • Truefitness.com...
- Page 6 3. Install this piece of equipment on a solid level surface that does not deviate more then 1/8” over a 10’ distance (or as defined and required by local building and architectural codes. 4. TRUE strongly recommends that all equipment be anchored to the floor to prevent movement and increase stability.
- Page 7 4. Replace any warning label at first sign of wear. Labels and the Facility Safety Sign may be obtained from Paramount free of charge. ENGTH EASURING UIDE FLAT HEAD SCREW BUTTON HEAD SCREW HEX HEAD SCREW SOCKET HEAD SCREW Page # 7 of 47 True Fitness Technology • O’Fallon, MO • Phone: 800-426-6570/636-272-7100 • Truefitness.com...
- Page 8 Retain these instructions for future reference. If you have any questions, do not hesitate to contact your Paramount dealer or Paramount Fitness Corp. at (800)721-2121 or nasales@paramountfitness.com. Page # 8 of 47 True Fitness Technology • O’Fallon, MO • Phone: 800-426-6570/636-272-7100 • Truefitness.com...
- Page 9 2 X 250 lbs. 1010 LBS [458 KG] 1145 LBS [519 KG] 92 LBS/FT [447 KG/M MAXIMUM USER WEIGHT IS 300 LBS. (136 KG.) Page # 9 of 47 True Fitness Technology • O’Fallon, MO • Phone: 800-426-6570/636-272-7100 • Truefitness.com...
- Page 10 Hardware and components are indicated with a balloon. Refer to the hardware tables that accompany each step for corresponding size and type. Be sure all hardware is tight before using the machine. Page # 10 of 47 True Fitness Technology • O’Fallon, MO • Phone: 800-426-6570/636-272-7100 • Truefitness.com...
- Page 11 Strength MP 2.0 & 2.5 Included in this box: -All Hardware -Assembly Manual -Weight Stack Labels Page # 11 of 47 True Fitness Technology • O’Fallon, MO • Phone: 800-426-6570/636-272-7100 • Truefitness.com...
- Page 12 Strength MP 2.0 & 2.5 Carton Contents Box 1: Page # 12 of 47 True Fitness Technology • O’Fallon, MO • Phone: 800-426-6570/636-272-7100 • Truefitness.com...
- Page 13 Strength MP 2.0 & 2.5 Carton Contents Box 2: Tagged for use only on Leg Ext/Curl weight stack. Page # 13 of 47 True Fitness Technology • O’Fallon, MO • Phone: 800-426-6570/636-272-7100 • Truefitness.com...
- Page 14 10 LB. Weight Plate Box Part Number: B1603 Part Number: B1602 Comprised of Comprised of (4) x 15lb. Weight Plates (4) x 10 lb. Weight Plates Page # 14 of 47 True Fitness Technology • O’Fallon, MO • Phone: 800-426-6570/636-272-7100 • Truefitness.com...
- Page 15 6. Install the rubber feet Threaded cable end. Insert the pre-assembled cables as far as possible into the upright as shown. Page # 15 of 47 True Fitness Technology • O’Fallon, MO • Phone: 800-426-6570/636-272-7100 • Truefitness.com...
- Page 16 3. Be sure that both the Seat pad and Back pad can adjust easily. Note: The adjustment slots are in front. Page # 16 of 47 True Fitness Technology • O’Fallon, MO • Phone: 800-426-6570/636-272-7100 • Truefitness.com...
- Page 17 First, place the slot in the plate over the stop peg, then rotate the arm down to line up the axle housings. TO INSTALL ARM Installation may require two people. Page # 17 of 47 True Fitness Technology • O’Fallon, MO • Phone: 800-426-6570/636-272-7100 • Truefitness.com...
- Page 18 (P13-0167). The following pages show sections in greater detail. P13-0167 This section of cable comes pre-assembled from the factory. Attach cable after weight stack is installed. Page # 18 of 47 True Fitness Technology • O’Fallon, MO • Phone: 800-426-6570/636-272-7100 • Truefitness.com...
- Page 19 Chest Press Station Attach cable after weight stack is installed. Page # 19 of 47 True Fitness Technology • O’Fallon, MO • Phone: 800-426-6570/636-272-7100 • Truefitness.com True Fitness Technology • O’Fallon, MO • Phone: 800-426-6570/636-272-7100 • Truefitness.com...
- Page 20 Low Pulley. out the Low Pulley. Page # 20 of 47 True Fitness Technology • O’Fallon, MO • Phone: 800-426-6570/636-272-7100 • Truefitness.com...
- Page 21 3. Make sure the cable and pulleys can move freely. Chest Press Floating Pulley From Mid Pulley in the Chest Press Station To Low Pulley Bottom Upright Page # 21 of 47 True Fitness Technology • O’Fallon, MO • Phone: 800-426-6570/636-272-7100 • Truefitness.com...
- Page 22 Use this pre-installed wire tie to pull cable through the Low Pulley by wrapping it the cable through the Low Pulley. around the threads of the bolt. Page # 22 of 47 True Fitness Technology • O’Fallon, MO • Phone: 800-426-6570/636-272-7100 • Truefitness.com...
- Page 23 9/16” or star toothed washer are adjustable wrench. in place, then tighten Lock Washer the cable bolt. Cable bolt Star Toothed Washer Plastic End Piece Page # 23 of 47 True Fitness Technology • O’Fallon, MO • Phone: 800-426-6570/636-272-7100 • Truefitness.com...
- Page 24 SSEMBLE THE RAME 1. Loosely assemble ALL hardware shown in this step. DO NOT TIGHTEN THE HARDWARE. 2. Assemble rubber foot. Do not tighten. Page # 24 of 47 True Fitness Technology • O’Fallon, MO • Phone: 800-426-6570/636-272-7100 • Truefitness.com...
- Page 25 3. Assemble the rubber foot. Assemble all the hardware. Then tighten everything, including the hardware from the previous step. Note: Use curved washers here. Page # 25 of 47 True Fitness Technology • O’Fallon, MO • Phone: 800-426-6570/636-272-7100 • Truefitness.com...
- Page 26 2. Insert the bolt through both the frame and the axle, then assemble and tighten the hardware. Page # 26 of 47 True Fitness Technology • O’Fallon, MO • Phone: 800-426-6570/636-272-7100 • Truefitness.com...
- Page 27 Then tighten the screw in the collar. 3. Assemble the Ankle Pad as shown. Be sure the Pad Frame can rotate freely. Then tighten the screw in the collar. Page # 27 of 47 True Fitness Technology • O’Fallon, MO • Phone: 800-426-6570/636-272-7100 • Truefitness.com...
- Page 28 2. Loosely assemble the Handle to the frame using the 4” bolts. 3. Assemble the Seat Pad and then tighten all the hardware. Note: Use curved washers here. Page # 28 of 47 True Fitness Technology • O’Fallon, MO • Phone: 800-426-6570/636-272-7100 • Truefitness.com...
- Page 29 Each weight stack consists of either (Qty. 16) - 10 lb. weight plates OR (Qty. 16) - 15 lb. weight plates. Page # 29 of 47 True Fitness Technology • O’Fallon, MO • Phone: 800-426-6570/636-272-7100 • Truefitness.com...
- Page 30 MP 2.0 & 2.5 11: I NSTALL ABLE 1. This step is for use only with the MP 2.0. If you have purchased the MP 2.5, please refer to the MP 2.5 manual to install this cable and the Leg Press.
- Page 31 MP 2.5 manual to install this cable and the Leg Press. Attach this end after weight stack is installed. OTTOM PRIGHT To Leg Ext/Curl Page # 31 of 47 True Fitness Technology • O’Fallon, MO • Phone: 800-426-6570/636-272-7100 • Truefitness.com...
- Page 32 3. Be sure the cable clears the retaining bolts and that the pulleys can rotate freely. Open Access plate to assist cable routing. Page # 32 of 47 True Fitness Technology • O’Fallon, MO • Phone: 800-426-6570/636-272-7100 • Truefitness.com...
- Page 33 To Attach Cable. weight plates. 2.0” 1” (25mm) (50mm) IMPORTANT ! Be sure to assemble the shroud holders before the weight plates. Page # 33 of 47 True Fitness Technology • O’Fallon, MO • Phone: 800-426-6570/636-272-7100 • Truefitness.com...
- Page 34 Tension the cable so that the weight stack selector pin can be easily inserted into each weight plate. 4. Finally, tighten the retaining nut. Page # 34 of 47 True Fitness Technology • O’Fallon, MO • Phone: 800-426-6570/636-272-7100 • Truefitness.com...
- Page 35 Be sure to assemble the shroud holders before the weight plates. Page # 35 of 47 True Fitness Technology • O’Fallon, MO • Phone: 800-426-6570/636-272-7100 • Truefitness.com...
- Page 36 3. Assemble the set screws on the bottom shroud holders. This screw retains both the guide rod and the shroud. Page # 36 of 47 True Fitness Technology • O’Fallon, MO • Phone: 800-426-6570/636-272-7100 • Truefitness.com...
- Page 37 4. After aligning all component edges and surfaces, tighten the hardware. Front shroud shown as transparent in order to see the installation hardware. Page # 37 of 47 True Fitness Technology • O’Fallon, MO • Phone: 800-426-6570/636-272-7100 • Truefitness.com...
- Page 38 These screws retain both the guide rod and the shroud. Use a 6” socket extension to install these screws. Page # 38 of 47 True Fitness Technology • O’Fallon, MO • Phone: 800-426-6570/636-272-7100 • Truefitness.com...
- Page 39 250 lbs (15 lbs plates) depending on your order. Make sure the numbers on the label line up with their corresponding weight plate. Page # 39 of 47 True Fitness Technology • O’Fallon, MO • Phone: 800-426-6570/636-272-7100 • Truefitness.com...
- Page 40 Install plastic Bolt covers (C-955) over all the exposed screws on the machine. They will snap on to the Bolt Cover Base (C-955A) which was installed earlier. Page # 40 of 47 True Fitness Technology • O’Fallon, MO • Phone: 800-426-6570/636-272-7100 • Truefitness.com...
- Page 41 Shroud on the Leg Press side as shown. Approx. 1” (25 mm) Approx. 3” (75 mm) Apply label only when Leg Press option is used. LEG PRESS Page # 41 of 47 True Fitness Technology • O’Fallon, MO • Phone: 800-426-6570/636-272-7100 • Truefitness.com...
- Page 42 Label required for the MP 2.0 and MP 2.5. If this label is missing or becomes damaged, Paramount will replace it free of charge. Page # 42 of 47 True Fitness Technology • O’Fallon, MO • Phone: 800-426-6570/636-272-7100 • Truefitness.com...
- Page 43 Strength MP 2.0 & 2.5 Warning Labels The following are the Warning labels required for the MP 2.0 and MP 2.5. If any of these tables are missing or become damaged, Paramount will replace them free of charge. Note: these labels are not to scale.
- Page 44 4. Verify that the selector pin can be inserted into each weight plate. 5. Perform the exercise on each station to verify the cable routes smoothly and the machine operates correctly. Page # 44 of 47 True Fitness Technology • O’Fallon, MO • Phone: 800-426-6570/636-272-7100 • Truefitness.com...
- Page 45 Hours of operation 8:30am - 5:00 pm CST workmanship for a 10 years. The frame is warranted for labor and freight (for parts shipped from TRUE) for one year from date of purchase. * This limited warranty on structural frame does not include paint or coatings.
- Page 46 DAMAGES, SO THE ABOVE LIMITATION OR EXCLUSION MAY NOT APPLY TO YOU. TRUE within 30 days of purchaser’s receipt of this Product. The serial number must be intact on the Product for this Limited Warranty to be valid.
- Page 47 If you prefer to mail your warranty card, have the owner of the product complete the information below and return it to TRUE Fitness within 30 days from the date of equipment installation.
Need help?
Do you have a question about the MP 2.0 and is the answer not in the manual?
Questions and answers