Advertisement
Quick Links
VS-88UHDA Quick Start Guide
This guide helps you install and use your VS-88UHDA for the first time.
Go to
upgrades are available.
Scan for full manual
Step 1: Check what's in the box
VS-88UHDA 8x8 UHDA Matrix Switcher
1 Power cord
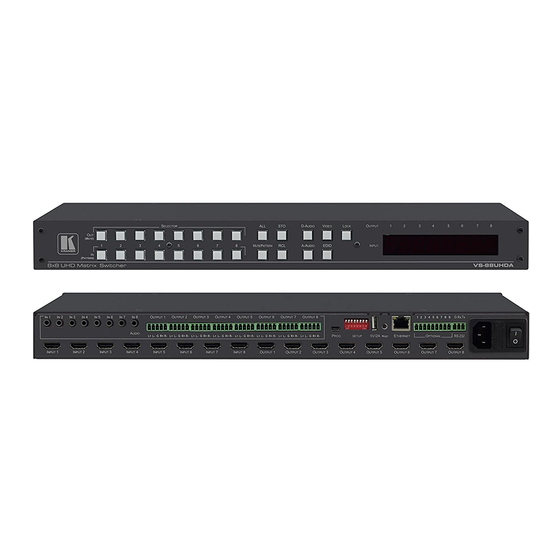
Step 2: Get to know your VS-88UHDA
#
Feature
1
IN (PATTERN)
SELECTOR Buttons
2
OUT (MUTE) SELECTOR
Buttons
3
MUTE/PATTERN Button
4
ALL Button
5
STO and RCL Buttons
6
A-AUDIO Button
7
D-AUDIO Button
8
VIDEO Button
9
LOCK Button
10
EDID Button
11
OUTPUT/INPUT
7-segment LED Display
VS-88UHDA Enhanced Quick Start (P/N: 2900-300790QS REV 2)
www.kramerav.com/downloads/VS-88UHDA
Function
Press to select the input (1 to 8) to switch after selecting an output (also used for storing machine
setups in the STO-RCL modes and for selecting a pattern in the Pattern mode).
Press to select an output (1 to 8) to which the input is routed. Also used for storing machine presets.
Press to view the current pattern status and select the output/s to which a pattern is routed.
Press to mute audio or video on a selected output when D-AUDIO/A-AUDIO, and/or VIDEO buttons
are pressed (lit).
Press to perform an action on all outputs (for example setting Mute mode, Pattern mode and so on).
For switching, press ALL and then a specific IN button to route the selected input to all outputs. For
example, press ALL and then IN 2 to route input 2 to all the outputs.
Press STO to store the current switching setting to a preset button.
Press RCL to recall the switching setting from a preset button.
Press to enable analog audio routing. When pressed together with VIDEO, the analog audio is routed
together with the video signal.
Press to enable digital audio routing. When pressed together with VIDEO, the digital audio is routed
together with the video signal.
Press to select video inputs. When pressed together with D-AUDIO/A-AUDIO, video is switched
together with audio.
Press and hold to toggle locking/releasing of the front panel buttons.
Press to save the following setups: HDCP (On/Off), ARC, Fast Switch and Switch mode.
Press to capture the EDID.
Displays the selected inputs switched to the outputs (marked above each input).
to download the latest user manual and check if firmware
1 Quick start guide
4 Rubber feet
P/N:
2 9 0 0 - 3 0 0 7 9 0 Q S
1 Set of rack ears
Rev:
2
Advertisement

Related Manuals for Kramer VS-88UHDA


Summary of Contents for Kramer VS-88UHDA
- Page 1 VS-88UHDA Quick Start Guide This guide helps you install and use your VS-88UHDA for the first time. Go to www.kramerav.com/downloads/VS-88UHDA to download the latest user manual and check if firmware upgrades are available. Scan for full manual Step 1: Check what’s in the box...
- Page 2 Step 4: Connect the inputs and outputs Always switch OFF the power on each device before connecting it to your VS-88UHDA. For best results, we recommend that you always use Kramer high-performance cables to connect AV equipment to the VS-88UHDA.
- Page 3 Kramer cables available at www.kramerav.com/product/VS-88UHDA. Step 5: Connect the power Connect AC power to the rear of the VS-88UHDA, switch on its power and then switch on the power on each device. Step 6: Operate the VS-88UHDA Via the front panel buttons: The 7-segment display shows the status of VS-88UHDA during normal operation and displays device information.
- Page 4 Step-in Settings: Control Step-in devices that are connected to the inputs. Select a device (that is connected to a VS-88UHDA input), set the input signal type, and set the outputs to which the input signal is switched when the Step-in button is pressed (on the Step-in device).
Need help?
Do you have a question about the VS-88UHDA and is the answer not in the manual?
Questions and answers