Table of Contents
Advertisement
Quick Links
I N S T A L L A T I O N I N S T R U C T I O N S
Instrucciones de instalación
Installationsanleitung
Instruções de Instalação
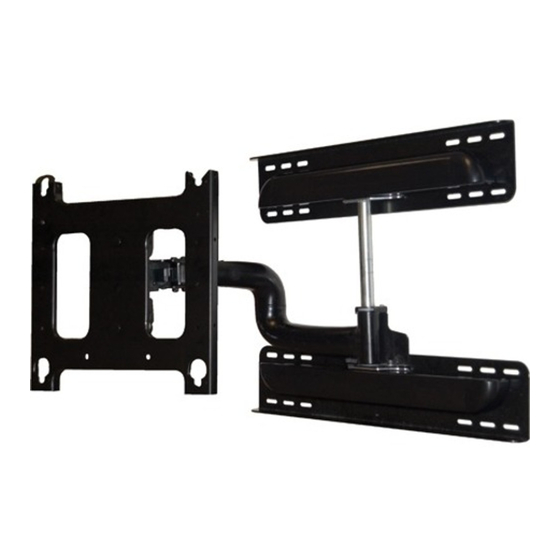
Large Flat Panel Steel Stud Wall Mount
Istruzioni di installazione
Installatie-instructies
Instructions d´installation
Spanish Product Description
German Product Description
Portuguese Product Description
Italian Product Description
Dutch Product Description
French Product Description
PWRSKU
Advertisement
Table of Contents

Related Manuals for CHIEF PWRSKU


Summary of Contents for CHIEF PWRSKU
- Page 1 I N S T A L L A T I O N I N S T R U C T I O N S Instrucciones de instalación Istruzioni di installazione Installationsanleitung Installatie-instructies Instruções de Instalação Instructions d´installation Large Flat Panel Steel Stud Wall Mount Spanish Product Description German Product Description Portuguese Product Description Italian Product Description Dutch Product Description French Product Description PWRSKU...
-
Page 2: Installation Instructions
It is the installer’s Chief® and ClickConnect™ are registered trademarks of responsibility to make sure the structure to which this mount Milestone AV Technologies. All rights reserved. - Page 3 Installation Instructions PWRSKU DIMENSIONS PRODUCT FEATURES WEIGHT CAPACITY 125 LBS Mounting Pattern HEIGHT ADJUSTMENT 0" NOTE: CUSTOM INTERFACE BRACKET TILT / ROLL / YAW +5 ,-15 / 2.5 / 0 NOT SHOWN. THE CUSTOM INTERFACE BRACKET NEEDED FOR YOUR DISPLAY WILL ADD BETWEEN 1/2"...
- Page 4 PWRSKU Installation Instructions TOOLS REQUIRED FOR INSTALLATION AND PARTS 1/2" (Ø13mm) A (1) C (8) B (8) (1/4"-20 x 1 3/4") (1/4") E (2) D (8) (1/4"-20 SNAPTOGGLE BB) F (1) G (4) H (1) J (2) K (12)
-
Page 5: Site Requirements
Installation Instructions PWRSKU Site Requirements IMPROPER INSTALLATION CAN LEAD TO EQUIPMENT FALLING CAUSING SERIOUS PERSONAL INJURY WARNING: OR DAMAGE TO EQUIPMENT! The figure below identifies the minimum reguirements for installation of display mounts onto a steel stud structure. If the structure or its components do not meet these requirements contact the mount manufacturer for specific instructions before attempting installation. - Page 6 PWRSKU Installation Instructions Holding plastic straps on anchor (D), pull anchor away from Mount Installation And Adjustment wall until channel rests flush behind wall making sure Mount Installation anchor channel is positioned vertically on stud. (See Figure After determining the site meets the installation requirements: Slide plastic cap on anchor (D) towards wall until flange of Identify desired mounting location on wall.
-
Page 7: Cover Installation
Installation Instructions PWRSKU Cover Installation To install channel covers: IMPROPER INSTALLATION CAN LEAD TO WARNING: EQUIPMENT FALLING CAUSING SERIOUS PERSONAL Install upper wall channel cover (E) by tipping cover top INJURY OR DAMAGE TO EQUIPMENT! Overtightening of down and positioning as shown in figure below. -
Page 8: Display Installation
PWRSKU Installation Instructions Display Installation IMPROPER INSTALLATION CAN LEAD TO WARNING: MOUNT FALLING CAUSING SEVERE PERSONAL INJURY Remove pin OR DAMAGE TO EQUIPMENT. Displays can weigh in and nuts and excess of 40 lbs (18.1kg). ALWAYS use two people and move to lower holes. -
Page 9: Roll Adjustment
Installation Instructions PWRSKU (K) x 4 Figure 10 ADJUSTMENTS Roll Adjustment The mount allows for the horizontal alignment (Roll)of the display to be adjusted up to 2 deg. right or left to level the display after installing. To adjust Roll: Loosen the roll tension adjustment nut located on the back side of the faceplate assembly. -
Page 10: Swing Arm Tension Adjustment
PWRSKU Installation Instructions Swing Arm Tension Adjustment Swing arm tension is pre-set at the factory and is adjusted to accommodate displays with weights near the top of the mounts DECREASE capacity. If smaller displays are used it may be difficult to reposition the display after mounting. - Page 11 Installation Instructions PWRSKU...
- Page 12 A Fellenoord 130 5611 ZB EINDHOVEN, The Netherlands Europe P +31 (0)40 2668620 F +31 (0)40 2668615 Chief Manufacturing, a division of A Room 24F, Block D, Lily YinDu International Building Asia Pacific Milestone AV Technologies LuoGang, BuJi Town, Shenzhen, CHINA.
Need help?
Do you have a question about the PWRSKU and is the answer not in the manual?
Questions and answers