
Related Manuals for CareFusion Alaris GH Guardrails 80023UN-G Series


Summary of Contents for CareFusion Alaris GH Guardrails 80023UN-G Series
- Page 1 Alaris™ GH Guardrails® Directions For Use Syringe Pump Models: 80023UNxx-G, 80023NWxx-G...
-
Page 2: Table Of Contents
Contents Page Introduction ....................2 About This Manual . -
Page 3: Introduction
The Alaris® GH Guardrails® Syringe Pump should only be operated by a clinician competent in use of automated syringe pumps and post- placement management of intravenous catheters. CareFusion cannot guarantee the continued system accuracy with other manufacturer’s syringes as identified in the ‘Compatible Syringes’ table. Manufacturers may change syringe specification significant to system accuracy without prior notification. -
Page 4: Creating A Data Set
Creating a Data Set To use the Alaris® GH Guardrails® Syringe Pump a Data Set will need to be developed, reviewed, approved, released, uploaded and verified according to the following process. Refer to the Guardrails® Editor Directions For Use (1000PB01398) for further details and operating precautions. -
Page 5: Features Of The Alaris® Gh Guardrails® Syringe Pump
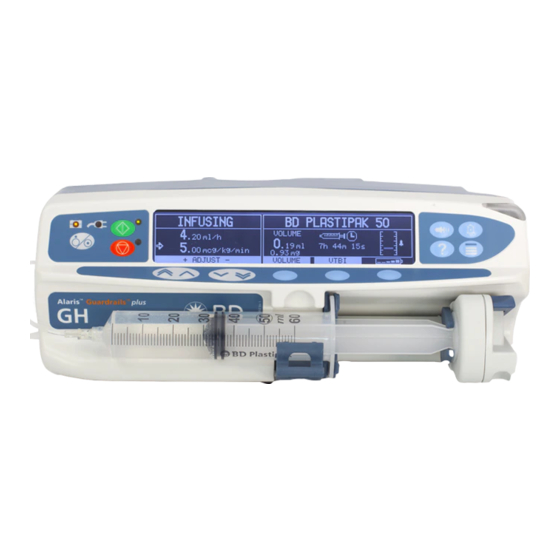
Features of the Alaris® GH Guardrails® Syringe Pump ON/OFF Release lever for High visibility Display Alarm Indicator PURGE/ BOLUS MUTE PRESSURE OPTION Finger Grips HOLD Shelf for chevron Syringe Clamp Positive Plunger Extension hook keys and softkeys Grippers Rating Plate (see Symbol Definitions for an explanation of the symbols used) Release lever for... -
Page 6: Controls & Indicators
Controls & Indicators Controls: Symbol Description ON/OFF button - Press once to switch the pump ON. Press and hold down for 3 seconds to switch the pump OFF. RUN button - Press to start the infusion. The green LED will flash during infusion. HOLD button - Press to put the infusion on hold. -
Page 7: Symbol Definitions
Symbol Definitions Labelling Symbols: Symbol Description Attention (Consult accompanying documents) Potential Equalisation (PE) Connector RS232/Nurse call Connector (Optional) Defibrillation-proof type CF applied part (Degree of protection against electrical shock) Protected against vertically falling drops of water Alternating Current Device complies with the requirements of Council Directive 93/42/EEC as amended by 2007/47/EC. -
Page 8: Main Display Features
Main Display Features Syringe type fitted / Pressure Pump Profile / Drug name Information Status Volume Infused Infusion Volume VTBI Option Rate Infused Option Screen Icons: Symbol Description TIME REMAINING DISPLAY icon - Indicates time before syringe will require replacing. BATTERY icon - Indicates battery charge level to highlight when the battery will require recharging. -
Page 9: Operating Precautions
However, it may be used in domestic establishments under the supervision of Medical professionals with additional necessary appropriate measures. (Consult Technical Service Manual, appropriately trained technical personnel or CareFusion for further information). • This pump is not intended to be used in the presence of a flammable anaesthetic mixture with air or oxygen or nitrous oxide. - Page 10 MRI compatible pump as such. If use of the pump within an MRI environment is unavoidable, then CareFusion highly recommends securing the pump at a safe distance from the magnetic field outside the identified ‘Controlled Access Area’ in order to evade any magnetic interference to the pump; or MRI image distortion.
-
Page 11: Getting Started
Getting Started Initial Set-up Before operating the pump read this Directions For Use manual carefully. 1. Check that the pump is complete, undamaged and that the voltage rating specified on the label is compatible with your AC power supply. 2. Items supplied are: Alaris®... - Page 12 Getting Started (continued) Do not mount the pump with the AC power inlet or the syringe pointing upwards. This could affect the electrical safety in the event of a fluid spill or lead to the infusion of air which may be in the syringe. Pole Clamp Installation The pole clamp is fitted to the rear of the pump and will provide secure fixing to vertical I.V.
- Page 13 Getting Started (continued) Syringe Loading Prepare Syringe and Administration Set To decrease potential start-up delays, delivery inaccuracies and delayed generation of occlusion alarms each time a new syringe is loaded: • Use smallest syringe size possible, for example, if infusing 9 ml of fluid, use a 10 ml syringe. •...
- Page 14 Getting Started (continued) Loading and Confirming a Syringe Warning: To securely load and confirm a syringe carefully follow the steps below. An incorrect loading of a syringe may result in misidentification of the syringe type and size. If then confirmed, this may lead to significant inaccuracy of the infusion rate and may also affect pump performance.
- Page 15 Note: If the PURGE SYRINGE option has been enabled then the prompt to purge screen is displayed and the extension set can be purged as required, however ensure that the extension set is not connected to the patient during this process. CareFusion recommends limiting the number of configured syringe types and sizes available for selection on the pump.
- Page 16 Getting Started (Continued) Starting the Pump 1. Connect the pump to an AC power supply using the AC power cable. Press the button. The pump will run a short self-test. Ensure that two beeps are activated during this test. Check the display test pattern and ensure that no rows are missing. Check that the displayed time and date are correct.
- Page 17 Getting Started (Continued) Starting the Pump (continued) 9. INFUSION RATE - Check the rate shown if set and change the rate if necessary using the keys. 10. CONNECT TO PATIENT - Connect the extension set to the patient access device. to commence operation.
-
Page 18: Basic Features
Basic Features Purge button allows the delivery of a limited volume of fluid in order to purge the extension set prior to being connected to a patient or after changing a syringe. 1. Press the button when the pump is not infusing. Ensure that the extension set is not connected to the patient. 2. - Page 19 Basic Features (Continued) Volume to be Infused (VTBI) This option allows you to set a specific volume to be infused. Rate at the end of this VTBI can also be set, selecting from stop, KVO, or continuous infusion at the set rate. 1.
- Page 20 Basic Features (Continued) Dosing Summary To review currently selected dosing information: 1. Press the button to first access the options menu. 2. Select DOSING SUMMARY. 3. Review the information and then press the QUIT softkey. Set VTBI over Time This option allows you to specify a VTBI and delivery time. The rate necessary to deliver the required volume within the specified time is calculated and displayed.
-
Page 21: Alarms And Warnings
Alarms and Warnings Alarms are indicated by a combination of an audible alarm, flashing alarm indicator and a descriptive message in the display (except DOSE WOULD EXCEED, DOSE UNDER & DOSE NOT PERMITTED which only have an audible alarm and message). 1. -
Page 22: Prompts
Prompts Display Description and Troubleshooting Guide DOSE WOULD EXCEED The infusion rate has been set to a value which exceeds a Guardrails® Soft Alert. Check infusion setting, to continue with infusion at set rate confirm OVERRIDE LIMIT by pressing the YES softkey. -
Page 23: Configured Options
Configured Options This section comprises of a list of options which are configurable. Some can be entered via the pump configuration menu (available in Technician Mode) and others through the Guardrails® Editor Software. Enter the access code on Alaris® GH Guardrails® Syringe Pump for Configured Options, see the Technical Service Manual for details. Important: Access codes should only be entered by qualified technical personnel. - Page 24 Configured Options (Continued) Guardrails Editor Software Profile Configuration ® The following options are only configurable via the Guardrails® Editor Software (PC based), see Guardrails® Editor Directions For Use (1000PB01398) for details on how to configure Profile Configurations. Quiet Mode Mode to silence key press tones and power down sequence. Audio Volume The audio alarm volume of the pump (high, medium or low).
- Page 25 Configured Options (Continued) Guardrails Editor Software Profile Configuration (Continued) ® The following configurations are only used when the Alaris® GH Guardrails® Syringe Pump is being used in ml/h or Dosing Only modes. (If a drug is selected then the drug's own configuration settings are used.) Bolus Bolus feature can be set to OFF, HANDS ON or HANDS ON &...
-
Page 26: Specifications
Specifications Infusion Specifications - System Accuracy - Maximum infusion rate can be set as part of the configuration. Volumetric Mean +/- 2% (nominal). 0.1ml/h - 150ml/h 5ml syringes Derating - 0.1ml/h - 300ml/h 10ml syringes Temperature +/- 0.5% (5 - 40ºC) 0.1ml/h - 600ml/h 20ml syringes High Rates +/-2.0% (rates >... -
Page 27: Recognised Syringes
In no event shall CareFusion be liable for any damages of any kind or nature, including without limitation, direct or indirect, special, consequential, or incidental damages arising from, or in connection with the use of syringes not listed in the ‘Recognised Syringes’... -
Page 28: Associated Products
Associated Products The Alaris® DS Docking Station The Alaris® Gateway Workstation 1000DF00332 Issue 6 27/36... -
Page 29: Compatible Extension Sets
White PVC Syringe Extension Set (200 cm). Priming Volume: 3.6ml For availability please contact your local CareFusion representative because new sets are continuously being developed for our customers. It is recommended that extension sets are changed in accordance with the Directions for Use. - Page 30 PVC Syringe Extension Set (105 cm). Priming Volume: 7.2ml For availability please contact your local CareFusion representative because new sets are continuously being developed for our customers. It is recommended that extension sets are changed in accordance with the Directions for Use.
-
Page 31: Maintenance
Alaris® Syringe Pump, and in conjunction with Alaris® Syringe Pump software, controls battery use, charge and temperature. Any use of battery packs that are not manufactured by CareFusion in the Alaris® Syringe Pump is at your sole risk, and CareFusion does not provide any warranty for or endorsement on any battery packs that are not manufactured by CareFusion. - Page 32 Maintenance (continued) Cleaning and Storage Before the transfer of the pump to a new patient and periodically during the use, clean the pump by wiping over with a lint-free cloth lightly dampened with warm water and a standard disinfectant / detergent solution. Do not use the following disinfectant types: •...
-
Page 33: Occlusion Pressure Limits
If you wish to discard electrical and electronic equipment, please contact your CareFusion affiliate office or distributor for further information. -
Page 34: Irda, Rs232 And Nurse Call Specification
IrDA, RS232 and Nurse call Specification IrDA / RS232 / Nurse call Feature RS232 / Nurse call Connection Data The IrDA (or RS232 / Nurse call optional feature) is a feature on Nurse call Specification - Alaris® Syringe Pumps that allows the pump to be connected to a Connector D Type - 9 Pin PC or other Alaris®... -
Page 35: Trumpet Curves & Start-Up Curves
Trumpet Curves & Start-up Curves In this pump, as with all infusion systems, the action of the pumping mechanism and variations in individual syringes cause short-term fluctuations in rate accuracy. The following curves show typical performance of the system in two ways: 1) the delay in onset of fluid flow when infusion commences (start-up curves), and 2) the accuracy of fluid delivery over various time periods is measured (trumpet curves). -
Page 36: Products And Spare Parts
A comprehensive list of spare parts for this pump is included within the Technical Service Manual. The Technical Service Manual (1000SM00001) is now available in electronic format on the World Wide Web at :- www.carefusion.co.uk/alaris-technical/ A username and password are required to access our manuals. Please contact local customer services representative to obtain login details. -
Page 37: Service Contacts
Service Contacts For service contact your local Affiliate Office or Distributor. CareFusion, CareFusion, CareFusion, CareFusion, PO Box 5527, Tullastr. 8-12 Döbrentei tér 1, Avda. São Miguel, 296 Atelier 14 Dubai, United Arab Emirates. 69126 Heidelberg, H-1013 Budapest, 2775-751 Carcavelos, Lisboa Deutschland. - Page 38 Alaris, Guardrails, SmartSite and IVAC are registered trademarks of CareFusion Corporation or one of its affiliates. All rights reserved. All other trademarks are property of their respective owners. © 2018 CareFusion Corporation or one of its affiliates. All rights reserved.
Need help?
Do you have a question about the Alaris GH Guardrails 80023UN-G Series and is the answer not in the manual?
Questions and answers