
Related Manuals for Daikin BRP072C42


Summary of Contents for Daikin BRP072C42
- Page 1 Installation Manual Wireless LAN Connecting Adapter [ BRP072C42 ] English ภาษาไทย Tiếng Việt 中文 (繁體) Bahasa Indonesia...
-
Page 3: Table Of Contents
Contents Safety precautions Accessories Main components Installation Configuration Troubleshooting Website: http://www.daikinthai.com/product/dmobile • For details on specifications, setting methods, FAQ, and the latest version of this manual, see our website. -
Page 4: Safety Precautions
Safety precautions Safety precautions • The following describes the meanings of pictorial symbols used in this installation manual. Give this installation manual to the customer when installation is completed. • To conduct a test run of the air conditioner, complete according to the installation manual for the air conditioner unit. - Page 5 Safety precautions Safety precautions WARNING Situations which could result in death or serious injury. When using: Do not disassemble, modify, or repair. (Could cause fire, electric shock or injury.) Do not handle the Wireless LAN connecting adapter with wet hands. (Could cause electric shock or fire.) ...
- Page 6 Safety precautions Safety precautions CAUTION Situations which could result in damage or physical injury. When installing: Do not install where flammable gas leaks can occur. (Could cause fire.) Grip the connector when disconnecting the wire harness assembly from the outlet. (Otherwise fire or electric shock can occur.) When using: ...
-
Page 7: Accessories
Accessories Accessories Check if the following accessories are included in your package. This set includes the following items: Installation manual: 1 pc Wireless LAN connecting adapter: 1 pc, Serial number sticker (*1): 1 pc, Screw (M3 × 8): 2 pcs. This set includes the following items: Wire harness assembly (*2): 1 pc Holder: 1 pc,... -
Page 8: Main Components
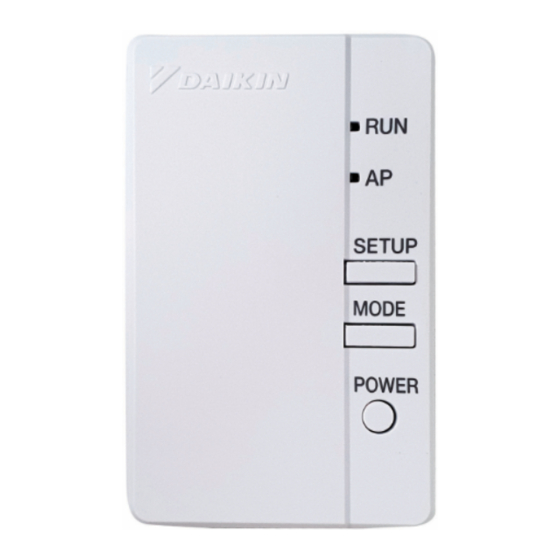
(Wireless LAN access point). Use when connecting to a router (Wireless LAN access point). AP lamp* MODE button* POWER button * No operation for BRP072C42 model. Installation type Wireless LAN connecting adapter (External) Installation type Wireless LAN connecting adapter (the product is inside the indoor unit) -
Page 9: Installation
Installation Installation Installation Work WARNING Always turn off the power supply when installing. (Touching the electrical parts could cause an electric shock.) The steps to be followed depend on the installation type: type = External, type = Internal. Choose an installation site. (In the case of The Wireless LAN connecting adapter should be sited in a place where: •... - Page 10 Installation Installation Installation Work In the case of TYPE B1 • Some models already have the wire harness assembly installed in the indoor unit. In such a case, please proceed with the installation as below. Remove the upper front panel from the indoor unit and open the door, grab the wire harness assembly with your fingers and pull it out, then remove the binding band and pull the insulation tube off the wire harness assembly.
- Page 11 Installation Installation Installation Work How to wire wiring Secure and guide the wiring with the wiring hooks and wiring guides in the electrical wiring box as shown in the figure. Printed-circuit board TYPE B2 (Small casing) (Sold separately) Wiring hook Wiring hook Wiring guide Front view...
- Page 12 Installation Installation Installation Work Remove the Wireless LAN connecting adapter case (upper). (For both Remove the upper case of the Wireless LAN connecting adapter. Wireless LAN connecting adapter case (upper) Wireless LAN connecting adapter printed circuit board Wireless LAN connecting adapter case (lower) Attach wire harness assembly to the Wireless LAN connecting adapter.
- Page 13 Installation Installation Installation Work Return the Wireless LAN connecting adapter case to its original state. (For both Snap the top of the upper case unto the clip at the top of the lower case and press to close the box. Wireless LAN connecting Wireless LAN connecting adapter case (lower)
- Page 14 Installation Installation Installation Work TYPE A2 Position of the Wireless LAN connecting adapter on the wall/surface is fixed by double face tapes. In this case screws located in accessory set are not necessary to fix the holder. 1. Attach two double face tapes located in accessory set to the back side of holder as shown below.
- Page 15 Installation Installation Installation Work In the case of Install the Wireless LAN connecting adapter inside of the indoor unit. There are three ways of installation B1, B2 and B3 (depend on indoor unit casing type). TYPE B1 Grab the adapter case with your fingers, insert it back into the indoor unit and close the door. CAUTION Close this door before operating the unit.
- Page 16 Installation Installation Installation Work Functionality Check In the case of Turn on the main power supply and check that the [RUN] lamp of the Wireless LAN connecting adapter blinks. In the case of Turn on the power supply, wait until the initialization is completed (the lower panel is in the closed position).
-
Page 17: Configuration
(Modem/router or similar device) □ Wireless LAN access point □ Application name: [DAIKIN Mobile Controller] (free) Installation method for the DAIKIN Mobile Controller application For Android Phones For iPhones (1) Open the [Google Play]. (1) Open the [App Store]. (2) Search using the application name: (2) Search using the application name: [DAIKIN Mobile Controller]. - Page 18 After connecting the Wireless LAN connecting adapter to the router, the user will able to detect the Wireless LAN connecting adapter via the DAIKIN Mobile Controller application. [About the SSID and KEY] The [SSID] and [KEY] shown on the serial number sticker which is included in the accessories are necessary when connecting the air conditioner and a smartphone via Wireless LAN.
-
Page 19: Troubleshooting
Wireless LAN network as the Wireless LAN connecting adapter. • None of the above work. Refer to the FAQ on: http://www.daikinthai.com/product/dmobile For instructions about how to operate the DAIKIN Mobile Controller application, please refer to the operation manual at http://www.daikinthai.com/product/dmobile. - Page 20 NOTE...
- Page 21 สารบั ญ ข อ ควรระวั ง เพื ่ อ ความปลอดภั ย อุ ป กรณ ส ว นประกอบหลั ก การติ ด ตั ้ ง การกำหนดค า การแก ไ ขป ญ หาเบื ้ อ งต น เว็ บ ไซต : http://www.daikinthai.com/product/dmobile • สำหรั บ รายละเอี ย ดเกี ่ ย วกั บ ข อ มู ล จำเพาะ วิ ธ ี ก ารตั ้ ง ค า คำถามที ่ พ บบ อ ย และเวอร ช ั น ล า สุ ด ของคู...
-
Page 22: ขอควรระวงเพอความปลอดภย
ข อ ควรระวั ง เพื ่ อ ความปลอดภั ย ขอควรระวงเพอความปลอดภย • ด า นล า งนี ้ อ ธิ บ ายถึ ง ความหมายของสั ญ ลั ก ษณ ภ าพที ่ ใ ช ใ นคู ม ื อ การติ ด ตั ้ ง ฉบั บ นี ้ เมื... - Page 23 ข อ ควรระวั ง เพื ่ อ ความปลอดภั ย ขอควรระวงเพอความปลอดภย คำเตื อ น เหตุ ก ารณ ท ี ่ อ าจก อ ให เ กิ ด การเสี ย ชี ว ิ ต หรื อ การบาดเจ็ บ สาหั ส เมื ่ อ ใช ง าน: ห...
- Page 24 ข อ ควรระวั ง เพื ่ อ ความปลอดภั ย ขอควรระวงเพอความปลอดภย ข อ ควรระวั ง เหตุ ก ารณ ท ี ่ อ าจก อ ให เ กิ ด ความเสี ย หายหรื อ การบาดเจ็ บ ทางร า งกาย เมื ่ อ ทำการติ ด ตั ้ ง : ห...
-
Page 25: อุ ป กรณ
อุ ป กรณ อุ ป กรณ ตรวจสอบว า ในบรรจุ ภ ั ณ ฑ ข องคุ ณ มี อ ุ ป กรณ ต า งๆ ต อ ไปนี ้ อ ยู ค รบหรื อ ไม ชุ ด นี ้ ป ระกอบด ว ยรายการต อ ไปนี ้ : คู... -
Page 26: สวนประกอบหลก
ไฟ AP* MODE/ปุ ม โหมด* POWER/ปุ ม เป ด ป ด * ไม ส ามารถใช ง านได ส ำหรั บ รุ น BRP072C42 การติ ด ตั ้ ง ประเภท อะแดปเตอร เ ชื ่ อ มต อ ระบบ LAN ไร ส าย (ภายนอก) การติ... -
Page 27: การตดตง
การติ ด ตั ้ ง การตดตง งานติ ด ตั ้ ง คำเตื อ น ป ด แหล ง จ า ยไฟเสมอเมื ่ อ ทำการติ ด ตั ้ ง (การสั ม ผั ส กั บ ชิ ้ น ส ว นอุ ป กรณ ไ ฟฟ า อาจทำให เ กิ ด ไฟฟ า ช็ อ ตได ) ขั... - Page 28 การติ ด ตั ้ ง การตดตง งานติ ด ตั ้ ง ในกรณี ข อง ประเภท B1 • บางรุ น จะมี ช ุ ด สายไฟ ติ ด ตั ้ ง ในตั ว เครื ่ อ งภายในไว อ ยู แ ล ว ในกรณี...
- Page 29 การติ ด ตั ้ ง การตดตง งานติ ด ตั ้ ง วิ ธ ี เ ดิ น สายไฟ ยึ ด และเดิ น สายไฟด ว ยตะขอเกี ่ ย วสายไฟและตั ว ยึ ด สายไฟในกล อ งวงจรไฟฟ า ดั ง ที ่ แ สดงในภาพประกอบ แผ...
- Page 30 การติ ด ตั ้ ง การตดตง งานติ ด ตั ้ ง ถอดกล อ งอะแดปเตอร เ ชื ่ อ มต อ ระบบ LAN ไร ส าย (ชิ ้ น บน) ออก (สำหรั บ ทั ้ ง และ ) ถอดกล อ งชิ ้ น บนของอะแดปเตอร เ ชื ่ อ มต อ ระบบ LAN ไร ส ายออก กล...
- Page 31 การติ ด ตั ้ ง การตดตง งานติ ด ตั ้ ง ประกอบกล อ งอะแดปเตอร เ ชื ่ อ มต อ ระบบ LAN ไร ส ายกลั บ ในสภาพเดิ ม (สำหรั บ ทั ้ ง และ ) ยึ ด กล อ งชิ ้ น บนกั บ กล อ งชิ ้ น ล า งโดยใช ต ั ว ล็ อ คประกบกั น และกดด า นล า งลงเพื ่ อ ป ด กล อ ง ตั...
- Page 32 การติ ด ตั ้ ง การตดตง งานติ ด ตั ้ ง ประเภท A2 การติ ด ตั ้ ง อะแดปเตอร เ ชื ่ อ มต อ ระบบ LAN ไร ส ายบนผนั ง หรื อ พื ้ น ผิ ว โดยยึ ด ด ว ยเทปกาวสองหน า ในกรณี...
- Page 33 การติ ด ตั ้ ง การตดตง งานติ ด ตั ้ ง ในกรณี ข อง ติ ด ตั ้ ง อะแดปเตอร เ ชื ่ อ มต อ ระบบ LAN ไร ส ายที ่ ด า นในตั ว เครื ่ อ งภายใน มี ก ารติ ด ตั ้ ง อยู ส ามวิ ธ ี คื...
- Page 34 การติ ด ตั ้ ง การตดตง งานติ ด ตั ้ ง การตรวจสอบฟ ง ก ช ั น การทำงาน ในกรณี ข อง เป ด แหล ง จ า ยไฟหลั ก และตรวจสอบว า ไฟ [RUN] ของอะแดปเตอร เ ชื ่ อ มต อ ระบบ LAN ไร ส ายกะพริ บ ในกรณี...
-
Page 35: การกำหนดคา
จุ ด เชื ่ อ มต อ ระบบ LAN ไร ส าย □ แอปพลิ เ คชั น [DAIKIN Mobile Controller] (ไม ม ี ค า ใช จ า ย) วิ ธ ี ก ารติ ด ตั ้ ง DAIKIN Mobile Controller แอปพลิ เ คชั น... - Page 36 หลั ง จากเชื ่ อ มต อ อะแดปเตอร เ ชื ่ อ มต อ ระบบ LAN ไร ส ายเข า กั บ เราท เ ตอร แ ล ว ผู ใ ช จ ะสามารถตรวจพบอะแดปเตอร เ ชื ่ อ มต อ ระบบ LAN ไร ส ายผ า นการใช ง าน ด ว ย DAIKIN Mobile Controller แอปพลิ เ คชั น [เกี ่ ย วกั บ SSID และ KEY] [SSID] และ...
-
Page 37: การแกไขปญหาเบองตน
• โปรดดู ท ี ่ ห ั ว ข อ FAQ บน http://www.daikinthai.com/product/dmobile สำหรั บ วิ ธ ี ก ารใช ง านของ DAIKIN Mobile Controller แอปพลิ เ คชั น โปรดดู ท ี ่ หั ว ข อ Operation manual ใน... - Page 38 บั น ทึ ก...
- Page 39 Mục lục Lưu ý về an toàn Phụ kiện Các bộ phận chính Lắp đặt Cấu hình Khắc phục sự cố Trang web: http://www.daikinthai.com/product/dmobile • Để biết chi tiết thông số kỹ thuật, phương pháp cài đặt, câu hỏi thường gặp và phiên bản mới nhất của tài liệu hướng dẫn này, hãy tham khảo trang web của chúng tôi.
- Page 40 Lưu ý về an toàn Lưu ý về an toàn • Phần sau đây mô tả ý nghĩa của các ký hiệu hình ảnh được dùng trong tài liệu hướng dẫn lắp đặt này. Đưa tài liệu hướng dẫn lắp đặt cho khách hàng khi việc lắp đặt hoàn tất. •...
- Page 41 Lưu ý về an toàn Lưu ý về an toàn CẢNH BÁO Các tình huống có thể dẫn tới tử vong hoặc thương tích nghiêm trọng. Khi sử dụng: Không được tháo, sửa đổi hay sửa chữa thiết bị. (Có...
- Page 42 Lưu ý về an toàn Lưu ý về an toàn THẬN TRỌNG Các tình huống có thể dẫn đến hư hỏng hoặc thương tích cho cơ thể. Khi lắp đặt: Không lắp đặt sản phẩm ở nơi có thể xảy ra rò rỉ khí dễ cháy. (Có...
- Page 43 Phụ kiện Phụ kiện Kiểm tra xem các phụ kiện sau đây có đi kèm trong gói sản phẩm không. Bộ phụ kiện này bao gồm: Tài liệu hướng dẫn lắp đặt: 1 quyển Bộ kết nối mạng LAN không dây: 1 bộ, Nhãn dán số...
- Page 44 Mạng LAN không dây). Mạng LAN không dây). Nút MODE (CHẾ ĐỘ)* Đèn AP* Nút POWER (NGUỒN) * Không hoạt động tương thích với kiểu máy BRP072C42. Lắp đặt loại Bộ kết nối mạng LAN không dây (Bên ngoài) Lắp đặt loại Bộ...
- Page 45 Lắp đặt Lắp đặt Công việc lắp đặt CẢNH BÁO Luôn tắt nguồn điện khi lắp đặt. (Chạm vào các bộ phận có điện có thể gây điện giật.) Các bước cần thực hiện tùy theo loại lắp đặt: loại = Bên ngoài, loại = Bên trong.
- Page 46 Lắp đặt Lắp đặt Công việc lắp đặt Trong trường hợp LOẠI B1 • Một số kiểu máy gắn sẵn bó dây trong dàn lạnh. Trong trường hợp này, vui lòng tiếp tục lắp đặt như sau. Tháo tấm chắn mặt trước phía trên khỏi dàn lạnh rồi mở cửa, dùng tay cầm bó dây kéo ra ngoài, sau đó...
- Page 47 Lắp đặt Lắp đặt Công việc lắp đặt Cách đấu dây Cố định và dẫn dây điện qua các móc dây và thanh dẫn đi dây trong hộp chứa dây điện như minh họa trong hình. Bảng mạch in LOẠI B2 (Vỏ nhỏ) (Bán riêng) Móc dây Móc dây...
- Page 48 Lắp đặt Lắp đặt Công việc lắp đặt Tháo vỏ (trên) của Bộ kết nối mạng LAN không dây. (Cả trường hợp và Tháo vỏ trên của Bộ kết nối mạng LAN không dây. Vỏ (trên) của Bộ kết nối mạng LAN không dây Bảng mạch in của Bộ...
- Page 49 Lắp đặt Lắp đặt Công việc lắp đặt Đặt lại vỏ Bộ kết nối mạng LAN không dây vào vị trí ban đầu. (Cả trường hợp và Cài phần đầu vỏ trên vào kẹp ở đầu vỏ dưới và ấn để đóng hộp. Kẹp phần đầu vỏ...
- Page 50 Lắp đặt Lắp đặt Công việc lắp đặt LOẠI A2 Bộ kết nối mạng LAN không dây được cố định trên tường/bề mặt bằng băng keo hai mặt. Trong trường hợp này, không cần dùng vít trong bộ phụ kiện để cố định giá đỡ. 1.
- Page 51 Lắp đặt Lắp đặt Công việc lắp đặt Trong trường hợp Lắp đặt Bộ kết nối mạng LAN không dây vào bên trong dàn lạnh. Có ba cách lắp đặt: B1, B2 và B3 (tùy theo loại vỏ dàn lạnh). LOẠI B1 Dùng tay cầm vỏ...
- Page 52 Lắp đặt Lắp đặt Công việc lắp đặt Kiểm tra hoạt động Trong trường hợp Bật nguồn điện chính và kiểm tra xem đèn [RUN] (VẬN HÀNH) của Bộ kết nối mạng LAN không dây có nhấp nháy không. Trong trường hợp ...
- Page 53 □ Điểm truy cập mạng LAN không dây □ Tên ứng dụng: [DAIKIN Mobile Controller] (miễn phí) Phương pháp cài đặt ứng dụng DAIKIN Mobile Controller Với điện thoại Android Với iPhone (1) Mở [Google Play]. (1) Mở [App Store].
- Page 54 Sau khi kết nối Bộ kết nối mạng LAN không dây với bộ định tuyến, người dùng sẽ phát hiện được Bộ kết nối mạng LAN không dây thông qua ứng dụng DAIKIN Mobile Controller. [About the SSID and KEY] (Giới thiệu về SSID và KEY) Bạn sẽ...
- Page 55 LAN không dây. • Không giải pháp nào ở trên hiệu quả. Tham khảo CHTG trên: http://www.daikinthai.com/product/dmobile Để xem thêm hướng dẫn về cách sử dụng ứng dụng DAIKIN Mobile Controller, vui lòng tham khảo hướng dẫn vận hành tại http://www.daikinthai.com/product/dmobile.
- Page 56 LƯU Ý...
- Page 57 目錄 安全注意事項 配件 主要組件 安裝 設定 故障排除 官網: http://www.daikinthai.com/product/dmobile ˙若需查詢詳細規格、設定方法、常見問題及新版手冊,請參閱官網。...
- Page 58 安全注意事項 安全注意事項 ˙以下說明本安裝手冊中的符號含意。 安裝完畢後,請將本安裝手冊交給客戶。 ˙請按照空調機隨附的安裝手冊完成空調機運轉測試。 標示此符號的電器有雙層絕緣加強保護,不需要接地。 禁止 遵照指示 警告 可能導致死亡或重傷的情況。 安裝時: 請經銷商或技術人員代為安裝。 ■ (否則可能導致觸電或起火。) 只能使用安裝專用的配件及指定零件。務必遵照本安裝手冊中的指示操作。 ■ (否則可能導致機器掉落、觸電或起火。) 電氣作業必須遵照地方及國家相關法規與本安裝說明書的指示執行。 ■ 務必使用專用電路。 (否則可能導致觸電或起火。) 安裝時務必先切斷電源。 ■ (若不慎接觸電氣零件,可能會導致觸電。) 請關上主開關,將電源切斷。...
- Page 59 安全注意事項 安全注意事項 警告 可能導致死亡或重傷的情況。 使用時: 切勿自行拆卸、改裝或修理。 ■ (否則可能導致起火、觸電或受傷。) 切勿用濕手處理無線 LAN 連線轉接器。 ■ (否則可能導致觸電或起火。) 切勿讓無線 LAN 連線轉接器受潮,亦不得在洗澡或進行類似用水活動時使用。 ■ (否則可能導致觸電或起火。) 切勿在醫療器材或體內裝有心臟起搏器或去顫器的人附近使用無線 LAN ■ 連線轉接器。無線 LAN 連線轉接器所產生的電磁干擾可能危及生命。 切勿在自動門或火災報警器等自動控制設備附近使用無線 LAN 連線轉接器。 ■ (否則可能導致設備故障而發生事故。) 若有異常氣味或聲音、過熱或冒煙現象,請立即斷開斷路器。 ■ (否則可能導致起火或故障。) ˙請經銷商進行檢查。 若無線 LAN 連線轉接器掉落或外殼損壞,請斷開斷路器。 ■ (否則可能導致起火或觸電。) ˙請經銷商進行檢查。...
- Page 60 安全注意事項 安全注意事項 注意 可能導致受損或受傷的情況。 安裝時: 切勿安裝在會有可燃氣體外洩的地方。 ■ (否則可能導致起火。) 從插座上拔下線束組時、請抓住接頭。 ■ (否則可能導致起火或觸電。) 使用時: 切勿在幼小孩童可觸及之處使用。 ■ (否則可能導致受傷。) 切勿在微波爐附近使用本產品。 ■ (可能影響無線 LAN 通訊。)...
- Page 61 配件 配件 請檢查包裝內是否隨附以下配件。 本組合內含以下項目: 安裝說明書:1 份 無線 LAN 連線轉接器:1 台, 序號貼紙 ( 1):1 張, 螺絲 (M3 8):2 根。 × 本組合內含以下項目: 線束組 ( 2):1 條 (長線) 托架:1 個, 用於 A 型 線束組 ( 2):1 條 雙面膠帶:2 片, (短線) 用於 B 型 螺絲...
- Page 62 主要組件 無線 LAN 連線轉接器 RUN/執行指示燈(橘色) 連線至路由器(無線 LAN 存取點) SETUP/設定按鈕 時亮起。 用以連線至路由器 (無線 LAN 存取點)。 AP/存取點指示燈 MODE/模式按鈕 POWER/電源按鈕 * 對型號 BRP072C42 無作用。 安裝型式 無線 LAN 連線轉接器(外接) 安裝型式 無線 LAN 連線轉接器 (安裝於室內機內) 基本參數: 頻率範圍: 2400 MHz 2483.5 MHz 無線通訊協定: IEEE 802.11b/g/n RF 頻道:...
- Page 63 安裝 安裝 安裝作業 警告 安裝時務必先切斷電源。 (若不慎接觸電氣零件,可能會導致觸電。) 以下步驟取決於安裝型式: 型 = 外接式, 型 = 內接式。 選擇安裝位置。 (若為 型) 無線 LAN 連線轉接器應安裝於以下位置: ˙無線 LAN 連線轉接器不會受到陽光直射。 ˙無線 LAN 連線轉接器遠離熱氣或蒸汽來源。 ˙沒有機油蒸氣來源(否則可能縮短無線 LAN 連線轉接器壽命)。 ˙無線 LAN 連線轉接器與任何電視機或收音機至少相距 1 公尺 (否則無線 LAN 連線轉接器可能造成影像或聲音干擾)。 ˙室內機與無線 LAN 連線轉接器之間距離小於無線 LAN 纜線長度。 連接無線...
- Page 64 安裝 安裝 安裝作業 若為 型 B1 型 ˙某些型號的室內機已安裝線束組 。 在此情況下,請按照以下步驟進行安裝。 拆下室內機的上前蓋板,打開門板,用手指抓住線束組並拔出,然後拆除束線帶, 將絕緣管從線束組上拉出。 ˙關於拆卸上前蓋板的詳細做法,請參閱空調機的安裝說明書。 打開門板 抓住線束組 束線帶 絕緣管 接頭(白色) B2 型(小機殼)及 B3 型(大機殼) 將線束組 (短線)連接至室內機。 拆下室內機的前格柵,然後將線束組 的接頭連接至電氣接線盒上的白色「S21」插座。 ˙關於如何拆下前格柵或將線束組 走線至定位,請參閱特定空調機的安裝說明書。 (線束組 可連接至 HA 接頭 S21。) 接頭 接上沒有線束固定錨的 端。 ˙如果沒有白色「S21」插座, 請在室內機內部另外安裝 塊電路板。...
- Page 65 安裝 安裝 安裝作業 如何走線 如圖所示,利用電器配線盒內的導線勾及導線孔固定及引導電線。 電路板(另售) B2 型(小機殼) 導線勾 導線勾 導線孔 正視圖 側視圖 B3 型(大機殼) 電路板(另售) 導線勾 導線勾 導線孔 正視圖 側視圖 將電氣配線盒蓋及前格柵裝回原位。 線束固定錨 線束組...
- Page 66 安裝 安裝 安裝作業 拆下無線 LAN 連線轉接器的外殼(上蓋) 。 ( 型及 型。 ) 拆下無線 LAN 連線轉接器的上蓋。 無線 LAN 連線轉 接器的外殼(上蓋) 無線 LAN 連線轉 接器的電路板 無線 LAN 連線轉 接器的外殼(底蓋) 將線束組連接至無線 LAN 連線轉接器。 ( 型及 型。 ) 接上線束組的接頭(白色)。 ˙將線束組固定到無線 LAN 連線轉接器的外殼(底蓋)缺口中。 將接頭連接至同色插座。 接頭(白色) 將線束組固定住,確認接頭不會被外力拉扯。...
- Page 67 安裝 安裝 安裝作業 將無線 LAN 連線轉接器的外殼蓋回。 ( 型及 型。 ) 將上蓋頂端卡進底蓋頂端的溝槽,壓下並蓋緊。 無線 LAN 連線轉 無線 LAN 連線轉 接器的外殼(底蓋) 接器的外殼(上蓋) 頂端溝槽 頂端卡榫 檢查線束組 是否確實固定。 用配件組中的 2 根螺絲 (M3 × 鎖上無線 LAN 連線轉接器的上蓋。 安裝無線 LAN 連線轉接器。 若為 型 將無線 LAN 連線轉接器安裝在室內機外。有兩種安裝型式:A1 及 A2。 A1 型...
- Page 68 安裝 安裝 安裝作業 A2 型 用雙面膠帶將無線 LAN 連線轉接器固定在牆面上。 在此情況下,不需要使用配件組中的螺絲來固定托架。 1. 如圖所示,將配件組中的兩片雙面膠帶貼在托架背面。 2. 用雙面膠帶將無線 LAN 連線轉接器的托架固定在牆面上。 3. 確保托架在牆面上夠牢固,足以支撐無線 LAN 連線轉接器的重量。 4. 將無線 LAN 連線轉接器滑入托架中。 註 用雙面膠帶固定無線 LAN 連線轉接器的托架之前,要先確保牆面乾淨,沒有油漬。 關於如何為您的機型安裝無線 LAN 連線轉接器, 請至 http://www.daikinthai.com/product/dmobile 參閱詳細更新資訊。 雙面膠帶 托架 托架背面 無線 LAN 連線轉接器(外接)...
- Page 69 安裝 安裝 安裝作業 若為 型 將無線 LAN 連線轉接器安裝在室內機內。有三種安裝型式: B1、B2、B3(取決於室內機的機殼種類)。 B1 型 用手指抓住轉接器的外殼,插回室內機內,然後關上門板。 注意 在操作空調機前, 請務必先關上門板。 轉接器的外殼 關上 B2 型(小機殼)及 B3 型(大機殼) 將轉接器安裝在前格柵內。先裝入上半部,然後推入下半部,直到卡入定位為止。 喀躂! 註 將檢修蓋裝回原位。 請檢查下列事項: 1) 轉接器不得突出於前格柵。 檢修蓋 2) 連接線必須沒入缺口內,不可被檢修蓋夾住。 若為 B3 型 * 扳下此擋片 註 * 在這個部分,各種型號的空調機可能會有所不同, 安裝前請先檢查。...
- Page 70 安裝 安裝 安裝作業 功能檢查 若為 型 打開主電源開關,檢查無線 LAN 連線轉接器上的 [RUN] 指示燈是否閃爍。 若為 型 打開主電源開關,等待初始化完成(下方面版必須蓋上)。打開門板,取出無線 LAN 連線轉接器, 檢查 [RUN] 指示燈是否亮起。檢查完畢後,將無線 LAN 連線轉接器裝回機器內,關上門板。 ˙打開電源開關時,無線 LAN 連線轉 接器的外殼(上蓋) 定要蓋上。...
- Page 71 (支援的作業系統:Android 2.3.3 或更新版本;iOS 5.0 或更新版本。) □ 網路線及網路通訊裝置 (數據機/路由器或類似裝置) □ 無線 LAN 存取點 □ 應用程式名稱:[DAIKIN Mobile Controller](免費) 如何安裝 DAIKIN Mobile Controller 應用程式 Android 手機 iPhones (1) 開啟 [Google Play]。 (1) 開啟 [App Store]。 (2) 搜尋應用程式名稱:[DAIKIN Mobile Controller]。 (2) 搜尋應用程式名稱:[DAIKIN Mobile Controller]。 (3) 按照螢幕指示安裝。...
- Page 72 長按無線 LAN 連線轉接器上的 [SETUP] 按鈕約 2 秒。 ˙無線 LAN 連線轉接器上的 [RUN] 指示燈會快速閃爍。 當無線 LAN 連線轉接器連上路由器(無線 LAN 存取點)時,該指示燈會恆亮。 若連線失敗,請回到「簡易無線連線設定」第 1 步,再試 次。 (有些路由器不相容,無法進行簡易無線連線設定。) 當無線 LAN 連線轉接器連上路由器之後,使用者可透過 DAIKIN Mobile Controller 應用程式偵測到無線 LAN 連線轉接器。 [關於 SSID 及 KEY] 將空調機經由無線 LAN 連線至智慧型手機時,必須使用配件 中序號貼紙上的 [SSID] 及 [KEY]。 請將貼紙存放在安全處。 若無法順利完成簡易無線連線設定,請至...
- Page 73 設定完無線 LAN 連線轉接器後, ˙檢查電源是否開啟。 空調機的總覽畫面(主畫面) ˙檢查 [RUN] 指示燈是否恆亮。 看不到無線 LAN 連線轉接器。 ˙若 [RUN] 指示燈閃爍,請重新嘗試將無線 LAN 連線轉接器連上無線網路。 確認無線 LAN 連線轉接器與路由器 (無線 LAN 存取點)之間的距離夠近。 ˙若 [RUN] 指示燈恆亮,請確認智慧型手機或平板 電腦是否與無線 LAN 連線轉接器連接至同一個無線 LAN 網路。 上述方法皆不管用。 ˙請參閱常見問題,網址: http://www.daikinthai.com/product/dmobile 關於 DAIKIN Mobile Controller 應用程式的使用說明,請至 http://www.daikinthai.com/product/dmobile 參閱使用說明書。...
- Page 74 注意...
- Page 75 Daftar Isi Tindakan kewaspadaan terkait keselamatan Aksesori Komponen utama Pemasangan Konfigurasi Pemecahan Masalah Situs web: http://www.daikinthai.com/product/dmobile • Untuk perincian mengenai spesifikasi, metode setelan, Tanya-Jawab, dan versi terbaru panduan ini, kunjungi situs web kami.
- Page 76 Tindakan kewaspadaan terkait keselamatan Tindakan kewaspadaan terkait keselamatan • Yang berikut ini menjelaskan arti dari simbol gambar yang digunakan dalam panduan pemasangan ini. Berikan panduan pemasangan ini kepada pelanggan bila pemasangan telah selesai. • Untuk menjalankan pengujian pendingin ruangan, lakukan sesuai dengan panduan pemasangan untuk unit pendingin ruangan.
- Page 77 Tindakan kewaspadaan terkait keselamatan Tindakan kewaspadaan terkait keselamatan PERINGATAN Situasi yang dapat mengakibatkan kematian atau cedera serius. Saat menggunakan: Jangan membongkar, memodifikasi, atau memperbaiki. (Dapat menyebabkan kebakaran, sengatan listrik atau cedera.) Jangan memegang adaptor penghubung LAN Nirkabel dengan tangan basah. (Dapat menyebabkan sengatan listrik atau kebakaran.) ...
- Page 78 Tindakan kewaspadaan terkait keselamatan Tindakan kewaspadaan terkait keselamatan WASPADA Situasi yang dapat mengakibatkan kerusakan atau cedera fisik. Saat memasang: Jangan memasang di tempat yang dapat terjadi kebocoran gas yang mudah terbakar. (Dapat menyebabkan kebakaran.) Pegang konektor saat melepaskan rakitan harnes kawat dari stopkontak. (Jika tidak maka dapat terjadi kebakaran atau sengatan listrik.) Saat menggunakan: ...
- Page 79 Aksesori Aksesori Periksa apakah aksesori berikut telah disertakan dalam paket Anda. Satu set alat ini menyertakan item berikut: Panduan pemasangan: 1 buah Adaptor penghubung LAN Nirkabel: 1 buah, Stiker nomor seri (*1): 1 buah, Sekrup (M3 × 8): 2 buah Satu set alat ini menyertakan item berikut: Rakitan harnes kawat (*2): 1 buah Tempat: 1 buah,...
- Page 80 (Titik akses LAN nirkabel). (Titik akses LAN nirkabel). Lampu AP* Tombol MODE* Tombol POWER * Tidak beroperasi untuk model BRP072C42. Jenis pemasangan Adaptor penghubung LAN Nirkabel (Eksternal) Jenis pemasangan Adaptor penghubung LAN Nirkabel (produk berada di dalam unit...
- Page 81 Pemasangan Pekerjaan Pemasangan Pemasangan Selalu matikan catu daya saat memasang. PERINGATAN (Menyentuh komponen listrik dapat menyebabkan sengatan listrik.) Langkah-langkah yang harus diikuti bergantung pada jenis pemasangan: jenis = Eksternal, jenis = Internal. Pilih tempat pemasangan. (Jika Adaptor penghubung LAN Nirkabel harus ditempatkan di lokasi di mana: •...
- Page 82 Pemasangan Pemasangan Pekerjaan Pemasangan Jika JENIS B1 • Sebagian model sudah dipasangi rakitan harnes kawat di unit dalam-ruang. Dalam hal demikian, lanjutkan pemasangan seperti di bawah ini. Lepaskan panel depan atas dari unit dalam-ruang dan buka pintunya, pegang rakitan harnes kawat dengan jari Anda dan tarik keluar, kemudian lepaskan gelang pengikat dan tarik selubung insulasi dari rakitan harnes kawat.
- Page 83 Pemasangan Pekerjaan Pemasangan Pemasangan Cara penyambungan kawat Amankan dan arahkan penyambungan kawat dengan kait penyambungan kawat dan pemandu penyambungan kawat di kotak sambungan listrik seperti yang ditunjukkan dalam gambar. Papan sirkuit tercetak JENIS B2 (Casing kecil) (Dijual terpisah) Kait penyambungan kawat Kait penyambungan kawat...
- Page 84 Pekerjaan Pemasangan Pemasangan Pemasangan Lepaskan casing adaptor penghubung LAN Nirkabel (atas). (Baik untuk maupun Lepaskan casing atas adaptor penghubung LAN Nirkabel. Casing adaptor penghubung LAN Nirkabel (atas) Papan sirkuit tercetak adaptor penghubung LAN Nirkabel Casing adaptor penghubung LAN Nirkabel (bawah) Pasang rakitan harnes kawat ke adaptor penghubung LAN Nirkabel.
- Page 85 Pekerjaan Pemasangan Pemasangan Pemasangan Kembalikan casing adaptor penghubung LAN Nirkabel ke keadaannya semula. (Baik untuk maupun Sangkutkan bagian atas casing atas ke klip di bagian atas casing bawah dan tekan untuk menutup kotak. Klip bagian atas casing Klip bagian atas casing adaptor penghubung LAN adaptor penghubung LAN Nirkabel (bawah)
- Page 86 Pekerjaan Pemasangan Pemasangan Pemasangan JENIS A2 Posisi adaptor penghubung LAN Nirkabel pada dinding/permukaan ditahan dengan dobel selotip. Dalam hal ini, sekrup yang ada di set aksesori tidak diperlukan untuk menahan tempat. 1. Pasang kedua dobel selotip yang ada di set aksesori ke sisi belakang tempat seperti yang ditunjukkan di bawah ini.
- Page 87 Pekerjaan Pemasangan Pemasangan Pemasangan Jika Pasang adaptor penghubung LAN Nirkabel di dalam unit dalam-ruang. Ada tiga cara pemasangan yaitu B1, B2 dan B3 (bergantung pada jenis casing unit dalam-ruang). JENIS B1 Pegang casing adaptor dengan jari Anda, masukkan bagian belakangnya ke dalam unit dalam-ruang dan tutuplah pintunya.
- Page 88 Pekerjaan Pemasangan Pemasangan Pemasangan Pemeriksaan Fungsionalitas Jika Hidupkan catu daya utama dan periksa apakah lampu [RUN] pada adaptor penghubung LAN Nirkabel berkedip. Jika Hidupkan catu daya, tunggu hingga inisialisasi selesai (panel bawah dalam posisi tertutup). Buka pintunya, lepaskan adaptor penghubung LAN Nirkabel dan periksa apakah lampu [RUN] untuk produk tersebut menyala.
- Page 89 (Modem/router atau perangkat serupa) □ Titik akses LAN Nirkabel □ Nama aplikasi: [DAIKIN Mobile Controller] (gratis) Metode instalasi untuk aplikasi DAIKIN Mobile Controller Untuk Ponsel Android Untuk iPhone (1) Buka [Google Play]. (1) Buka [App Store]. (2) Cari menggunakan nama aplikasi: (2) Cari menggunakan nama aplikasi: [DAIKIN Mobile Controller].
- Page 90 “Setelan Sederhana Koneksi Nirkabel”, bergantung pada kompatibilitas dengan router.) Setelah menyambungkan adaptor penghubung LAN Nirkabel ke router, pengguna akan dapat mendeteksi adaptor penghubung LAN Nirkabel lewat aplikasi DAIKIN Mobile Controller. [Tentang SSID dan KEY] [SSID] dan [KEY] ditunjukkan pada stiker nomor seri yang disertakan di aksesori diperlukan saat menyambungkan pendingin ruangan dan smartphone lewat LAN Nirkabel.
- Page 91 Jika lampu [RUN] menyala, pastikan smartphone atau tablet telah tersambung ke jaringan LAN Nirkabel yang sama seperti adaptor penghubung LAN Nirkabel. • Tidak ada yang berhasil. Lihat Tanya-Jawab pada: http://www.daikinthai.com/product/dmobile Untuk petunjuk tentang cara mengoperasikan apl kasi DAIKIN Mobile Controller, lihat petunjuk pengoperasian di http://www.daikinthai.com/product/dmobile.
- Page 92 CATATAN...
- Page 93 CATATAN...
- Page 94 CATATAN...
- Page 96 SIAM DAIKIN SALES CO LTD This telecommunication equipment is in compliance with NTC requirements. Complies with IMDA Standards DA107930 4P518835-2C M18N045...
Need help?
Do you have a question about the BRP072C42 and is the answer not in the manual?
Questions and answers